Creating an Active/Pasive SQL Server Failover Cluster
In a production environment you can’t afford downtime, well…not for hours anyway. If one of the servers stops or crashes, most of the applications in that production environment will stop working. Off course, you have a recovery plan. But what if those applications are using a database, and the database server crashes ? Your recovery process will take a long time. During that time users will not be able to do their jobs, and your management will not be so happy about that. In order to prevent those kind of things, you started implementing a SQL Server Failover Cluster, so if one of those SQL servers goes down, another one (part of the cluster) will take the “heat”, and your applications will continue to function.
This is what I’m going to show you in this guide, how to make your SQL servers highly available. I will use a Windows server 2012 cluster, on which I’m going to install SQL 2012. For those of you that have Windows server 2008/2008 R2, and SQL server 2008/2008 R2, is OK, you can continue to read on, because the procedure is the same.
The first step is to build your Windows Server Failover Cluster, but this time besides the quorum and data storage you will need to add an extra one. This extra storage is for the Microsoft Distributed Transaction Coordinator (MSDTC), and is recommended to be around 2 GB.

Before we start the SQL installation, the MSDTC role needs to be configured in the cluster. For that open the Failover Cluster Manager, right-click Roles and choose Configure Role.

From the list, select Distributed Transaction Coordinator (DTC) and click Next.

Give it a name and IP address then continue the wizard. A computer object will be created in AD with this name, so make sure the user you are logged in with has the proper permissions to create objects in AD. If you are in a network with a tight security, the computer object needs to be created before (prestaged) you click Next here.

Like I said in the beginning, you need a dedicated drive/storage for the MSDTC role, and here you need to assign that drive to the cluster role.

On the Confirmation screen click Next to save the changes and configure the role.

On the Summary page you can see if the role configuration succeeded or not. For a more detailed report click the View Report button.

The MSDTC role should be now up and running.

The next step is to install .NET Framework 3.5 on all nodes that are part of this cluster. Follow the link if you don’t know how it’s done on a 2012 server. After the .NET Framework installation, mount the SQL installation media on the active node and run the installer. Click the Installation menu from the left then choose New SQL server Failover Cluster installation.

After the wizard checks that everything is in order and you have green check marks on the report, click the OK button to continue.

The first screen of the SQL Server 2012 Setup is the Product Key. Type it, then click Next.

Accept the EULA and continue the wizard.

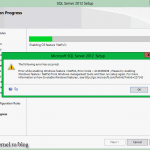
If you are connected to the internet the wizard will search for product updates, if not it will give you an error like the one in the bellow picture. I don’t have an internet connection in this lab, because to be honest, I don’t need it. You can patch the product later, by using Cluster-Aware Updating.

After clicking Next, the Setup files will start installing. This will take only a few seconds.

After the Setup files are installed the Support Rules page pops-up and runs another check, just to make sure that no problems will arise during installation.

Type the product key again then click Next.

Accept the EULA and continue. I know you are having a déjà vu, but from the next page everything will be different.

Here you need to choose if you are installing PowerPivot for SharePoint or just a standard SQL Server. For this example however I’m going to select the first option, SQL Server Feature Installation.

Select the SQL features you want to install then click Next.

Another verification is done by the wizard to identify any problems that might block the features installation you just selected. If everything is in order, click Next.

Give your SQL server a network name. This will be the name that applications will use to connect to the database(s), the name clients will see it in the network. You might be tempted to change the default installation directory to a cluster volume, but don’t do that. The database(s) needs to be available for all the nodes in the cluster, not the SQL files. If the system crashes you’ll still have to install the product again, you can’t just run it from that cluster volume like a portable application. Get it ?
Again, if the account you are logged in with does not have permissions to create objects in AD, you will need to create a computer object with this name, or the installation will fail.

If the disk space requirements are good and green, continue the wizard.

For the SQL cluster group name, I’m just going with the default one. If you want to give it another name, just type it in the SQL Server cluster resource group name box.

Here you need to select the cluster volume(s) that is/are going to be used to store the SQL database(s). If no disk(s) are showed in the wizard is because they were not provisioned in the cluster.

You have a SQL network name, but that name does not resolve to an IP address, not yet anyway. In order for the clients to be able to connect the SQL instance, that instance needs to have an IP. Type the IP address in the Address box then click Next.

Provide an account under which SQL services will run. I created an AD account for this example, which is recommended.


In this screen, you need to provide the account name(s) or group(s) that will be able to connect to the Database Engine. If you need your SQL instance to run in a mixed mode, just select the Mixed Mode option and type a password for the “sa” account.

If you want to send error reports to Microsoft just check that box.

Another verification is done, and if it passes click Next.

If you are ready, click the Install button to begin the installation.


At the end click Close.

If you open the volume you selected during the SQL Setup configuration, you should see the default databases created. They are not located on the C drive where SQL is installed, they are on a cluster volume which is good.

OK, we installed SQL on the active node, but this is just one server. We need at least two servers with SQL server installed in order for the database(s) to be highly available.
Let’s move to the second node. Mount the SQL server installation media and launch the installer. On the Installation section click Add a node to a SQL Server Failover cluster.

You saw this window before, so just click OK to move forward.

Type the product key and continue the wizard using the default settings. At the end just click the Install button to install the SQL Server Setup files.


If you have only green check marks on the Setup Support Rules window, you are good-to-go. Click Next.

As you can observe, you don’t have to type a SQL cluster network name anymore and provide an IP address for it. The wizard automatically detects the SQL instance, the SQL cluster network name, the IP address of the SQL instance, and on which node the instance runs. All you have to do here is click Next.


In the Service Accounts window, the only thing you can do is to provide the password for the account under which SQL services are running. You can’t change the account name, not from here anyway. Provide the password and continue the wizard.

This is another check, just so there will be no problems adding this node to the SQL cluster.

When you are ready to install SQL server and add this node to the SQL cluster, click the Install button.


After the installation, click Close.

If you take a look now in the Failover Cluster Manager console you can see the SQL instance running as a role in the cluster.

When the active node fails, the SQL and the MSDTC roles are moved to another member of the cluster. All this failover process happens in few seconds.


Now ask yourself, how many applications will notice this outage ? Very few, I can tell you that.
Want content like this delivered right to your
email inbox?
More similar articles
 How to install SQL Server 2012 on Windows Server 2012
- How To Install SQL Server 2008 R2 on Windows Server 2008 R2
- Step-by-step Hyper-V Storage Live Migration
- Install and Configure SQL Server Reporting Services (SSRS)
- Creating and configuring Windows Domain Service Accounts
- Deploying and configuring the Remote Desktop Gateway Server Role