Clustering Active Directory Certificate Services (AD CS)
I have to say, the implementation is not that easy especially if you are doing this for the first time, so if you want to follow along, you will need to have a bit of knowledge about Microsoft Certificate Services. For that, you can go and read my other articles on this blog about implementing and deploying Microsoft PKI infrastructures, build some labs and get familiar with the technology.
Now that you understand how a Microsoft Certification Authority works, we can move along, but before that, let me put a list of guidelines about what’s supported and what’s not:
- A CA Cluster can only run a single instance of Certificate Services.
- Any number of nodes can be used to provide a high availability environment for the certificate services.
- Clustering is supported only for the Certificate Services service role. Other role services, such as Web Enrollment, Net Device Enrollment, Online Responder are not supported. If you also want to make these highly available, configure them on separate servers behind a Load Balancer (LB). It is recommended to make these roles highly available too since they also play a critical role in a PKI environment, especially the OCSP and CRL/CRT repository.
We are going to build a two tier PKI here for simplicity, a Root CA, which is going to be our top level CA and an Issuing CA, which is going to be our clustered CA made of two Windows 2019 server nodes . Also, the CRL/CRT repository will be sitting on the two nodes cluster for redundancy. If you have the hardware, and by hardware I mean a Load Balancer (LB), you can put the CRL/CRT repository on separate servers behind the LB.
1. Building the Root Certification Authority
1.1. Installing and configuring the Root Certification Authority role
Presuming you already have your CAPolicy.inf file created, open the Server Manager console and begin the Active Directory Certificate Services role installation.
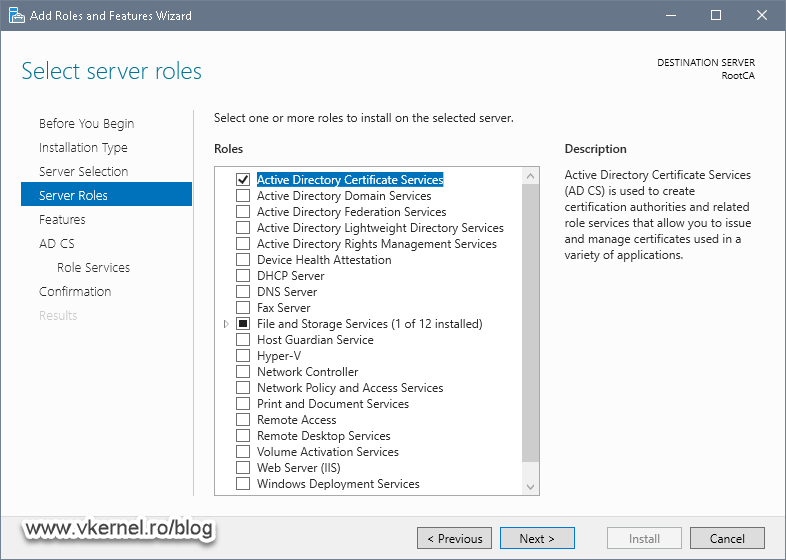
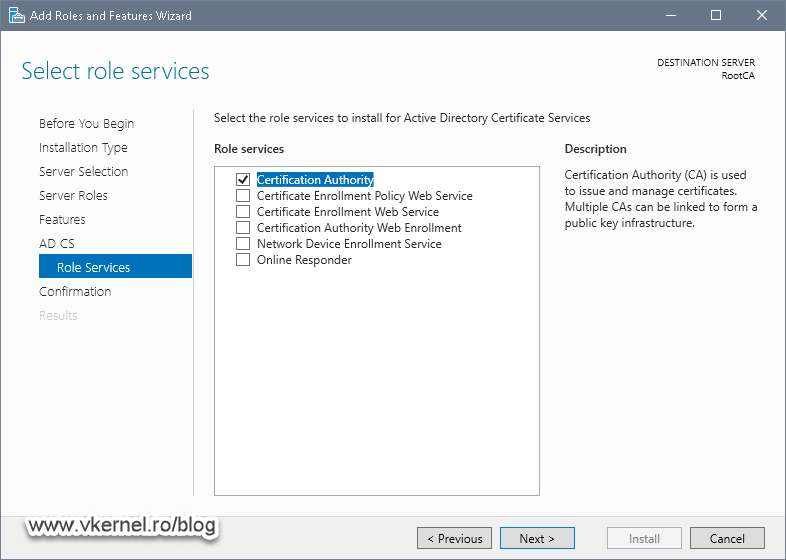
Since this is a Root CA server, we will only need the Certification Authority role service. After you tick the box, click Next.
Once the wizard is done with the installation of the Active Directory Certificate Services role, it is time to configure it. Click the Configure Active Directory Certificate Services on the destination server link to open the AD CS Configuration wizard.

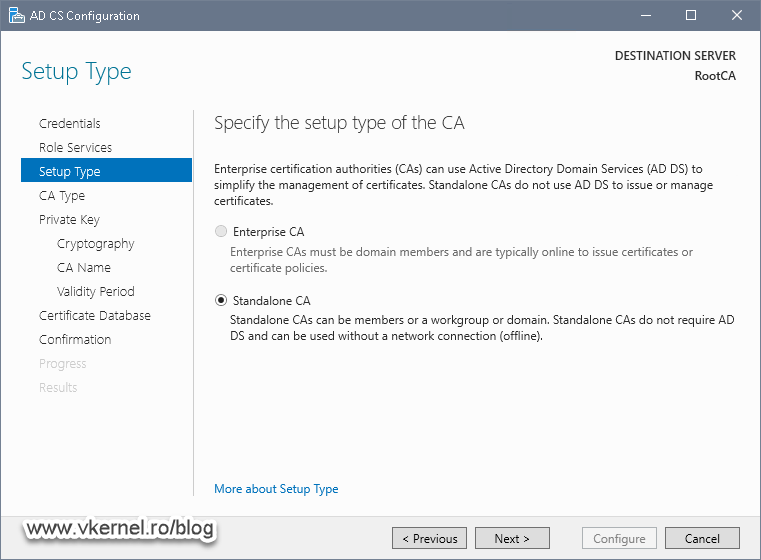
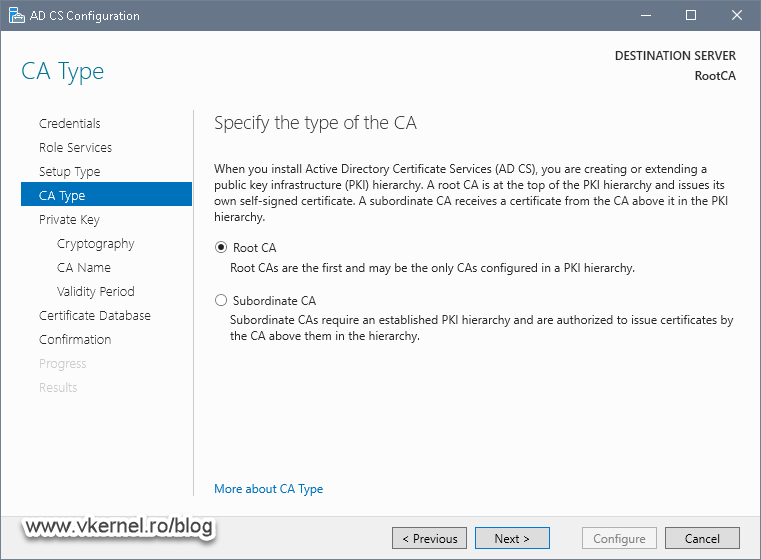
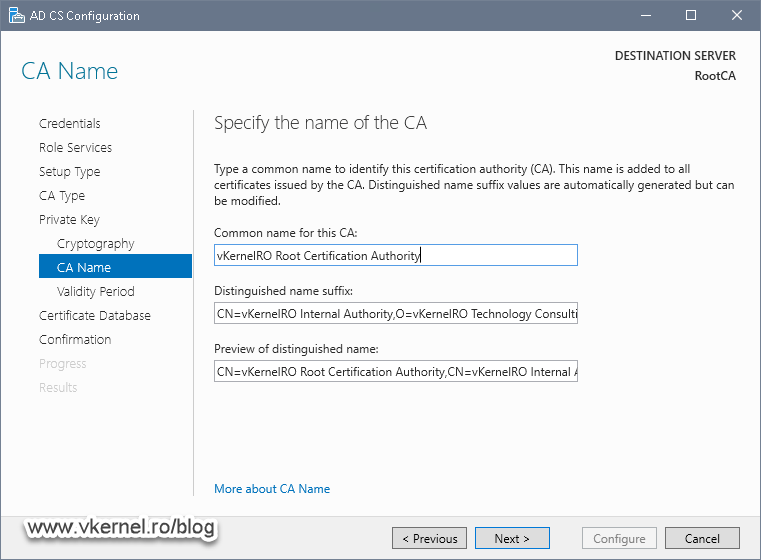
In the AD CS Configuration wizard make sure you configure the CA as Standalone > Root CA server.
As for the name of the Certification Authority, well…I will leave this up to you. The Distinguished Name Suffix box is optional, but I recommend you fill it up with the proper info by following this article as a guide.
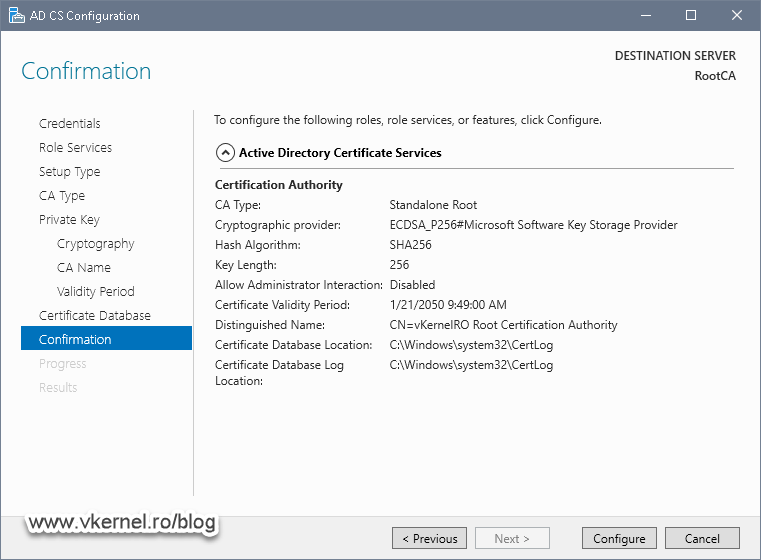
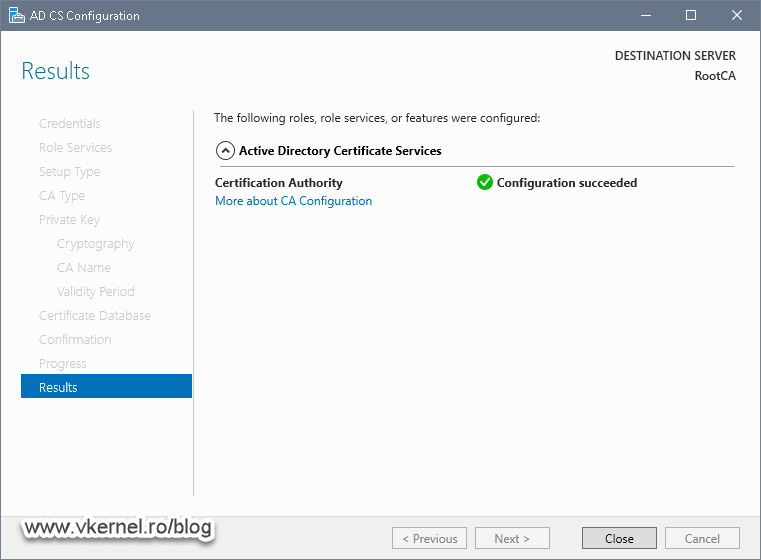
On the Confirmation page, review your configuration, and if everything is good just hit the Configure button. After a few seconds we should have a Configuration Succeeded message.
As you can see I have selected the ECDSA cryptographic provider, which is pretty new at the time of this writing. Only go on this route if your internal applications support it, if not, go with the old one, the RSA cryptographic provider.
1.2. Configuring the Root CA Extensions (CRL and AIA)
Now, before we leave the Root CA alone and move on to the other servers, there are a few more things we need to configure, and those are the CRL publication interval and the CA extensions. Again, for more in-depth details on how to configure these settings please read my previous article.
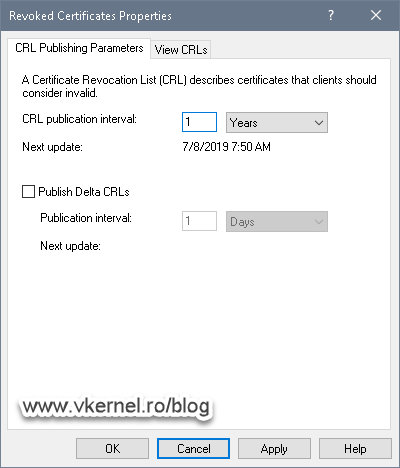
The CRL publication interval is how often the CRLs are published so clients can have an up to-date file about revoked certificates. Since this is a Root CA , it will issue certificates just for Intermediate or Issuing CAs, so certificates will not be revoked very often, maybe never in some cases. The CRL publication interval for an internal/private Root CA is usually set to one year, but this might differ from one environment to another.
To set this up, just right-click the Revoked Certificates folder in your Certification Authority console and choose Properties. In the CRL publication interval box, set the value to one year or whatever interval suits your environment better then hit OK. Leave the option Publish Delta CRLs un-checked since Root CAs don’t usually publish delta CRLs.
The next step is to configure the CA extensions so clients know where to go and download the base CRL and the root certificate to build the trust. I usually like to change the default names and publication paths for all my CAs and use custom ones, but even if you go with the defaults, you will still have to add a new distribution point and replace the server name with a domain name (FQDN) in your environment. More about this in just a moment.
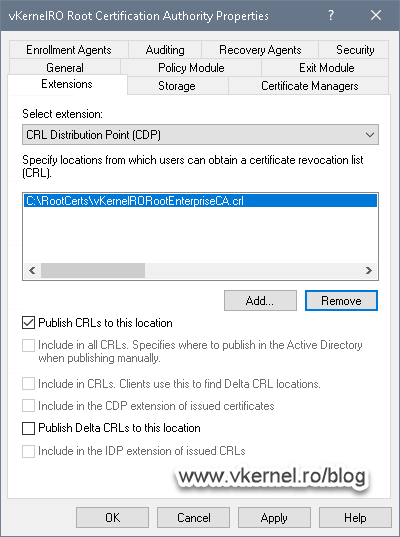
If we open the Properties of our Root CA we can see that by default, the CRL is published in C > Windows > System32 > CertSrv > CertEnroll > <CRL Name> and clients can find it by using the HTTP protocol followed by the Root CA server name (http://<ServerDNSName/CertEnroll…). Since this server will be offline, leaving the default distribution point, will lead to clients unable to get the CRL and verify if a certificate was revoked or not.
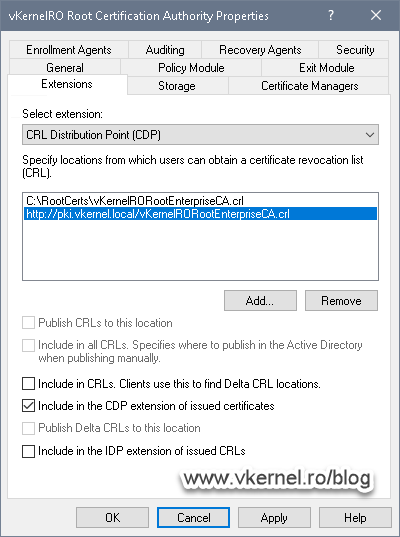
We are going to fix this, but for now, all we need to think about is choosing the right FQDN -pki.vkernel.local in my case- where clients can find the repository in our environment and the name of the root certificate and base CRL. Once we have these, click the Add button to configure the CRL extension as shown in the bellow pictures.
As you can see, I configured my Root CA to publish the base CRL in a folder on the root of my C drive, then I provided the distribution point link where clients can find the CRL. Yes, I know, this FQDN does not point to any IP address yet, but bear with me because all these steps need to be in a specific order, so we don’t have to keep jumping from one server to another for to many times.
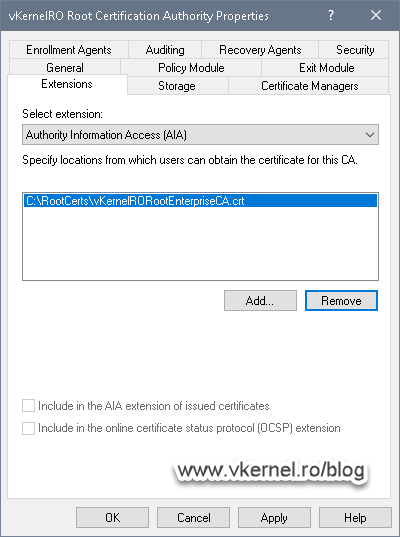
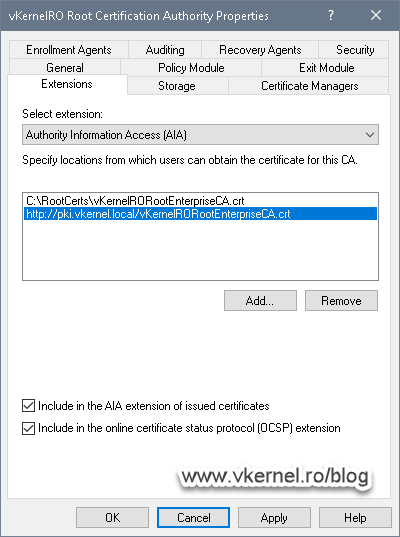
Moving on the Authority Information Access (AIA) extension, the same configuration is applied. Only check the Include in the online certificate status protocol (OCSP) extension option if you have an OCSP service up and running. If not, leave the box un-checked. Click OK to apply the changes and restart the Certificate Services service.
And once we force the publishing of a new CRL -using the bellow command line-, the file should be created in the RootCerts folder or whatever folder you set up as the publishing path on the Root CA server. Since there is no command line option anymore that forces the certificate to be re-published, the root certificate will need to be manually exported from the CA itself and copied here. Make sure you give the certificate the same name you set up in the CRL/CDP Extension.
certutil -CRL
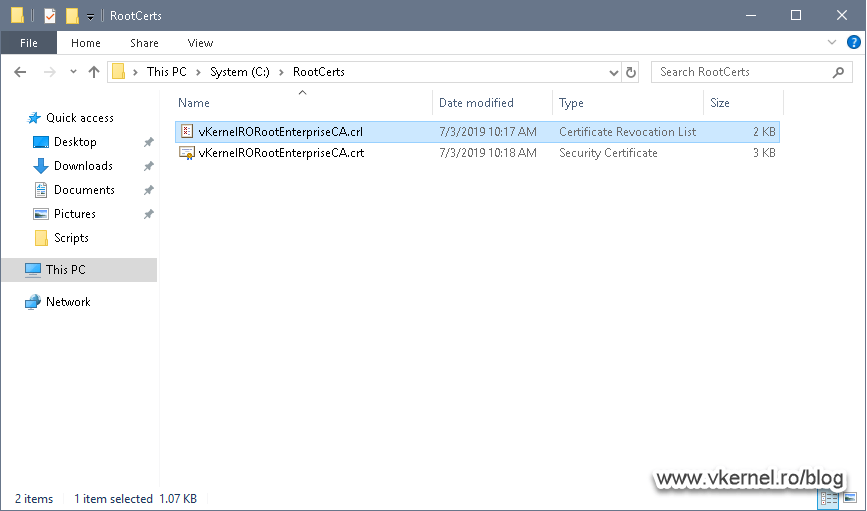
Now that we have our Root CA configured, we are almost ready to build our Enterprise CA cluster. Later we will have to come back here in order to copy these two files -Root CRL and Root certificate- to our web servers, for distribution, so don’t shut down the machine yet.
1.3. Extending the Root CA certificate validity period
By default, the Root CA will issue certificates with a validity period of one year, which in our case it’s a very short one. In order to have longer validity periods for our certificates, we need to run the bellow commands. Replace the number with the validity period that suits your environment better. This is usually set as half the period of the upper CA.
certutil -setreg CAValidityPeriodUnits 15
certutil -setreg CAValidityPeriod Years
net stop certsvc && net start certsvc

2. Installing and configuring the Windows Failover Cluster
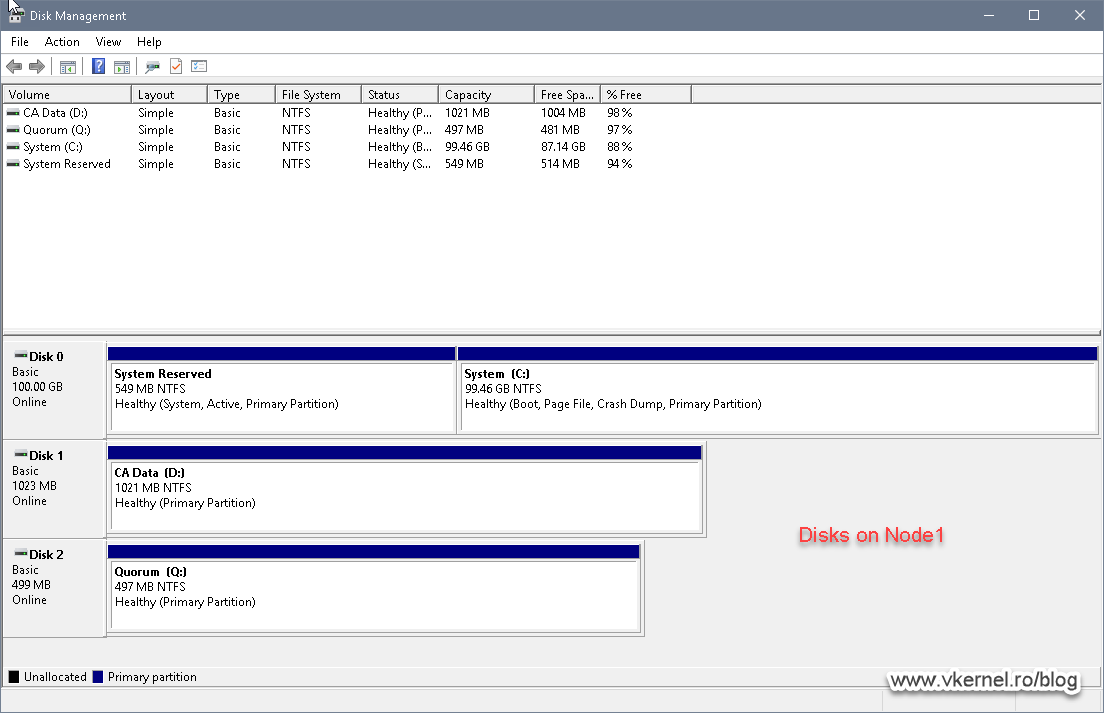
As I have said in the begging of the article, we are going to build the Windows Failover cluster using two Windows 2019 server nodes, and these can be physical servers or virtual ones. Since every Failover Cluster needs a central storage, I though it will be better to put this first in the order of configurations; so go configure your storage, create a data LUN no larger that 1GB -there is no need for a larger one- then a quorum one -if using a disk as a cluster witness-, connect them to the two Windows server nodes then format the LUNs using NTFS.
If you think you need more details on how to build a Windows Failover Cluster, I have an article just for for that where I go deep into configuring the service.
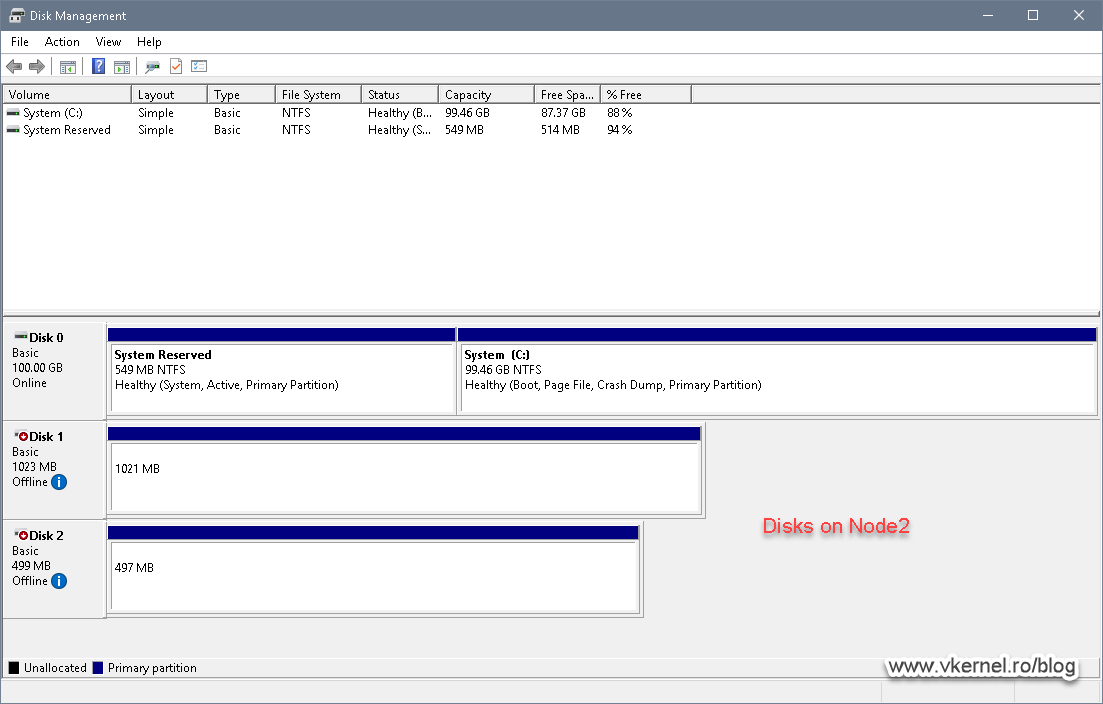
In the end we should have some nice, clean formatted partitions on Node 1, and only available on Node 2. On the second node the disks needs to be offline so they don’t get corrupted.
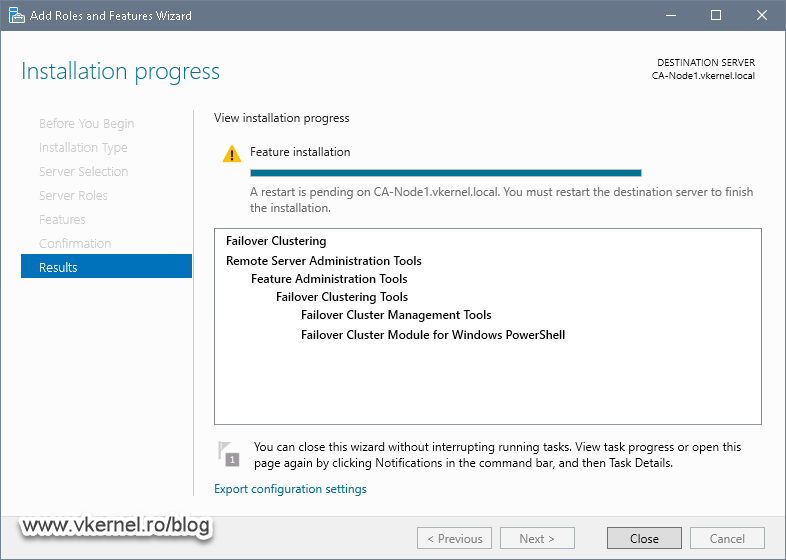
Once the disks are ready, we can go ahead and install the Windows Failover Cluster role on both nodes using either the GUI
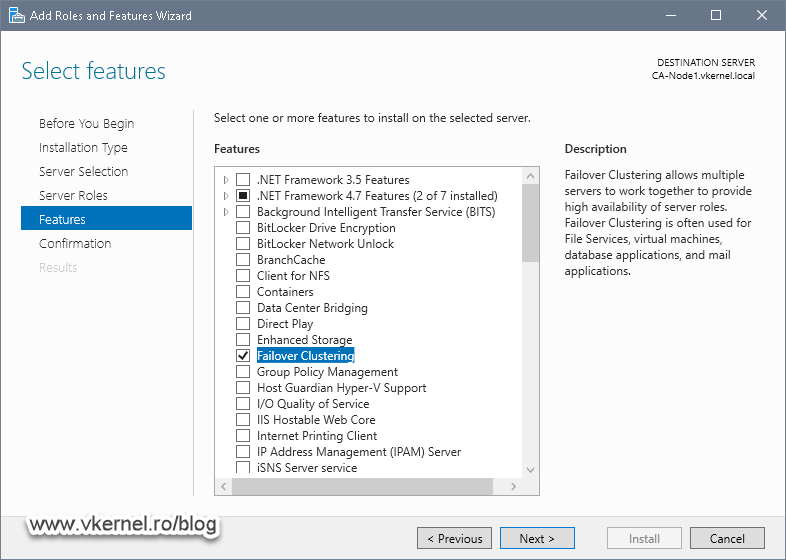
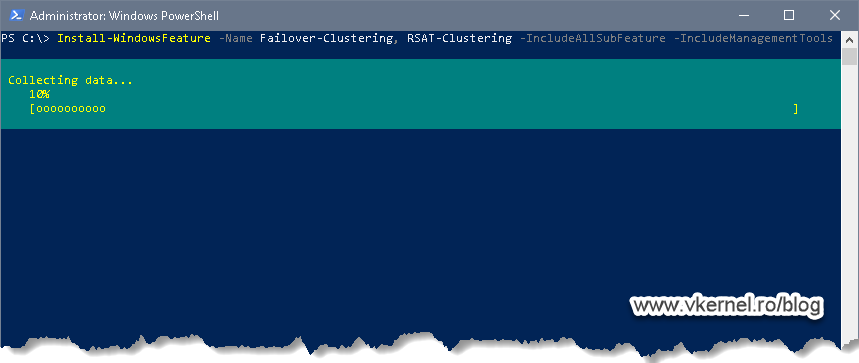
or PowerShell
Install-WindowsFeature -Name Failover-Clustering, RSAT-Clustering -IncludeAllSubFeature -IncludeManagementTools

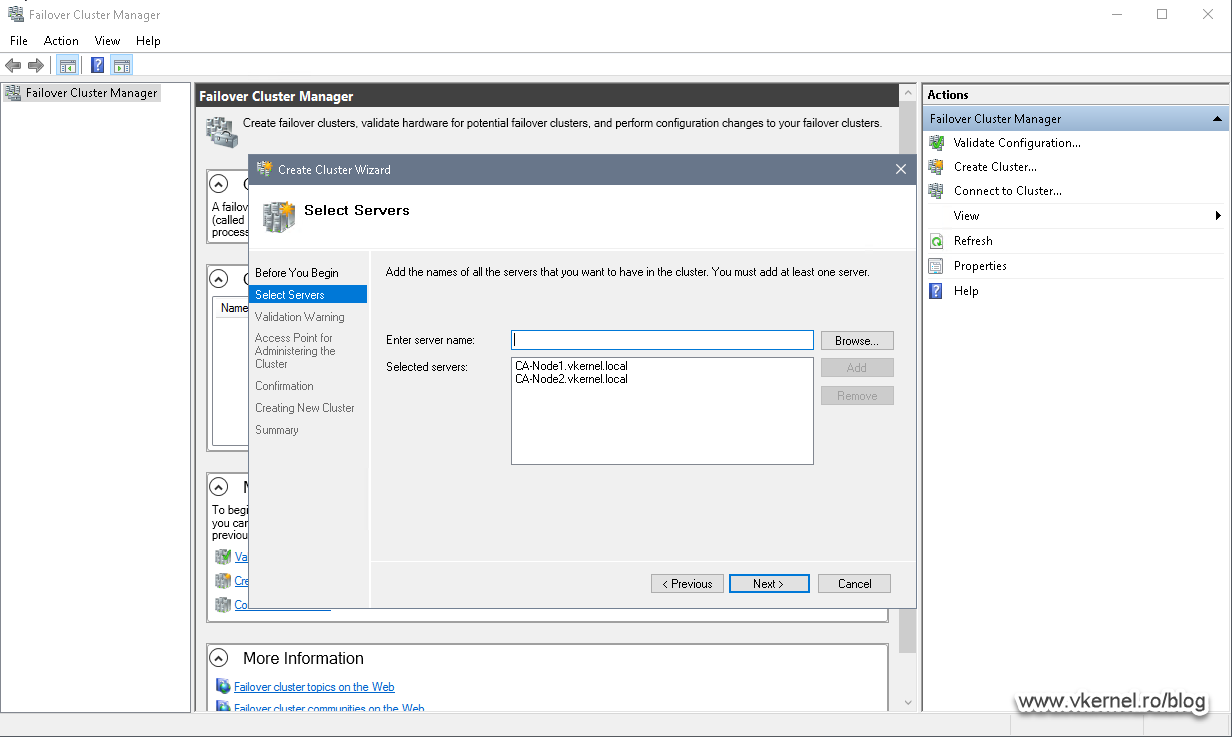
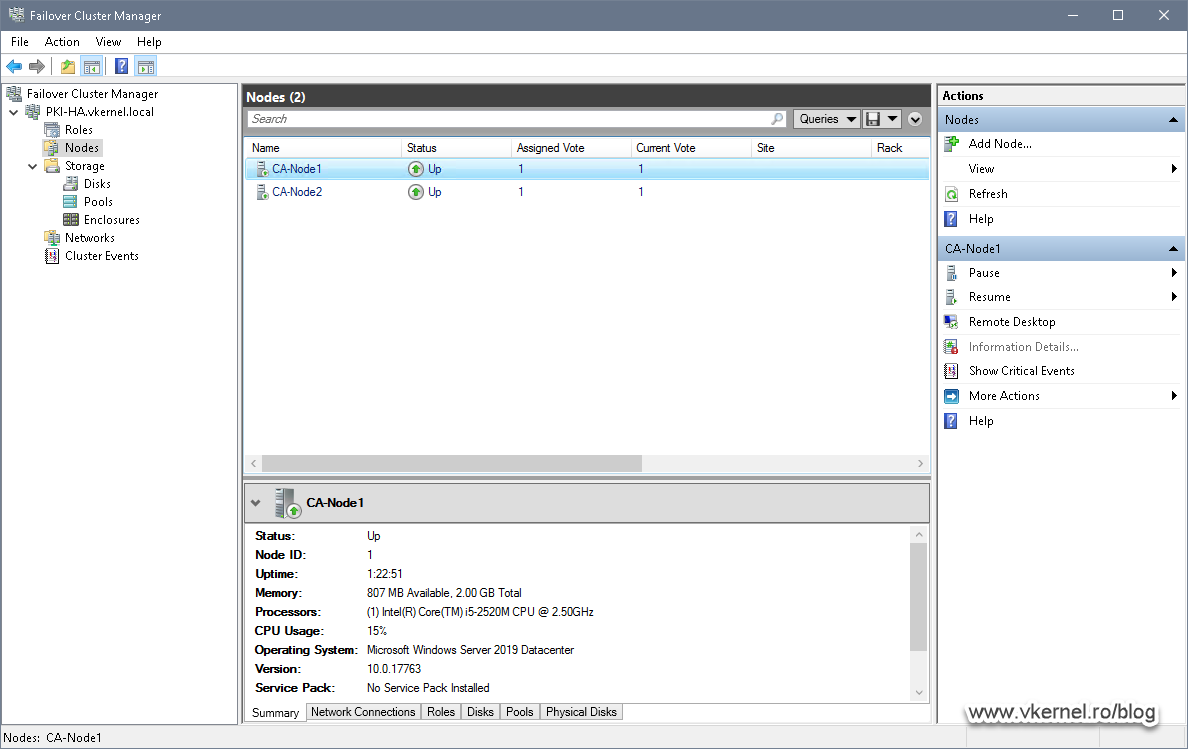
Now create the cluster.
3. Setting up the Certification Authority role service on the first cluster node
3.1. Installing the Certification Authority role service on the first cluster node
Before we actually start the Certificate Authority installation on Node 1, we first have to prepare the folders hierarchy where the CA database and log files will sit. As you probably guessed, these will be hosted on the cluster disk, so in case one of the nodes fails, the other node can use the same CA database.
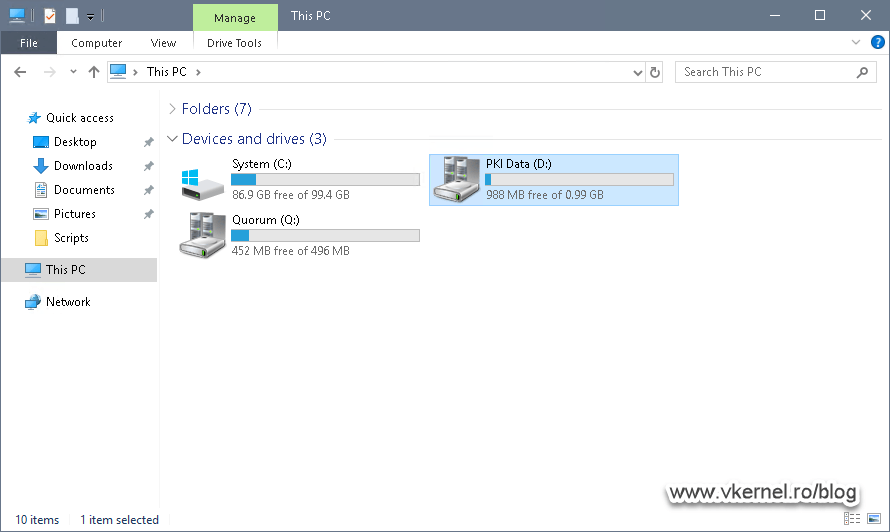
My cluster disk is called PKI Data where I have my database and log folders separated from each other. This is not mandatory, but it’s organized and useful for troubleshooting to have them in separate directories.

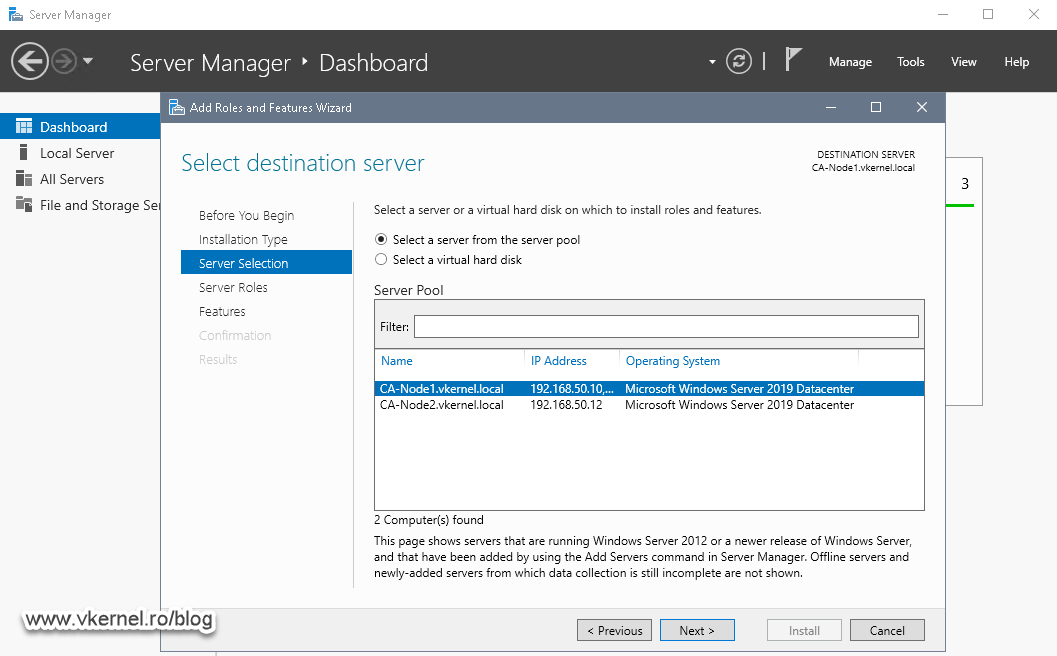
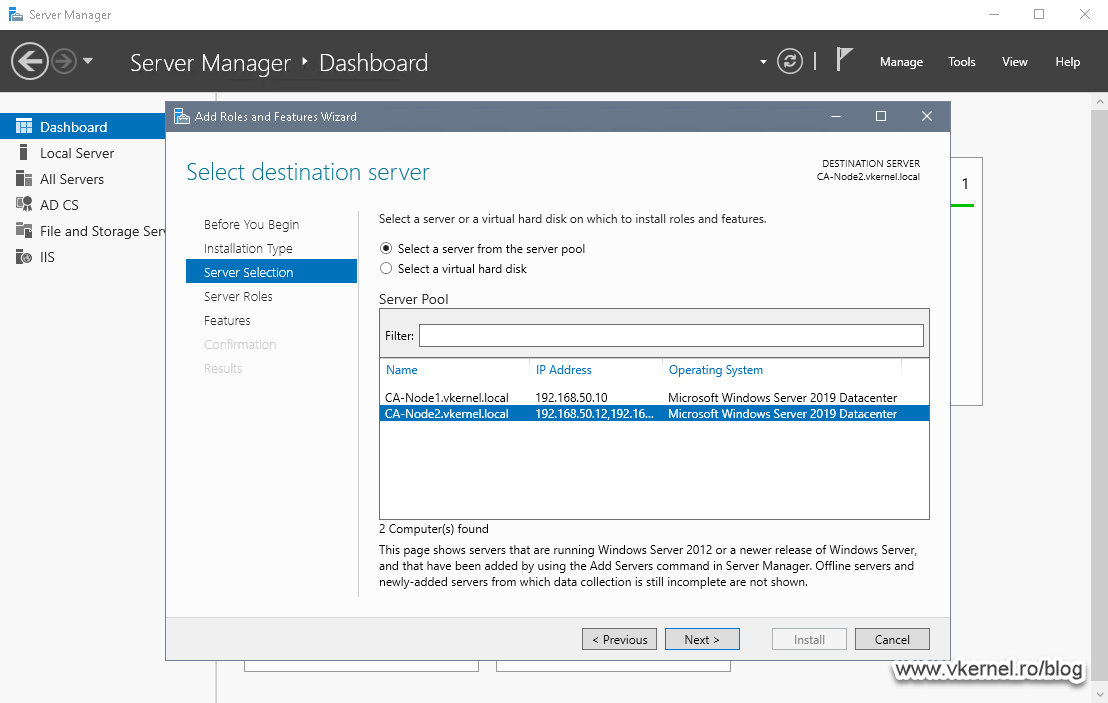
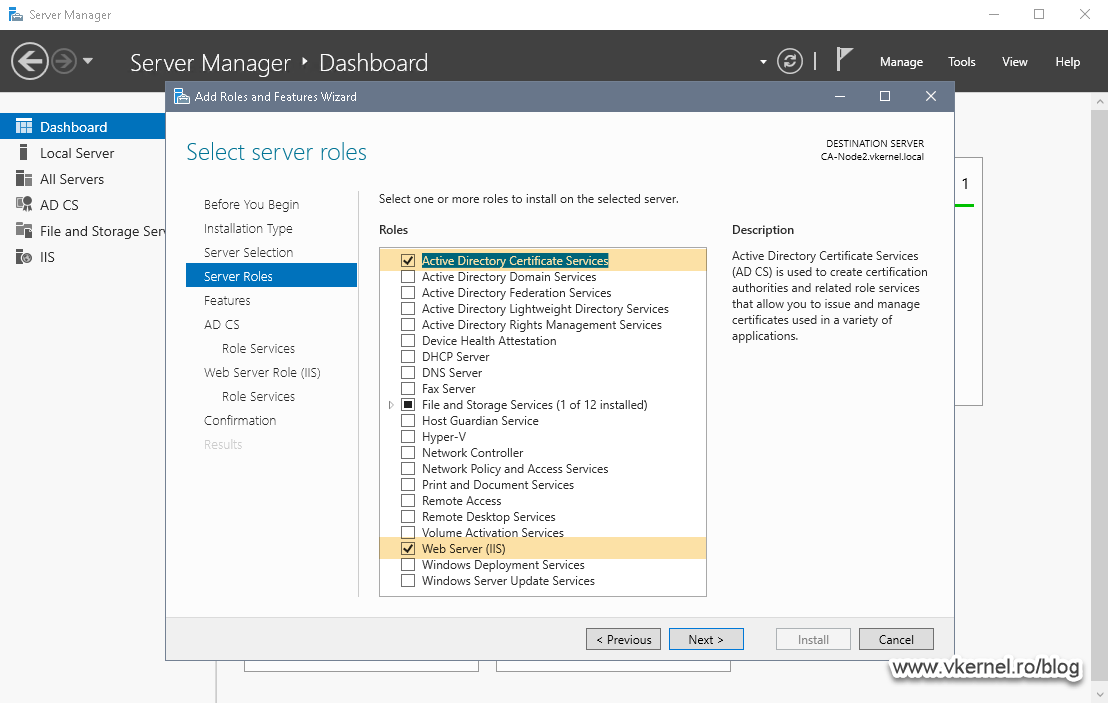
Once we are done creating the folders, open Server Manager and install the Active Directory Certificate Authority role. Besides the AD CS role, we also need to install the Web Server IIS one so we can distribute the CRLs and CRTs to clients using the HTTP protocol.
Remember the FQDN (pki.vkernel.ro) that we put in the CDP and AIA extensions of the Root CA? In the end, that FQDN will point to this Web server and the one that we are going to install on Node 2 later on. Again, we do this so we use as little resources as possible, but if you have them, you can always put the CRL/CRT repository on separate servers behind a LB.
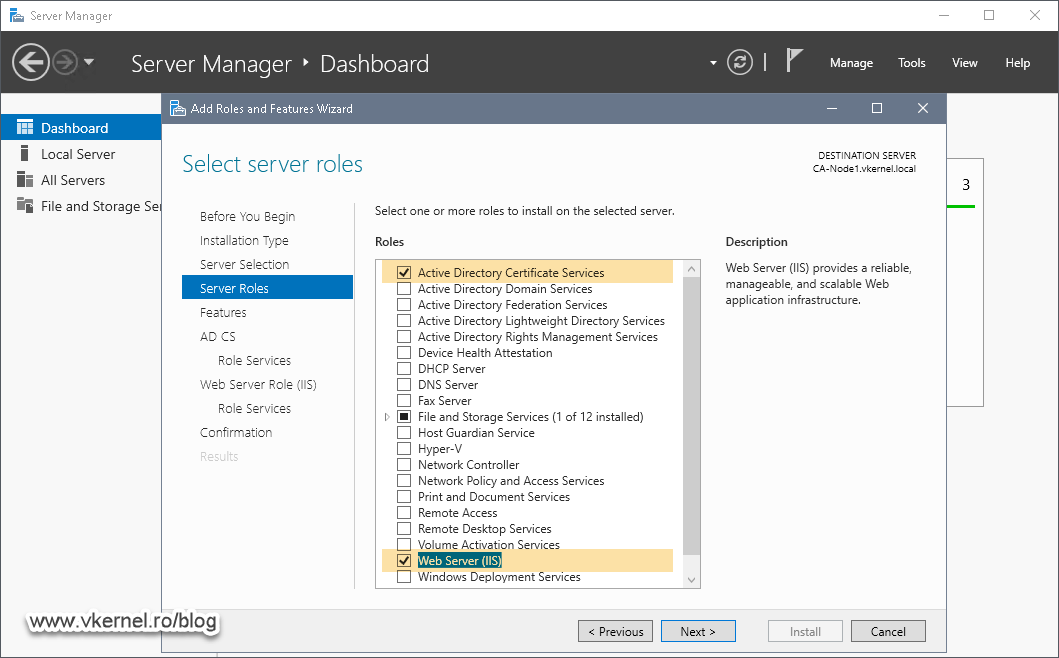
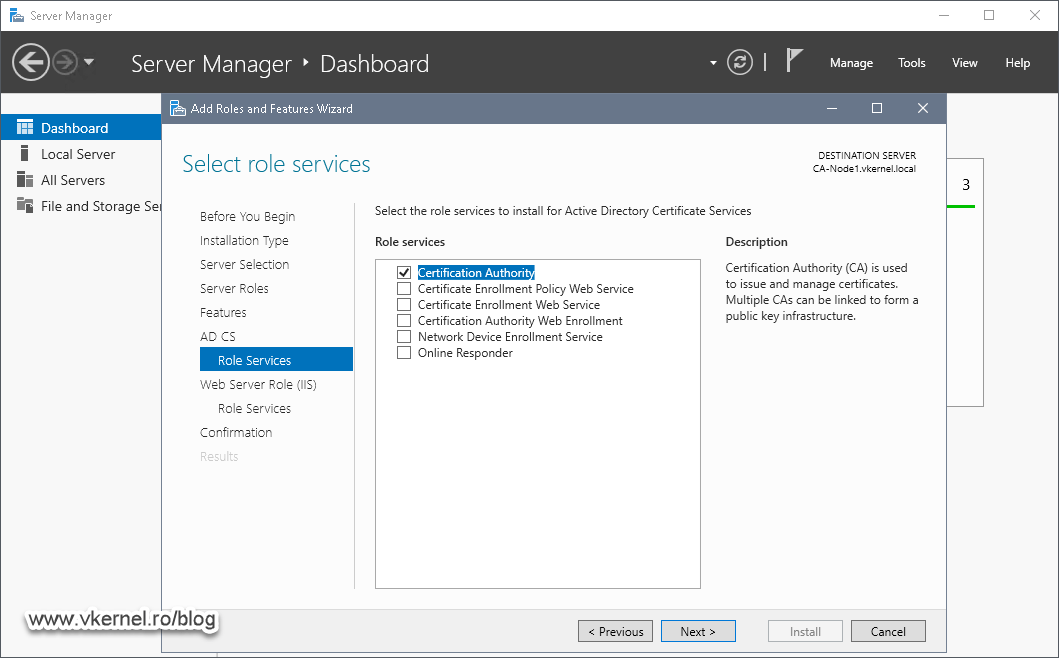
On the Role Services screen leave just the Certification Authority box selected and click Next.
Continue the wizard using the default settings then hit the Install button to start the installation of the Active Directory Certificate Authority and Web Server IIS server roles.

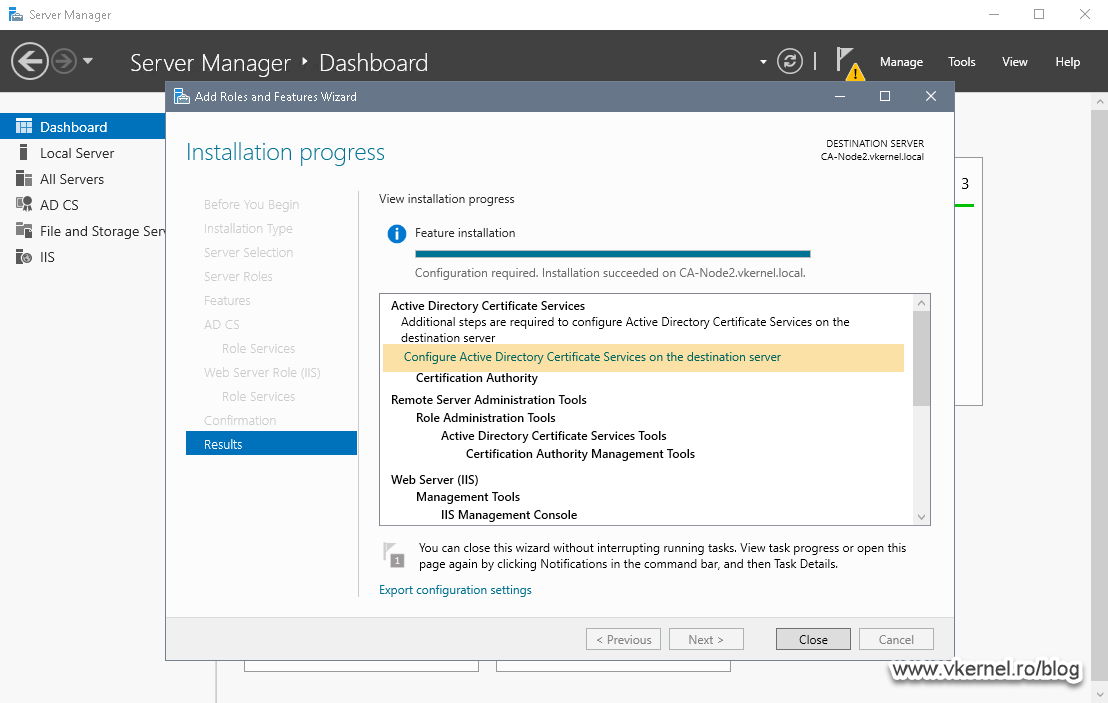
All this is going to take a few minutes, and once it is done, we get the option in the Add Roles and Features Wizard to configure the Certificate Authority role. Click the link Configure Active Directory Certificate Services on the destination server to launch the configuration wizard.

3.2. Configuring the Certification Authority role on the first cluster node
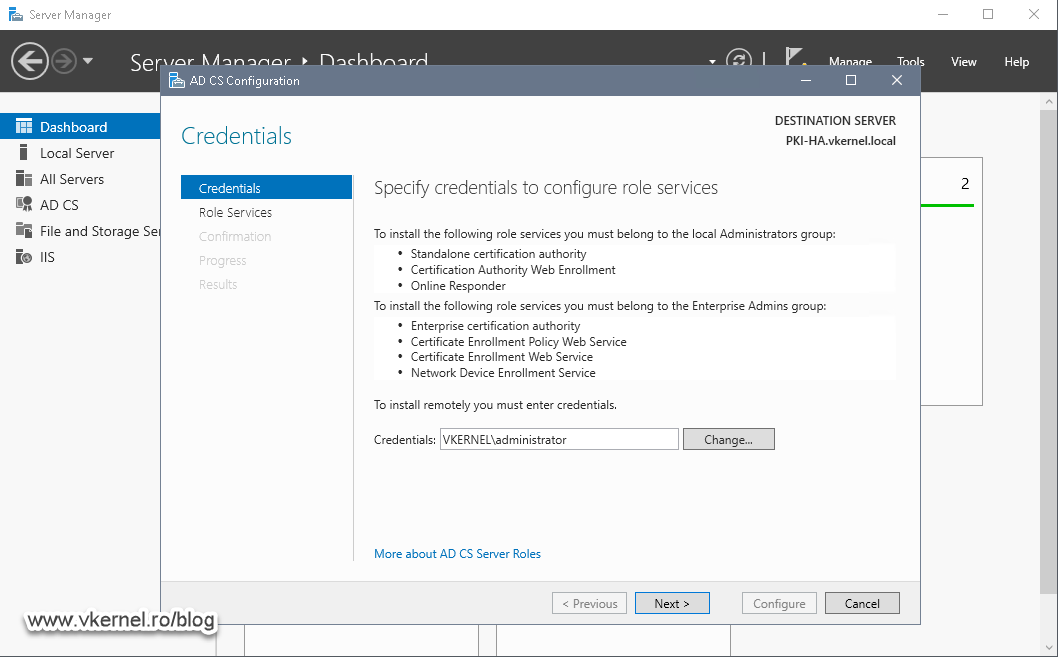
Once the AD CS Configuration wizard pops-up, provide a Domain Administrator account so the wizard has the proper rights to configure the service.
In the Role Services screen check the Certification Authority role box then click Next.

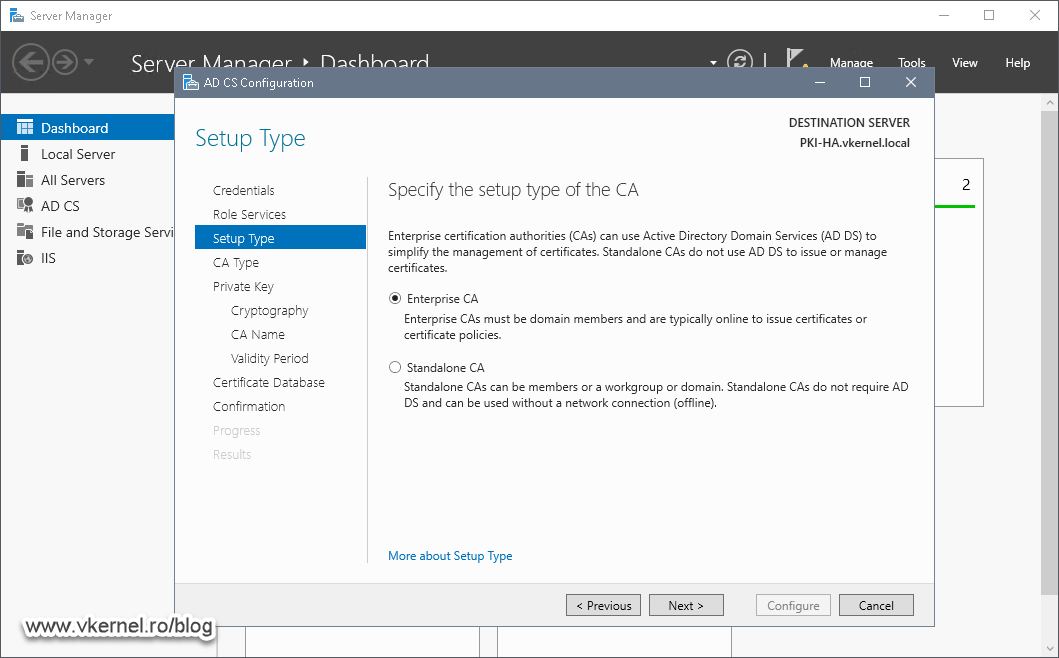
Since this is going to be an Enterprise Issuing CA, we need to go with the first option, Enterprise CA. Select it then click Next.
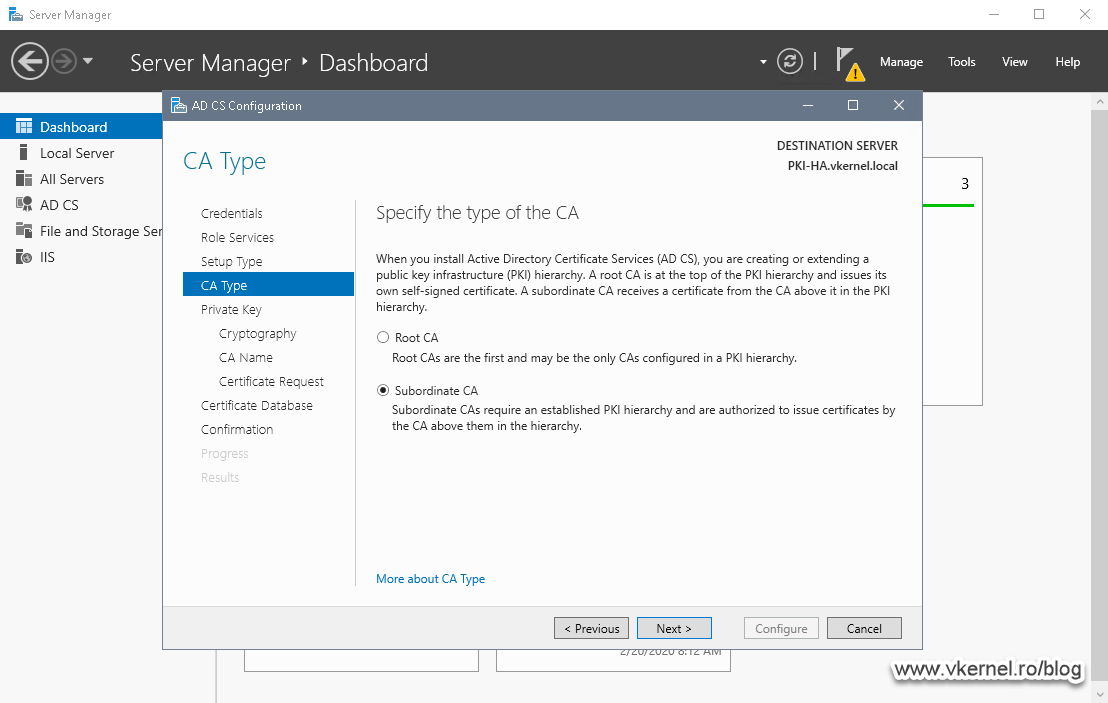
Because we already have a Root CA deployed, this one will need to be a Subordinate CA. Select the second option and continue the wizard.

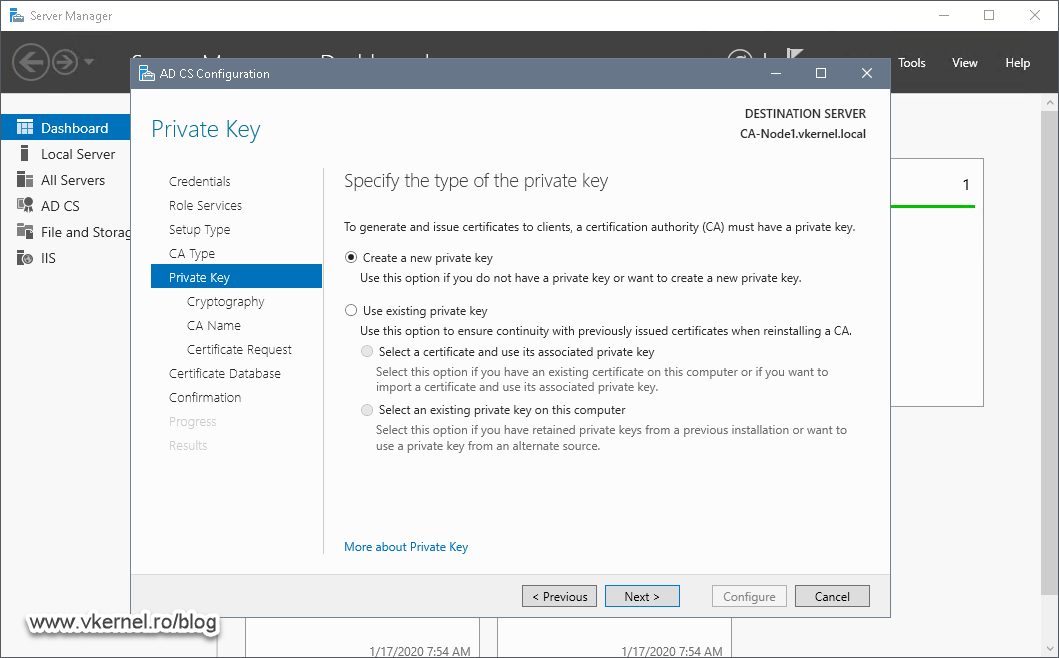
In the Private Key screen of the wizard select Create a new private key and click Next.
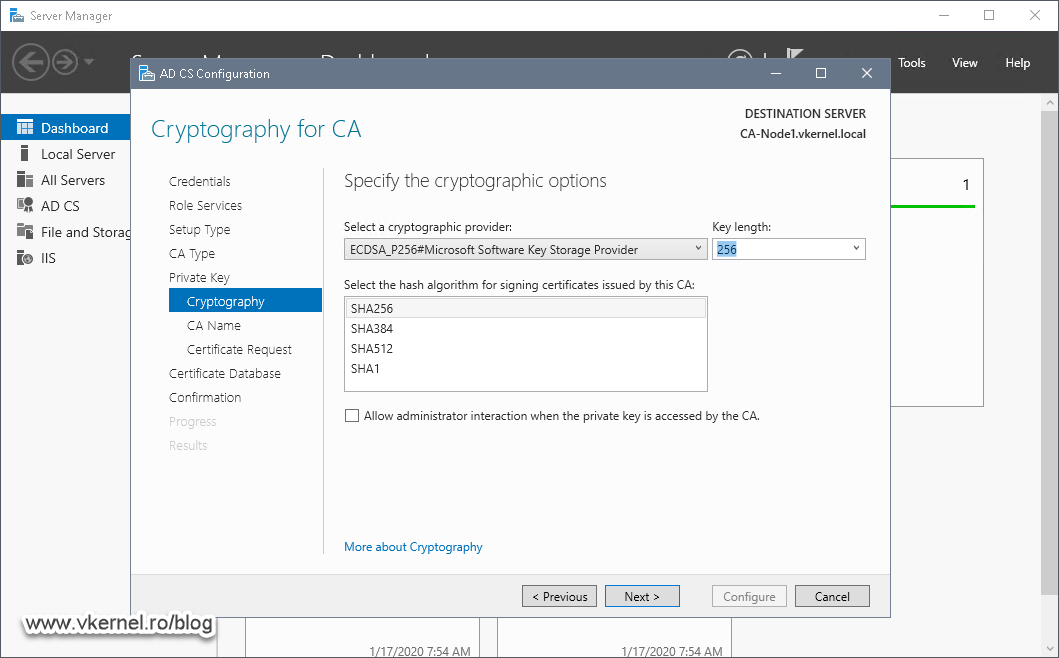
As a cryptographic provider, I’m going with ECDSA here too, the same as the Root CA since it has a smaller key size and a stronger cryptography. Again, ECDSA might not be compatible with some of your internal applications and you will be forced to use the old RSA cryptography. It is better to test all this before implementation, because the only way to change it back is with a re-installation of the PKI infrastructure.
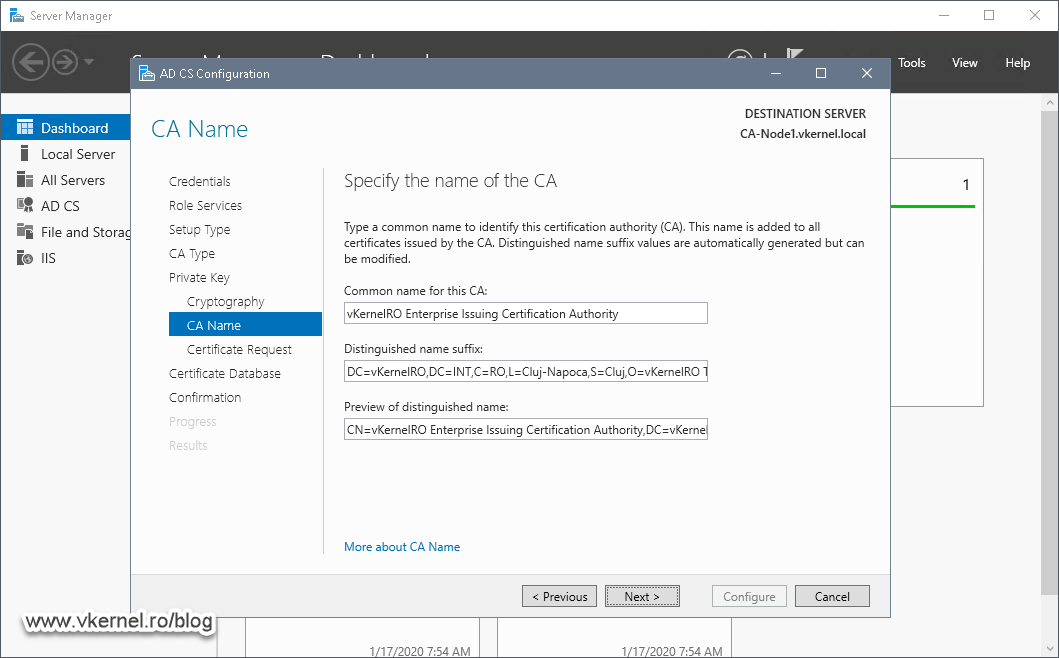
Provide a name for this Issuing CA then type the Distinguished name suffix, which is optional, but I recommend you do it.
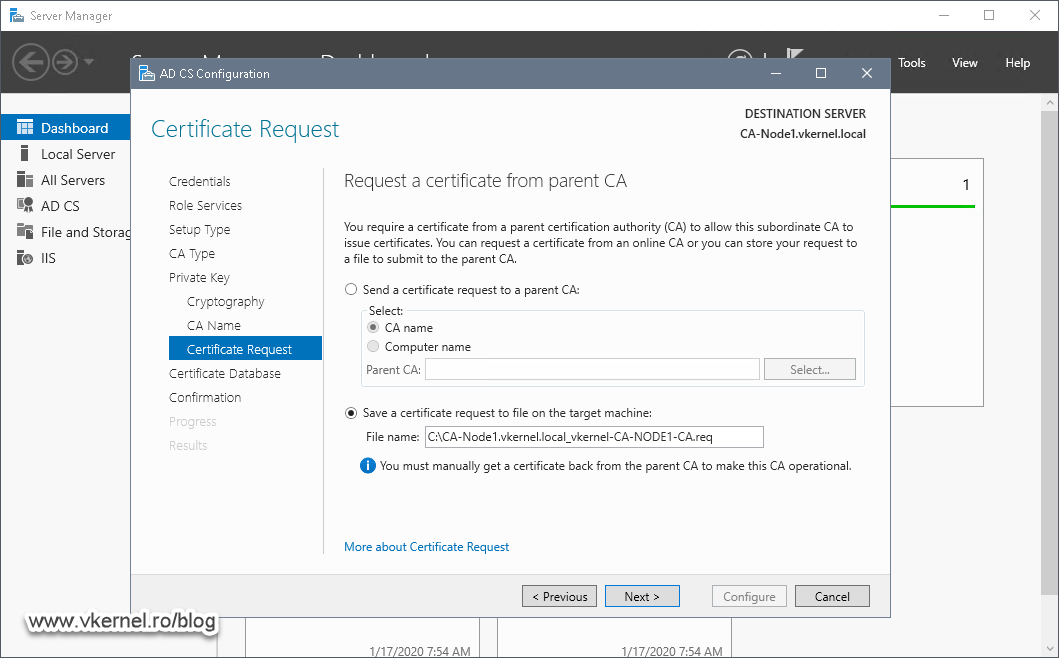
Since this is a Subordinate CA, we will have to generate a certificate request which later on we are going to use it and issue the subordinate certificate from our Root CA. Provide the path where to save the request file, then click Next.
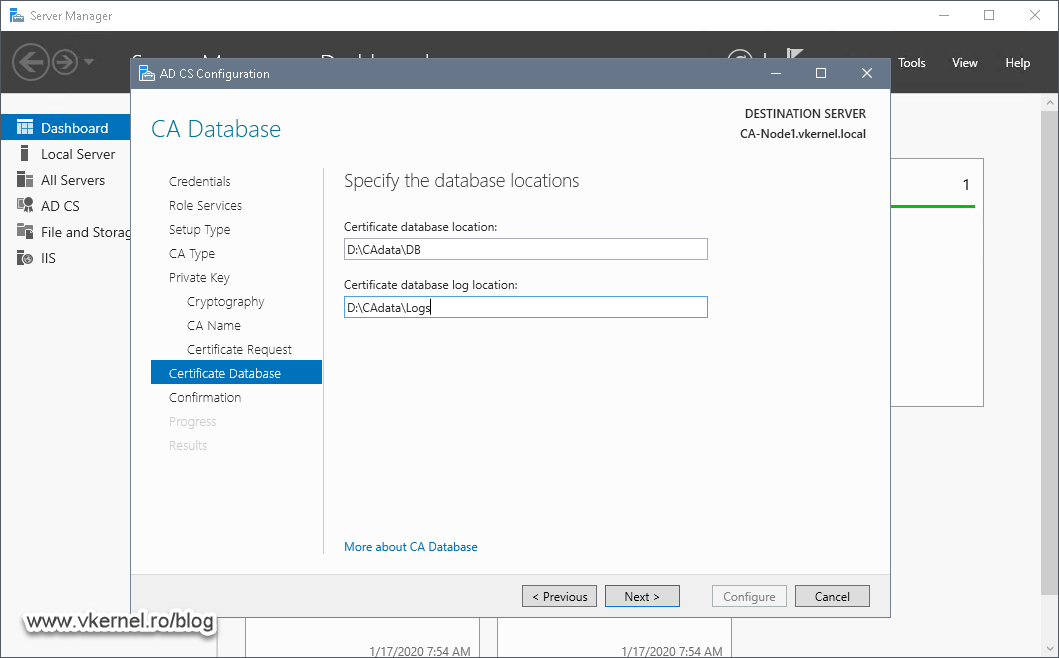
This is the part where we make use of the cluster data disk and the folders hierarchy we created in the previous section of this article. Provide the path where the CA should keep the database and log files then continue the wizard.
In the Confirmation screen, review the settings, and if everything is good hit the Configure button to begin the CA configuration.

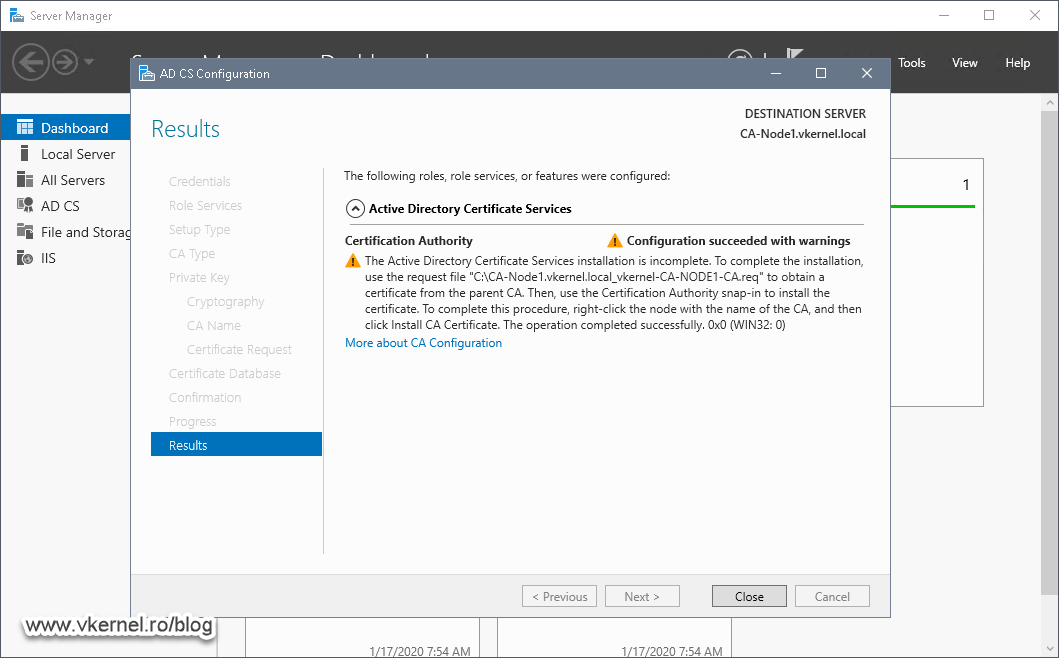
The warning we get at the end of the configuration wizard it’s expected, because as I have mentioned a moment ago, we need to issue the subordinate certificate from our Root CA and install it here, on the first cluster node. The warning is displayed because right now, our Issuing CA does not have a certificate installed and it cannot start the service because of it.
4. Configuring settings for the PKI environment
I know you are eager to go and configure the second node in the Windows Failover Cluster we just built, but there are other things that need to be put in-place before that; actually there are quite a few if I stop and thing about it, so let’s dig into them.
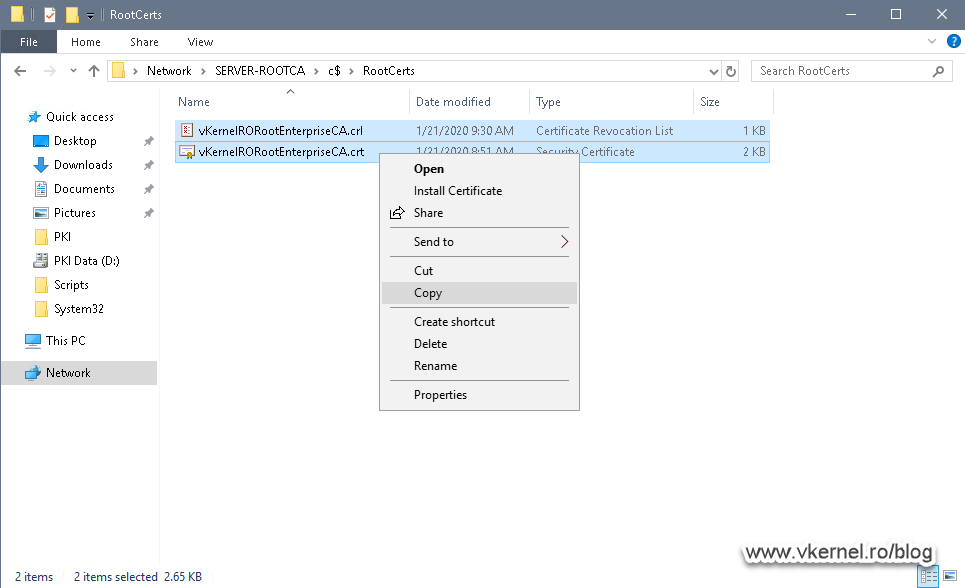
4.1. Copy the CRT and the CRL files from the Root CA to the distribution point
On the cluster volume on Node 1, create a new folder where all our CRLs and CRTs files will sit so clients can get them using the HTTP protocol. I named mine very simple, PKI.
Now we need to go back to our Root CA server and copy into this folder the Root CRL and CRT files that we published in sections 1.2 and 1.3. Since it’s easier and faster, I’m using a UNC path from Node 1 to my Root CA server to copy the files.

4.2. Configure the IIS Website for CRLs and CRTs distribution on Node 1
Now it’s time to configure the IIS website so clients can check the validity and build the trust of issued certificates by downloading the CRLs and CRTs from this website.
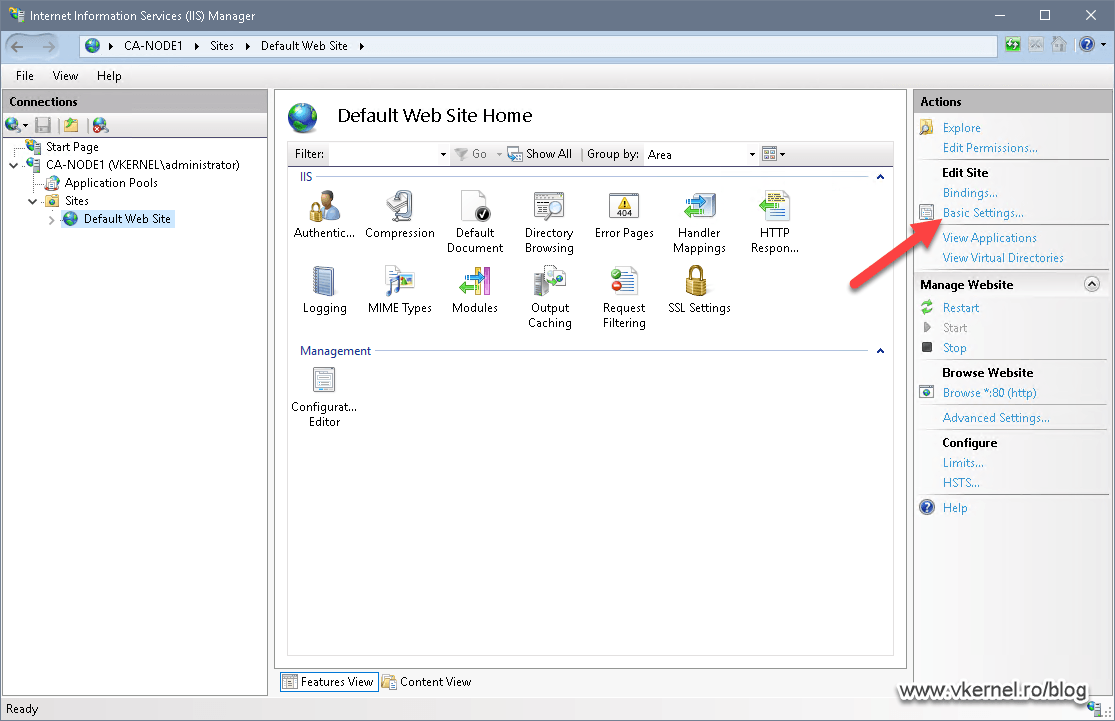
Open the Internet Information Services (IIS) Manager on Node 1 and either create a new website for this, or edit the default one. For the sake of simplicity and because I know that no other website will be hosted on this IIS server, I am going to edit the current one.
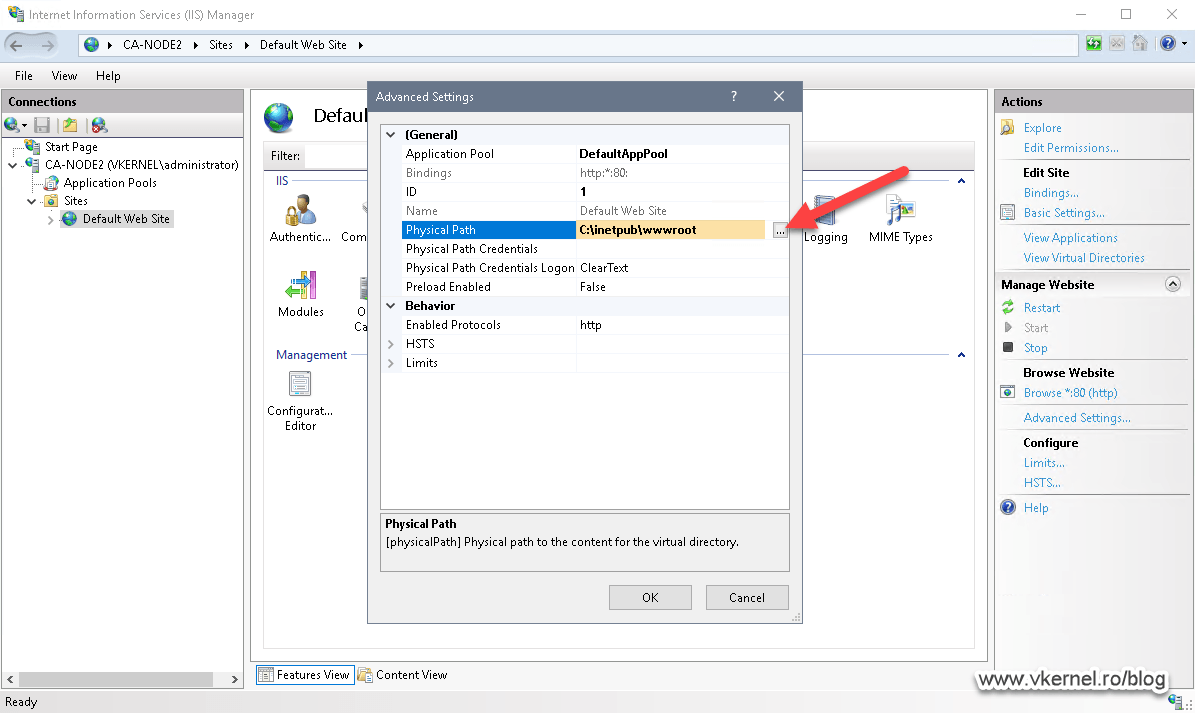
Click the Default Web Site then Basic Settings from the Actions pane.
After the Edit Site window opens, on the Physical path field provide the PKI folder created on our cluster disk in section 4.1 by either browsing for it or type it manually. Click OK.

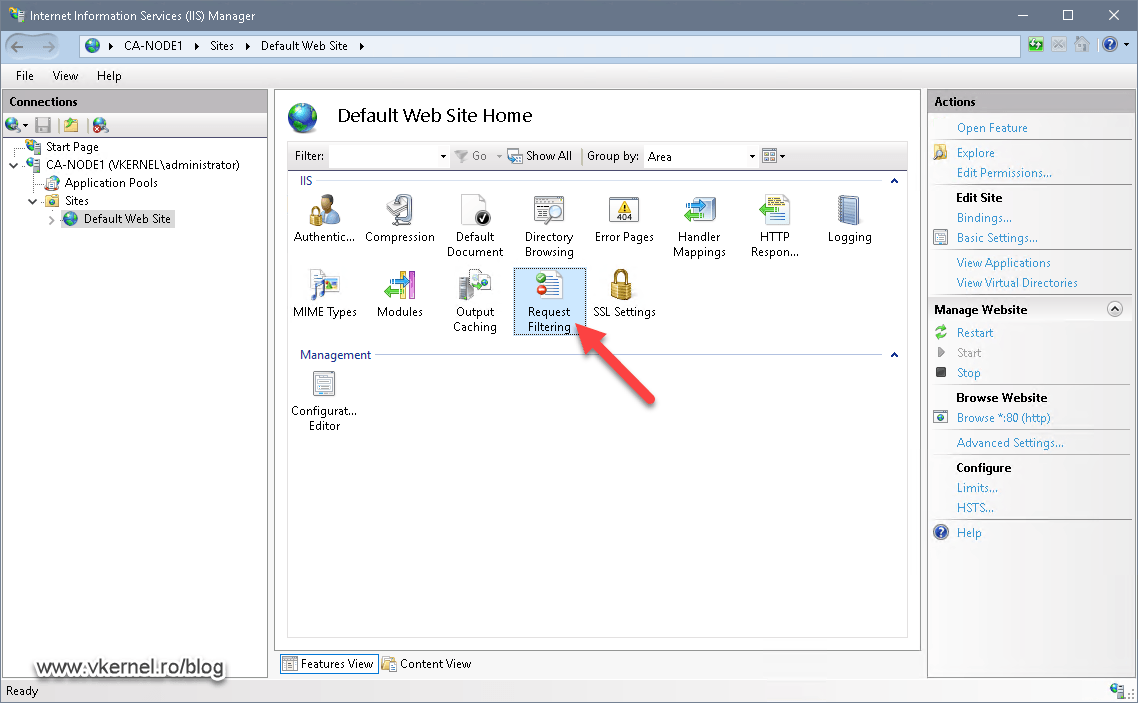
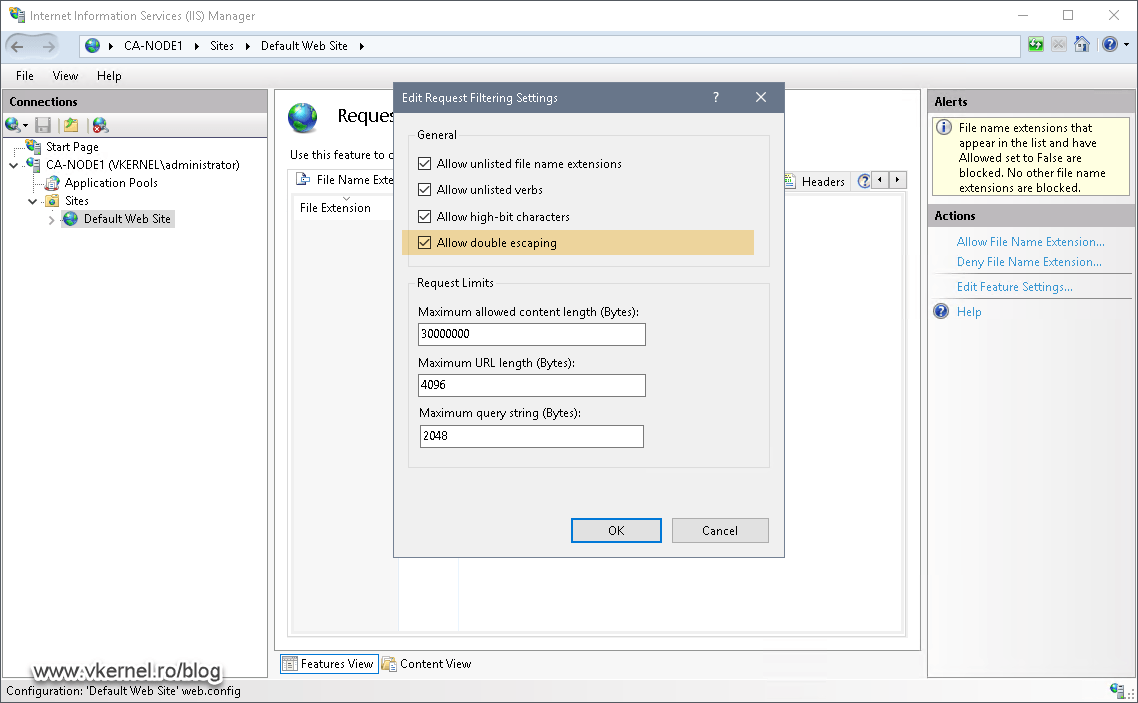
Back in the Internet Information Services (IIS) Manager, double click the Request Filtering option then click the Edit Feature Settings from the Actions pane.

The Edit Request Filtering Settings window will open. Here we need to tick the Allow double escaping box. This is needed so clients can download files that have special characters in their names, like the delta CRLs that we are going to publish from our Issuing CAs. These type of files have a plus (+) character at the end of their names and without this option enabled in IIS, clients will fail to download the delta CRL and the browser or service will throw a certificate error.
4.3. Setting up DNS records
This is the part where we actually tell our clients where is the server that holds the CRL and CRT repository in the network. Remember that in section 1.2 we have configured the CA extensions with a URL ) where clients can go and download these files and verify the certificate trust and if it was revoked or not. That URL needs a DNS entry in order to resolve to an actual IP address and the IP address that we are going to provide to the DNS A record, well…you guessed it, it is the VIP of our Windows Failover Cluster. Now if the active node fails, the cluster disk will be migrated to the other node and clients can still access the CRLs and CRTs and pass the certificate checking.
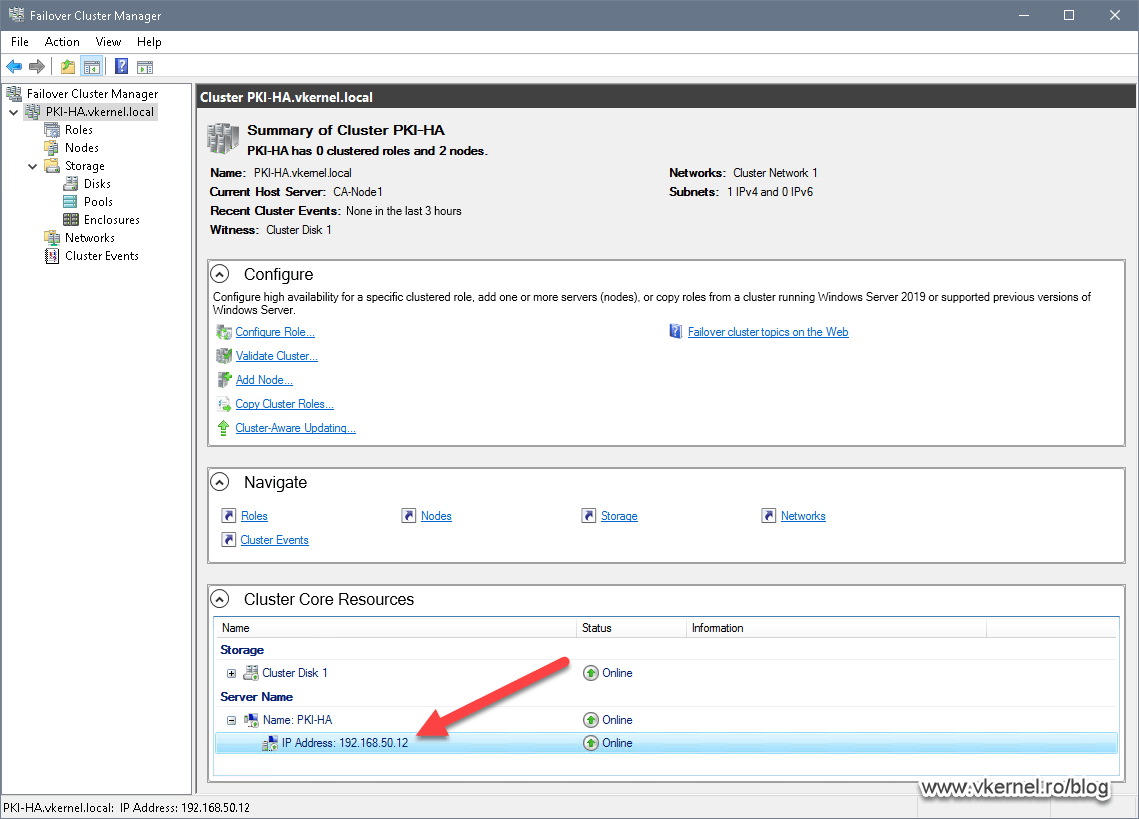
First thing we need to do is identify the VIP of our Windows Failover Cluster, and that can be done by clicking the cluster name in the Failover Cluster Manager console. In the Cluster Core Resources section expand the server name and you should get the cluster IP.
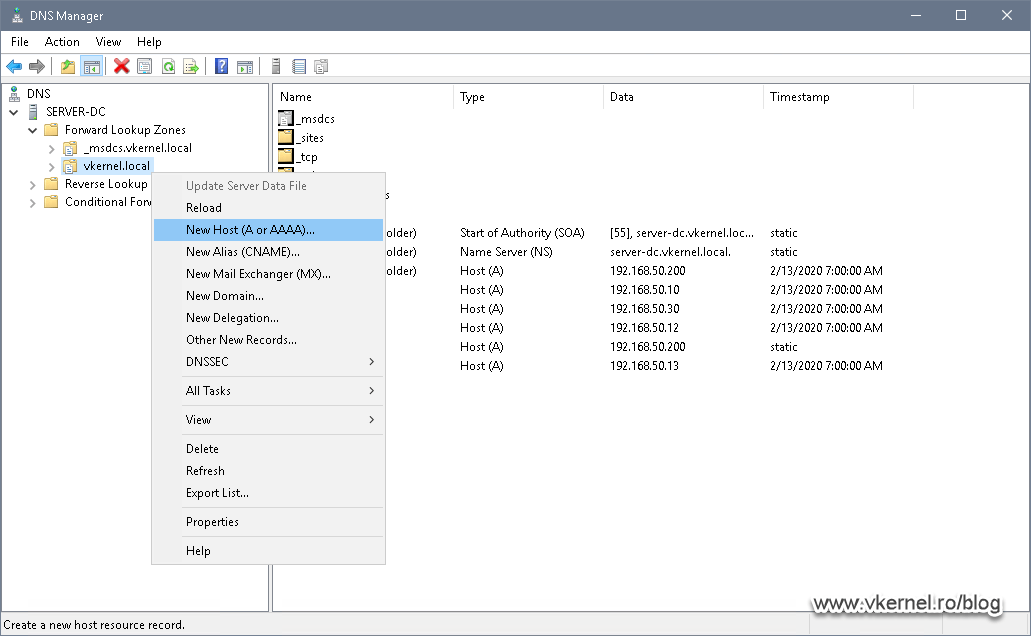
Now log in to one of your domain controllers and open the DNS Manager console. Right-click your DNS zone and choose New Host (A or AAAA).
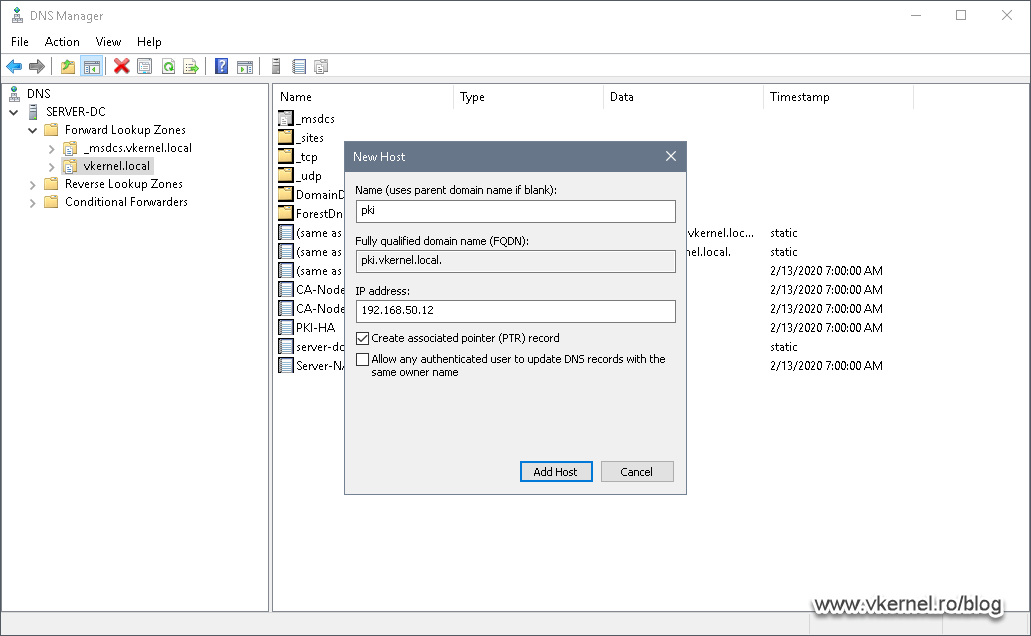
In the New Host window that pops-up type in the name you set up in the CA extensions option from section 1.2 then in the second field provide the VIP of the Windows Failover Cluster that we identified a moment ago. Check the box Create Associated Pointer (PTR) record then click OK.
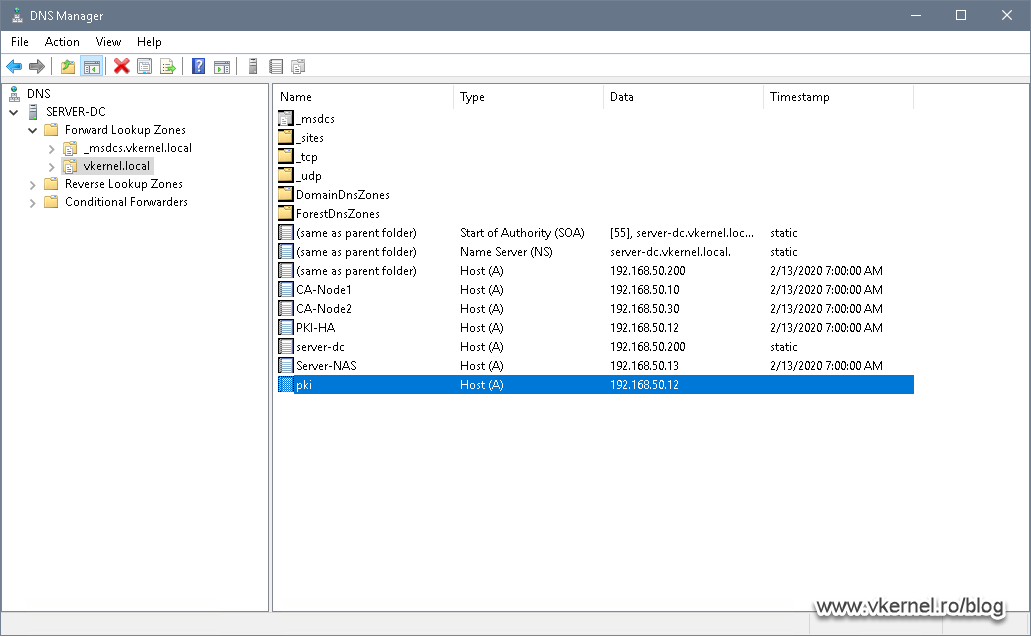
The DNS A record should be created successfully.
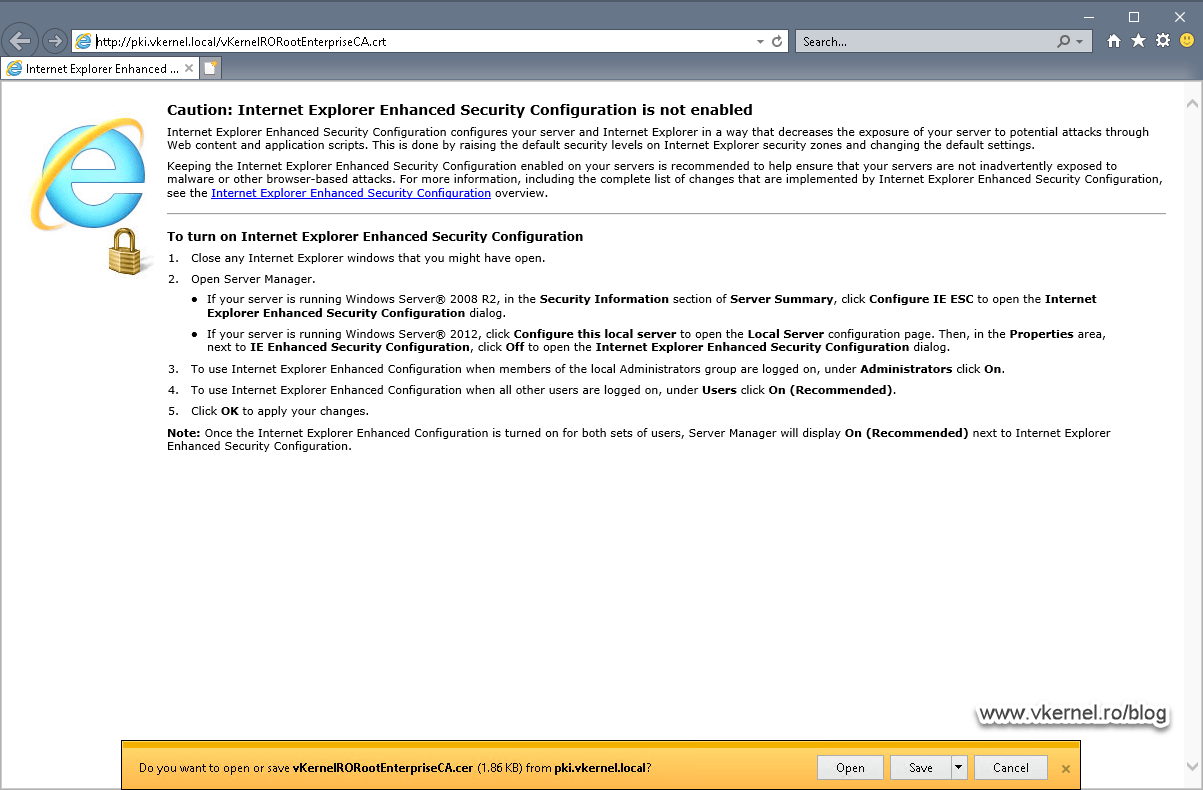
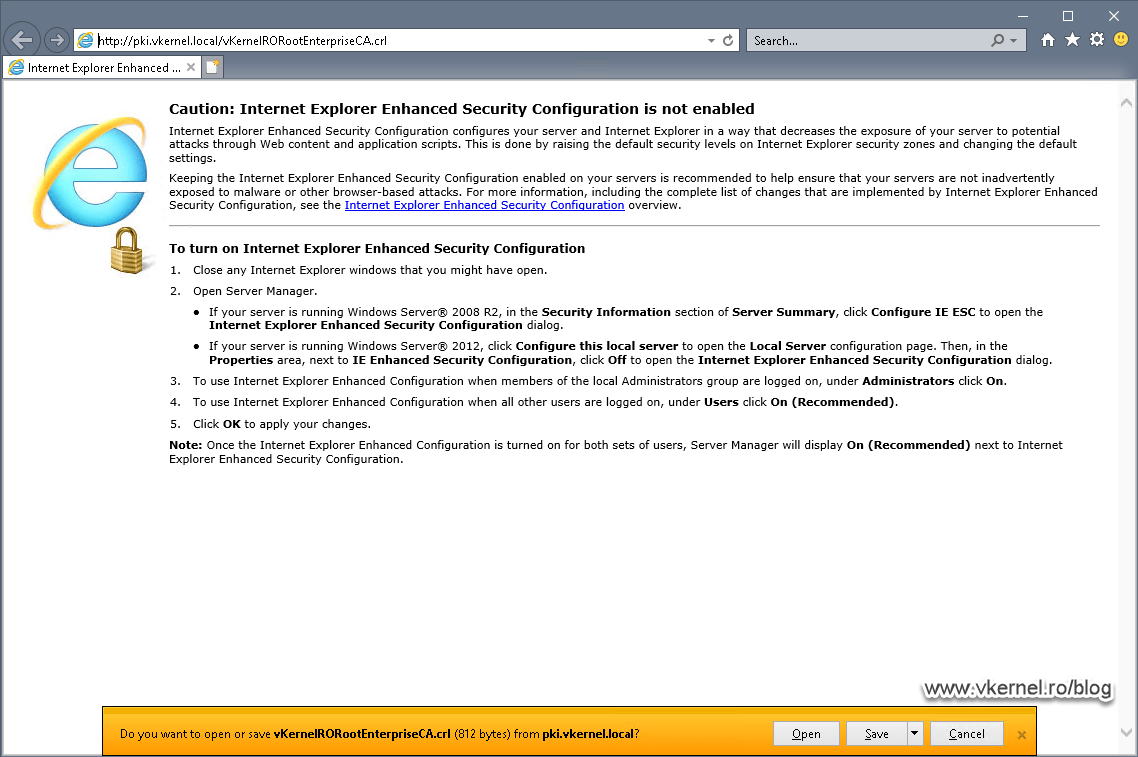
Now if we open a browser on any of our internal clients and put in the distribution link from our CA extensions, we should get the option to download the Root CRL and CRT files, which is exactly what we wanted.
4.4. Publishing the Root certificate into the enterprise
The next thing we need to do as a preparation step into building this CA cluster, is to publish our root certificate into Active Directory. This way all our domain joined Windows clients will automatically get the certificate in their Trusted Root Certification Authorities machine store, and we have two options to do this: using group policy, which is the long road, or using the certutil command line, which is the preferred method.
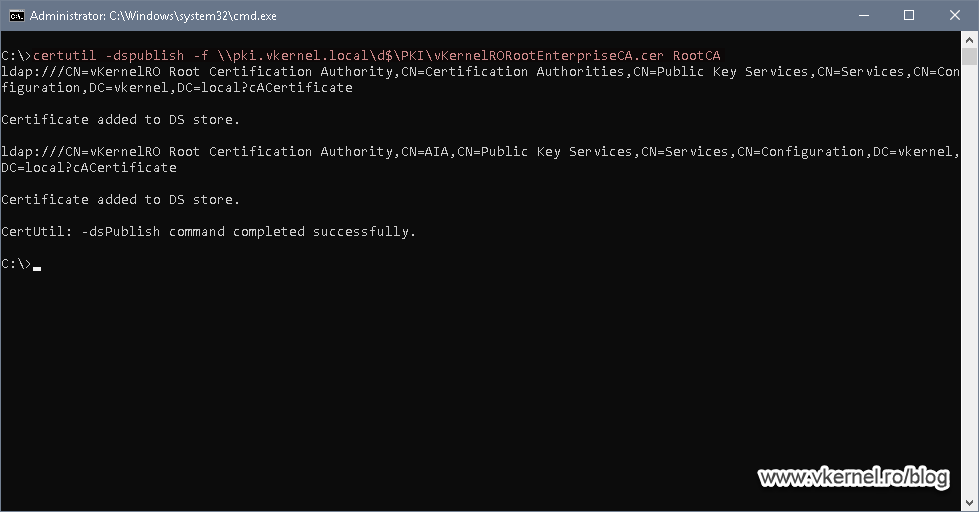
One one of your Domain Controllers, open a Command Prompt window and type the below command line to publish the root certificate into the directory partition.
You can use a UNC path like I did in this example so you don’t have to copy the root certificate locally on the Domain Controller. As you can notice, the UNC path that I used here points to the cluster volume managed by our Windows Failover cluster.
certutil -dspublish -f <certfilename> RootCA
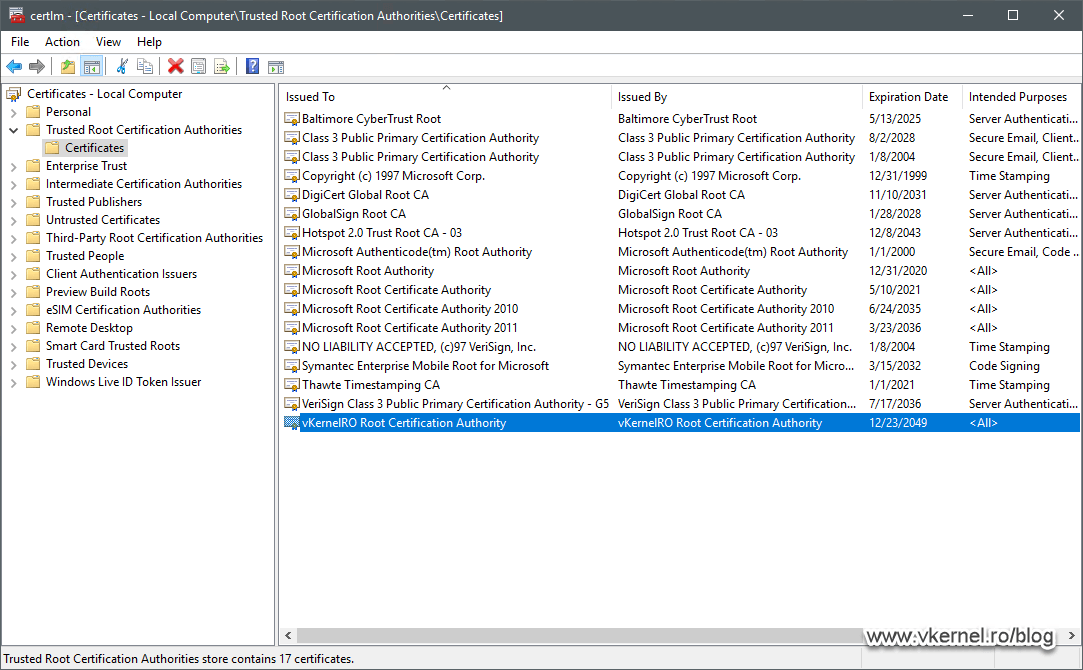
This will take some time to replicate in the environment and it all depends on how many domain controller you have or how your Active Directory Sites and Services replication schedule is set up, but once it’s done you should see the root certificate installed in your domain joined Windows clients.
4.5. Starting the Certification Authority service on Node 1
Remember that in section 3.2 when we deployed the Enterprise Issuing CA on Node 1 we created a request certificate file during the wizard. We are now going to use this request file to issue a CA certificate from our Root CA in order to activate and start the Certification Authority service on Node 1. Without this certificate, every attempt to start the CA service will fail.
On our Root CA server, open the Certification Authority console, right-click the CA name and choose All Tasks > Submit New Request.
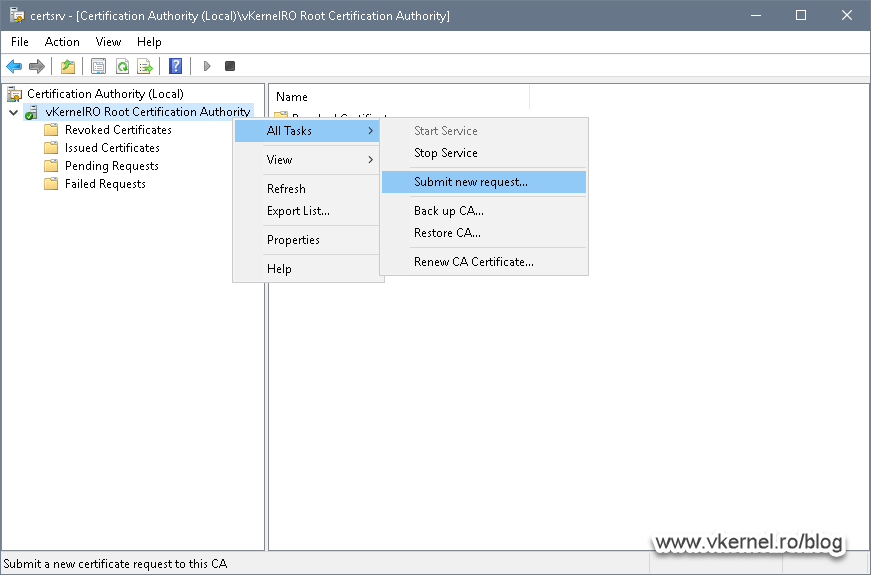
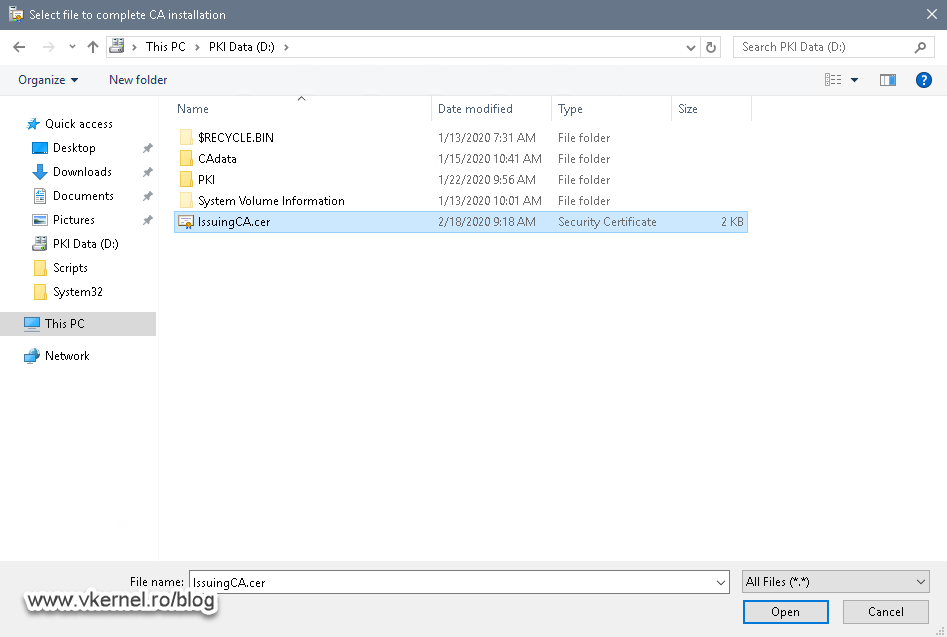
In the File Explorer window that pops-up provide the certificate request file then click Open. Since all the servers are connected to a network I’m going to use a UNC path to my Node 1 server where the certificate request file resides. If you followed along, it should be on the root of the C drive.

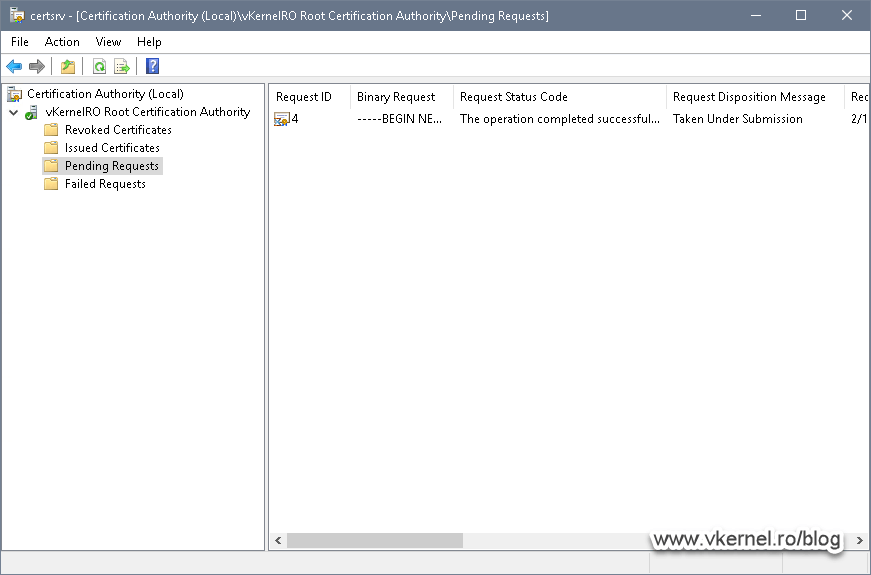
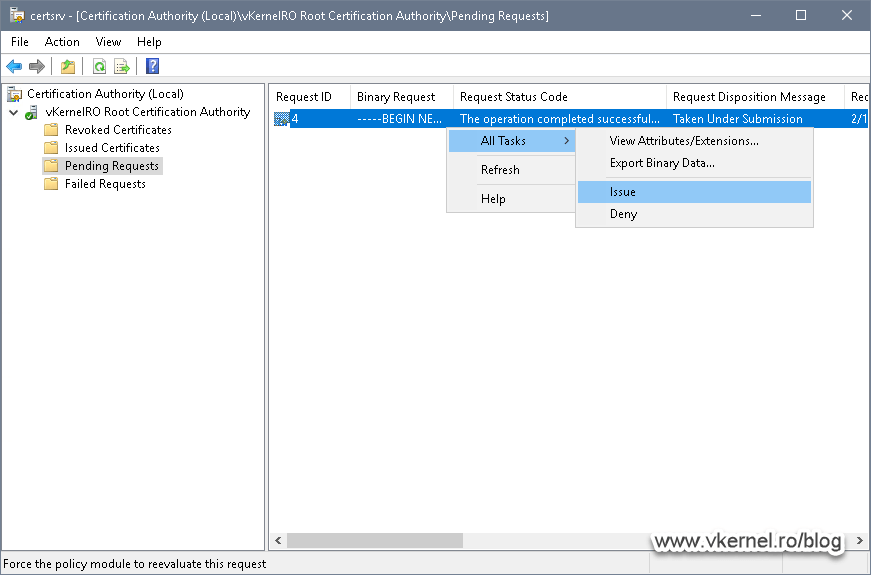
Once we click the Open button, the Certification Authority will read the request file and build the certificate. If we now look in the Pending Request folder we should have a certificate waiting to be approved for issuing. Right-click the pending certificate request and choose All Tasks > Issue.
After a few seconds the certificate will be issued and can be viewed in the Issued Certificates folder.
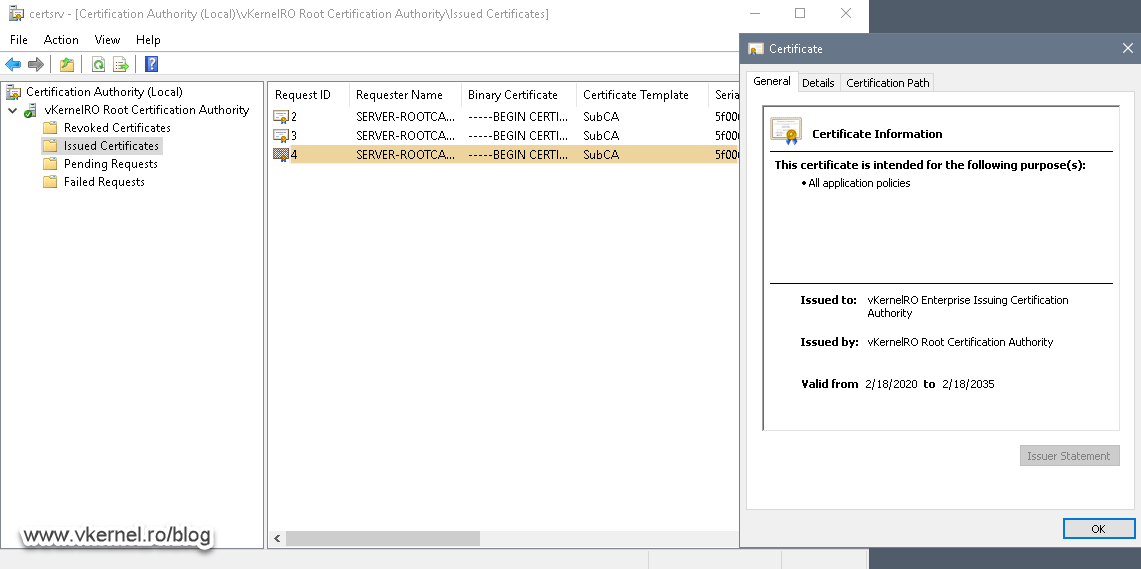
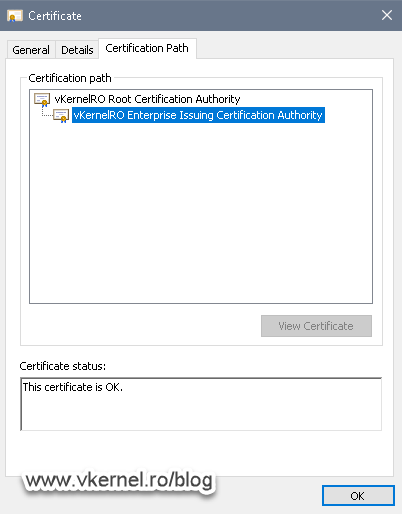
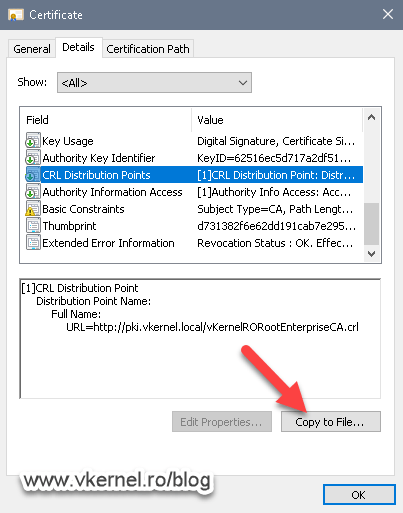
By opening the certificate we can see a lot of information, like the expiration date, to whom it was issued, the certificate chain trust, etc. The tab that interest us right now is the Details tab, because from here we can export the certificate so we can later on import it on the Certification Authority on Node 1.
From the Details tab, click the Copy to File button to export the certificate.
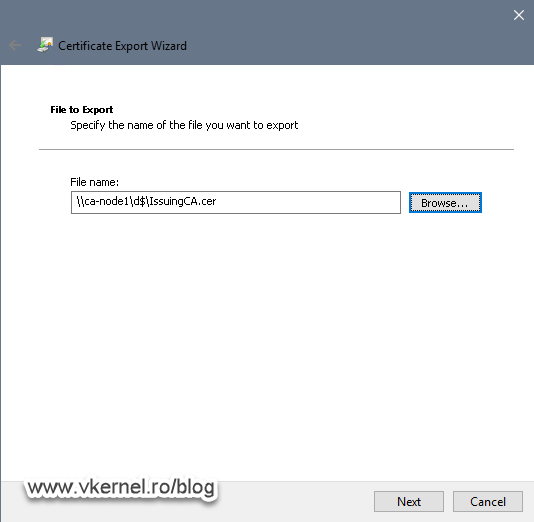
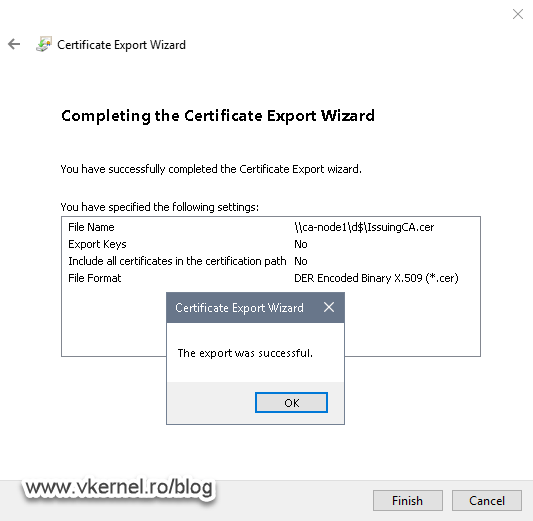
Follow the Certificate Export Wizard and using a UNC path to our Node 1 server, save the certificate on the cluster volume.
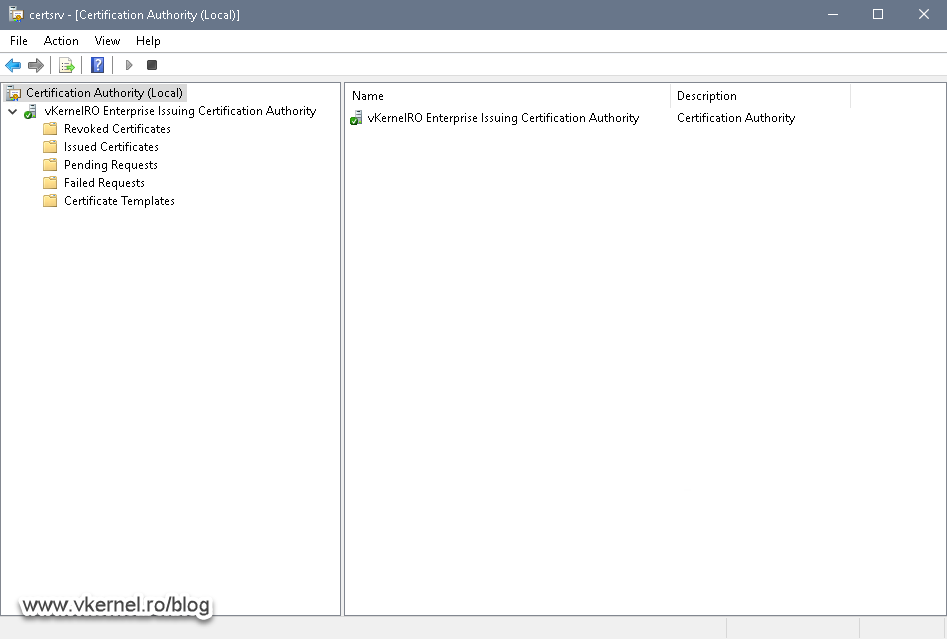
Moving to our Node 1 server, open the Certification Authority console and hit the green start/play button from the Actions bar. A message will pop-up telling us that the CA certificate is missing and if we want to install it right now. Click Yes to continue.

Browse for the certificate we just issued and exported on our cluster volume then hit Open.
You might have to change the extension file from the bottom right corner since it defaults to .p7b and our certificate has a .cer extension.
The service will take up to a minute to start because it needs to verify if the certificate is trusted or if it was revoked or not, and only then it will accept the CA certificate and start the service. Since everything was prepared before doing this operation, the CA service had no problems starting up.
If you are having problems starting up the service, it usually means the CA cannot access the CRL/CRT distribution point link or repository and verify the root certificate and revocation list.
4.6. Backing up the Certification Authority from Node 1
We are going to need a backup of our CA from Node 1, so we can import it into our second node later on in order to have the same encryption key, the same certificate and the same Certification Authority name
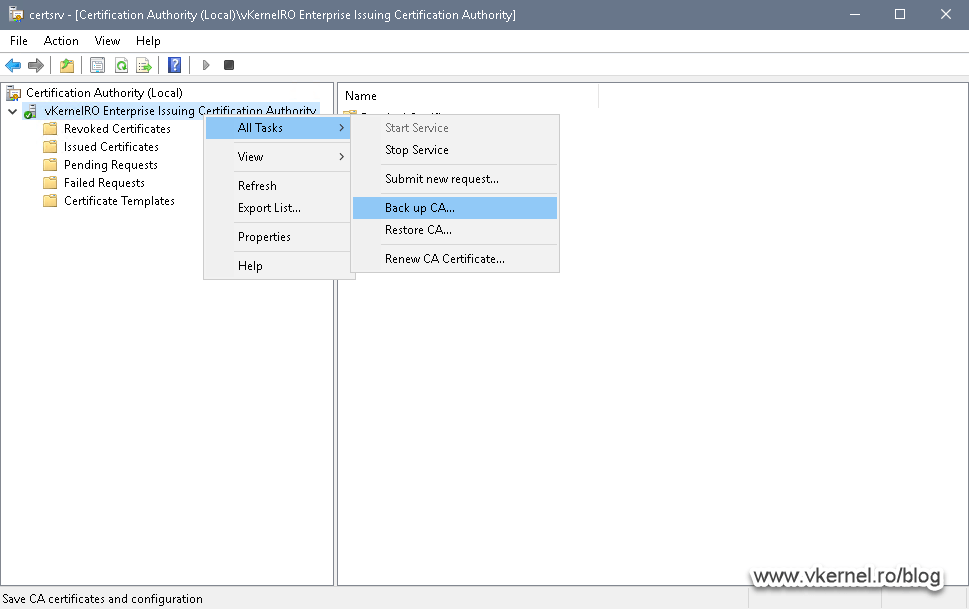
Open the Certification Authority console, right-click the CA name and choose All Tasks > Back up CA.
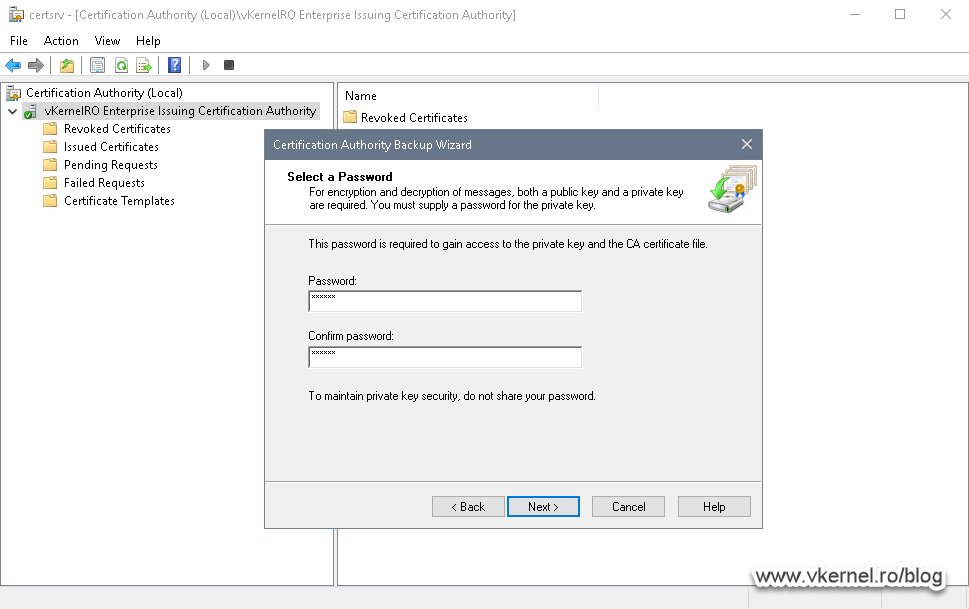
The Certification Authority Backup Wizard opens and in the Items to Backup screen, select Private key and CA certificate then hit the Browse button to provide the cluster disk as the location to save the file.

Since we are exporting the CA certificate with its private key, we need to protect this key with a password. Provide the password in the wizard, the click Next and Finish.
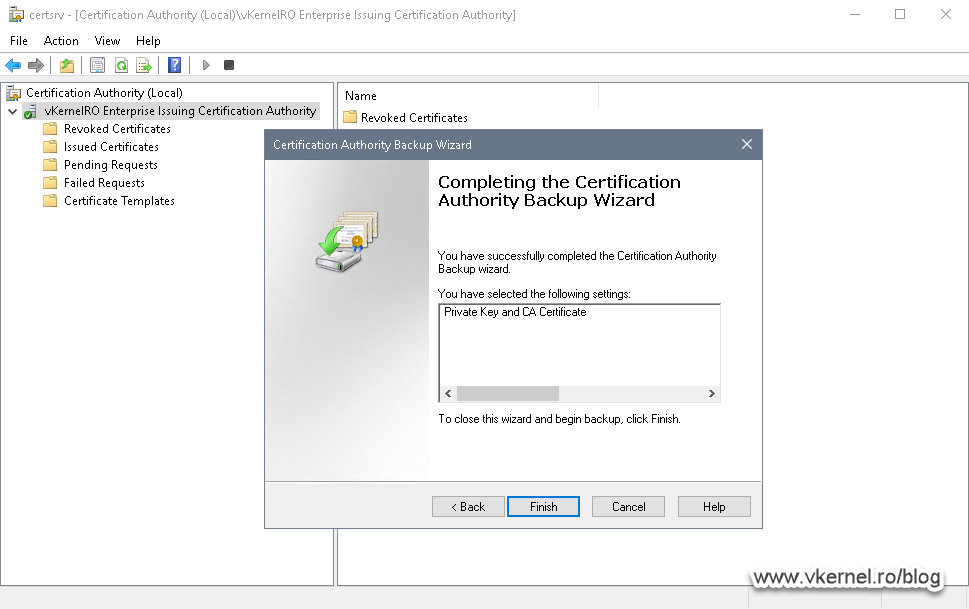
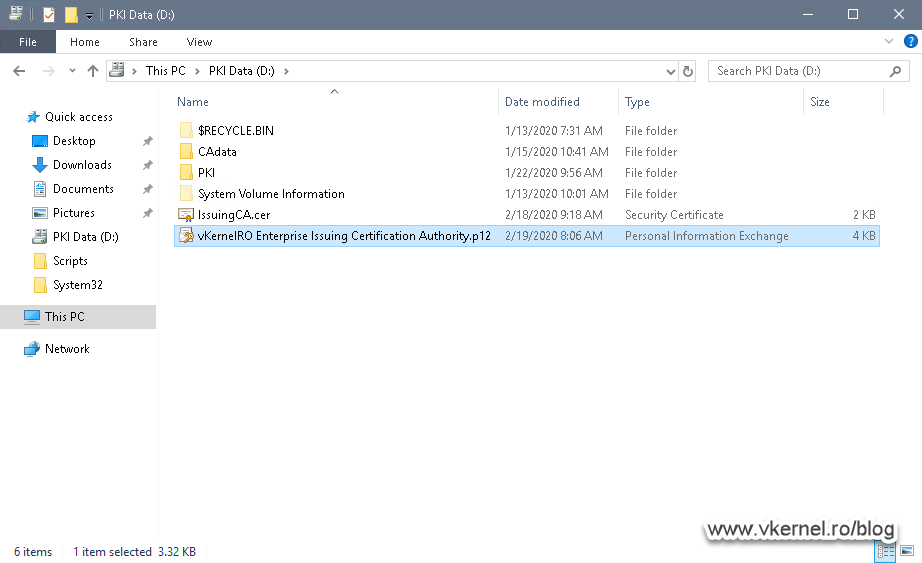
We can now see our CA certificate exported on our cluster volume.
4.7. Stopping services and cluster roles on Node 1
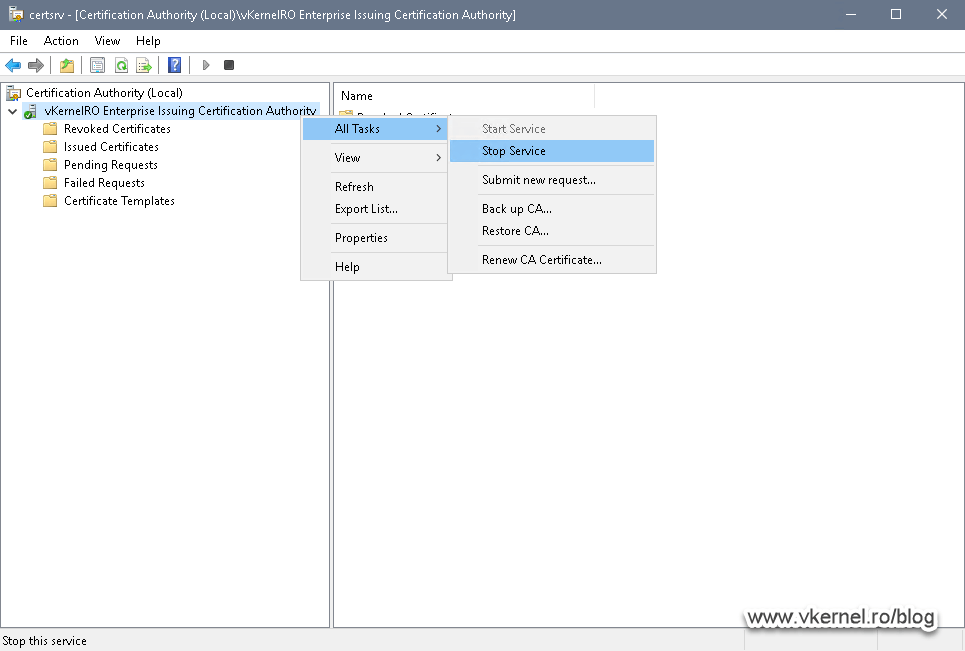
The next operation in the order of things is to stop the Certification Authority service on Node 1 then move the cluster disk to the second node so we can set up Node 2 CA database in the same location. Stopping the Certification Authority service is something that I prefer doing in order to have a proper unlock on the database.
Open the Certification Authority console then right-click the CA name and choose All Tasks > Stop Service.
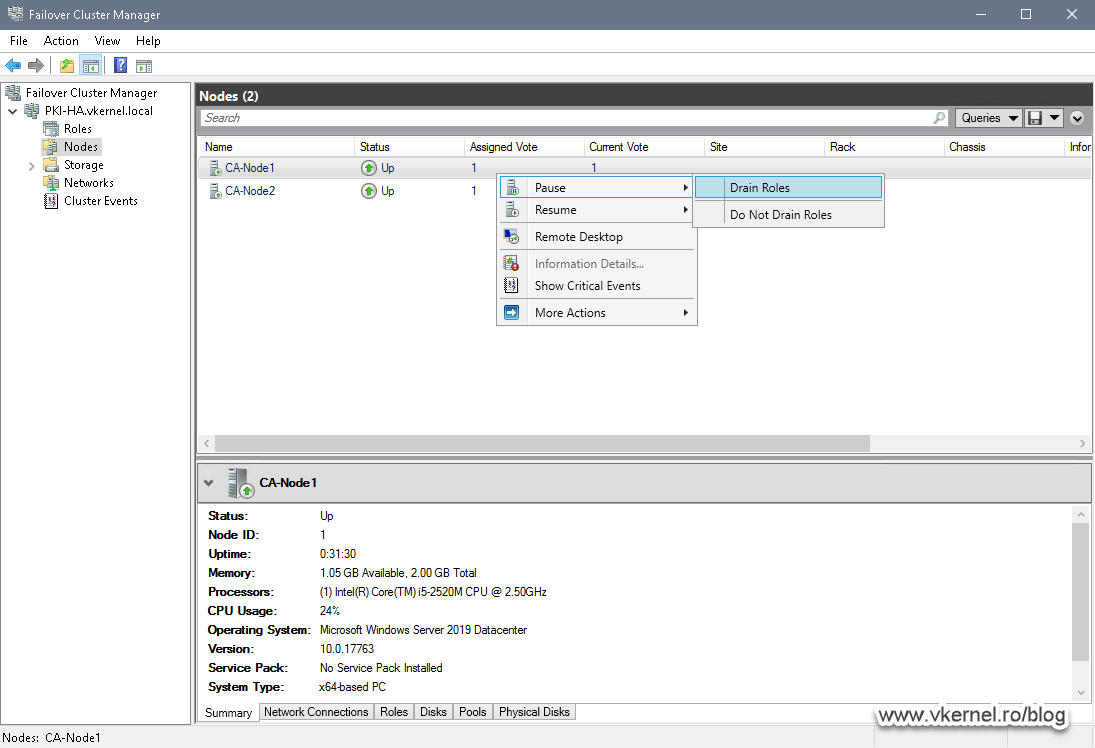
After the Certification Authority service gets stopped, open the Failover Cluster Manager console, right-click Node 1 and choose Pause > Drain Roles. This will move the cluster disks (data and quorum) on the second node.
5. Setting up the Certification Authority role service on the second cluster node
5.1. Installing the Certification Authority role service on the second cluster node
We finally got to the point of installing and configuring the Certification Authority role on our second node cluster. The process is similar to what we did on Node 1, but with a few differences here and there.
Open Server Manager on Node 2 and begin the role installation of Active Directory Certificate Services and Web Server (IIS). Remember that we need the IIS web server for our CRLs and CRTs distribution to clients.
After the installation, click the the Configure Active Directory Certificate Services on the destination server link to start the configuration of our CA.
The AD CS Configuration wizard opens up. Once we reach the Setup Type screen, we need to choose the same option as we did on our Node 1 server CA configuration, and that is Enterprise CA.

On the next screen of the wizard select Subordinate CA and hit Next.
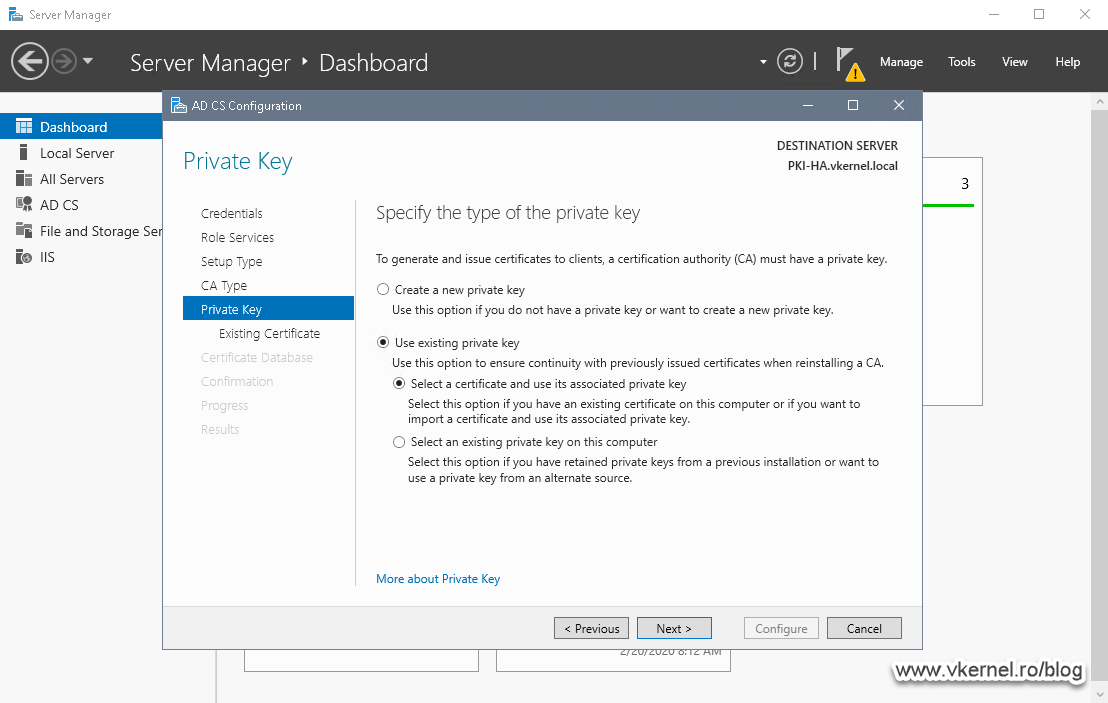
Here is the wizard screen that makes all the difference. Since our two nodes in the Failover Cluster need to be identical, creating a new private key here doesn’t cut it, so we are going with the second option.
Select Use existing private key > Select a certificate and use its associated private key then click Next.
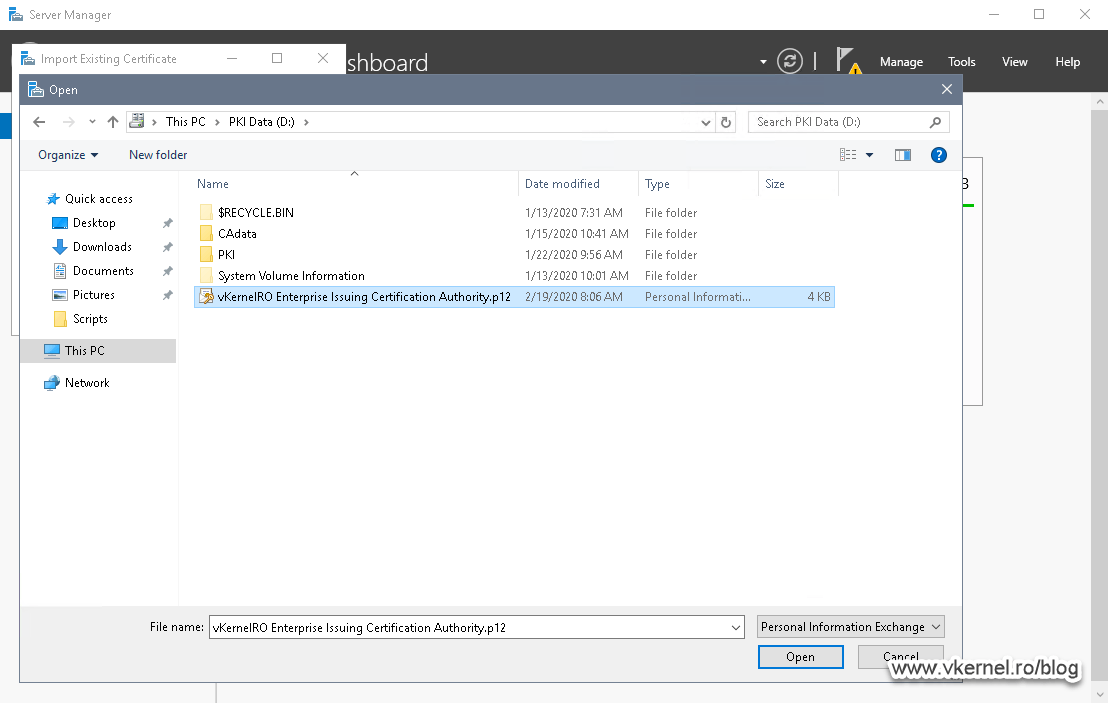
We are now given the option to select our certificate and its private key, so click the Import button and select the .pfx certificate we exported in section 4.6 during the Node 1 CA backup. If you followed along, you should find the file in the root of the cluster disk. Type in the decryption password then hit OK.
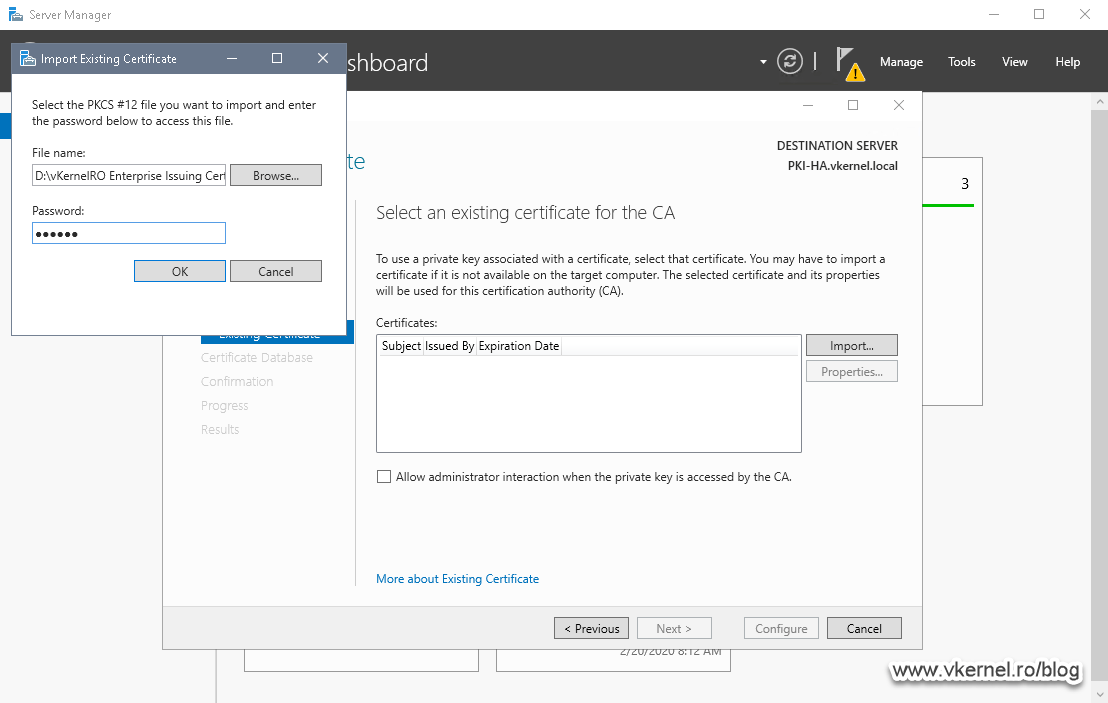
Once we import the certificate we can click the Properties button to see all the information about it. When you are ready to continue click Next.

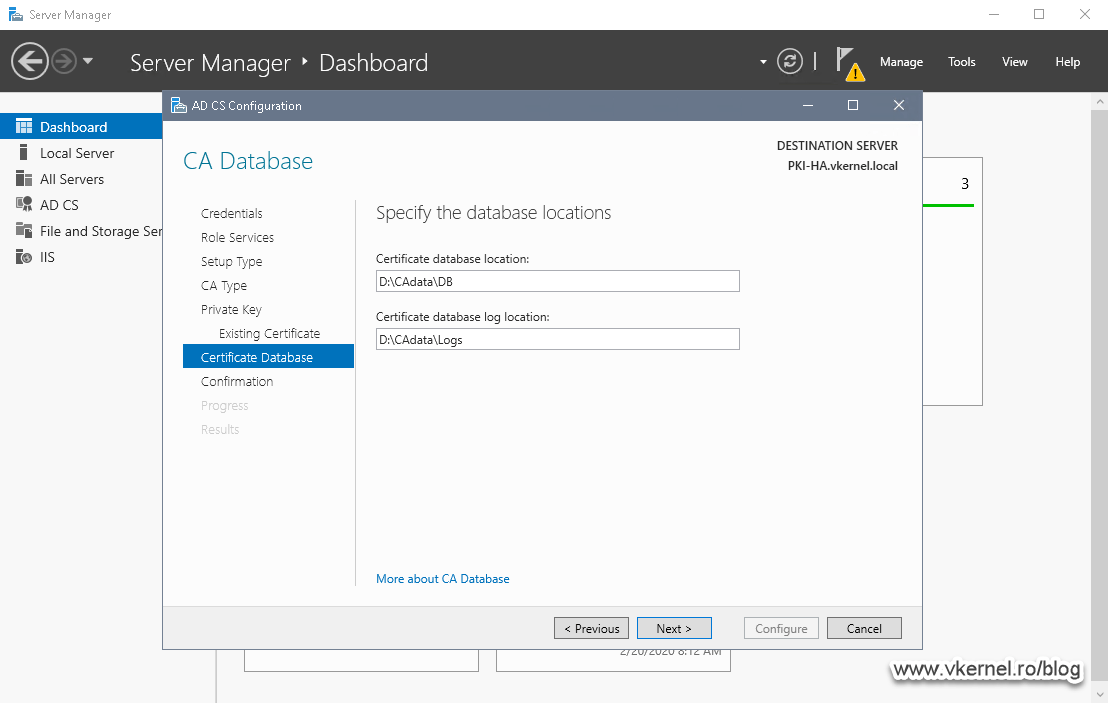
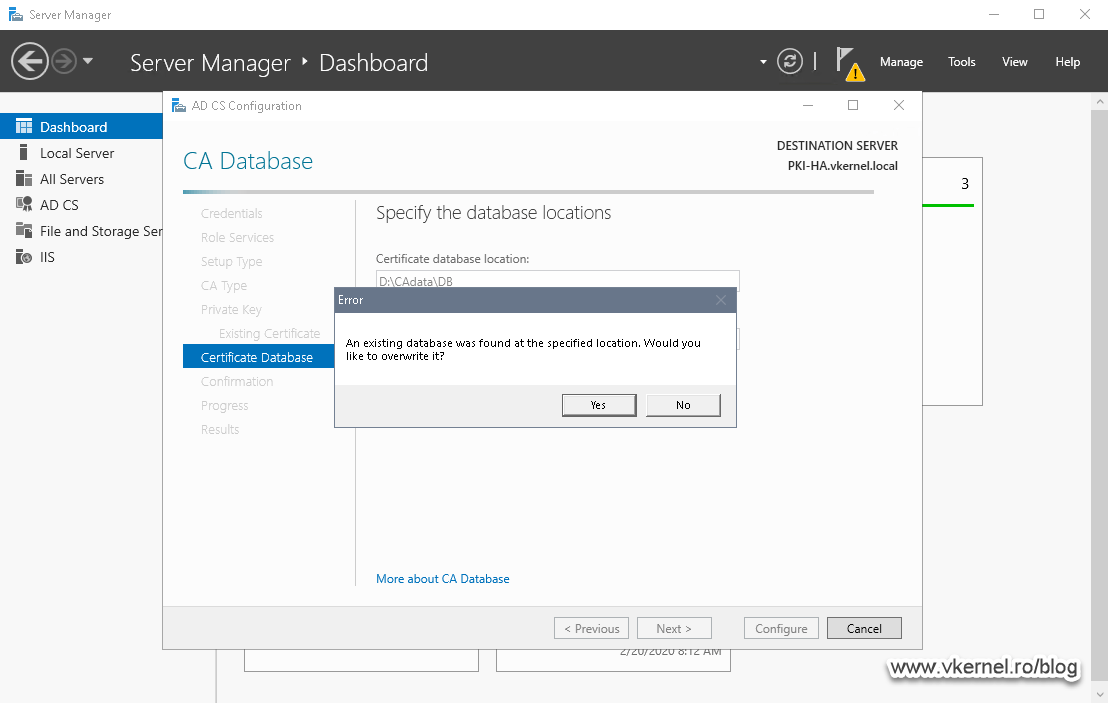
As for the database and log files location, select the same path as we did on our first node, and that’s the CAdata folder on the cluster disk. We are going to overwrite the existing database and log files, so when you get the error message pop-up, just click Yes to overwrite the existing files.
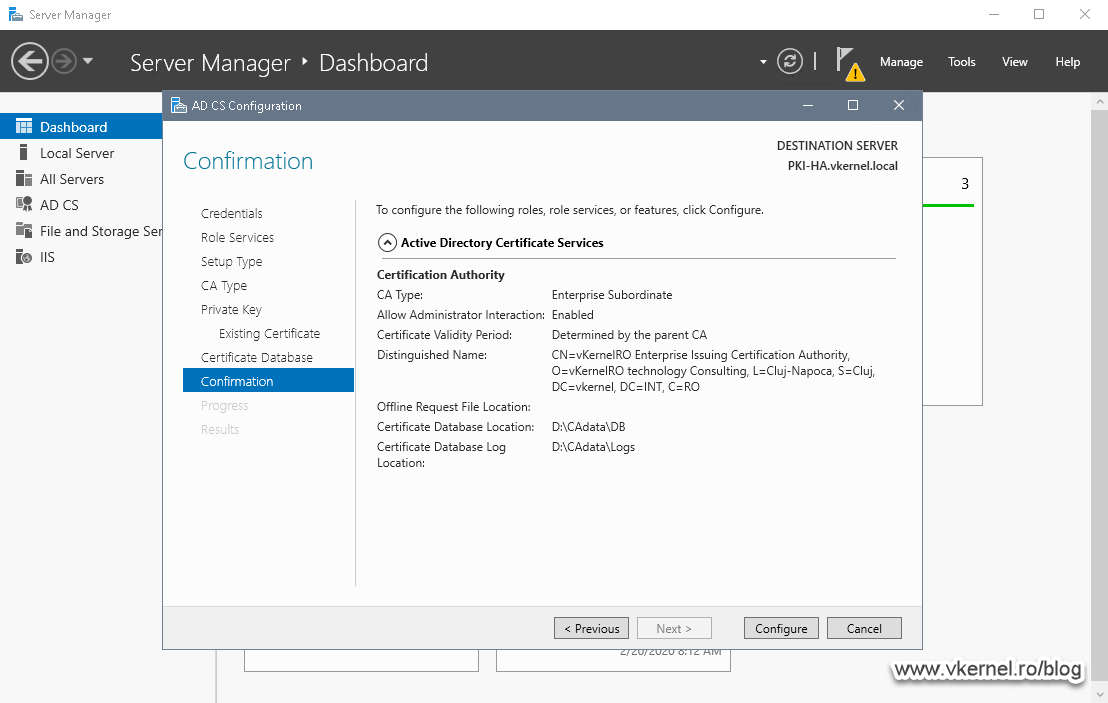
In the Confirmation screen window click the Configure button to save all of our changes and set the CA on our Node 2 server.
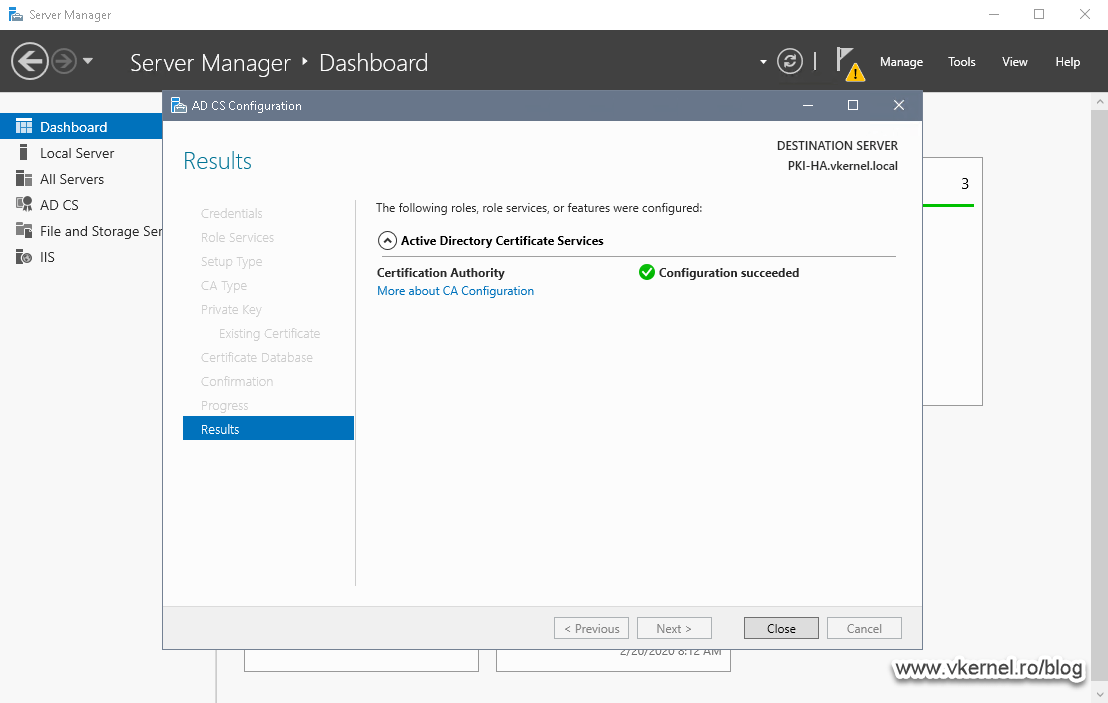
After a few seconds we get the Configuration Succeeded message, which is exactly what we wanted.
5.2. Configure the IIS Website for CRLs and CRTs distribution on Node 2
Since we need to have redundancy for our revocation and certificate files, we will have to configure IIS on our second cluster node too. We don’t have to change to much here since all configuration settings were saved in a file (web.config) on our cluster volume from section 4.2. In order to make IIS read this configuration file, all we have to do is point the website to the PKI directory on the cluster volume.
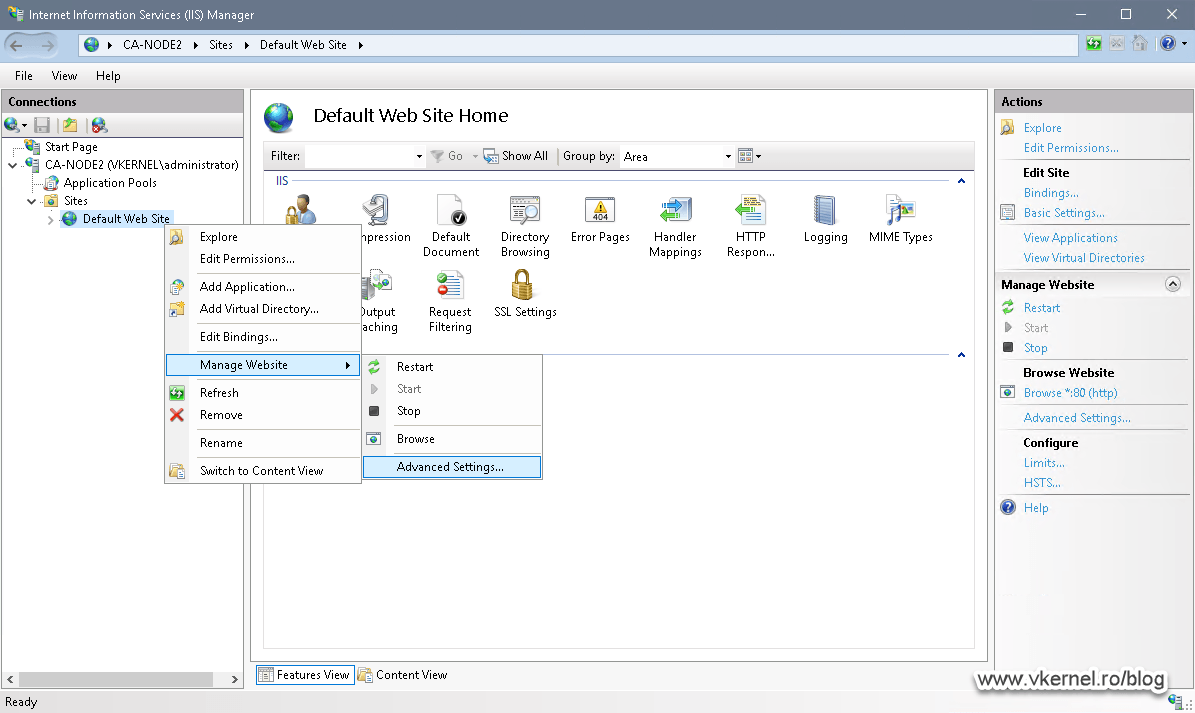
Open IIS on Node 2, right-click the Default Web Site and choose Manage Website > Advanced Settings.
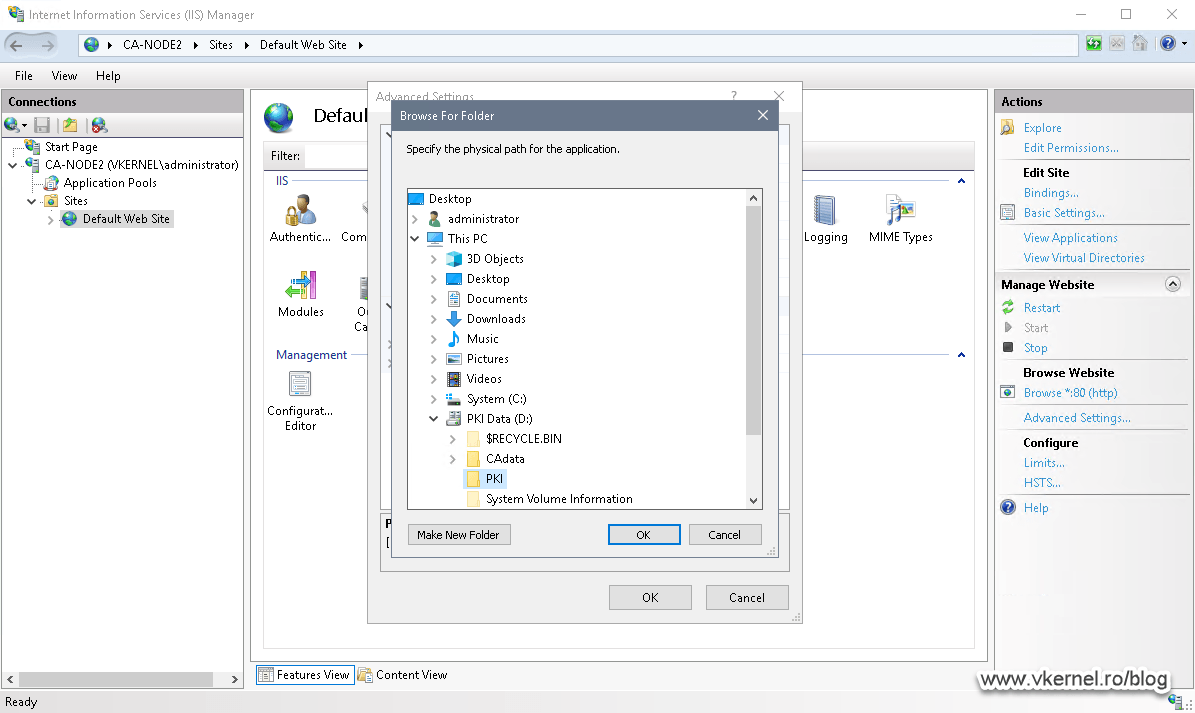
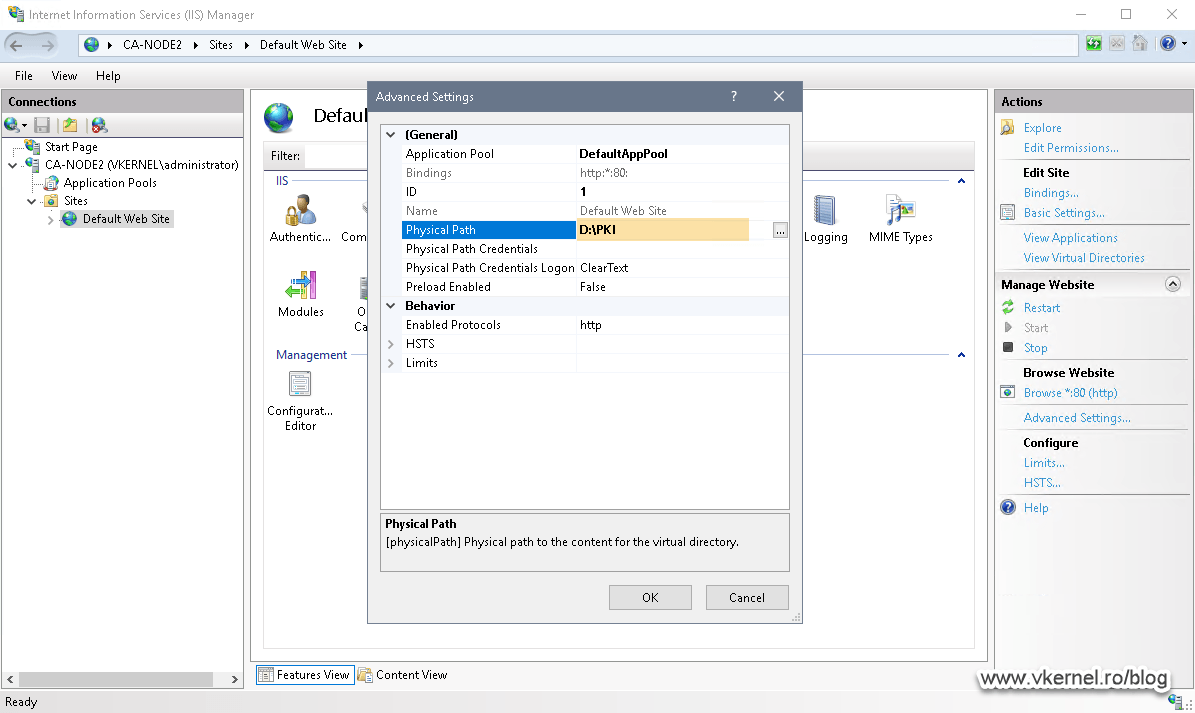
As you can see, by default, the website points to the wwwroot directory on the C drive of the server. To change it, click the ellipse button and select the PKI directory from our cluster volume. Click OK.
Save the changes by clicking OK again.
We can now safely start the Certification Authority service on our Node 2 server since the CA can access the .CRL and root certificate files using the URL provided in the certificate extension.
6. Setting up the Certification Authority Role in the Windows Failover Cluster
Everything until now was just preparation for this section of the article. Here we will actually integrate our Issuing Certification Authority services into the Failover Cluster.
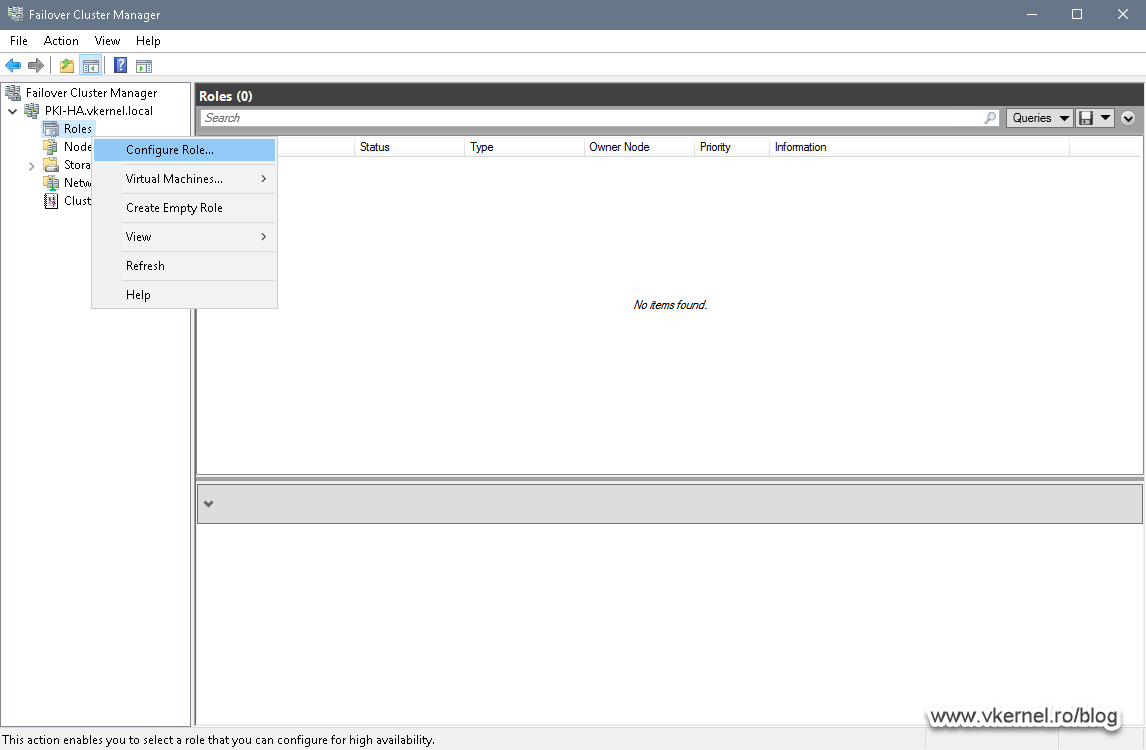
Since everything is running on our second node, we will use this one to configure the cluster role service. Open the Failover Cluster Manager, right-click Roles and choose Configure Role.
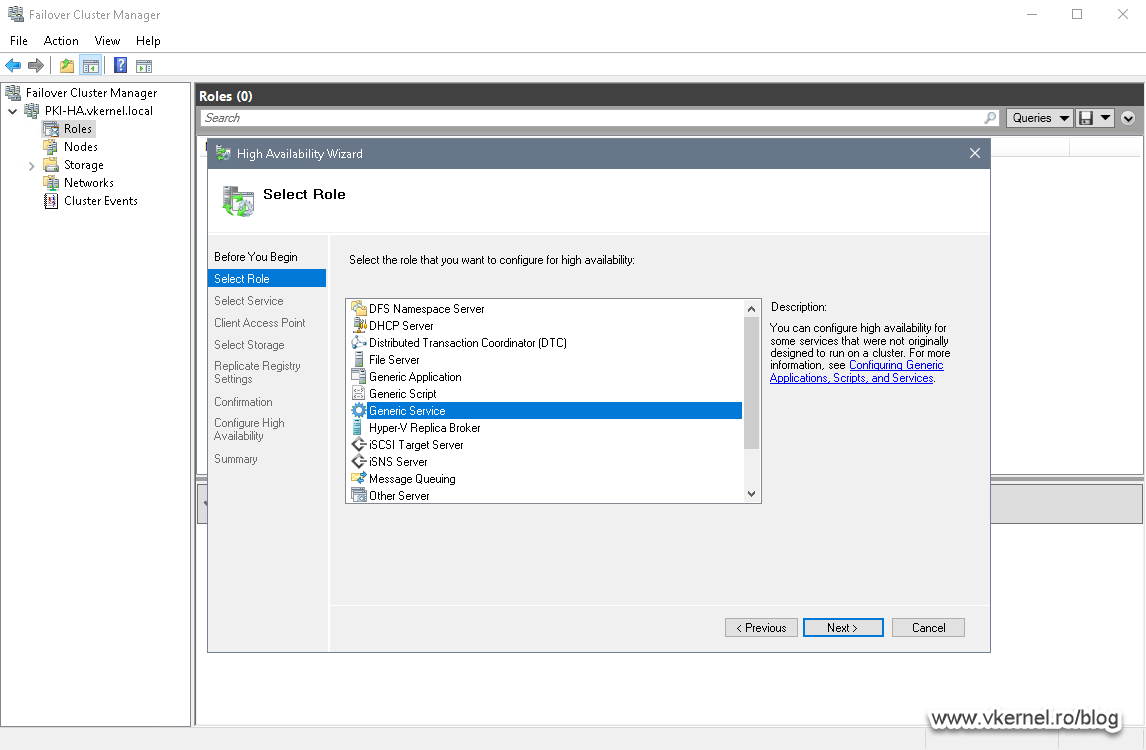
The High Availability Wizard opens. In the Select Role list click Generic Service then hit Next.
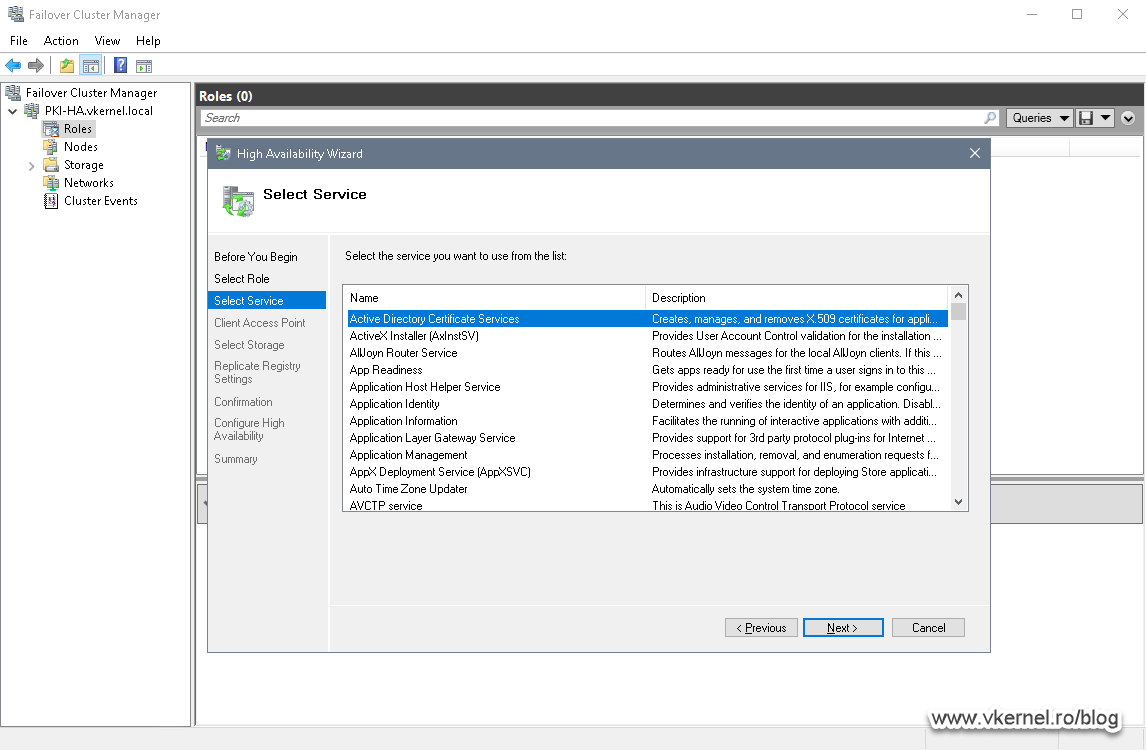
Since the service we need is the first one in the list, it is very hard to miss it. Select the Active Directory Certificate Services service and click Next.
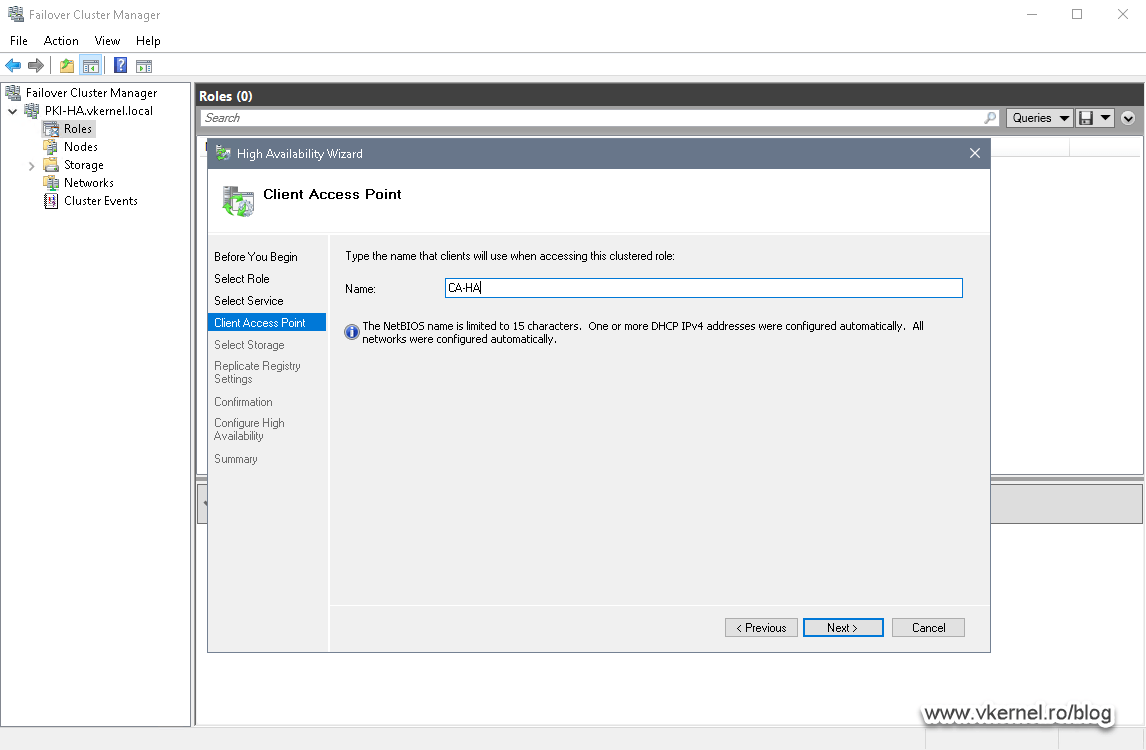
In the Client Access Point screen we need to provide a name for our CA Failover Cluster Role. This is something that we are going to need later on when we configure the Active Directory Configuration partition, and in production you should type a name that describes the service. The wizard will create a computer account in Active Directory with the same name.
Since I have a DHCP server in my management network, the wizard automatically requested an IP address from it. If no DHCP is present, the wizard will provide us the option to type the IP address for the CA Failover Cluster Role.
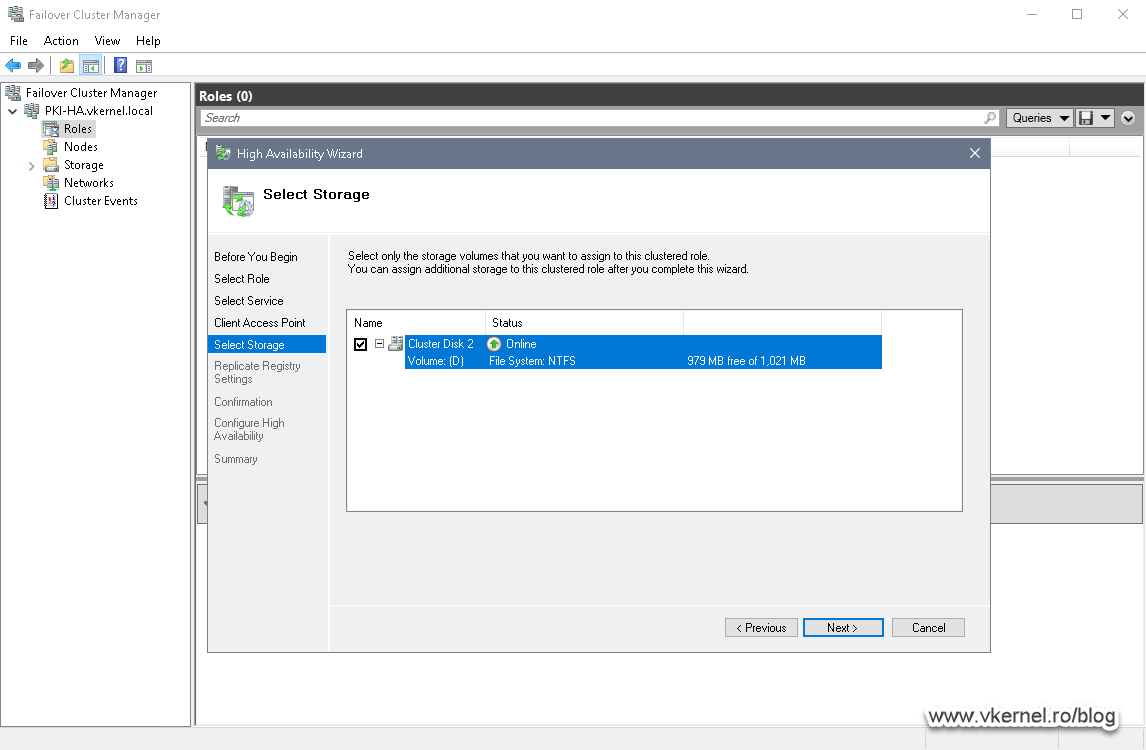
Here we need to assign a storage volume to the cluster role, and that’s our 1 GB volume where the Certification Authority database and CRL/CRT repository is sitting. Tick the box next to the storage volume then click Next.
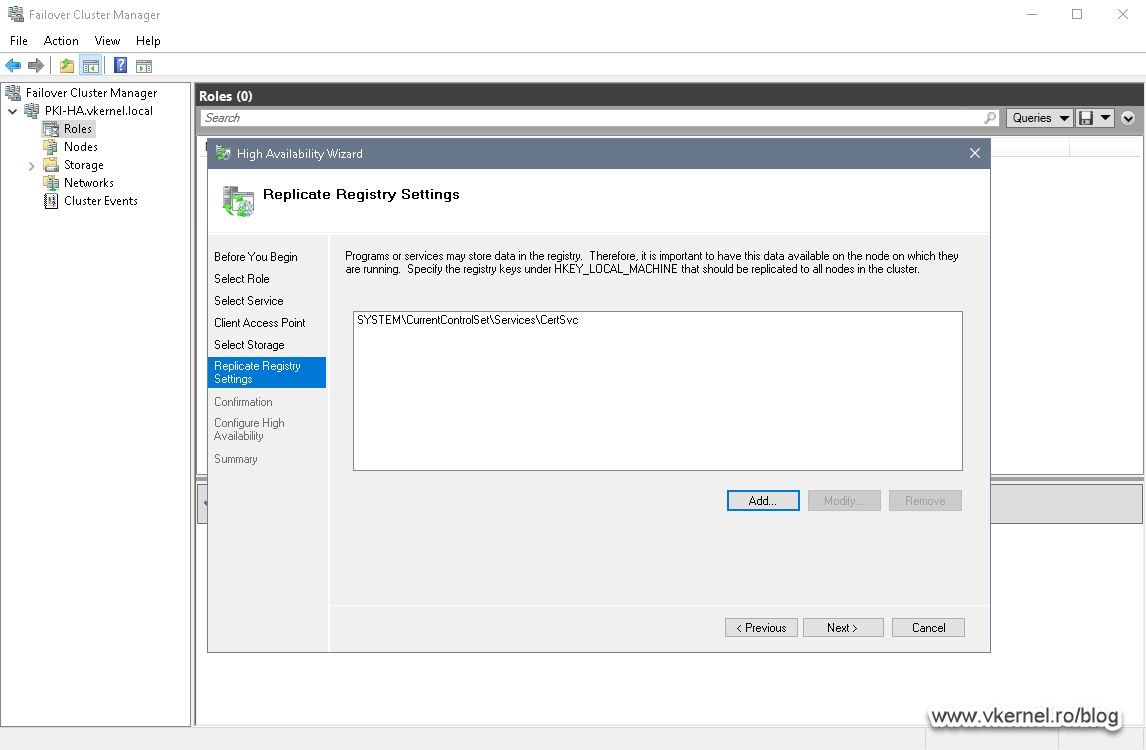
In the Replicate Registry Settings screen we need to provide the registry hive path where the Certification Authority is keeping all its settings so they can be replicated between the cluster nodes.
Think about it. This is an active/passive Failover Cluster where only one node can be active at one time. If we do some configuration changes to the “active” Certification Authority these changes need to be replicated to the passive node during a failover. If this is not happening, when the passive node becomes the active one -because of a failover-, this Certification Authority will have different settings. By replicating the Certification Authority registry hive, we make sure that both nodes/CAs are configured the same.
Click the Add button and paste the bellow registry path in the Registry Key box. Hit OK and Next.
SYSTEM\CurrentControlSet\Services\CertSvc

In the Confirmation screen just click Next to create the cluster role service.

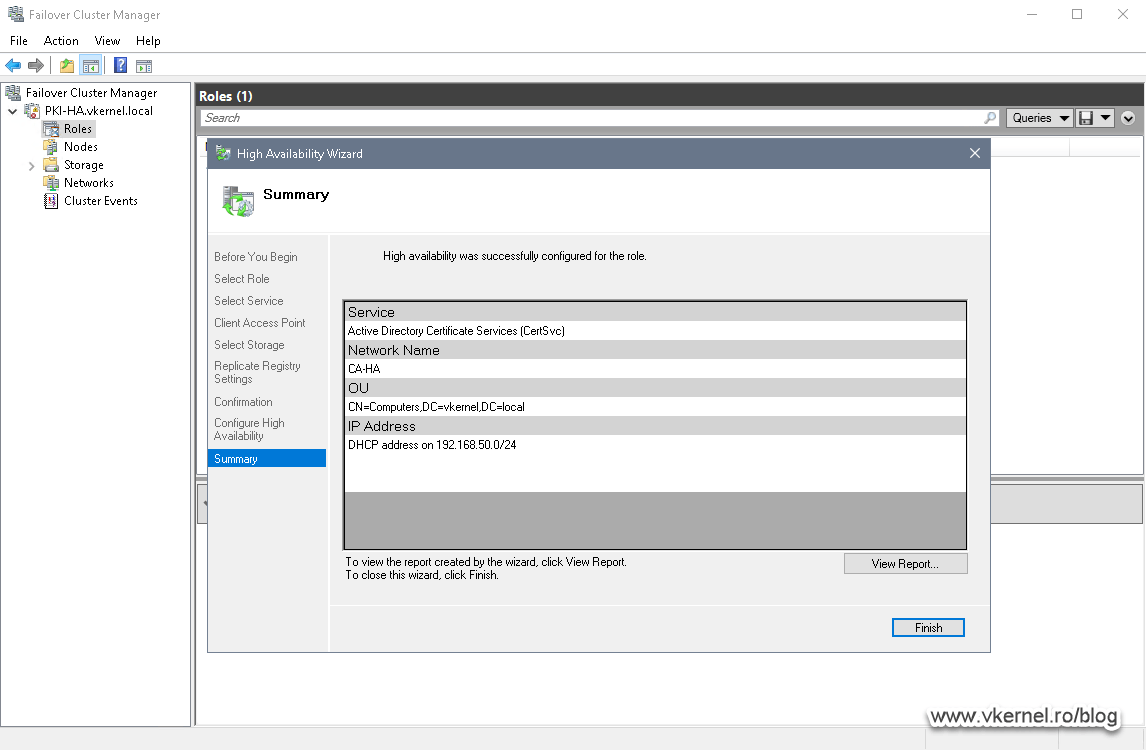
The operation will take just a few seconds to complete and if succeeds we are notified in the Summary screen of the High Availability Wizard.
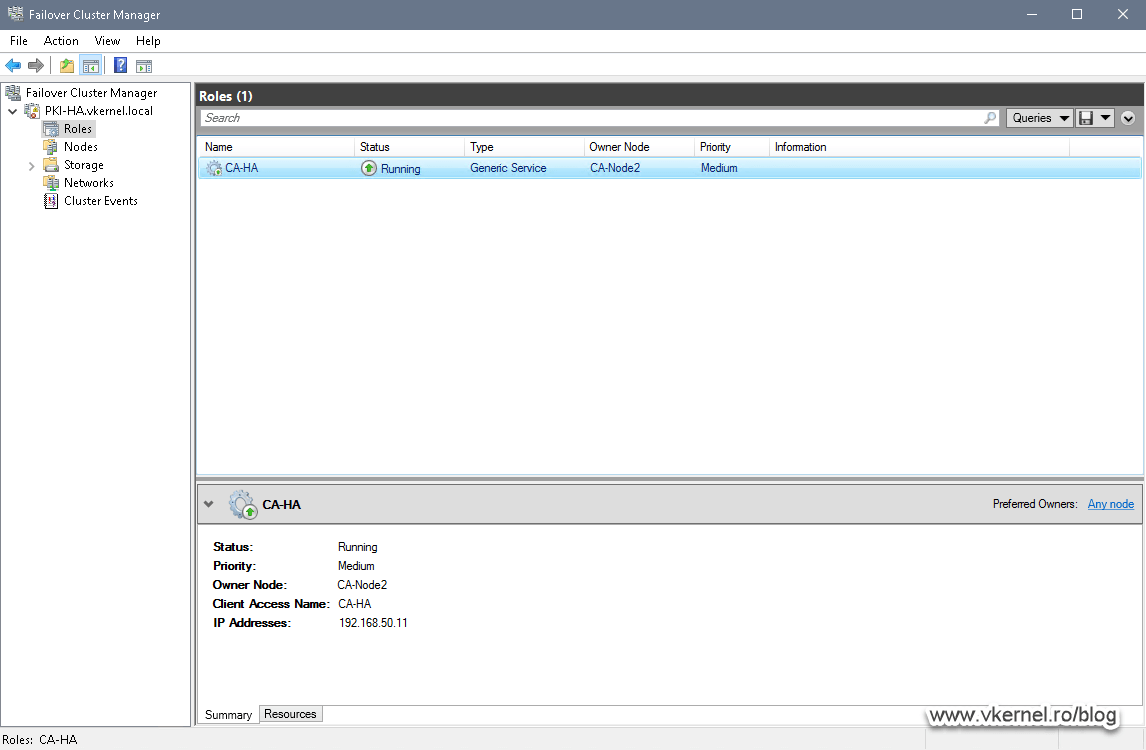
We should now see a cluster role service created and running in our Windows Failover Cluster Manager console.
7. Setting up the Certification Authority in Active Directory
By default, the names and permissions we have in our Active Directory environment for our CAs are not going to work since they point to the server/node names instead of the CA cluster role service we just configured. In order to change that we are going to use some Active Directory built in tools that I know you will recognize.
7.1. Configure the cluster nodes permissions to update the CA certificate
In order for our two CA node servers to be able to renew their certificate, we need to configure the proper permissions by using the Active Directory Sites and Services console.
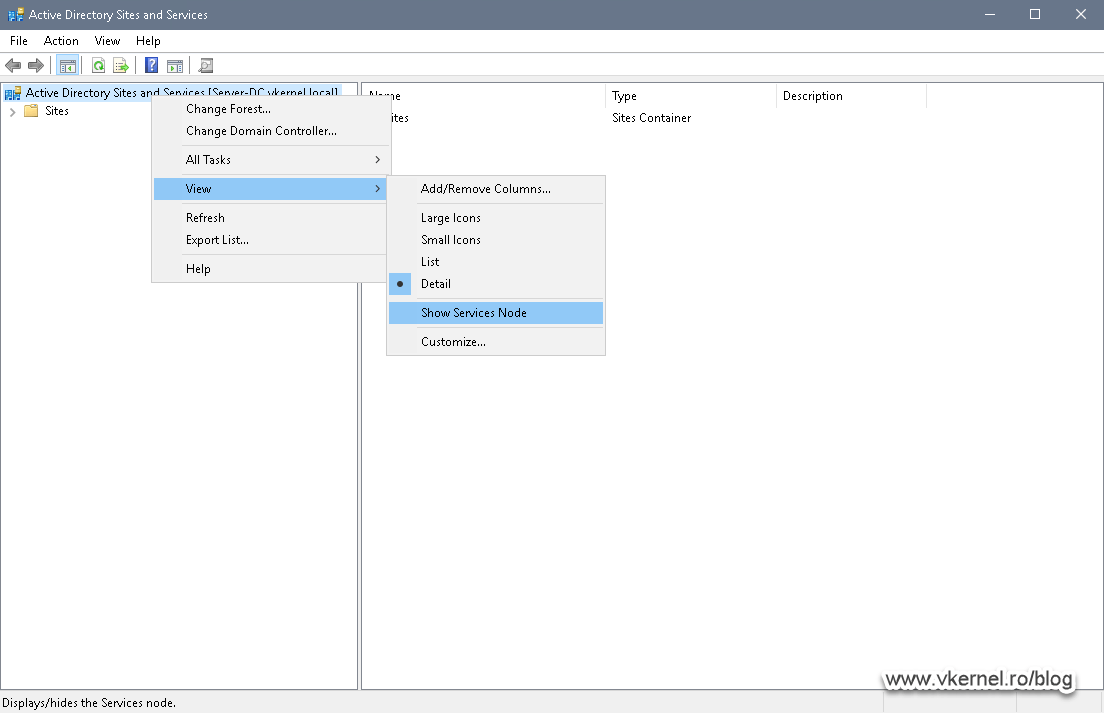
On any of your domain controllers, open the console, right-click the top node from the left pane and choose View > Show Service Node.
Expand Services > Public Key Services, and then select the AIA folder. In the details pane (right hand side), right-click the Issuing Certification Authority name and choose Properties.
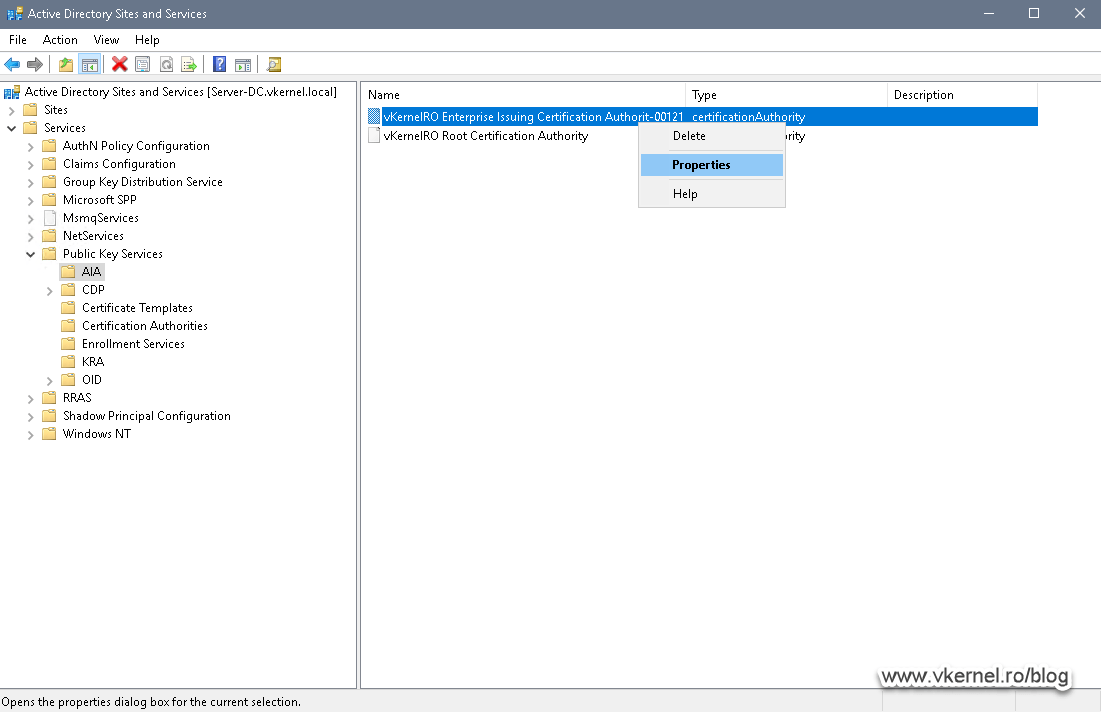
Once the Properties window opens, the first thing we notice is that only one of our CA nodes is part of the Access Control List (ACL) and this is the node where we first started the CA installation (Node 1). What we need to do here is add our second cluster node server to the ACL.
What I usually do when setting this up in production environments, I add the Cert Publishers security group to the ACL since it contains all the Enterprise CA servers. This way I don’t have to update the ACLs when I replace one of the servers, but for now, let’s just follow what Microsoft says.
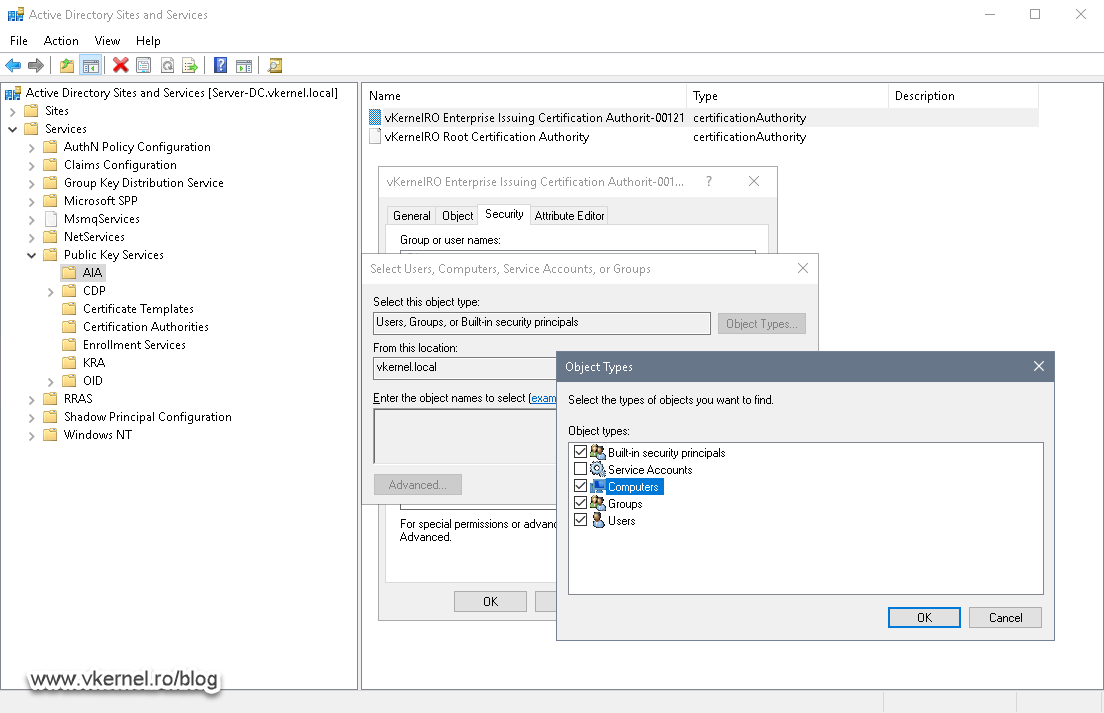
Click the Add button, then Object Types. Here we are going to specify that we need to view the search results for the computers also. For some reason that it out of my understanding, Microsoft did not put this on default so we don’t have to many results? If you know the answer, please put into the comments area.
Search for your second node server and click OK. Once the server is in the ACL make sure you give it Full control permissions by ticking the boxes under the Allow column. Click OK again.

The same process needs to be applied on the CA name object found in the CDP, Enrollment Services and KRA folders. Inside CDP you will have to expand it more and select the server names. Also, there will be objects where the second node cluster is present in the ACL, so you will need to add the first one there. Long story short, make sure both cluster nodes are part of the ACL with Full control permissions on the CA object present in the folders I just mentioned.
7.2. Adjusting the DNS Name for the CA in Active Directory
Right now if a client requests a certificate from our Enterprise Issuing CAs, the request will go on the last configured CA server, which in our case is the second node in the Failover Cluster. This is a problem because the clients connect to a single server name, not a cluster service name, so if the second node fails, the certificates requests will fail to.
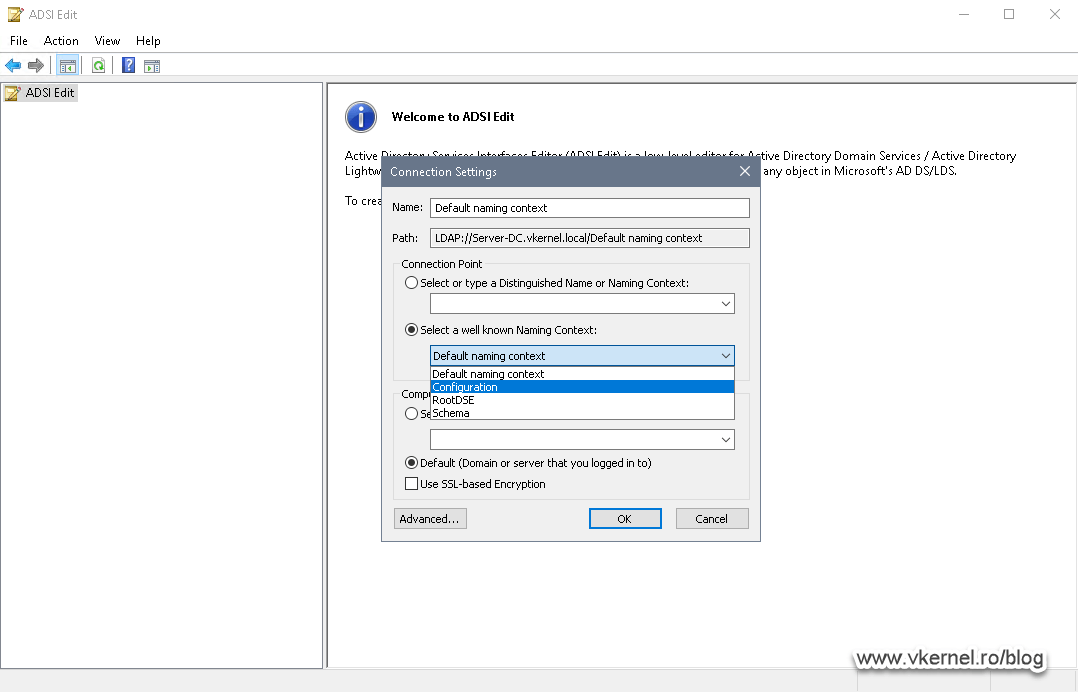
Open the ADSIEdit console, right-click the top node and choose Connect to.
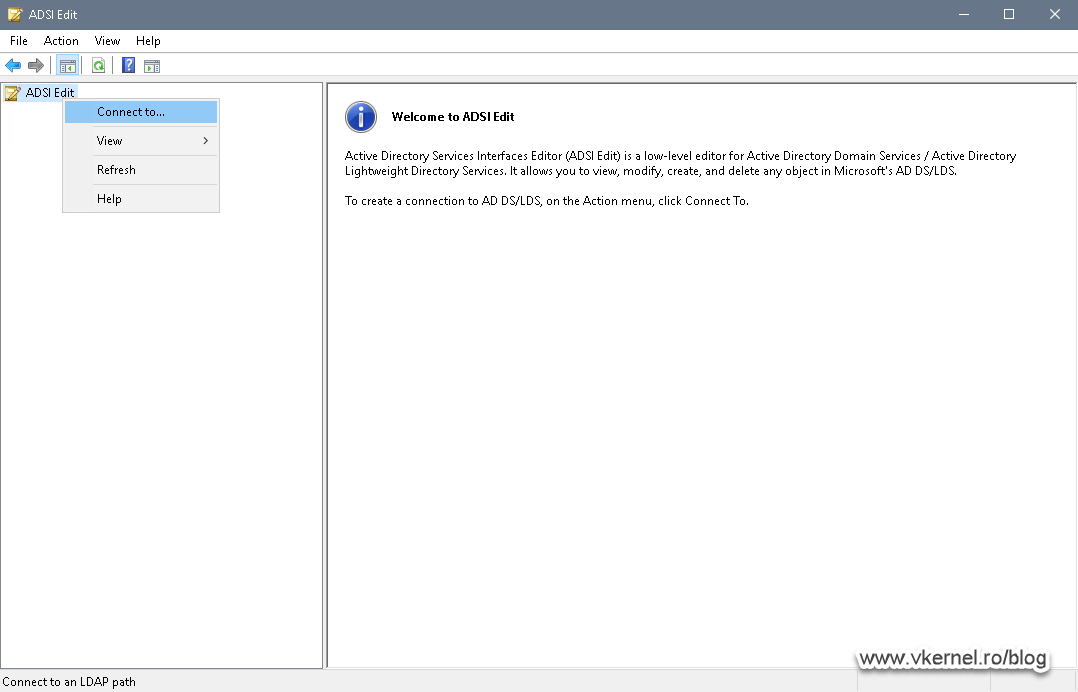
After the Connection Settings window opens connect to the Configuration Naming Context.
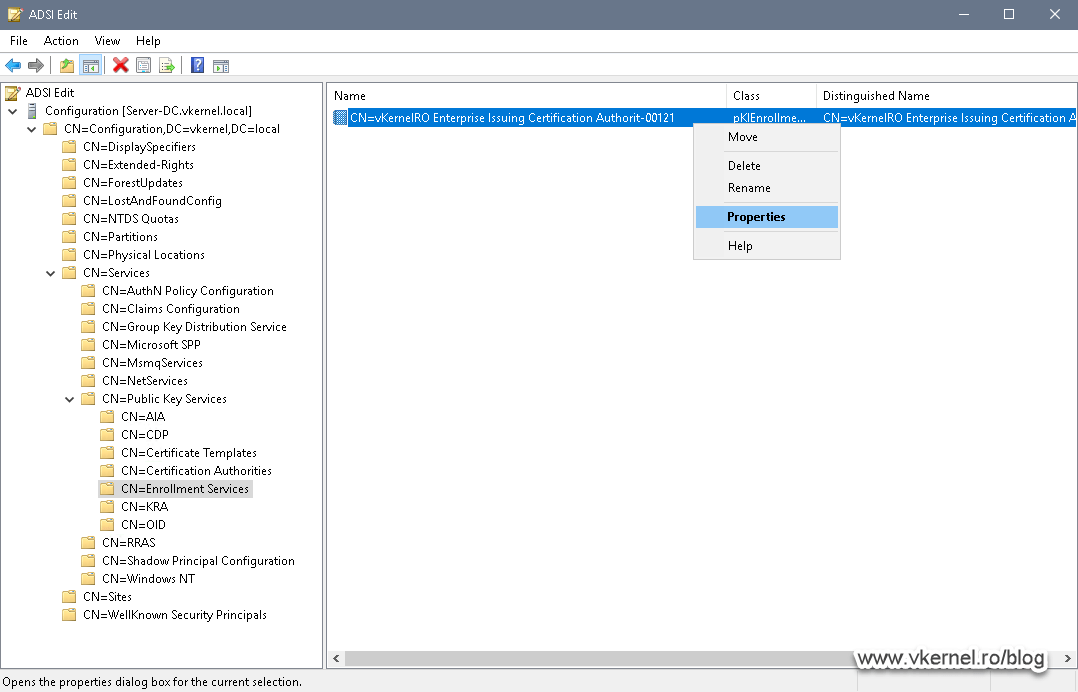
Expand <domain controller name> > CN=Configuration <domain name> > CN=Services > CN=Public Key Services and here select the CN=Enrollment Services folder. On the right-hand side we can see our Enterprise Issuing CA object. Right-click it and choose Properties.
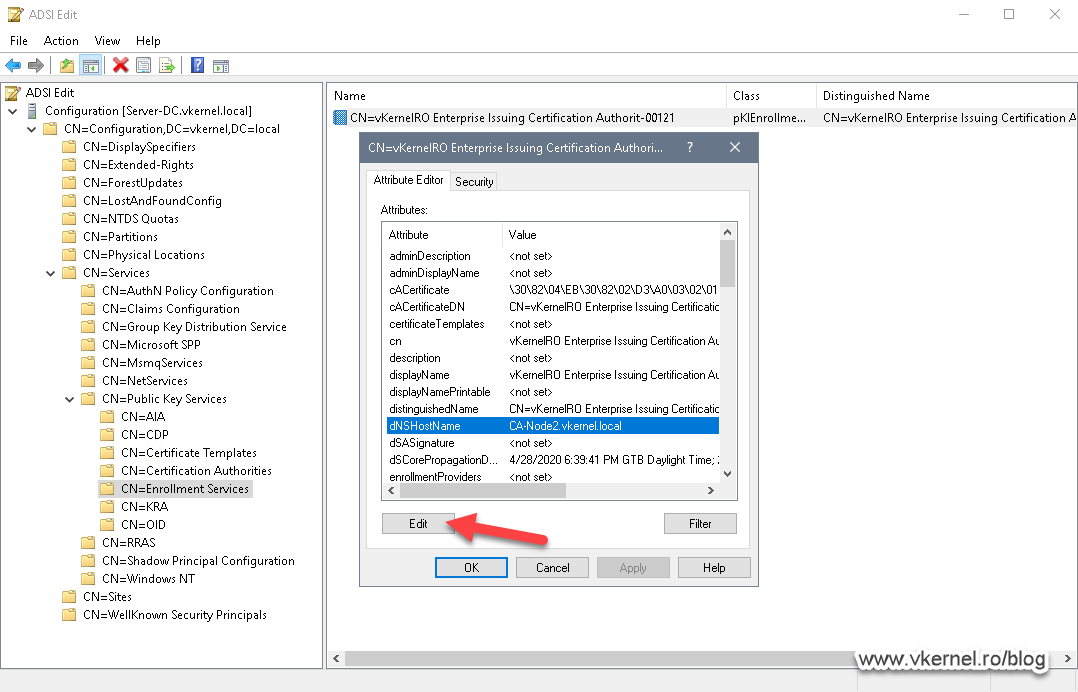
Once the Properties window opens, select the attribute dNSHostName, and click Edit.
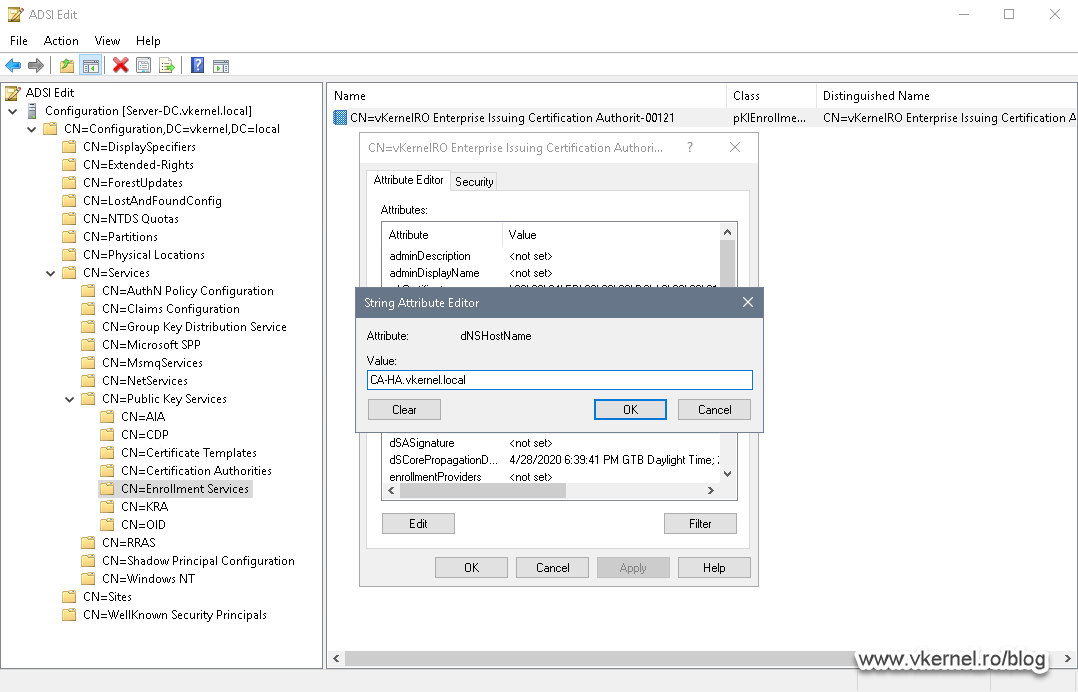
Here we need to enter the service name of the CA as shown in the Failover Cluster Manager in the Roles section. Click OK to save the changes.
This change can also be done form the Active Directory Sites and Services console and it works just fine, but I taught to follow Microsoft’s recommendations.
Since all these settings are kept on the Active Directory Configuration partition, they will replicate trough the entire forest.

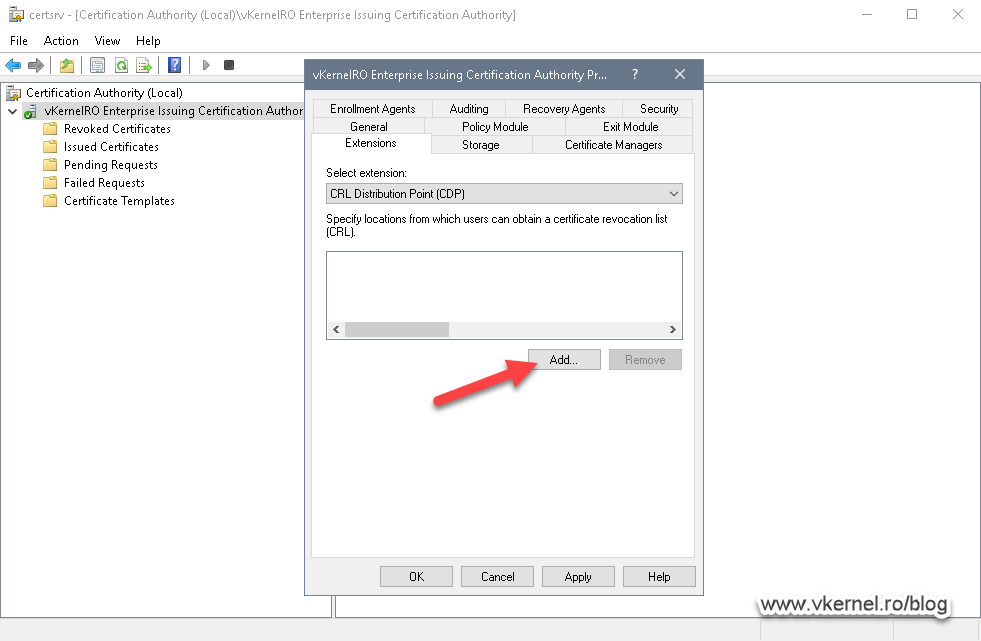
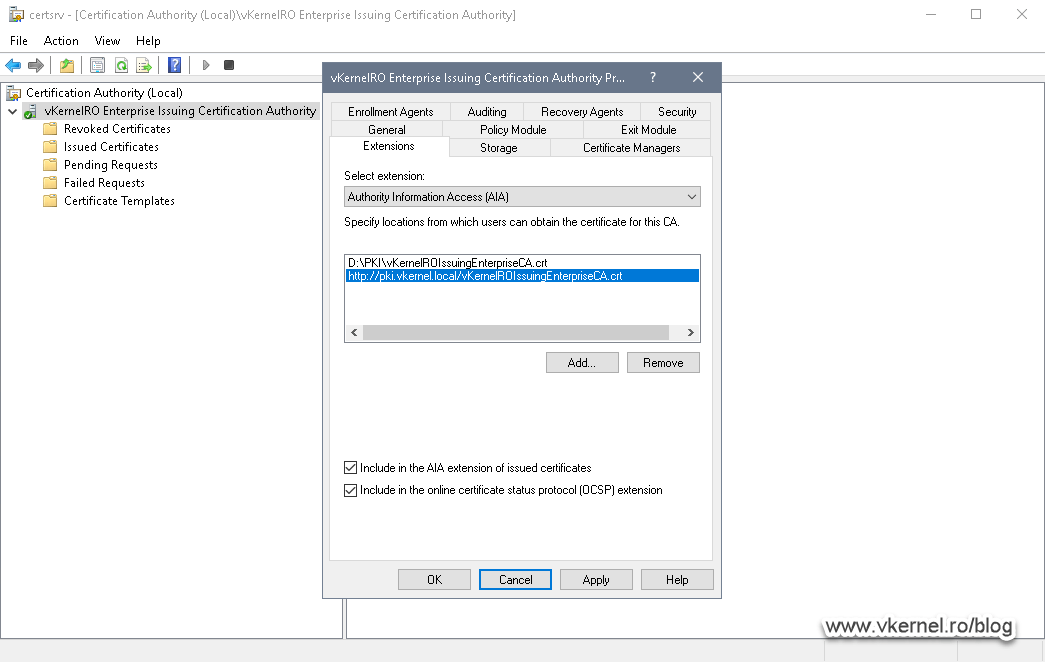
8. Configuring AIA and the CRL distribution point on the Issuing CAs
As on our Root CA, by default, the CRL and AIA extensions are configured using the server’s name, but once the CA is joined to a Failover Cluster, this name needs to be replaced with the cluster’s name. Also, the root certificate and CRL are published in the Windows > System32 > CertSrv > CertEnroll folder which is not good, not for a clustered environment anyway. We need to configure our CAs to publish these files in our PKI folder on the cluster disk, so in case of a failover event they will still be available to clients.
Remove all the entries from the CRL box, then hit the Add button to add our own’s.
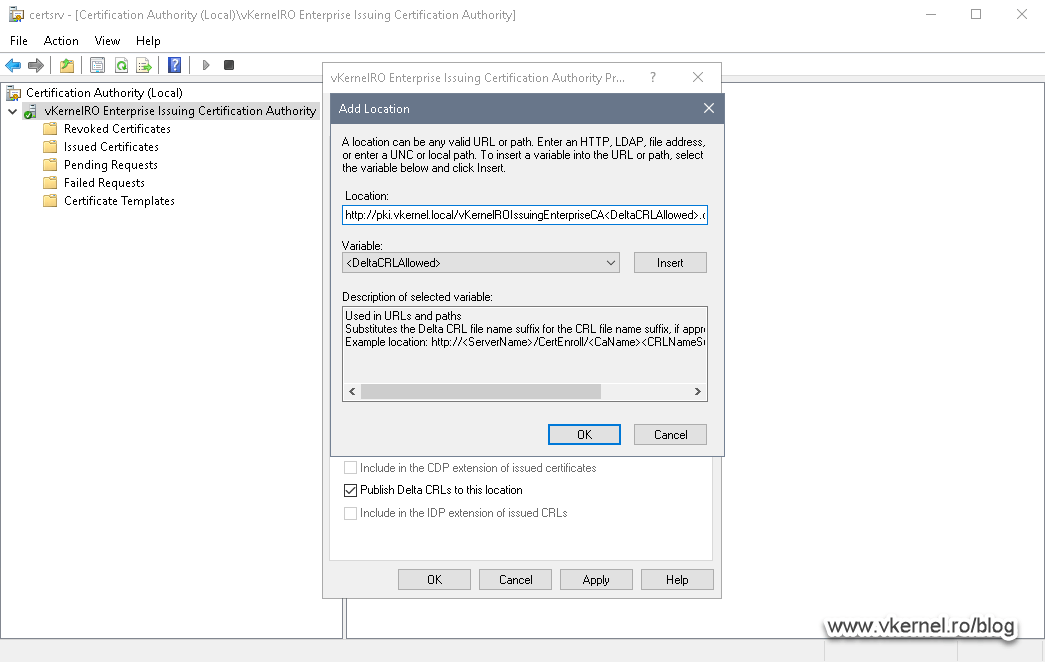
The first entry that we need to add is the path where the CA will publish the CRL and delta CRL and what names these files should have. Yes, we are going to publish delta CRLs on our Issuing CAs, which is a best practice. As I have mentioned above, the path for CRL publication will be our PKI folder sitting on the cluster disk.
Here we need to make sure we insert the <DeltaCRLAllowed> variable from the Variable drop-down box to allow delta CRLs to be published. Click OK when done typing the publication path.
<path to the folder><CRL file name><DeltaCRLAllowed>.crl

Back on our CRL extension box, make sure you tick Publish CRLs to this location and Publish Delta CRLs to this location.

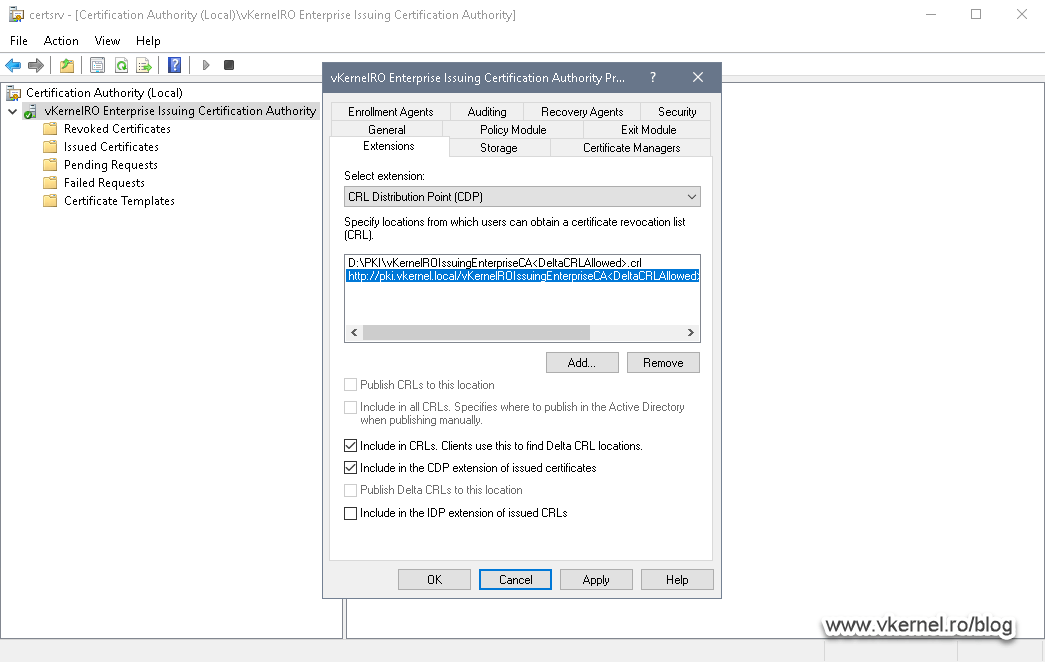
Now that we are done with the publishing part, the next one is to configure the distribution one, and we have two options here: LDAP or HTTP. Since LDAP can only be accessed by Windows domain joined clients it will not be a smart option to put it in the list. Think about it, in medium to large environments there are a multitude of clients like Linux, Oracle, Windows Workgroup computers, Network appliances etc, and these type of clients will not be able to check a certificate CRL using the LDAP protocol.
The best of both worlds is the HTTP protocol which can serve everyone, and this is what we are going to use for this demonstration. If for some reason you want to go with both, and later on you change your mind, you will have to re-issue all the certificates in order for the change to take effect, so choose wisely.
Click the Add button again and type:
http://<your internal CDP URL>/<CRL file name><DeltaCRLAllowed>.crl
The internal URL is the one we used before, on the Root CA, and the CRL file name is the one we just configure on the publication path. Make sure you insert the variable <DeltaCRLAllowed> from the Variable drop-down box after the file name so the clients can download delta CRLs. Click OK when done.
Back on the Extension tab, tick the first two boxes, Include in CLRs. Clients use this to find Delta CLRs location and Include in CDP extension of issued certificates so this URL can be insert in the issued certificates.
The CDP is now configured and the next step will be to set up the AIA extension, so from the Select extension drop-down box choose Authority Information Access (AIA). Remove all the entries then repeat the steps we just did on the CDP extension. Off course, the <DeltaCRLAllowed> extension is not needed anymore since certificates do not have “delta certificates”, and the extension in the link and publication path will be .crt instead of .crl.
When you set-up the distribution link for the AIA extension, only tick the Include in the online certificate status protocol (OCSP) extension box if you have an OCSP responder up and running.
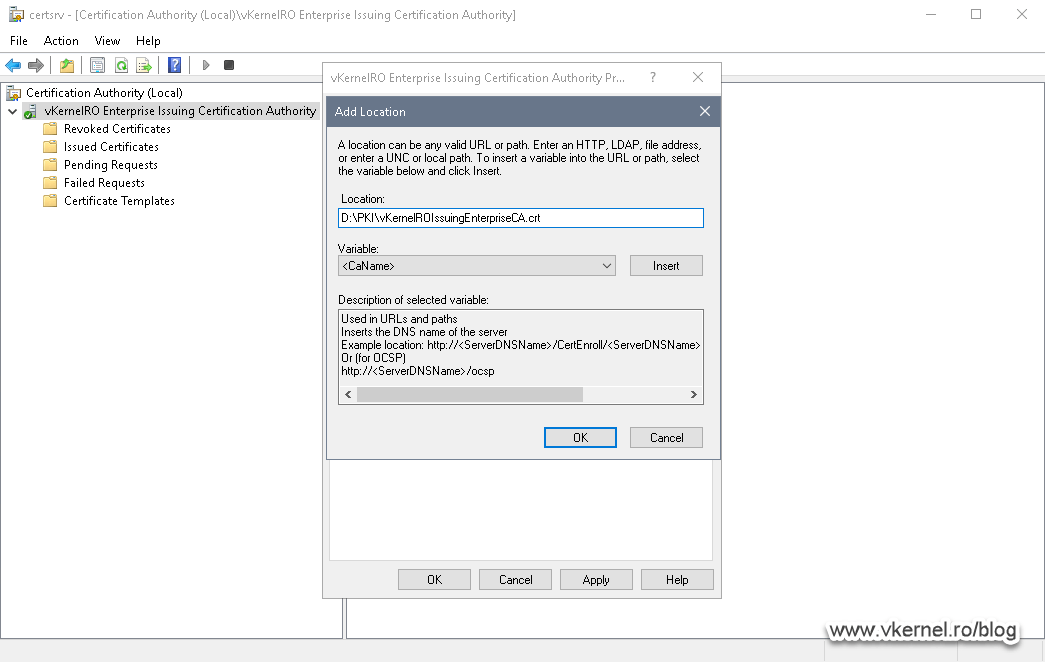
Once we click OK, we will be asked to restart the AD CS service. Choose Yes to restart.

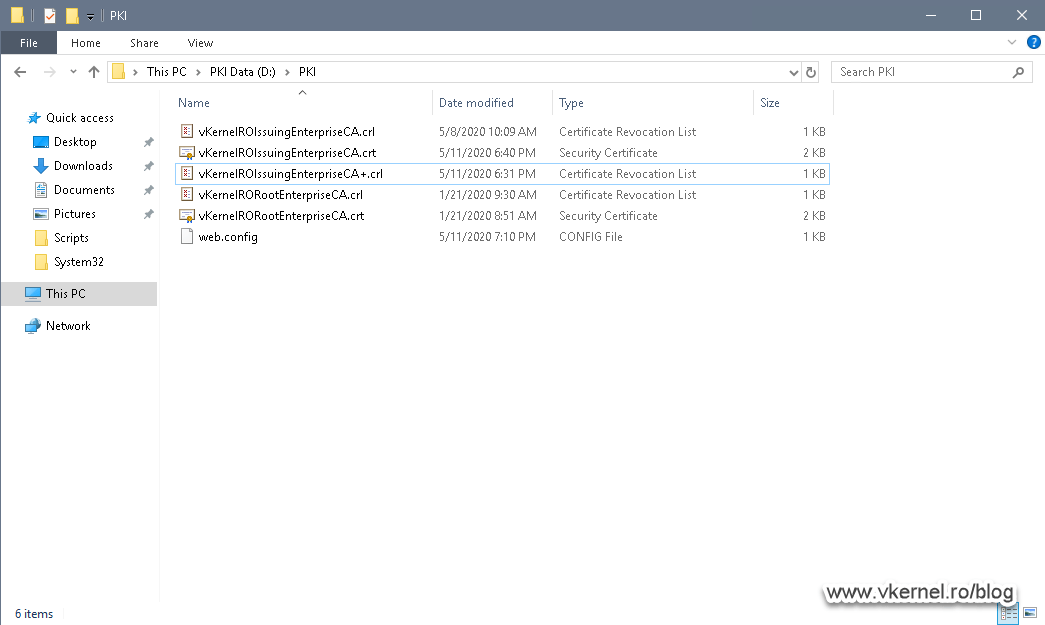
The only thing left here is to export the issuing certificate from our CA and move it to the PKI directory on the cluster disk. In the end you should have something similar to the bellow image.
If the CRL and delta CRL are not re-published in the PKI directory after the service restart, you might have to do this manually by right-clicking the Revoked Certificates folder inside the Certification Authority console.
Open the Failover Cluster Manager console, right-click Node 1 and choose Resume > Do Not Fail Roles Back.

If you are wondering why are we not doing the same thing on the other node, it is because these settings will get copied automatically thanks to the registry replication that we configured in section 6.
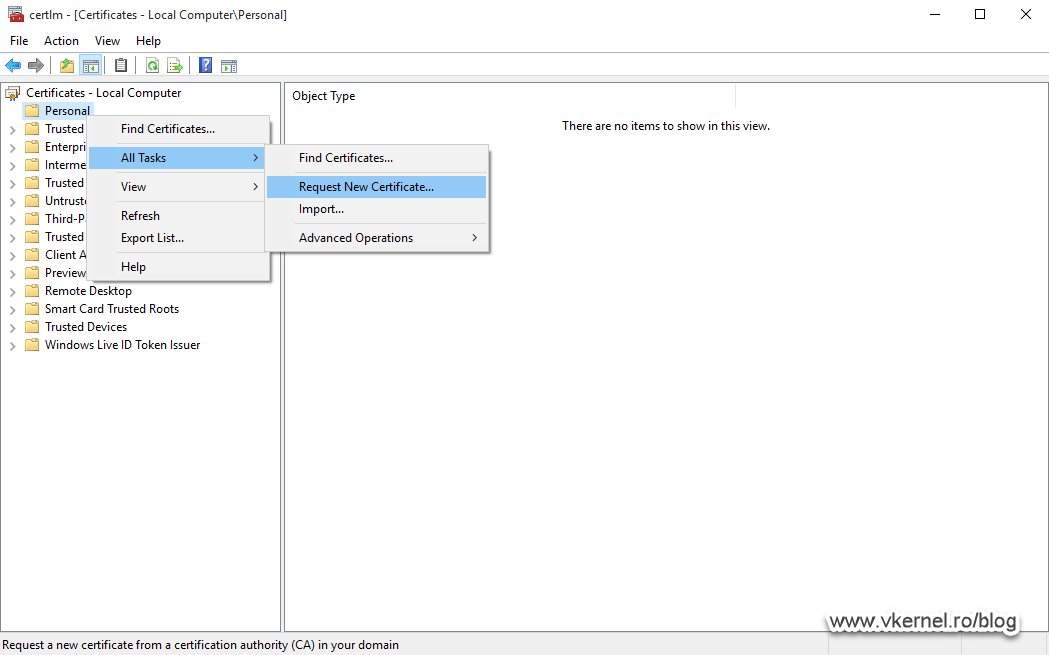
9. Requesting certificates from the CA Failover Cluster
Finally, the moment of truth! We are going to use a client and request a certificate from our newly built CA Failover Cluster.
Open the Machine Certificates Store (certlm.msc), right-click the Personal folder and choose All Tasks > Request New Certificate.
Wen you reach the certificate templates page, just select one from the list and click Enroll if it does not need any further configurations.
If you do not see any certificate template in the list, go on the active CA server and check if the Certificate Templates folder has any templates available. It happens that the folder is not populated with the default certificate templates during installation, so this has to be done manually.

After a few seconds the certificate is issued based on the selected certificate template.
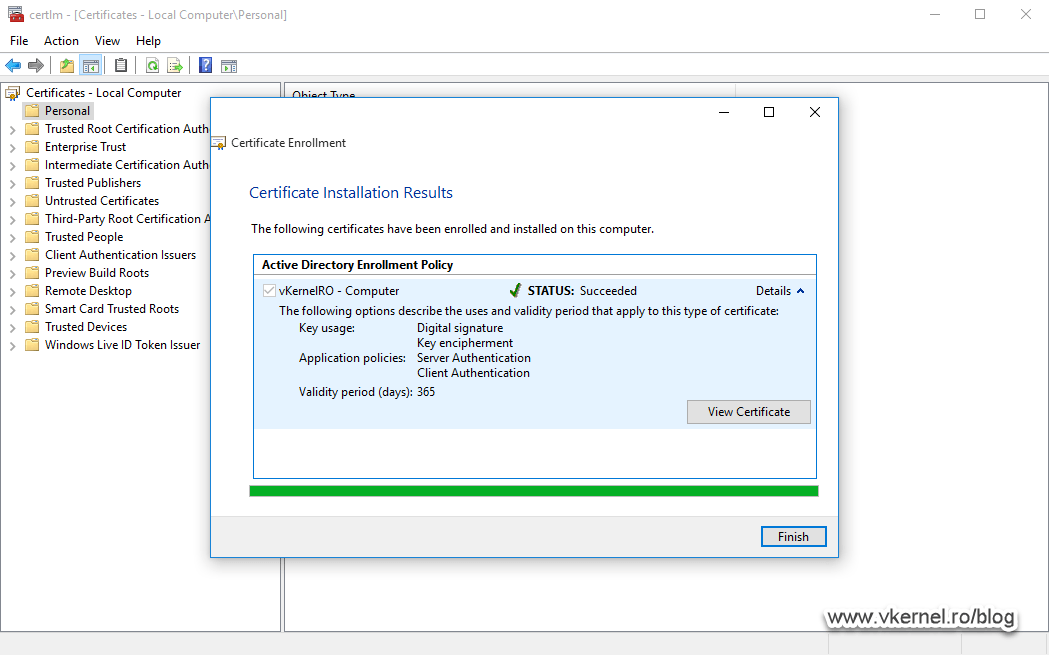
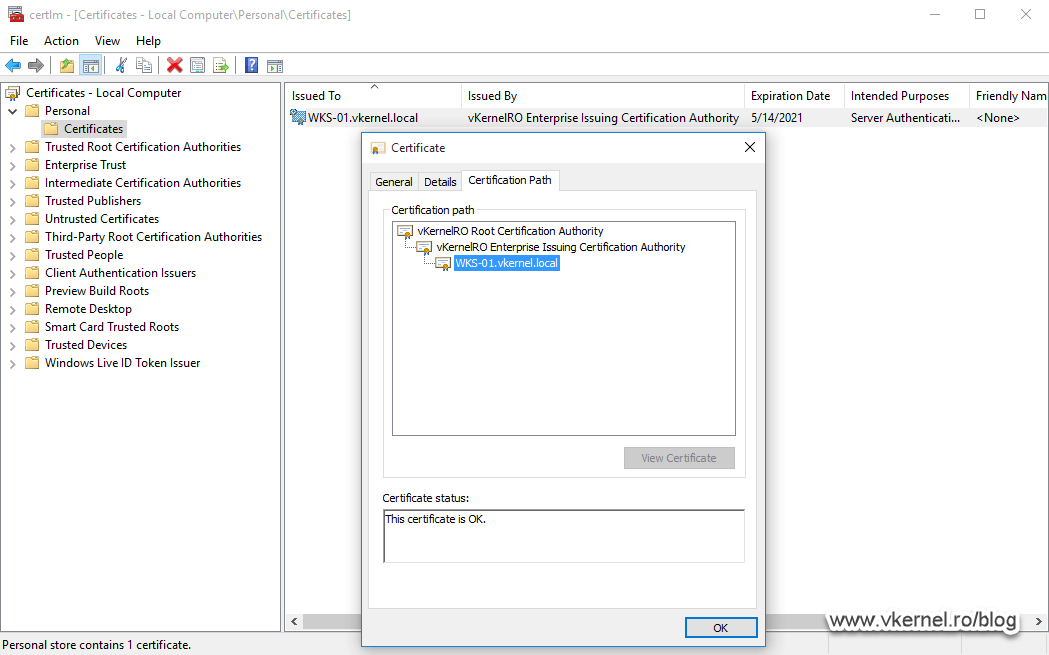
If we take a look at the certificate, it should have a private key and the certificate chain should be complete with no errors whatsoever. Don’t forget to check the certificate CRL and AIA extensions too (in the Details tab) and see if the links work. Better check a few times more before putting in production.
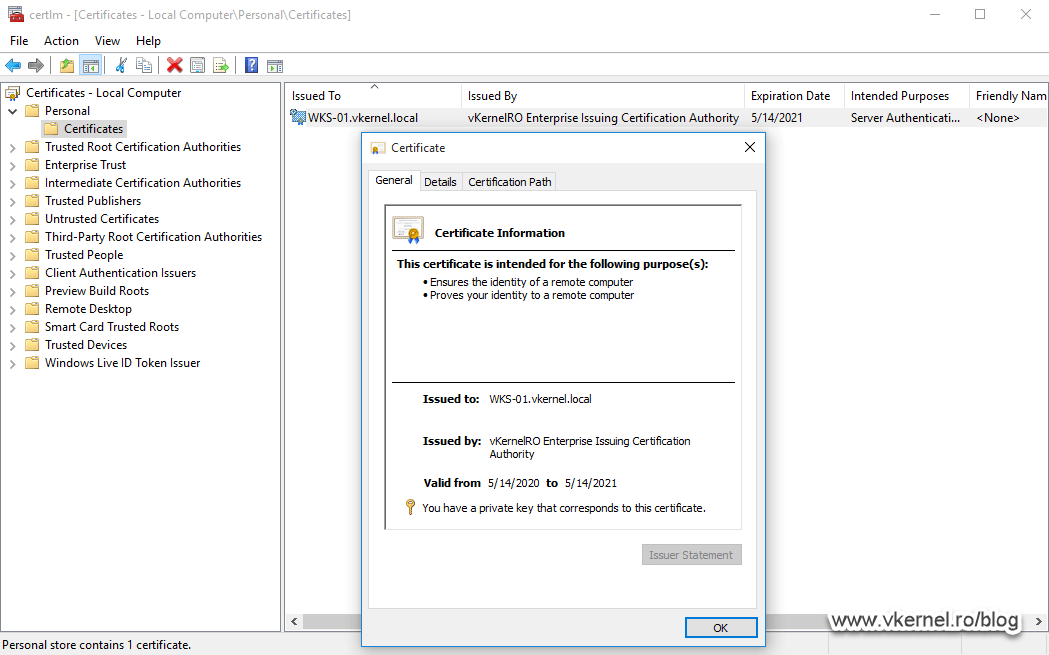
If you are getting some error messages like “Illegal operation attempted on a registry key that has been marked for deletion” or not having enough permissions on the certificate template, just pause the active node from the Failover Cluster Manager console (with Draining Roles) than resume it and move back the CA role. After I did this a couple of times, everything started to work. I guess it was needed so the registry can be copied between the cluster nodes.
Summary
I know it was a lot to read, but man… it was fun! Building a CA cluster is not something that you should ignore because it provides high availability and easier management. Yes, it is a bit of work at the begging, but then it is just keeping an eye every now and then on the infrastructure. Try it, see how it works in your environment then come back and share your findings with the community, the comments area is opened 24/7.
Want content like this delivered right to your
email inbox?
More similar articles
 Setting permissions on ADCS Certificate Templates
- How to Publish the CRL and AIA on a Separate Web Server
- Enable computer and user accounts to be trusted for delegation
- Steps to check if Domain Controller was properly promoted
- Creating and configuring Windows Domain Service Accounts
- Installing and configuring CEP and CES for certificate enrolling on non-domain joined computers


Hi!
Installed the “Certificate Authority Web Enrollment” service, if I go to the browser, the issue templates are not available. If I look in the mmc CA snap-in, the templates are there. Can you tell me how to fix this?
Hi Boris,
There is no simple answer to this, that’s why I always encourage people to do many tries in the lab so they can understand the process.
In your case, I don’t know what the issue is, but you can try and publish a new template on your CA then go to the client and test again. I’m guessing the client is already part of the domain.
Also, check on the client and see if the Root CA certificate got deployed.
Hi,
As the CDP\AIA it pointing to the cluster address, seem the IIS services is not included in the cluster services, so if the primary node server IIS services had issue, do the ADCS cluster role services will failover to secondary node.
Hi,
As mentioned in the beginning of the article, if you want the CDP and AIA to be highly available, you will have to put these roles behind an LB. More specifically de IIS role.
Great Guide.
I deployed a web enrollment on another server and it is not working.
When trying to download a CA Certificate I am having the error below:
An unexpected error has occurred:The Certification Authority Service have not been started.
When trying to request a user certificate, I am having the error below:
Your request failed. An error occurred while the server was processing your request.
Contact your administrator for further assistance.
Request Mode: newReq NN – New Request (Keygen)
Result: Invalid pointer 0x800004003
Com Error info: CCertRequest::Submot Invalid Pointer
The cluster is working fine, only the web enrollment auth is not.
Thanks for your help.
Motus
Hi,
Take a look in the logs and post the errors here so I can try and replicate.
Hi
Is there a procedure for renewing a certificate on such a center in a cluster somewhere ?
Hi,
It is the same as with the single server.
Hi,
first thank you for posting this guide, the basic clustering / CS services work just fine for me, already managed to create an internal SSL certificate.
However, I am unable to get smart card authentication working, as upon login the dialog says that it is unable to check the revocation status of the DC certificate. Taking a further look into the event logs, an event with ID 9 is produced saying that “The revocation server is offline”.
This is a bit confusing to me, as both the issuing CA and DC certificate contain the relevant URLs:
On the issued certificate (Domain Controller Authentication):
[1]CRL Distribution Point
Distribution Point Name:
Full Name:
URL=http://pki./IssuingCA.crl
On the Issuing CA:
[1]CRL Distribution Point
Distribution Point Name:
Full Name:
URL=http://pki./RootCA.crl
Both addresses can be accessed using a browser, offering to download the respective files.
I even re-enrolled the certificate, as I initially forgot to check “Include in the certificate extension” in the AIA dropdown.
Deep diving into the event data, it seems like Windows is trying to find a CDP in AD with the name of the cluster (Issuing-CA is my cluster name), whereas only entries for the two nodes exist (CDP -> Node 1 -> Issuing CA, CDP -> Node 2 -> Issuing CA – is my CA Name):
ldap:///CN=Issuing%20CA,CN=ISSUING-CA,CN=CDP,CN=Public%20Key%20Services,CN=Services,CN=Configuration,DC=?certificateRevocationList?base?objectClass=cRLDistributionPoint
It also does a lookup for the AIA, which seems to resolve however:
ldap:///CN=Issuing%20CA,CN=AIA,CN=Public%20Key%20Services,CN=Services,CN=Configuration,DC=?cACertificate?base?objectClass=certificationAuthority
Am I missing something here or is there a step missing in the tutorial?
Hi,
First of all I will put the entire FQDN of the CRL server in the Distribution Point (http://pki.domain.com/RootCA.crl). Once you do this, copy the URL and paste it in a Browser. You should get a download.
Once this is fixed, the error should go away.
Did you ever find a way to get the Web Enrolment features working?
Kind regards,
Richard.
Hi I would like to ask regarding how to set up an active-active ADCS, thanks in advance!
Hi John,
A Microsoft CA cannot be in an Active-Active cluster, not right now anyway.
Great guide! In this case Root CA is ECDSA, but then how do you configure CAPolicy.inf, I guess Renewalkeylength cannot be 4096.
Thank you
Too far. ECDSA uses shorter keys
Take a look here.