Configure Internal Windows CA to issue SAN certificates
A lot of companies these days are using SAN (Subject Alternative Name) certificates because they can protect multiple domain names using a single certificate. For example you can protect both www.mydomain.com and www.mydomain.org. If you are in a small environment and can’t afford a SAN certificate, you can use your internal Windows CA to issue this kind of certificates.
For this lab I’m going to use an Enterprise Windows CA running on Windows Server 2008 R2 SP1. If you don’t have a 2008 R2 box, you can use a Windows 2003 server edition. To be able to issue SAN certificates using our internal Windows CA we need to configure it first, so connect to the CA server and open a terminal. Here type the following command:
certutil -setreg policy\EditFlags +EDITF_ATTRIBUTESUBJECTALTNAME2

Don’t close the terminal yet, because we need to restart the Active Directory Certificates Services service. Type the following command to restart the service:
net stop certsvc & net start certsvc

Our internal CA is now ready to issue certificates that contains the SAN extension. Let’s request some.
For this exercise you need to configure your Internal CA web page to use an encrypted connection. Issue a WEB certificate from the internal CA, or create a self sign certificate, then bind the certificate to the web site.
Open a browser on one of your clients, or even the localhost and type the CA server web address into your browser (eg: https://MyInternalCA/certsrv). On the Welcome page click Request a certificate.

Click advanced certificate request.

Click Request and submit a request to this CA.

On the warning message click the OK button.

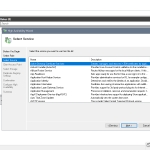
On the Certificate Template box select Web Server.

Now I want to show you something fancy. Usually in the Name box you would type the common name of the certificate, but this time we are not going to. Just type something like SSL Certificate or My SSL Certificate.

Complete the rest of the boxes until you reach the Attributes box. Here we provide the domain names that this certificate should protect. The syntax is like this:
san:dns=mydomain.com&dns=mydomain.org&dns=mydomain.net
If you want to, give the certificate a friendly name than click the Submit button. When the warning pops-up click Yes.

To install the certificate click the link Install this certificate. Now if we open the user certificates store we can see our certificate installed, and with a SAN extension that contains the protected domain names. Just look at the Issued to section. I told you it will be fancy.
Remember, this “fancy” certificate is just for fun, you can use it with your internal CA, but not with a commercial CA, because it will cost you more since you pay for the domains in the SAN extension. Another problem with this “fancy” certificate is that some software will give you a certificate error message, not being able to recognize the SAN extension in the certificate (been there). If you have this problem just type the FQDN (common name) in the Name box on the CA web page when you request the certificate.


OK, we created a certificate by completing the information in the CA web page, but what about those of you that have the request in a file ! Don’t worry, this is next. For this part of the guide I created a certificate request using OpenSSL. You can download OpenSSL from this address. To configure it for SAN extension we need to edit the openssl.cfg file from the bin directory.
Here uncomment req_extensions = v3_req line, then paste this:
[ v3_req ]
 # Extensions to add to a certificate request
basicConstraints = CA:FALSE
keyUsage = nonRepudiation, digitalSignature, keyEncipherment
subjectAltName = @alt_names

[alt_names]

DNS.1 = myfirstdomain.com
DNS.2 = www.myseconddomain.net.net
DNS.3 = myseconddomain.org
Off course replace the domain names with your own. Now open a terminal and go to the OpenSSL bin directory path. Here type the following:
openssl genrsa 2048 > rui.key

openssl req -new -key rui.key > rui.csr

Now in the bin folder there is a new file called rui.csr. Open the file using notepad or any other text editor, copy the content and go the CA web page. Click Request a certificate > advanced certificate request > Submit a certificate request by using a base-64-encoded…’ and paste the content from the rui.csr file in the Saved Request box. Under Certificate Template select Web Server and click the Submit button.

Click Download Certificate and save it somewhere on your hard drive, then open it. It should have a common name and a SAN extension. If you want the common name to be something “fancy” like before, on the OpenSSL line Common Name (eg, YOUR name) []: type your desired name.


Want content like this delivered right to your
email inbox?
More similar articles
 Enable computer and user accounts to be trusted for delegation
- Setting permissions on ADCS Certificate Templates
- Steps to check if Domain Controller was properly promoted
- Creating and configuring Windows Domain Service Accounts
- Domain Controller promotion fails with “Access is denied”
- Clustering Active Directory Certificate Services (AD CS)


Thanks for sharing this info.
Great post and great information!
Thank you
Is there a way to enforce SAN field to be used for every cert requested?
Hi,
Sorry for the late response.
This is done from the certificate request, and you can put a SAN entry in every certificate. I don’t know about the code signing, and user certificates ones, never need it to put a SAN entry on this type of certificates.
My Website stopped working with Chrome 58.
Thanks for the article, i could create SAN enabled certificate in my Internal CA Server. I also exported this certificate (it does not have private key) and copied this .cer file to my webserver where i need to bind it to 443.
Then, I imported this .cer file to Personal > Certificates.
But when i see in IIS certificates, i don’t see this certificate in the list.
I checked certutil -store my to see what happened to this certificate. This is what it gave:
No key provider information
Cannot find the certificate and private key for decryption.
Encryption test passed
How to export private key when i export that newly created SANCertificate so that i can create a .pfx file to import into my webserver IIS > Server Certificates?
Please help!!
Hi,
You can create the CSR directly on the web server by going to Certificates > Create Certificate Request and once you have the certificate file go back on your web server and use the option Complete Certificate Request. You should now have a certificate with a private key on your web server. If you want, you can export the certificate from here.
Bit more information for others having trouble.
From IIS -> Server Certificates -> Create Certificate Request
Once your CSR is created and saved, open a command prompt
Change server.domain.com to the FQDN of the IIS server. Change the certificate template name to whatever template you want to use. Make sure you use the template name. If you dont know what it is
certreq -submit -attrib “SAN:dns=server.domain.com” -attrib “CertificateTemplate:WebServer”
A box pops up asking for the location of the CSR
Another box pops up asking you to select your CA
If all goes well it will create a CER.
Go back to IIS -> Server Cert -> Complete Certificate Request
Once you see the Cert present -> right click your site -> Edit bindings -> select https -> edit -> select your SSL Cert at the bottom from the drop down.
Stop restart IIS and navigate to your site.
I also thank you very, very much for your article. In particular the first part stating that you must execute certutil -setreg policy\EditFlags +EDITF_ATTRIBUTESUBJECTALTNAME2 to get this feature to work.
I have spend over ten hours with another colleague hunting the internet and no one (including Microsoft) mentions that this is necessary for this to work and no errors are issued regarding this problem.
Best regards
Miguel
Thanks you, I’m glad I could help.
This is a great article! I just upgraded to Chrome 58 which stopped supporting certificates without a SAN. You have to include the host name in the SAN field or Chrome will show a certificate warning. I found other articles that explained how to do this in a Windows server CA but they were more complicated.
Frankly I think Microsoft’s enterprise CA implementation is a dinosaur that barely changed at all since server 2003.
Thanks for sharing this!
Yes, yo are right, Microsoft did not changed much in the CA implementation since 2003. I was hopping for some monitoring tools, web interfaces etc , but looks like they were lazy.
Thank you for this! Its also worth noting that you can confirm your request contains the subjectAltName extension by viewing the request in the Certificate Authority tool before you issue it. If you don’t see the subjectAltName on the extensions tab, the request is messed up *as was my case* until I fixed my openssl.cnf file.
What would one do if Web Server isn’t in the list? Running SBS Server 2011 Standard.
Here you go
https://support.microsoft.com/en-us/kb/2581361
In my case a certificate request from a server 2003 against an enterprise ca under windows server 2012 r2 needs to submit the attribute above
Thank you.
This article has helped me a lot.