Migrating the WSUS database from WID to SQL Server
Running WSUS with the Windows Internal Database (WID) has been working great for us, for years, but if we want to have the database on a separate volume, if we want better performance, better management tools and especially being able to back it up using our internal or cloud backup tool, then we need to migrate it to a dedicated SQL Server instance. If you are wondering if it’s worth it, well…yes, if you already have a SQL license, if not I will just stick with the WID, because buying a SQL Server license just for this, does’t justify the costs.
1. Checking WSUS for WID or SQL instance
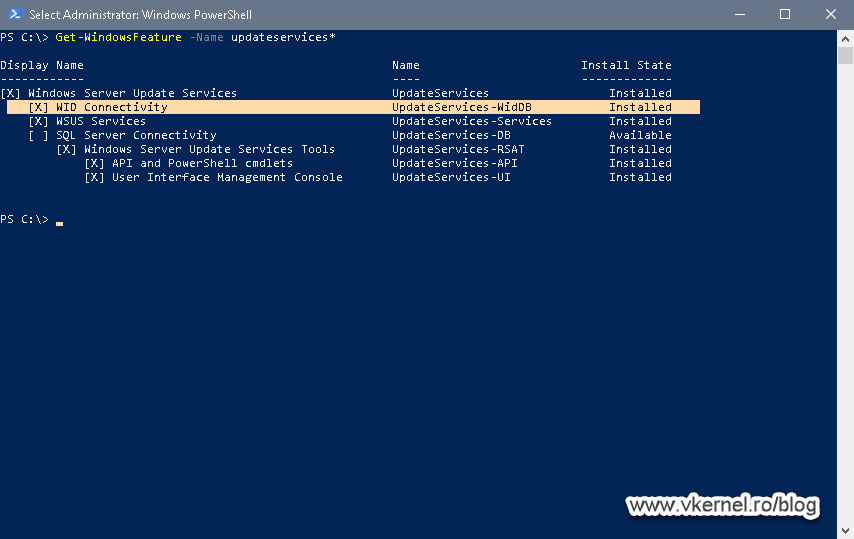
When using the default settings during the WSUS installation, the wizard will configure it using WID. If you inherited the network and try to find out which type of database your WSUS server is using, PowerShell comes to the rescue.
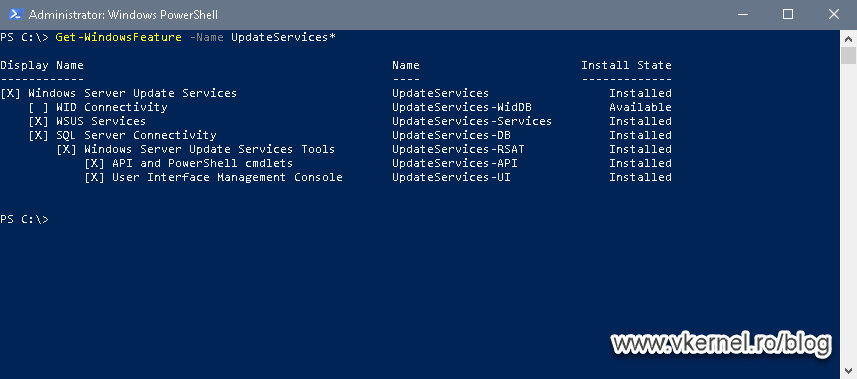
Type the bellow command in a PowerShell window and if the WID Connectivity box is checked, then you are using the built in database. If we also look at the Installed State column, we can see that it says Installed. The second thing that we can notice in the results is that the SQL Server Connectivity box is un-checked and it only says Available. This is another indicator that we are not using a dedicated SQL Server.
Get-WindowsFeature -Name UpdateServices*
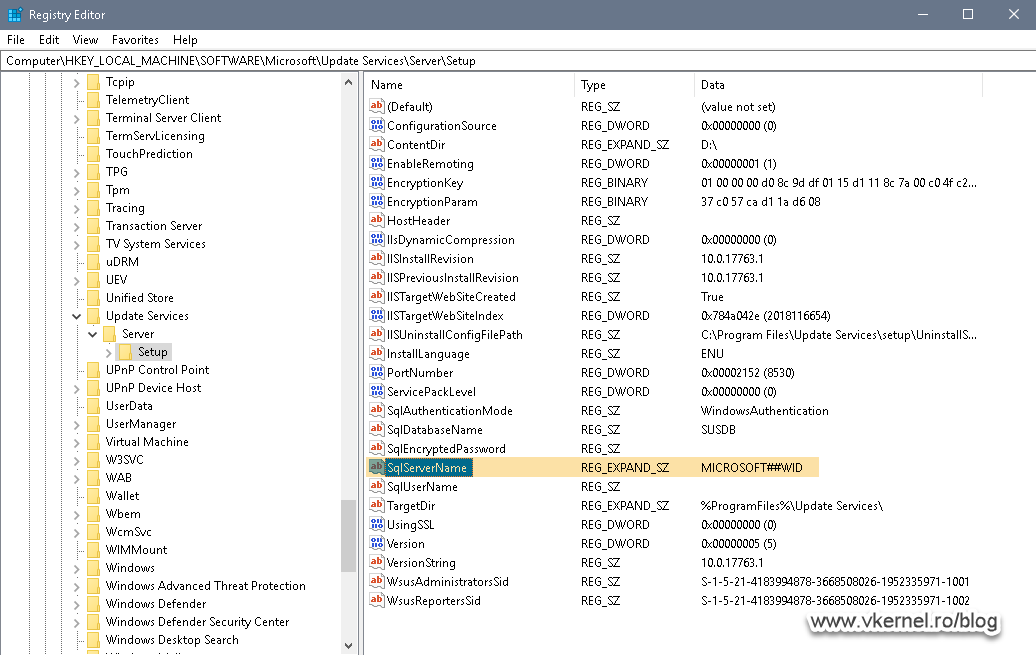
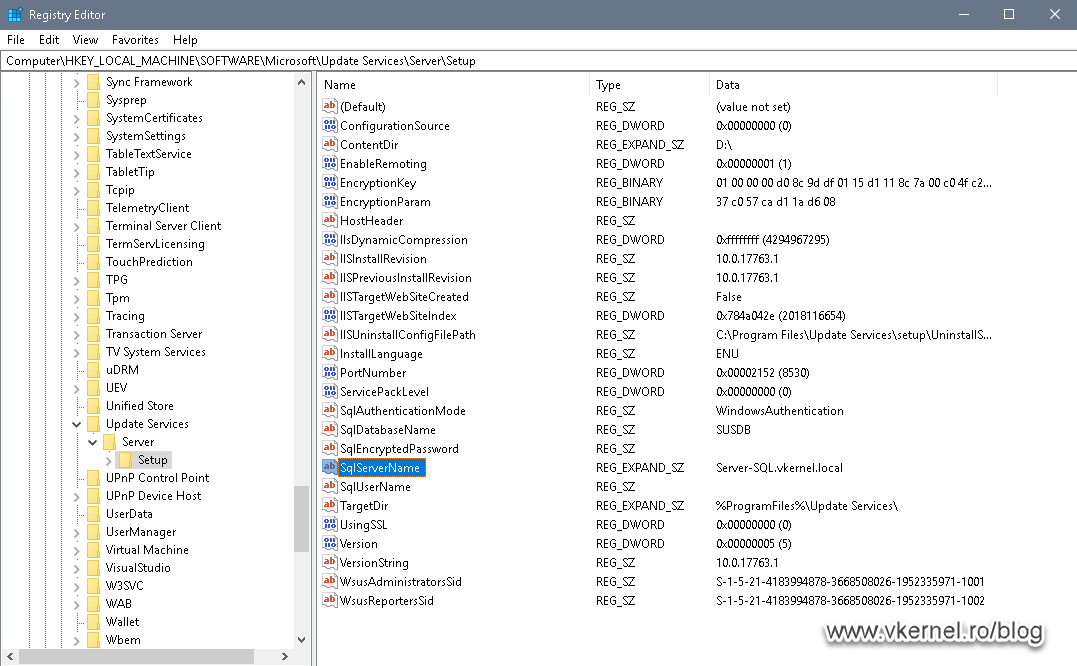
Another option to see if we are using a WID database or a SQL one is to look in the registry. Browse to HKEY_LOCAL_MACHINE > SOFTWARE > Microsoft> Update Services > ServerSetup and here we have the SQLServerName registry data. If the value says MICROSOFT##WID, then we are using the built in database.
Later on, -after we migrate the database to the SQL server – we will re-visit these settings and they will be changed to our SQL server instance.
2. Migrating the WSUS database
2.1. Detaching the WID database
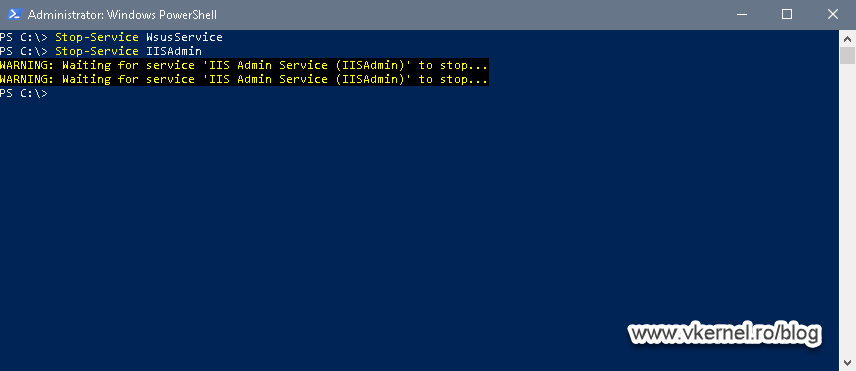
In order for us to be able to copy the existing WID database to our SQL server, we first need to detach it from the running instance, and to do that, we can either use SQL Management Studio (SSMS) or the SQLcmd utility on our WSUS machine. I’m going to present both options in this section, but before that we need to stop the IIS and WSUS services.
Open a PowerShell window and paste the bellow two command lines to do just that.
Stop-Service WsusService
Stop-Service IISAdmin
Once those services are stopped, open SQL Management Studio -that we downloaded and installed on the WSUS server- and connect to:
\\.\pipe\MICROSOFT##WID\tsql\query
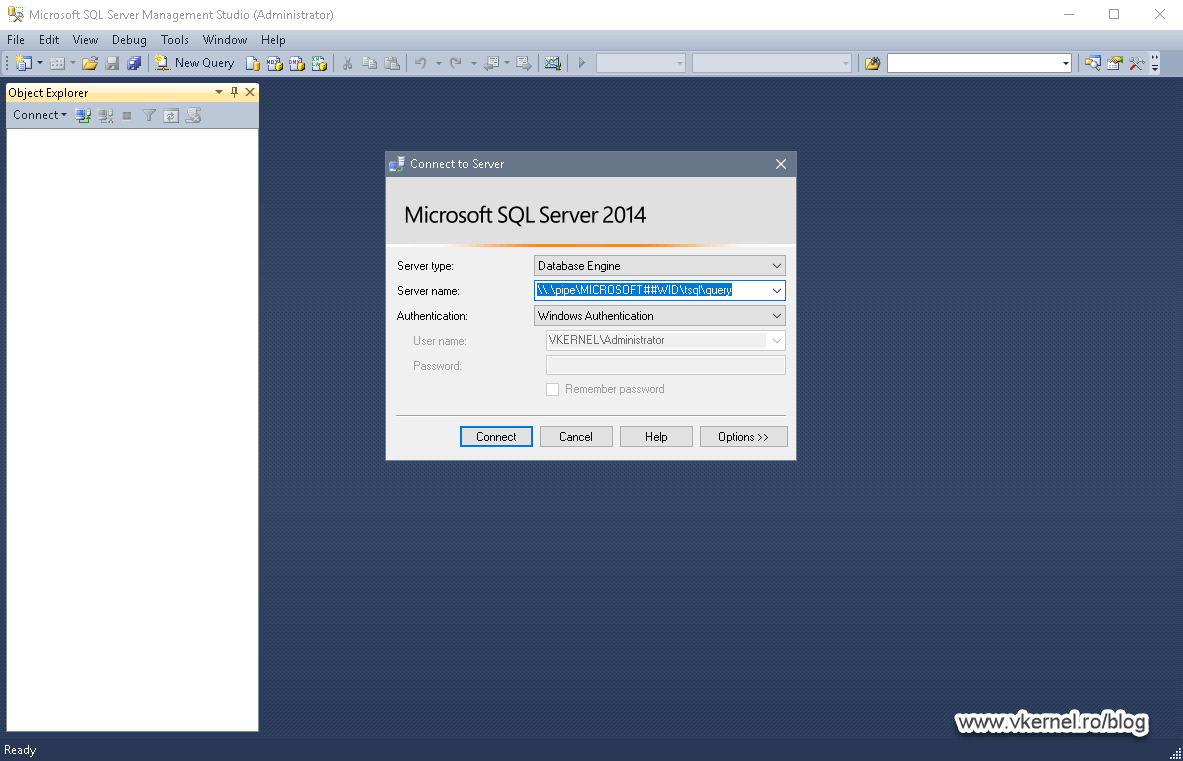
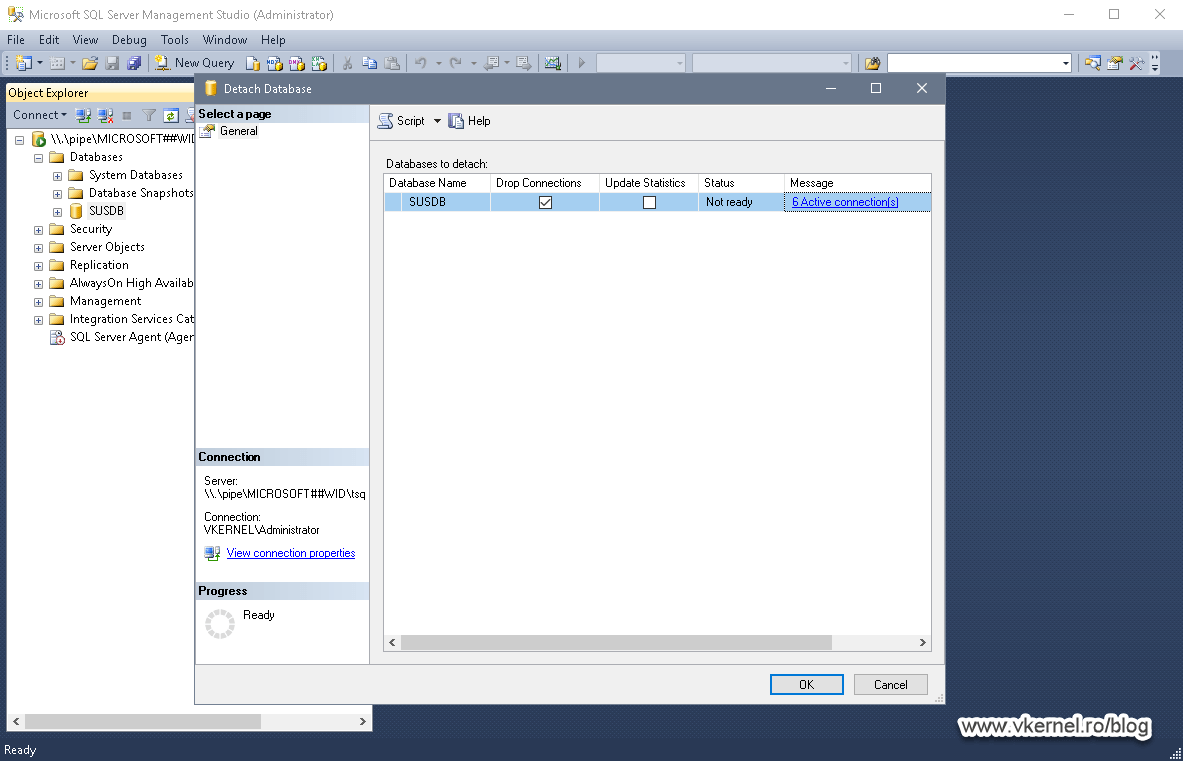
Expand the Databases folder, right-click the SUSDB database and choose Tasks > Detach.
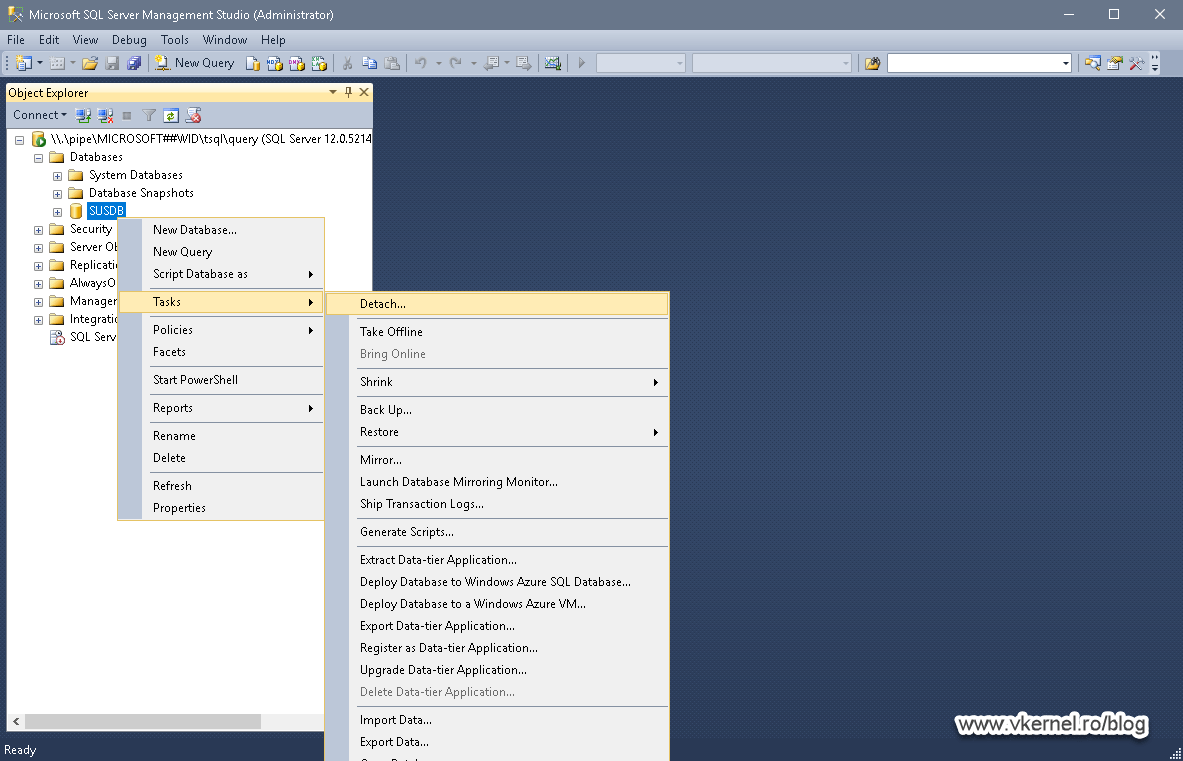
In the Detach Database window that pops-up, check the Drop Connections box then hit OK to detach the database. Once the database is detached it will disappear from the Databases folder in the SQL Management Studio console.
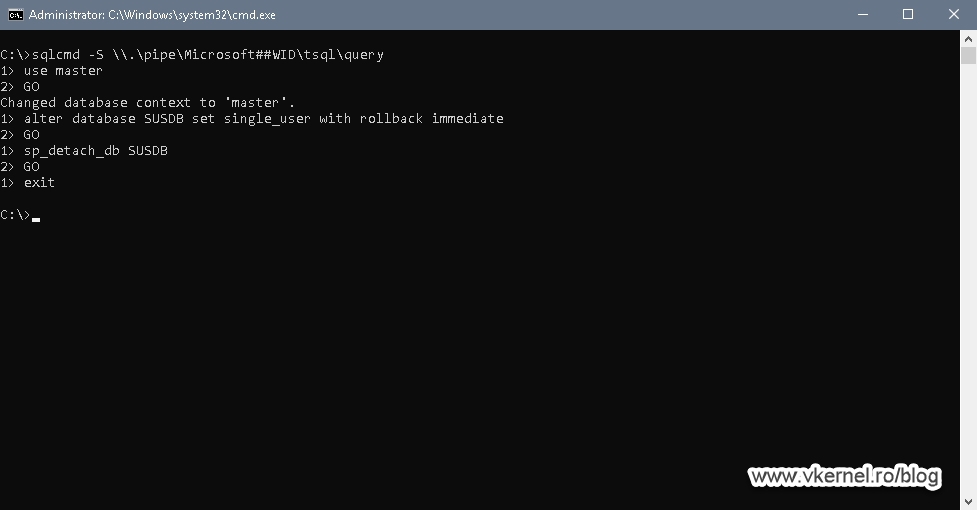
Using the command line it is much faster since the download package is way smaller and quicker to install, compared to SQL Management Studio, but unfortunately we still need a utility to accomplish this. Download the SQLcmd utility, install it, then come back and run the bellow command lines to detach the WSUS database from the WID instance.
sqlcmd -S \\.\pipe\MICROSOFT##WID\tsql\query
use master
GO
alter database SUSDB set single_user with rollback immediate
GO
sp_detach_db SUSDB
GO
exit
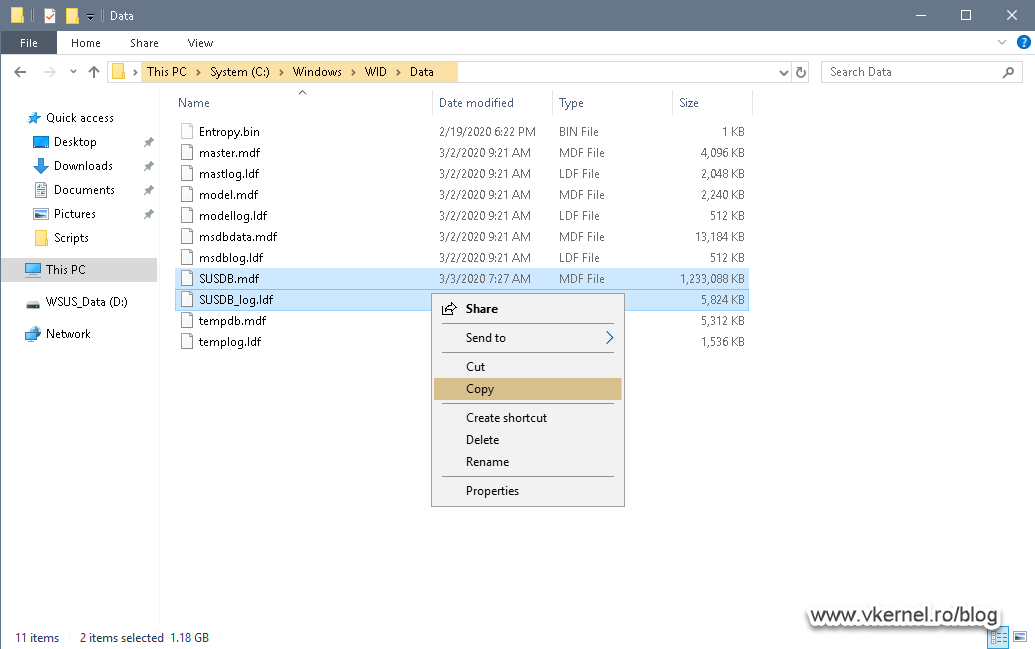
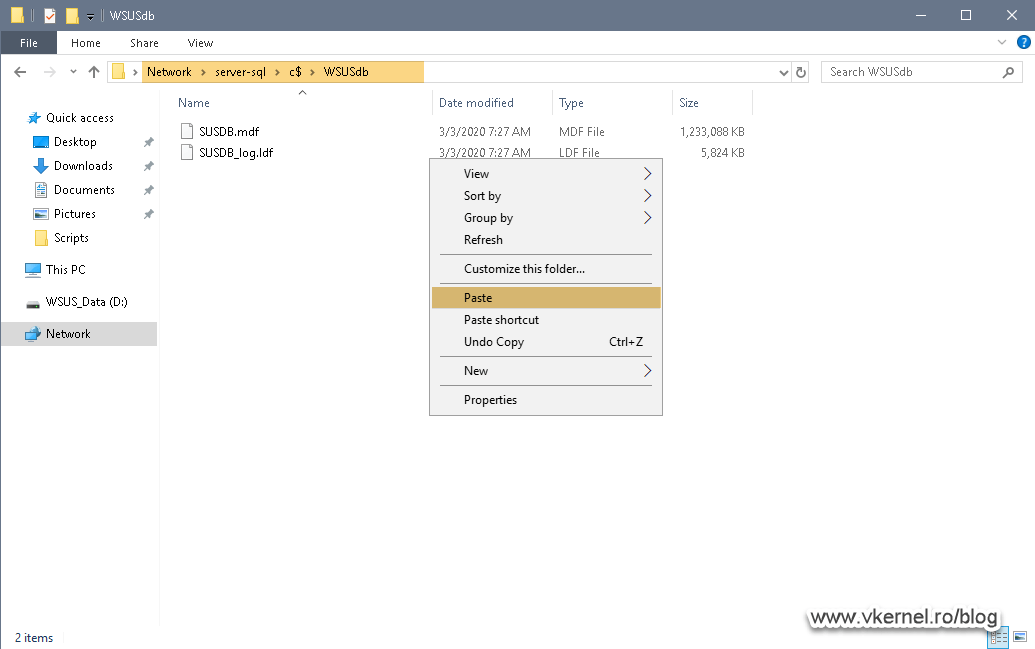
All that is left now before moving to our SQL server is to copy the database and log files from the WSUS server to the SQL one. Open File Explorer and browse to C: > Windows > WID > Data. Here we can see the SUSDB.mdf and SUSDB_log.ldf files that we need to copy. Select them, then using a UNC path, copy the files to the SQL server.
2.2. Attaching the WSUS database to the SQL instance
This operation is very easy since we have all the tools already installed on the SQL server and the database transferred locally.
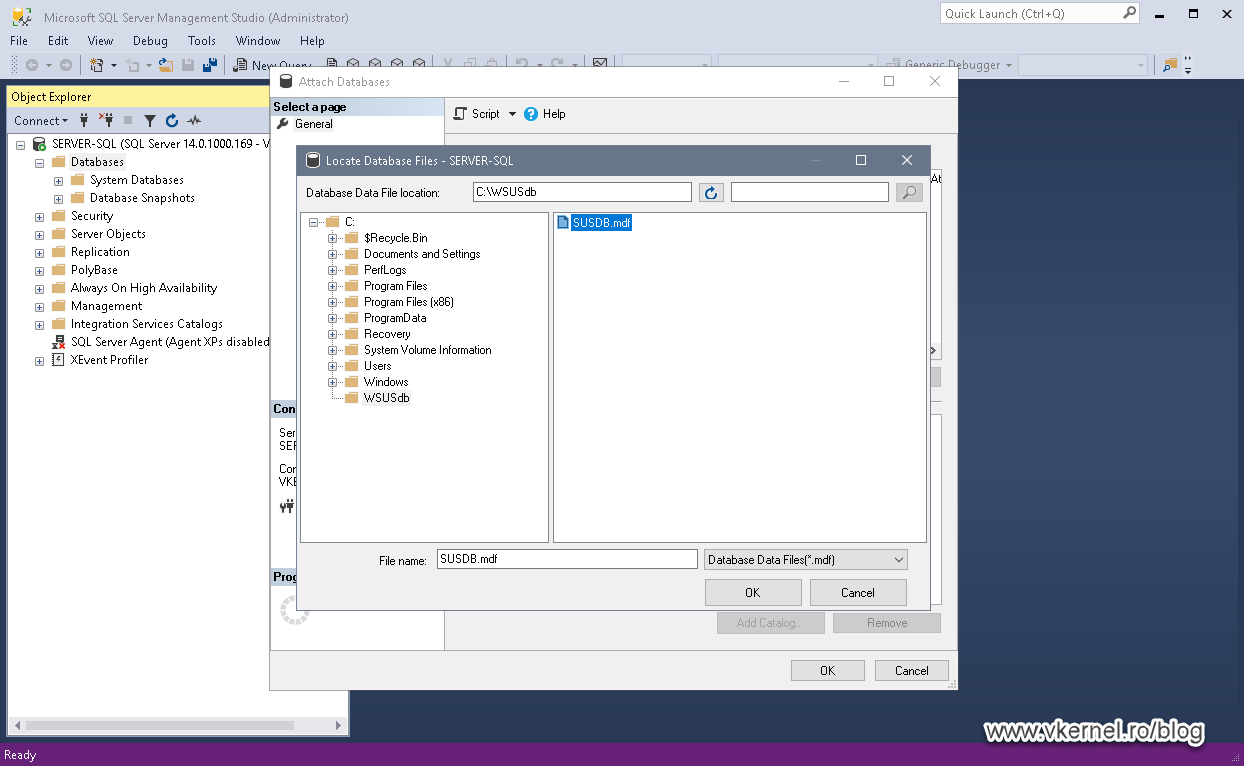
Open the SQL Management Studio console, right-click the Databases folder then choose Attach.

In the Attach Databases window that opens up click the Add button then select the database we copied over from our WSUS server.
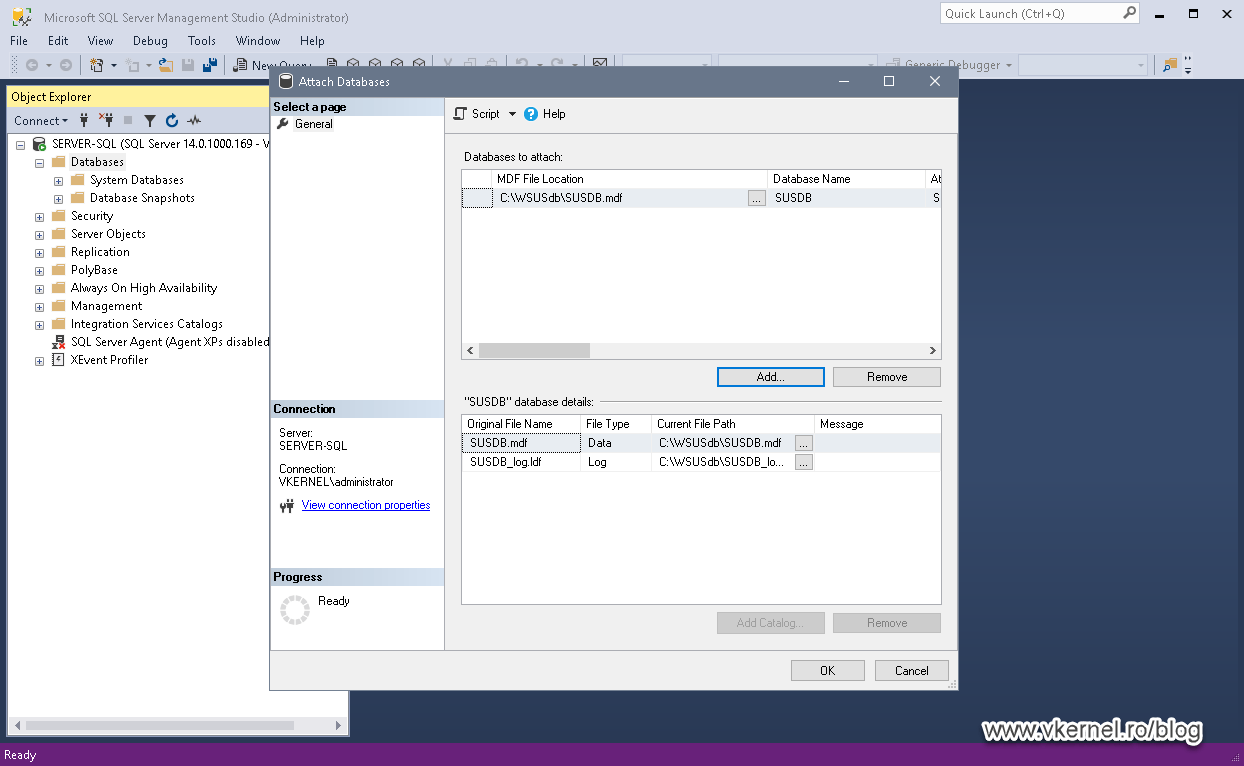
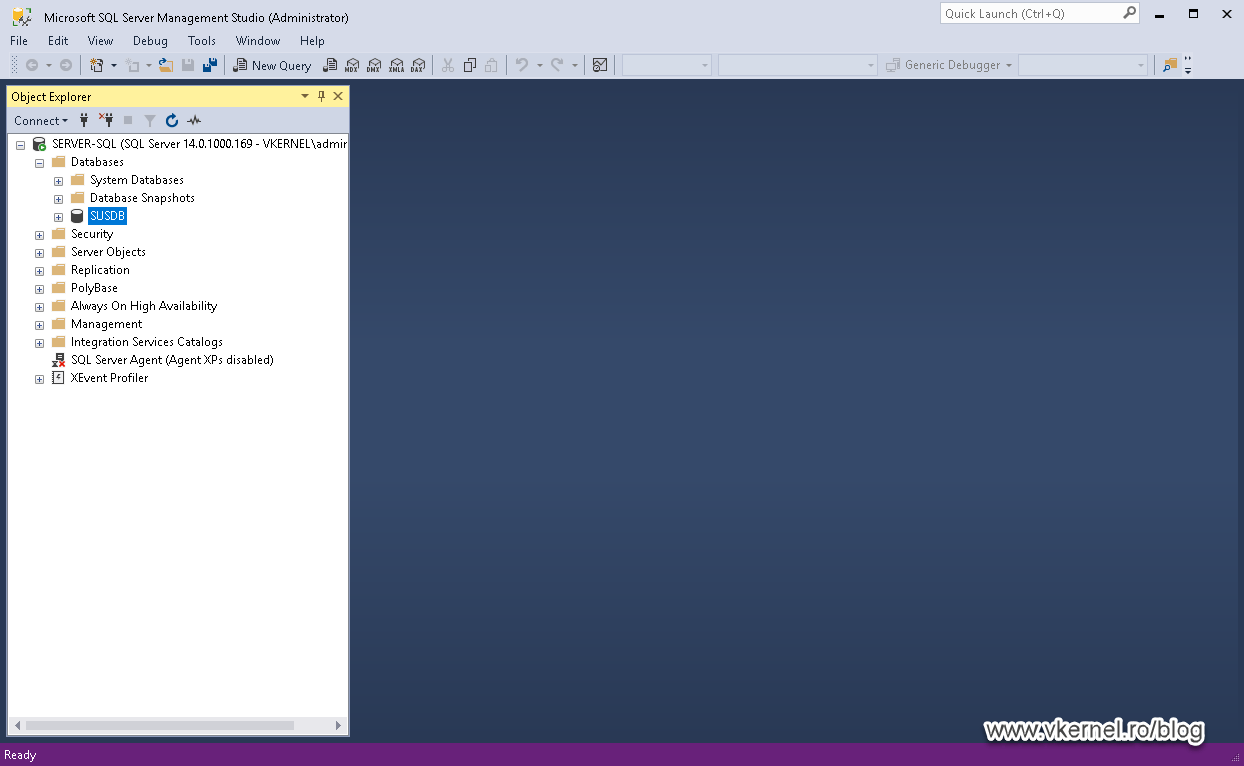
After a few seconds, the WSUS database will be attached to our SQL instance.
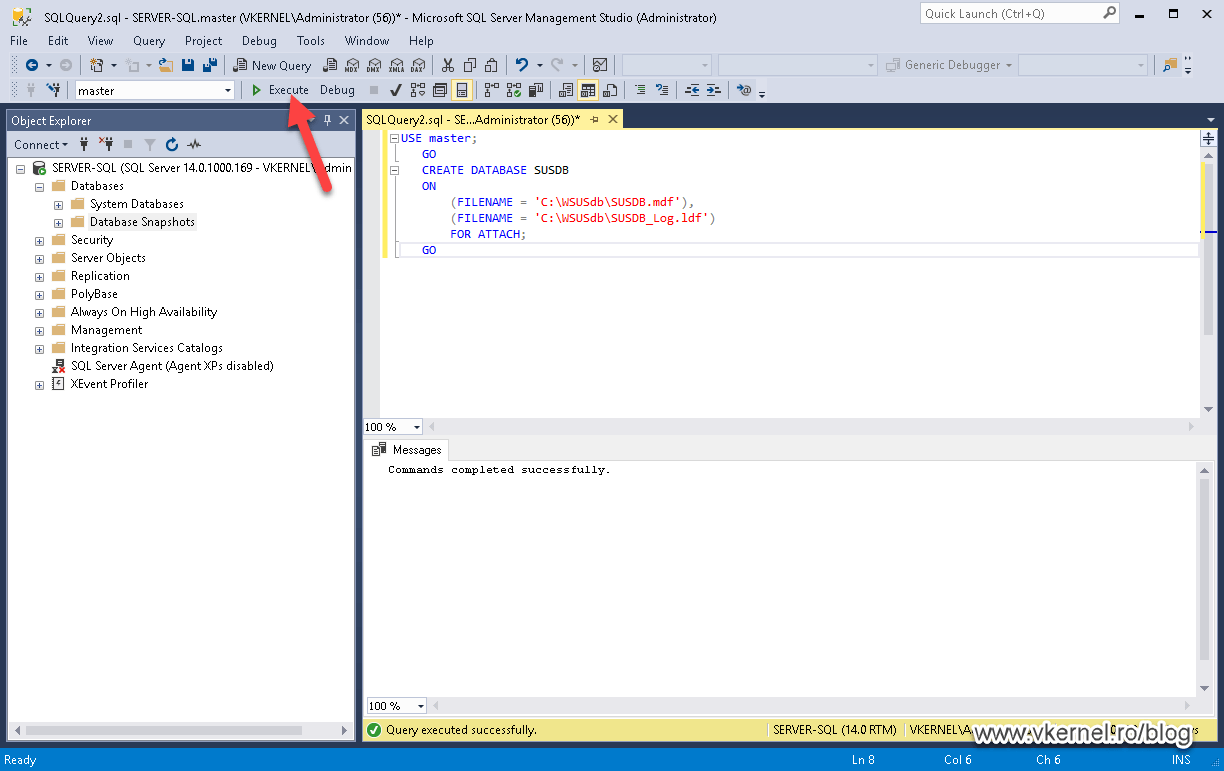
If you want to use a SQL query in your SQL Management Studio to attach the database, it goes like this:
 USE master;
   GO
   CREATE DATABASE SUSDB
   ON
       (FILENAME = 'C:WSUSdbSUSDB.mdf'),
       (FILENAME = 'C:WSUSdbSUSDB_Log.ldf')
       FOR ATTACH;
   GO
Change the path for the filenames with the one corresponding to yours then click the Execute button or hit F5 from your keyboard to start running the query.
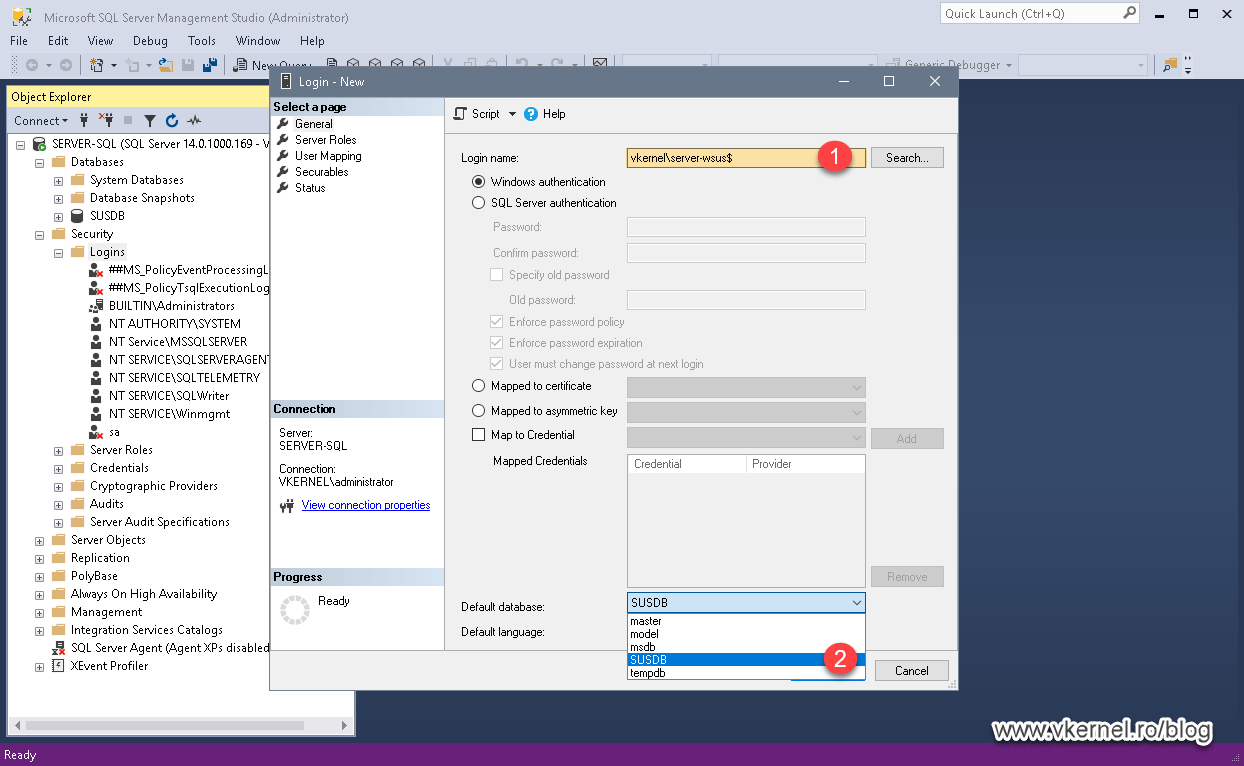
2.3. Configuring SQL database permissions for the WSUS server
In order for our WSUS server to be able to access the database we just attached to the SQL instance, we need to configure the proper permissions so we don’t have problems later on.
In the SQL Management Studio, expand the Security folder then right-click Logins and choose New Login.

The New Login window opens up. In the Login name field type your WSUS server name followed by a dollar sign at the end,
<domain name>\<WSUS server name>$
then from the Default database drop-down-box select our WSUS database.
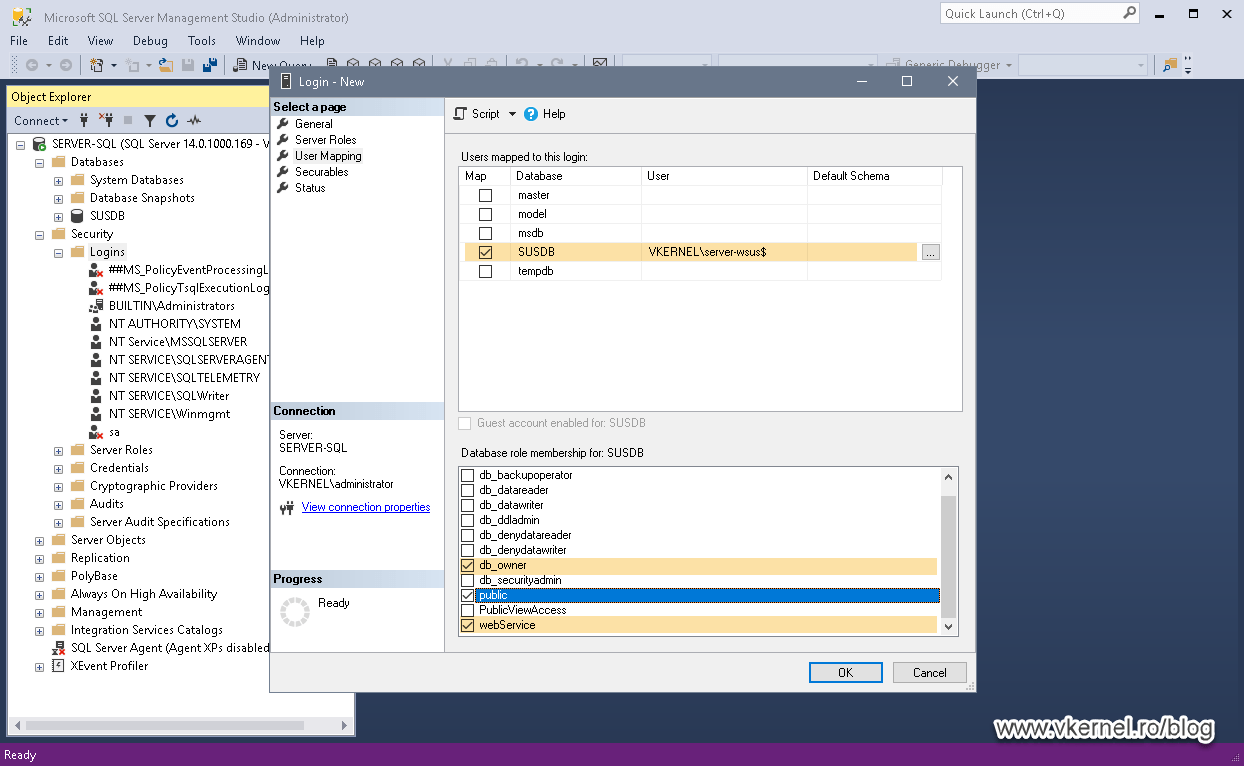
Moving to the User Mapping page, tick the box for the SUSDB database then on the Database role membership for section check db_owner and webService boxes. Click OK when done.
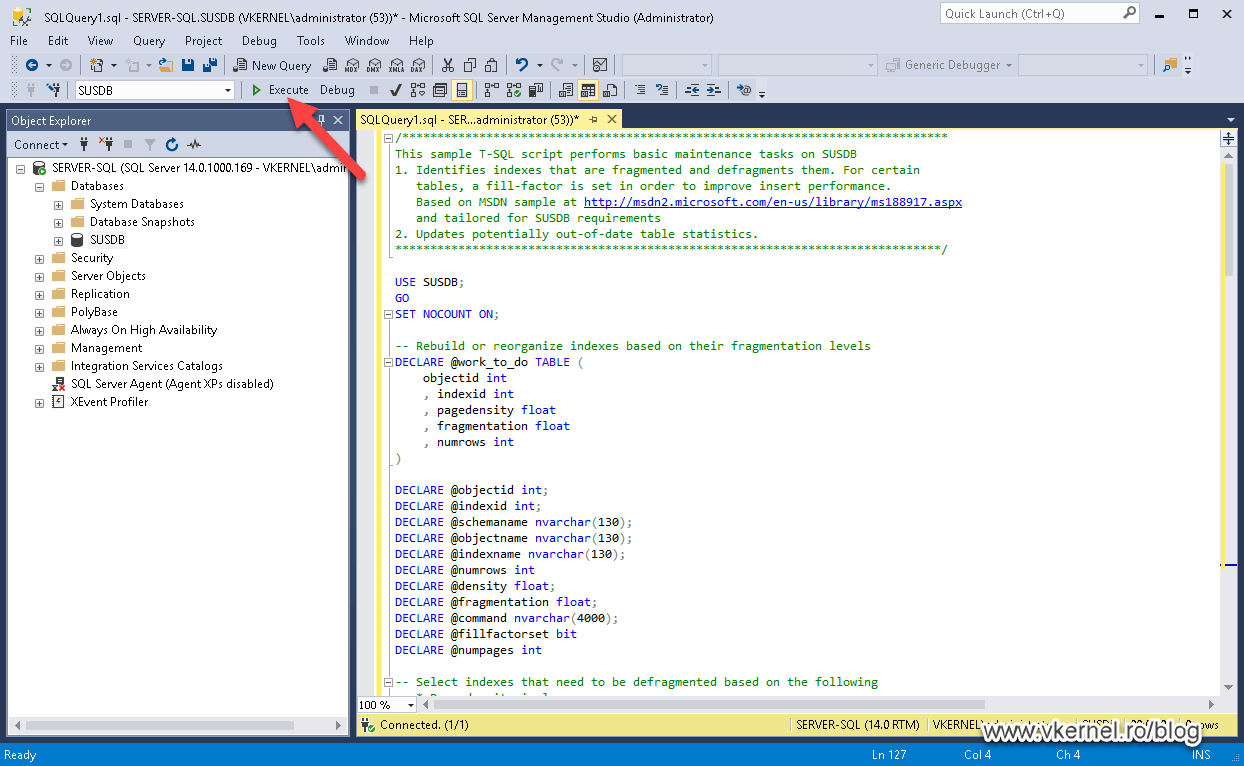
2.4. Re-index the WSUS database
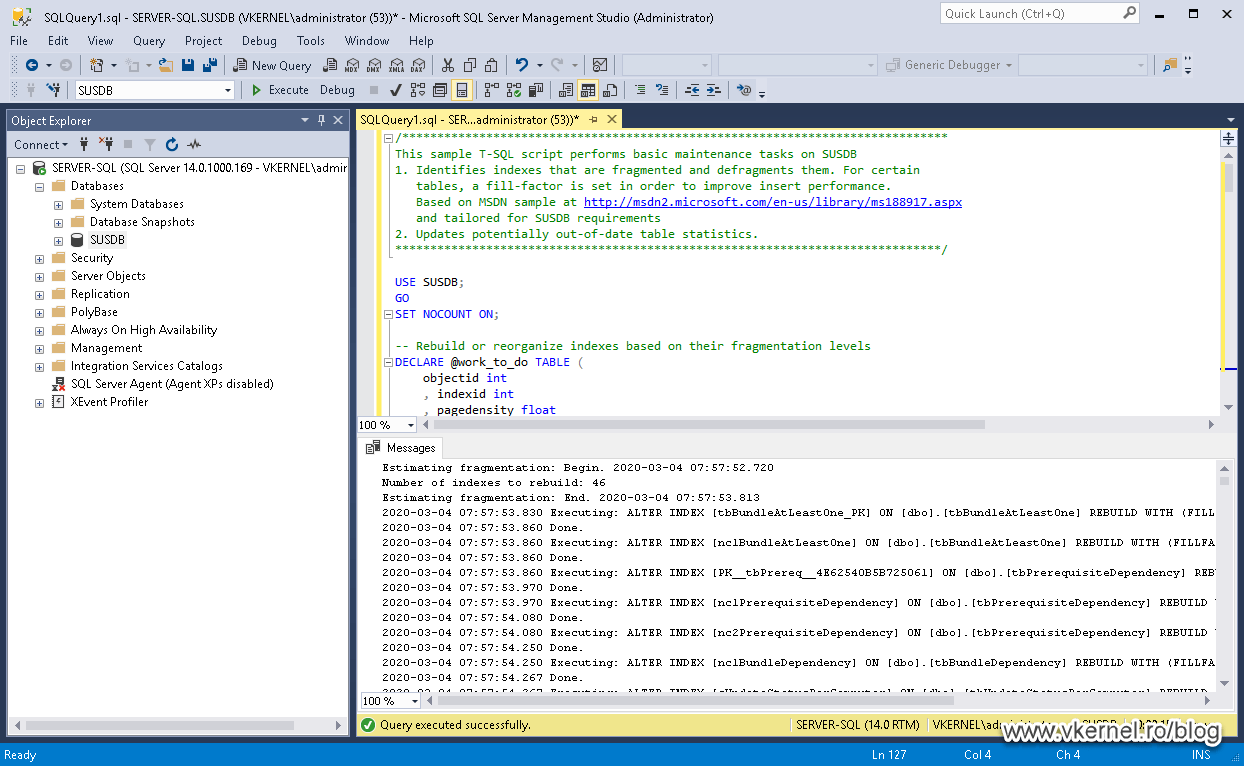
Before moving straight to re-configuring our WSUS server, I will like to take a minute and do some maintenance on the database by re-indexing the tables, and to accomplish this, we will use an already made Transact SQL script from Microsoft Technet.
/******************************************************************************
This sample T-SQL script performs basic maintenance tasks on SUSDB
1. Identifies indexes that are fragmented and defragments them. For certain
   tables, a fill-factor is set in order to improve insert performance.
   Based on MSDN sample at http://msdn2.microsoft.com/en-us/library/ms188917.aspx
   and tailored for SUSDB requirements
2. Updates potentially out-of-date table statistics.
******************************************************************************/

USE SUSDB;
GO
SET NOCOUNT ON;

-- Rebuild or reorganize indexes based on their fragmentation levels
DECLARE @work_to_do TABLE (
    objectid int
    , indexid int
    , pagedensity float
    , fragmentation float
    , numrows int
)

DECLARE @objectid int;
DECLARE @indexid int;
DECLARE @schemaname nvarchar(130);
DECLARE @objectname nvarchar(130);
DECLARE @indexname nvarchar(130);
DECLARE @numrows int
DECLARE @density float;
DECLARE @fragmentation float;
DECLARE @command nvarchar(4000);
DECLARE @fillfactorset bit
DECLARE @numpages int

-- Select indexes that need to be defragmented based on the following
-- * Page density is low
-- * External fragmentation is high in relation to index size
PRINT 'Estimating fragmentation: Begin. ' + convert(nvarchar, getdate(), 121)
INSERT @work_to_do
SELECT
    f.object_id
    , index_id
    , avg_page_space_used_in_percent
    , avg_fragmentation_in_percent
    , record_count
FROM
    sys.dm_db_index_physical_stats (DB_ID(), NULL, NULL , NULL, 'SAMPLED') AS f
WHERE
    (f.avg_page_space_used_in_percent < 85.0 and f.avg_page_space_used_in_percent/100.0 * page_count < page_count - 1)
    or (f.page_count > 50 and f.avg_fragmentation_in_percent > 15.0)
    or (f.page_count > 10 and f.avg_fragmentation_in_percent > 80.0)

PRINT 'Number of indexes to rebuild: ' + cast(@@ROWCOUNT as nvarchar(20))

PRINT 'Estimating fragmentation: End. ' + convert(nvarchar, getdate(), 121)

SELECT @numpages = sum(ps.used_page_count)
FROM
    @work_to_do AS fi
    INNER JOIN sys.indexes AS i ON fi.objectid = i.object_id and fi.indexid = i.index_id
    INNER JOIN sys.dm_db_partition_stats AS ps on i.object_id = ps.object_id and i.index_id = ps.index_id

-- Declare the cursor for the list of indexes to be processed.
DECLARE curIndexes CURSOR FOR SELECT * FROM @work_to_do

-- Open the cursor.
OPEN curIndexes

-- Loop through the indexes
WHILE (1=1)
BEGIN
    FETCH NEXT FROM curIndexes
    INTO @objectid, @indexid, @density, @fragmentation, @numrows;
    IF @@FETCH_STATUS < 0 BREAK;

    SELECT
        @objectname = QUOTENAME(o.name)
        , @schemaname = QUOTENAME(s.name)
    FROM
        sys.objects AS o
        INNER JOIN sys.schemas as s ON s.schema_id = o.schema_id
    WHERE
        o.object_id = @objectid;

    SELECT
        @indexname = QUOTENAME(name)
        , @fillfactorset = CASE fill_factor WHEN 0 THEN 0 ELSE 1 END
    FROM
        sys.indexes
    WHERE
        object_id = @objectid AND index_id = @indexid;

    IF ((@density BETWEEN 75.0 AND 85.0) AND @fillfactorset = 1) OR (@fragmentation < 30.0)
        SET @command = N'ALTER INDEX ' + @indexname + N' ON ' + @schemaname + N'.' + @objectname + N' REORGANIZE';
    ELSE IF @numrows >= 5000 AND @fillfactorset = 0
        SET @command = N'ALTER INDEX ' + @indexname + N' ON ' + @schemaname + N'.' + @objectname + N' REBUILD WITH (FILLFACTOR = 90)';
    ELSE
        SET @command = N'ALTER INDEX ' + @indexname + N' ON ' + @schemaname + N'.' + @objectname + N' REBUILD';
    PRINT convert(nvarchar, getdate(), 121) + N' Executing: ' + @command;
    EXEC (@command);
    PRINT convert(nvarchar, getdate(), 121) + N' Done.';
END

-- Close and deallocate the cursor.
CLOSE curIndexes;
DEALLOCATE curIndexes;


IF EXISTS (SELECT * FROM @work_to_do)
BEGIN
    PRINT 'Estimated number of pages in fragmented indexes: ' + cast(@numpages as nvarchar(20))
    SELECT @numpages = @numpages - sum(ps.used_page_count)
    FROM
        @work_to_do AS fi
        INNER JOIN sys.indexes AS i ON fi.objectid = i.object_id and fi.indexid = i.index_id
        INNER JOIN sys.dm_db_partition_stats AS ps on i.object_id = ps.object_id and i.index_id = ps.index_id

    PRINT 'Estimated number of pages freed: ' + cast(@numpages as nvarchar(20))
END
GO


--Update all statistics
PRINT 'Updating all statistics.' + convert(nvarchar, getdate(), 121)
EXEC sp_updatestats
PRINT 'Done updating statistics.' + convert(nvarchar, getdate(), 121)
GO
Right-click the WSUS database and choose New Query then paste the script in the new query section that opens up. Hit the Execute button from the toolbar or F5 from the keyboard to run the script. After a few seconds or minutes -depending on the size of the database- we should have the Query executed successfully message down at the bottom.
We can now close the SQL Management Studio and move over to our WSUS server so we ca point it to the new SQL instance.
3. Pointing WSUS to the new SQL server instance
3.1. Removing the WID Connectivity role feature and installing the SQL Server one
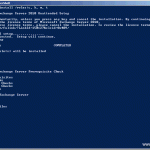
The first thing that we need to do on our WSUS server is to remove the WID Connectivity role feature, since it is not used anymore. To do that, open PowerShell and type:
Remove-WindowsFeature -Name UpdateServices-WidDB


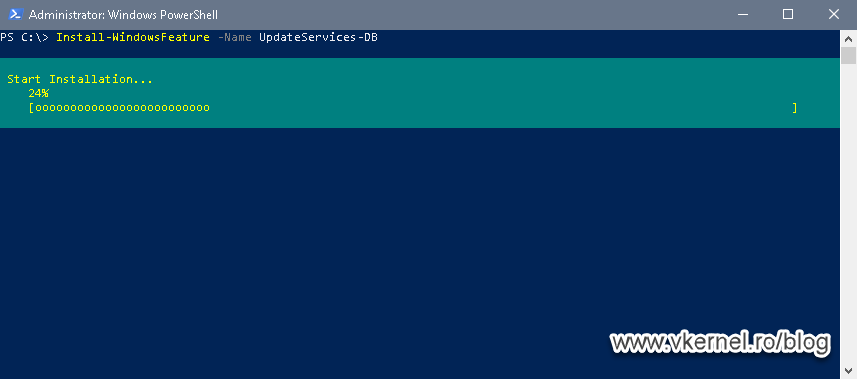
Once the removal of the WID Connectivity role feature is done, in the same PowerShell window, type the bellow command to install the SQL Server Connectivity role feature. After a few seconds we should have the WID Conectivity removed and showing as Available, and the SQL Server Connectivity showing as Installed.
Install-WindowsFeature -Name UpdateServices-DB
3.2. Pointing WSUS to the SQL server instance
We are finally at the point of creating the link between our WSUS server and the SQL server instance, and since we have all the prerequisites installed and ready, let’s make the connection. For this, we are going to use a utility called WsusUtil.exe which can be found in our WSUS installation folder.
In a PowerShell window, change directory to C: > Program Files > Update Services > Tools folder then type the following command line:
.\WsusUtil.exe postinstall SQL_INSTANCE_NAME="<SQL Server FQDN>" CONTENT_DIR="<Your WSUS Content Directory>"
SQL_INSTANCE_NAME – is the FQDN of your SQL Server. If you have a custom named instance, you will have to put your custom SQL instance after the server FQDN (Server-SQLCustomInstance).
CONTENT_DIR – Is the directory where all your downloaded WSUS updates are sitting.

The process will take a minute or so, and we can monitor the progress by opening the log file from the path printed on our screen.
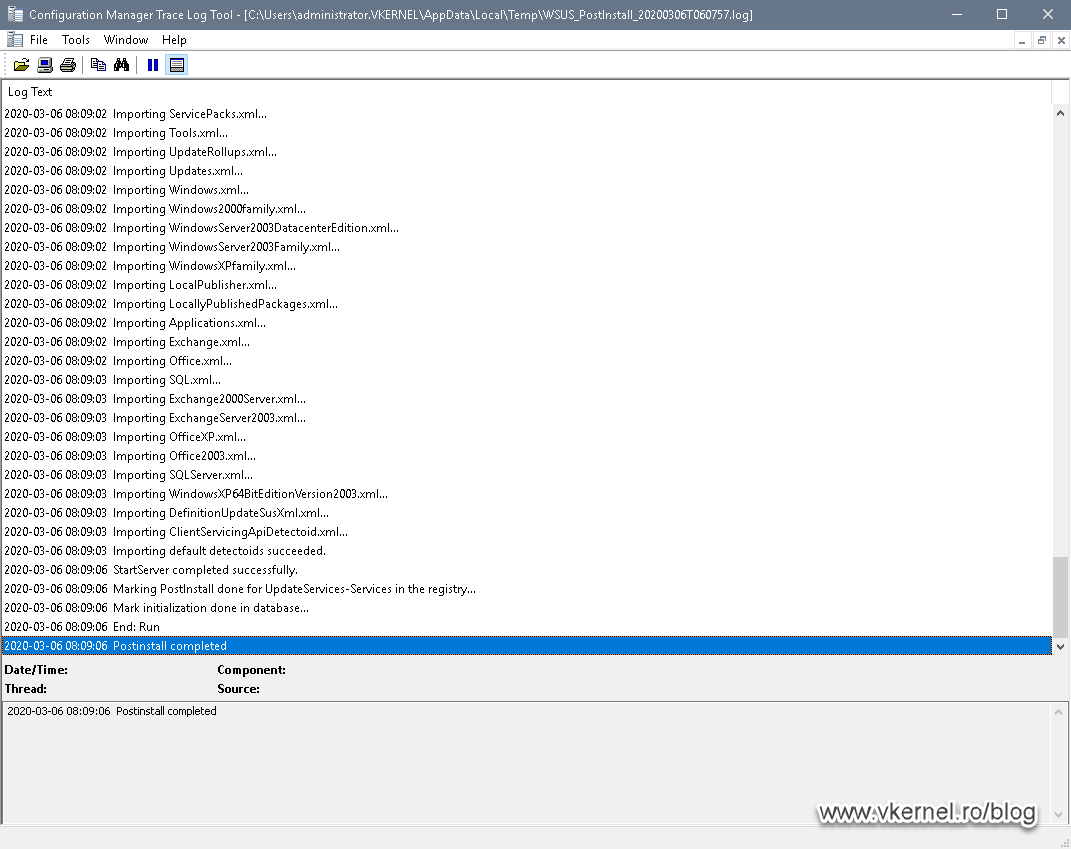
Once It’s done, in the registry we should have our SQL server FQDN configured, which means that our WSUS server is now using this key value to connect to the SQL server.
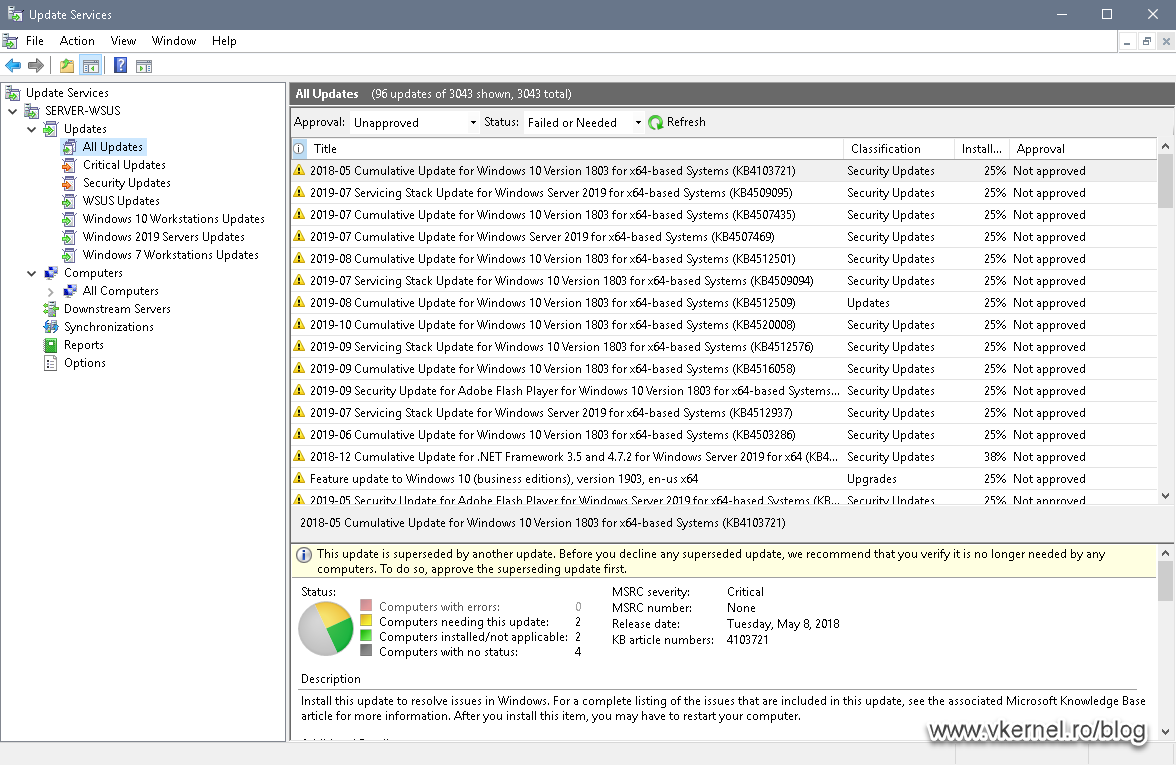
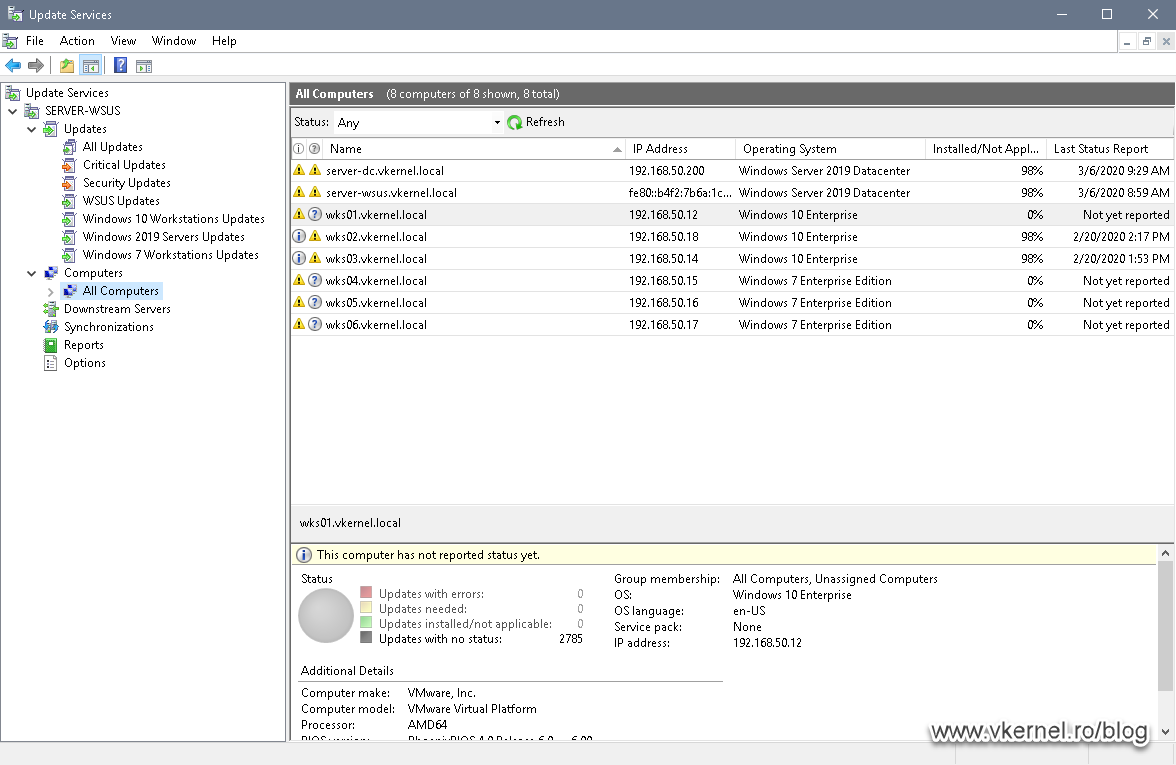
In the WSUS console, we also have our updates, our computers just as before, meaning that our work paid off.
Summary
Moving the WSUS database to a dedicated SQL instance it’s not that difficult and I will go for it if you have the SQL license already in place. Maybe is just me, but I like having most of the services concentrated in one place. Easier for backup, easier for management and troubleshoot. Yes, the SQL server can fail, but you can always build a SQL cluster in case you need that high availability.
If you have questions, ideas, or like to share your experience about how you migrated your WSUS database in your environment, let the community know in the comments area bellow.
Want content like this delivered right to your
email inbox?
More similar articles
 Installing and Configuring NFS on Windows Server 2012/R2
- Bulk import computers into the MDT Database using PowerShell
- Adding and removing the GUI in Windows Server 2012
- Remote Group Policy update in Windows Server 2012
- Creating Exchange 2010 Mailbox Databases using the Exchange Management Shell
- Install Exchange 2010 with SP1 using PowerShell

hi Adrian, as someone has already said, this is the best how to on this topic on the internet!
well done and thanks for putting it out.
Thanks for reading it Rafiq.
Hello,
Thank you for the article! :-). When I run Get-WindowsFeature -Name UpdateServices* I can see the WID is using, however when I go to registry I see the SQL instance is used. Why there is a difference? and what information I should rely on?
Thank you in advance for your help!
regards,
Tomek
Hi Tomek,
In this case, always trust the registry since this is the place where WSUS takes its configuration.
Nice guide. I’m going to try it again tonight after I made a mistake and had to roll back. I’d make sure you take a note of the contentdir location reg key so that you type the exact correct path in the final step during wsusutil.exe.
It all worked except servers couldn’t download updates. Because I’d put E:\ and not E:\WSUS.
thanks
Worked for me. Server 2016, WSUS, SQL 2016 Enterprise. No issues.
Thanks for this!
I am glad I could help out.
Hi, I was following your guide but at step 3.2 WsusUtil.exe finished with error. In the log file there was a message ‘Synchronization in progress. Please cancel synchronization and rerun postinstall again.’
After lot of googling I had to go to IIS console and delete ‘WSUS Administration’ site then start WsusUtil.exe again. This time it finished without any error.
Regards,
Valentin.
Hi,
Never had this problem, but hanks for the input.
Thanks, the best guide found in internet about this topic!
Thanks for passing by.