How To Install SQL Server 2008 R2 on Windows Server 2008 R2
Now days, there is barely an application that is not using a database, they can use an internal one or a third-party product like Microsoft SQL server. SQL server comes in more than one edition, and if you are a small business you can use the free edition of this product; off course it has some limitations. Witch edition suits your business, you can find out on this this Microsoft web site. If you have an Active Directory domain, your golden, because SQL server integrates great with AD; and this is the method I’m going to show you in this guide. To be able to install Microsoft SQL server 2008 R2 some minimum system requirements need to be fulfilled. A minimum of 1 GB or RAM and 1 GHz CPU speed will do for starters; as for OS goes you need a 2003 or 2008 SP2 or R2 server 64 bit. For a full list of system requirement click here.
Right before you start make sure that .NET Framework 3.5 is on the system or you will get a message like the one in the picture bellow. Just hit the OK button to install .NET Framework.

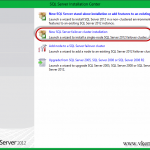
Now, if everything is in order the SQL Server Installation Center screen should pop-up. Click the Installation link from the left, then New installation or add features to an existing installation.

The wizard starts to verify that the system is ready for SQL installation. If you click the Show details button you will get a small report of what was checked, and what the results are. Click OK to continue.

Enter the product key then continue the wizard.

To be able to go forward you need to accept the EULA. Check the I accept the license term box, then click Next.

Because this is a fresh installation of SQL server some support files need to be installed on the system. Just click the Install button to continue.

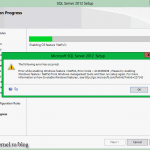
At the end we’ll get another report and this time some warnings might pop-up. The Microsoft .NET Application Security warning is because I don’t have an internet connection on this box, and the one with the firewall is because I don’t have the proper ports configured. My firewall is disabled anyway, so all ports are opened on the system. If you need to have the firewall enabled, configure the proper ports (usually you only need to open 1433) by following this Microsoft article.

Here we can choose to install all the features using the default settings, or customize the installation. For now we are going with a custom installation, so leave the option SQL server feature installation selected and click Next.

On the Feature Selection screen select the features you want for the installation. As a minimum you should select the Database Engine Services and Management Tools – Basic features, but for now I’m going to select all features so that we can walk through a complete installation process. For the Reporting Services feature you don’t have to install IIS any more, because it no longer depends on it. On the Shared Feature Directory boxes provide a new path for the installation, if the default one is not good for you.

If the Installation Rules checking passed, you can click the Next button to continue.

Select if you want to go with the default or a named instance name then choose where the installation files should reside on your hard drive. I’m going with the defaults here.

The wizard is doing another checking, but this time is verifying if there is enough space for the installation to proceed.

On the Server Configuration screen, specify the credentials used to run the services. It is recommended to use a separate account for every SQL service. For more details on how how to configure SQL service accounts, read this page.


On the Collation tab you can specify the collation for your Database Engine and Analysis Services instance by clicking the Customize buttons.

By default the wizard will configure SQL server to use Windows authentication mode, but there are times when you need SQL server authentication too. For the purpose of this guide I will use both. If you also want to use SQL authentication select Mixed Mode (SQL Server authentication and Windows authentication) radio button, the type a password in the boxes bellow. By clicking the Add button you can add a group or some users that will be nominated as SQL server administrators.

On the Data Directories tab you can change the default database, temp database, logs, backup location.

If you want to use FILESTREAM you can enable it from the FILESTREAM tab. More information about FILESTREAM can be found on this page.

Here you need to specify which accounts will have access to Analysis Services, and on the Data Directories tab you can change the default installation directories.


Select which type of Reporting Services installation to create. I will go with the default one, Install the native mode configuration.

If you want to send error reports to Microsoft check the box “Send Windows and SQL Server Error Reports to Microsoft…“, if not just click Next to continue.

Another system check is made by the wizard. If passed click Next.

Here hit the Install button to start the installation process.


At the end, if the installation ends without errors or warnings you will get a nice green check. Click the Close button to exit the installation wizard.

If you open the reports page it should work without problems.

If you connect using the console, again…no problems.


Want content like this delivered right to your
email inbox?
More similar articles
 Creating an Active/Pasive SQL Server Failover Cluster
- How to install SQL Server 2012 on Windows Server 2012
- Step-by-step Hyper-V Storage Live Migration
- Install and Configure SQL Server Reporting Services (SSRS)
- Creating and configuring Windows Domain Service Accounts
- Deploying and configuring the Remote Desktop Gateway Server Role