Backing up Domain Controllers using Windows Server Backup and DPM
This is happening people ! Domain controllers need backups, like any other server in your infrastructure, even if they replicate with one another. Backing them up is an easy job, but you need to know what kind of backups you need to perform. I know you just want to create an image server backup of your domain controllers (eg: Norton Ghost, Bare metal recovery) but those are not enough, because those images will get old and you will have a lot of problems on restoration; plus using only image based backups you can’t do an authoritative restore. You need to backup the System State also and keep it up to date. That way if a domain controller fails, you restore the domain controller from an image backup and from an up-to-date System State backup.
For this demonstration I will use the Windows server backup utility and DMP 2012. Windows server backup is great, but when your infrastructure starts growing, sooner or later you will realize that you need a professional solution. That’s why I’ve included DPM in this guide. Since I mentioned the Windows server backup utility first, let’s start with this one.
Go to Administrative Tools > Windows Server Backup. If you are seeing this message: “Windows Server Backup is not installed on this computer. To install Windows Server Backup, click Start…”

then you will have to open Server Manager and install the Windows Server Backup feature from here.

If it’s all good then click the Backup Once option, to perform one time backup, or click the Backup Scheduler option to perform a schedule backup. The second one is a little bit disappointing because of the lack of the schedule configurations options. You will see in just a moment what I’m talking about.

On the Select Backup Configuration screen go with Custom and click Next.

Click the Add Items button, and in the Select Items window choose what type of backup you want to perform. If this domain controller was never backed up before, I recommend you go with the Bare metal recovery option. This way you will backup up everything starting from the boot partition to system partition. If you then want to recover, you don’t have to install a fresh system, join it to the domain, configure it, install Active Directory, etc…, because you have all this in one image.

Since I already have an image backup of this domain controller, I’m going only with the System State backup.


This is what disappoints me. You don’t have the option to set the days you want the backup to be performed, you don’t have the option to do incremental or differential backups. All you can do is run this schedule backup every day, and set how many backups should be run in a day. For the sake of this example I’m going with the default one, and run a single System State backup every day at 9 PM. If you need more backups in a single day go with the More than once a day option and set the time.

Choose the destination where the backup should be performed. If you go with Backup to a share network folder, then the latest backup will always be overwritten by the new one. You will have only one backup at a time even if you scheduled three backups in a day, you will still have one, the newest one.

I’m going to set the backup for this domain controller to another drive, which is recommended.
By going with this option, the drive will be reformatted, and hidden from Windows Explorer. So make sure you provide a dedicated empty drive with no data.

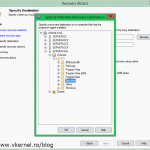
At the Select Destination Disk screen click the Show All Available Disks button to list all the disks present on this system.


Like I’ve said…your drive will be reformatted. This is what the message tells you. Click Yes to continue.

On the confirmation screen click Finish to save the changes.

After you pushed that button, your backup destination drive will be formatted and the backup schedule created.


Hit the Close button to end this wizard.

Now your backups will run at the scheduled times, and you can see this in the Windows Server Backup administration console. I manually started this just to see if it works.

Now let’s see how it’s done using DPM 2012. I presume you already installed DPM, provision the storage for your backups and deployed the agents to remote systems. Click Protection on the DPM console wunderbar; because we need to create a protection group. Once in the Protection section click the New button to start the Create New Protection Group wizard.

Click Next to skip the Welcome screen.

Select what type of computer you want to backup. Since these are domain controllers we are backing up, go with the default option.

Select your domain controllers from the list and expand them. Check the System State (Includes Active Directory) box and click Next. Again, if this is the first backup of your domain controllers, is recommended to create a full system backup, then do a System State backup.

Name your protection group then continue the wizard. If you have tapes, you can opt to have long-term protection by checking the box I want long-term protection using tape. For domain controllers this is not so common, since data on these type of servers changes a lot.

Specify the retention range and when the full express backup should run then click Next.

If you are not satisfied with the space that DPM allocated for the backups click the Modify button and provide your own values. I usually go with the default values and leave the Automatically grow the volumes box checked, just in case these values are not enough.

Choose how and when the backup(s) should start. Since I’m in a test environment I will go with the default values, but in a production environment you should schedule this after working hours. This is recommended because a lot of traffic will be created and the domain controllers will be a little busy.

If you want DPM to run a consistency check on your backups, leave the first box enabled. If you want it to run daily, enable the box Run a daily consistency check according to the following schedule.

On the Summary screen click the Create Group button to create the protection group.

The operation will take a few minutes to complete and when it’s done, just hit the Close button.


After this, DPM will run a consistency check and the protection status should turn to green.

You should now see all the recovery points in the Recovery section of DPM.

Want content like this delivered right to your
email inbox?
More similar articles
 Migrating from FRS to DFSR
- How to reset forgotten Active Directory Domain Administrator password
- Restoring failed Active Directory Domain Controllers
- Enabling the Active Directory Recycle Bin in Server 2012/R2
- Set Up Automatic Certificate Enrollment (Autoenroll)
- Deploying and Configuring an Read-Only Domain Controller (RODC)