How to Publish the CRL and AIA on a Separate Web Server
I have been talking about Enterprise PKI and how to build a multi-tier PKI infrastructure, but never talked in depth about the Authority Information Access (AIA) and Certificate Revocation List Distribution Point (CDP) extensions. In this article I want to extend the discussion about this certificates extensions since they are very important to understand and how to implement them correctly. The way we configure them, and the way we make them available impact the company since nowadays most of the services and internal websites are secured by certificates issued from an internal Certification Authority.
Now, as you know, right after we deploy our Enterprise Certification Authority (CA) server, the wizard has already configured the AIA and CDP extensions for our CA server(s) with some default settings or predefined settings if we used a CAPolicy.inf file. Most of the times the default settings work, especially in small environments with one or two CAs, but as the company grows, they present some problems because:
- LDAP publishing works best with Windows domain joined computers, so Linux, Android and IOS clients will have a really big problem with this one. Windows Workgroup computers might fail too when trying to reach the distribution point using LDAP.
- HTTP (the preferred method) was configured using the hostname of the server instead of a domain name. If clients can’t reach the hostname of the server, the connection will fail and they will get either a certificate chain error or a CRL one. Also, building another server with a different name imposes a problem since all the certificates are stamped with the old server name.
- For those companies that need to to do cross forest trust, it will be difficult to near impossible to do it using the default configuration or trough LDAP.
In order to fix this and make it more flexible, we are going to publish the AIA and CRLs on a different server, a web server. And since we are in Microsoft’s world, we are going to use IIS as our new location or distribution point.
And now I kind of have the feeling you want to ask me: But can we use another type of web server? And the answer is yes. You can use whatever web server you like, Apache, nginx etc…as long as it is available and clients can reach it. Also, if you want to make this highly available, you can put multiple web servers behind a load balancer (LB) and this way you can distribute the load and have a backup in case of a server failure. Just something to think about.
Now a second question that I feel you want to ask me is: If I already have a PKI infrastructure built, how do I configure the AIA and CDP on a different server? If you are in this situation, there is no easy way, and you need time to fully migrate. The most easy steps I can think of are:
- You configure the new AIA and CDP location on your CAs so every issued certificate from now on will have the old and the new location in the certificate. You wait for the old certificates (those issued before the AIA and CDP change) to expire, then you can use only the new distribution point. As you can probably figured it out, this can take years.
- The second method is you build another PKI infrastructure with the proper AIA and CDP location that works aside with the old one. This implementation still takes time because you will have to contact all the divisions in your company to renew their certificates from the new PKI. The approach does not take years, but it still takes a lot of time and effort.
- Another one is where you configure the AIA and CDP extensions with the new location and remove the old one, then force clients to renew their certificates. This one works pretty great since I used it to migrate an entire PKI environment. There are a lot of communications involved, but at least you get it done faster.
Are there any other methods? Off course. But it’s impossible for me to list every one of them here because honestly… I don’t know them all since every environment is different. If you have just a little bit of experience with certificates I’m sure you can find the best solution that fits your business. If not, use the comments area bellow so the community and myself to help you out.
Since publishing the AIA and CRL extensions to a different distribution point it’s done in medium to large environments where multiple tiers of CAs are involved, I’m also going to use a multi-tier PKI for this example.
1. Install and configure the IIS machine (aka new AIA and CRL distribution point)
The first step is to prepare our distribution point server where we will put the root certificates and CRLs so clients can access them. Deploy a VM with a Windows Server edition, join it to your domain, then install IIS.
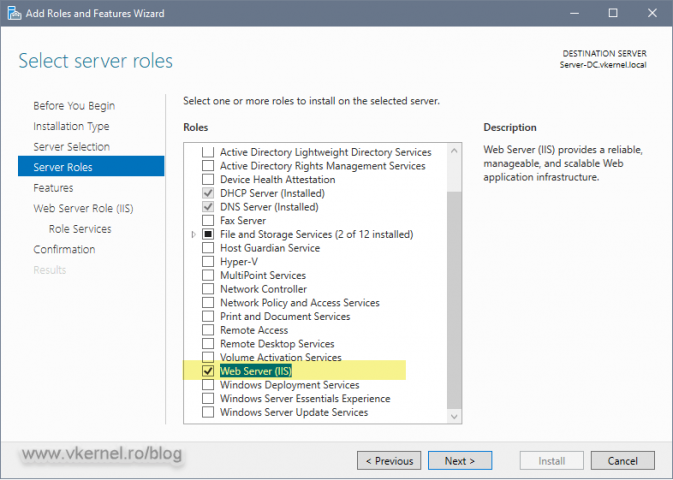
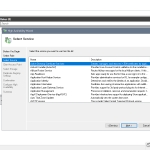
To install IIS, open Server Manager, go to Manage > Add Roles And Features and follow the wizard. Once you get to the Server Roles page of the wizard check the Web Server (IIS) box then click the Add Features button on the window that pops-up. Finish the wizard.
In case you prefer PowerShell for the IIS installation, use the bellow line:
Add-WindowsFeature "Web-Server" -IncludeManagementTools
1.1. Making Delta CRLs available for download in IIS
Right after the IIS installation, there is a small configuration change we need to make in order for our delta CRLs to be accessible for download by clients. Delta CRL names have a “+” (plus) sign at their end and without this configuration change in IIS, clients will fail to download the delta CRL resulting in a certificate warning.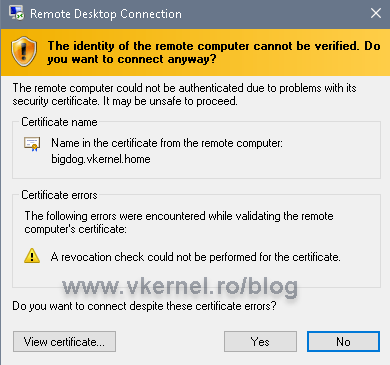
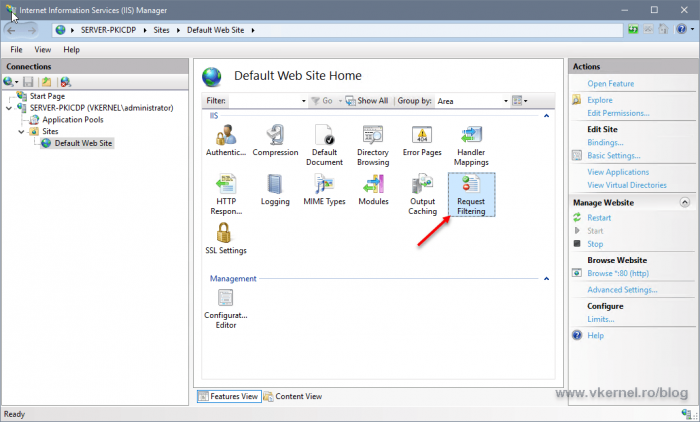
To make it work, open the IIS Manager console, go to your website, then double-click Request Filtering.
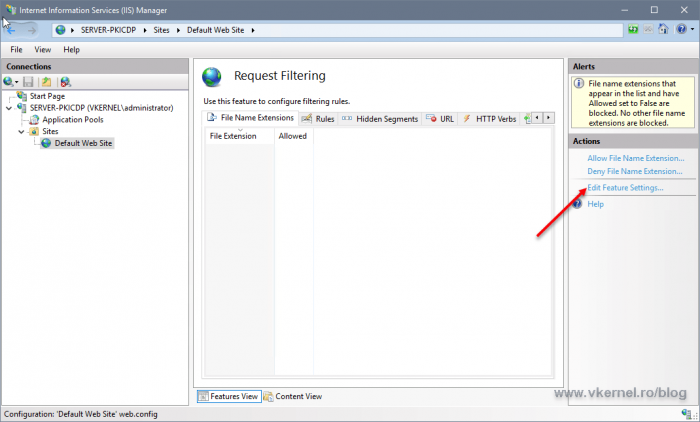
From the Alerts section, click the Edit Features Settings option.
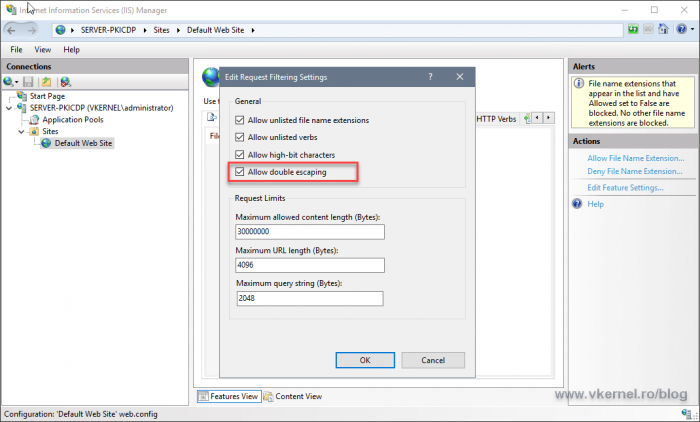
Check the Allow double escaping box then hit OK.
Now clients will be able to download/access delta CRL files from the distribution point server (IIS server).
2. Setting up DNS records
The next thing we need to configure is DNS. First and foremost think of a name, a FQDN that you want to use for clients to access the CRLs and the certificates on the distribution point. This FQDN will be present in every issued certificate and it can be whatever you want, but I recommend something simple, short and self explanatory like pki.<your domain name>.
[important]If you have multiple web servers behind a load balancer, make sure you use the VIP of the load balancer for the DNS A record.[/important]
Now that we know what name to use for our AIA and CDP location, we need to make it accessible over the network, and we do this by creating a CNAME or A record in our internal DNS zone.
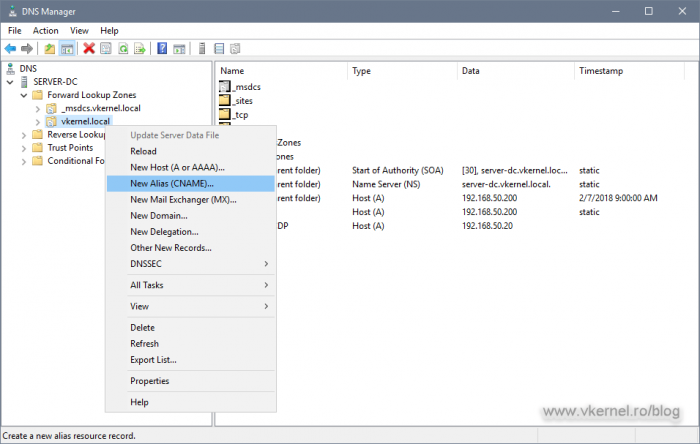
Log on to one of your domain controllers and open the DNS Manager console. Right click the domain DNS zone name and choose New Alias (CNAME).
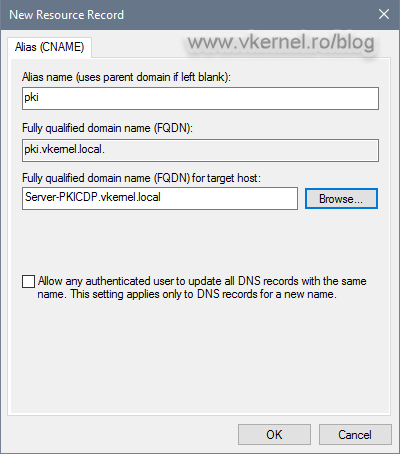
In the window that pops-up type the alias of your chosen, then browse for the A record of the IIS server. The A record was automatically created when we joined the IIS server to our internal Active Directory domain. Click OK, and let it replicate.
3. Configure the AIA and CDP (CRL Distribution Point) extensions on the Root CA
3.1. Configure the CDP (CRL Distribution Point) extension on the Root CA
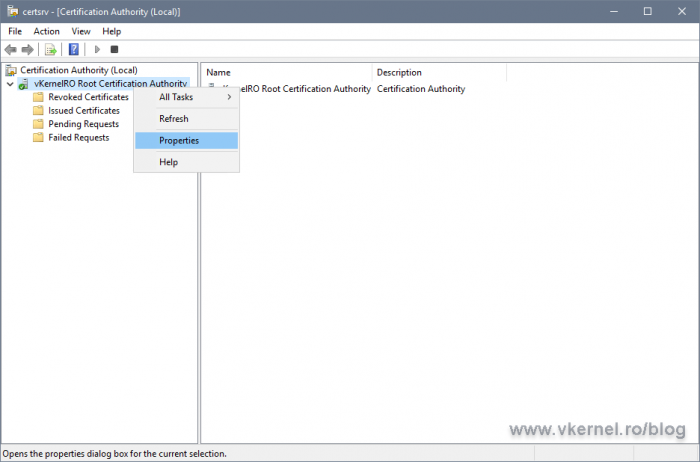
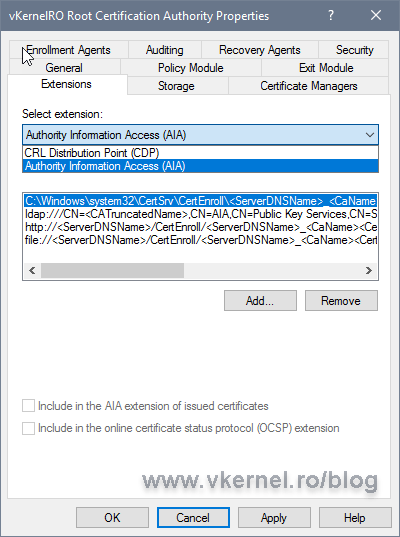
To change the CRL publication and distribution points on your Root CA server, open the Certification Authority console, right-click the CA name and chose Properties.
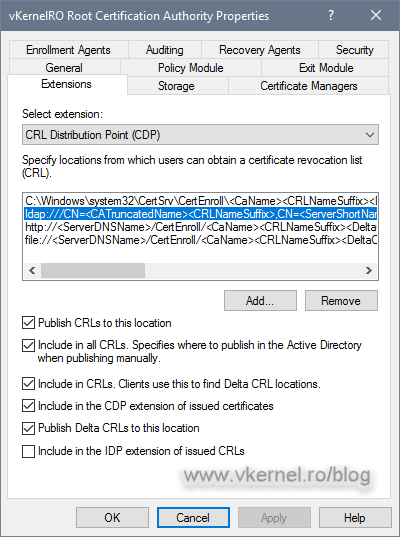
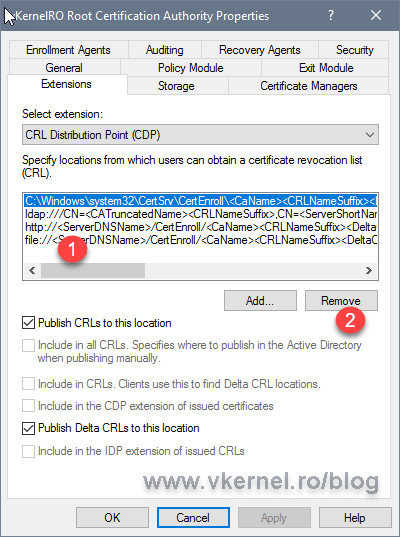
On the Extensions tab you can see the default CRL and AIA publication and distribution paths. Select them, and click the Remove button for every one of the entries in the list until you get an empty one.
[important]If you really like the default publication point and CRL name (C:Windowssystem32CertSrvCertEnroll<CRL Name>), you can leave the first entry in the list and not delete it. In this case I want to publish the CRL on a different folder on the local host and use a different name for the CRL file.[/important]
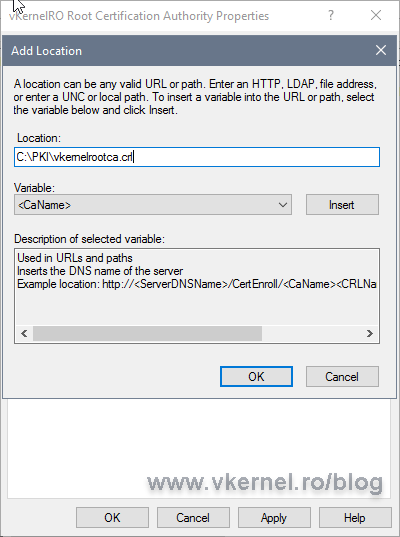
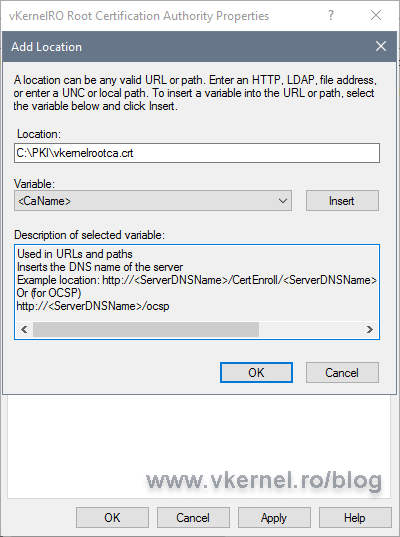
Now click the Add button to configure a new path to where the CA should publish the CRL, and in this case, a new folder created on the local server.
After you entered the new publication path click OK.
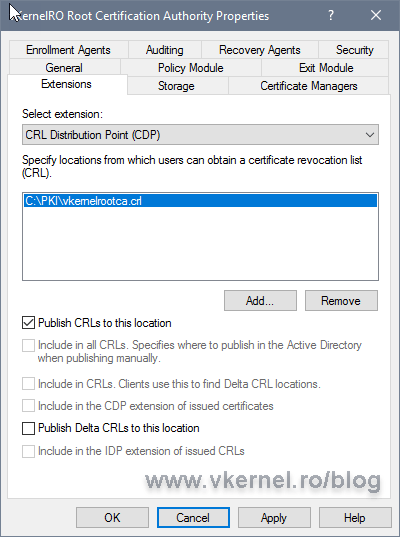
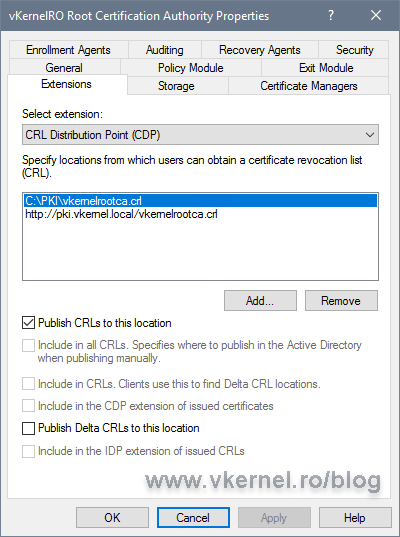
Back on the Extensions tab, select the new entry and make sure you check the Publish CRLs to this location box. Since this is a Root CA, we are not going to have delta CRLs, so leave the Publish Delta CRLs to this location box un-checked.
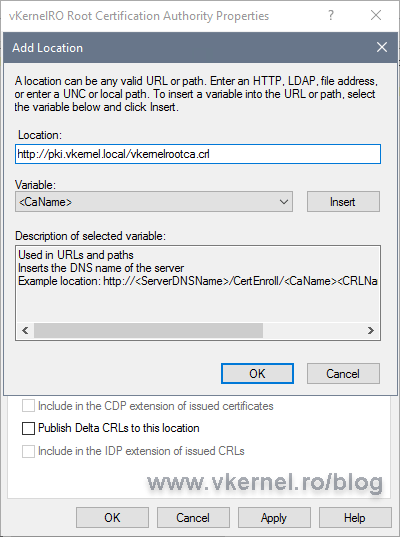
Click the Add button again to add the URL where clients can find the CRL published by the Root CA. The URL we put here will be stamped in every issued certificate from this CA. Usually the only clients for a Root CA server are the Intermediate CAs or Issuing CAs, so not much traffic happening here. The FQDN used for the URL is the one we created in the Setting up DNS records section.
Make sure the CRL name you type in the box, is the same with the CRL name we typed a moment ago when we created the publication path.
[important]You must never implement Secure Socket Layer (SSL) protection for the Web server hosting the CA certificate or CRL publication points. Also, never use the HTTPS protocol for CRL file retrieval because is not going to work. CryptoAPI will permanently fail to fetch HTTPS URLs.[/important]
When you are done click OK.
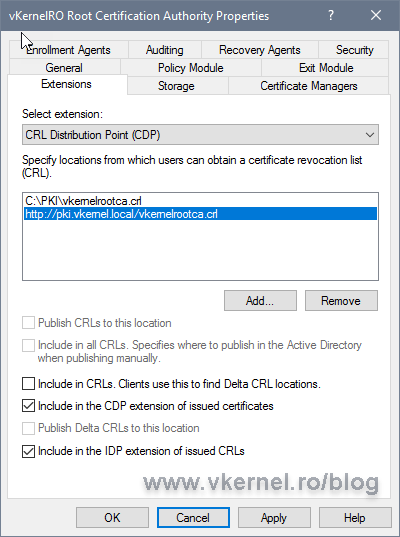
Back on the Extensions tab, check the Include in the CDP extension of issued certificates and Include in the IDP extension of issued CRLs boxes.
3.2. Configure the AIA extension on the Root CA
Now that we took care of the CDP let’s move on at configuring the AIA extension. From the Select extension drop-down-box choose Authority Information Access (AIA).
Once again, clean everything in the list and set the publication point and URL for the root certificate like we did in the Configure the CDP (CRL Distribution Point) extension section, but make sure this time you put the .crt extension at the end of every path instead of .crl, since we are now publishing the Root CA certificate.
On the URL entry, check the box Include in the AIA extension of issued certificates in order to stamp the URL in the certificates. If you have an OCSP Responder you will have to also check the second box, Include in the online certificate status protocol (OCSP) extension.
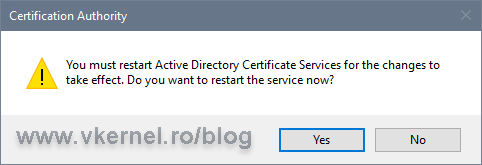
Click OK then choose Yes to restart the Active Directory Certificate Services (ADCS) service.
4. Importing the new CRL and root certificate to the distribution point
Now that we configured the new CRL and AIA on our Root CA, it is time to set up how often the CRL will be published and to actually copy the new CRL and the root certificate to our IIS server (distribution point).
4.1. Configure the CRL publication interval
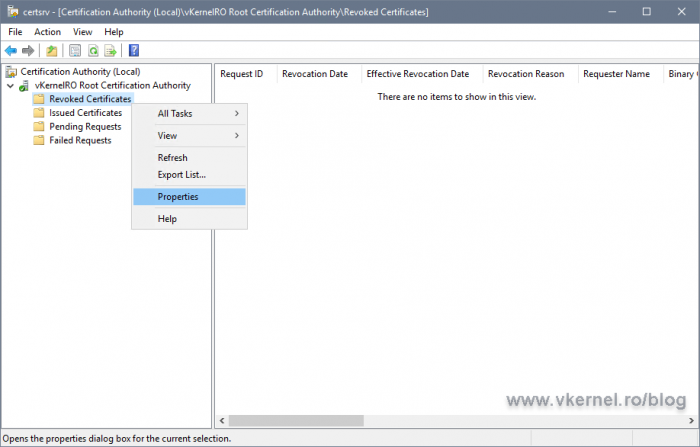
In the Certification Authority console, right-click Revoked Certificates and choose Properties.
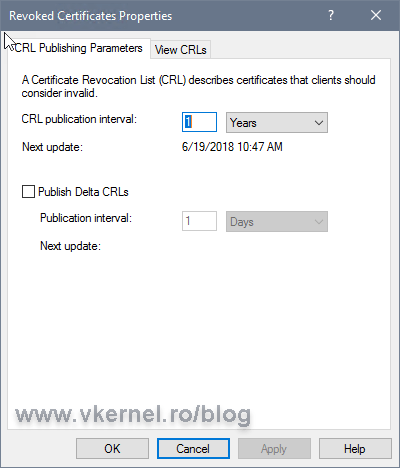
In the CRL publication interval box type the new renewal interval value. Since this is a Root CA server, a one year publication interval is more than enough. Leave the Publish delta CRLs box un-checked since for root and also for intermediate CAs usually there is not Delta CRL file published.
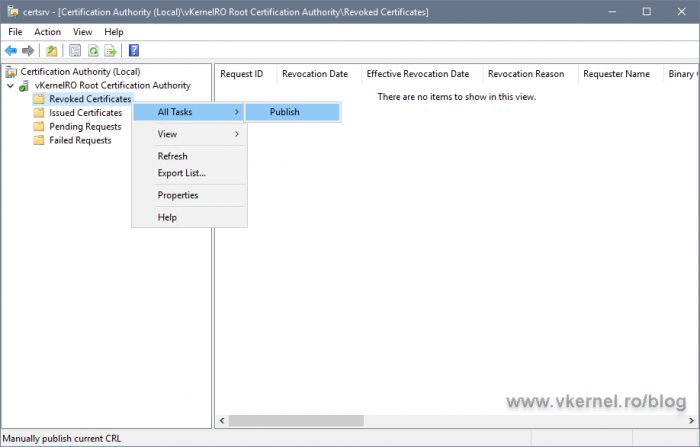
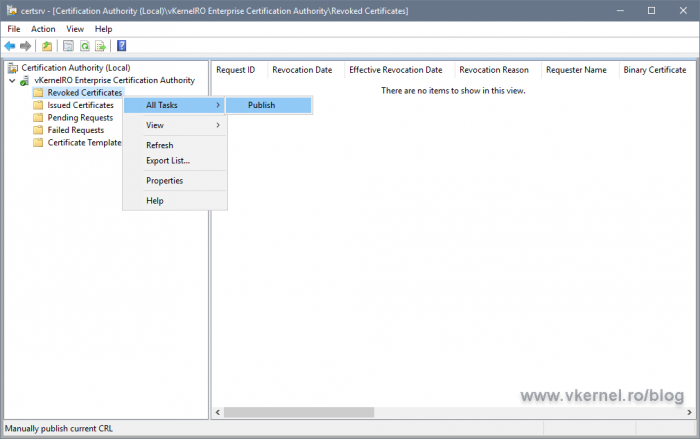
Now right-click the Revoked Certificates folder again and choose All Tasks > Publish. In the Publish CRL window that opens, just hit the OK button. This will publish the new CRL on the local server folder we configured in the CRL extension, which in my case in C:PKI.
4.2. Exporting the root certificate
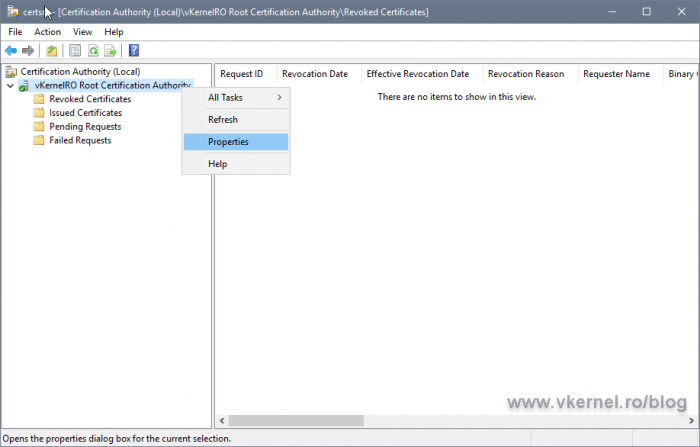
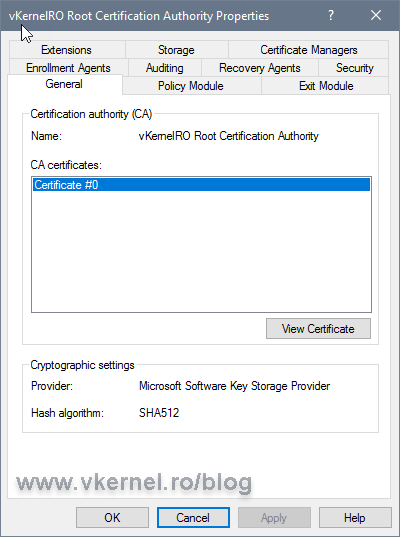
Open the Certification Authority console, right-click the name of the certification authority and then select Properties.
In the Properties window that pops-up, go to the General tab then select the certificate for the certification authority and click View Certificate.
[important]If the certificate was renewed you will have multiple entries in the CA certificates list. The one that has the higher number at the end it is the latest one issued/renewed.[/important]
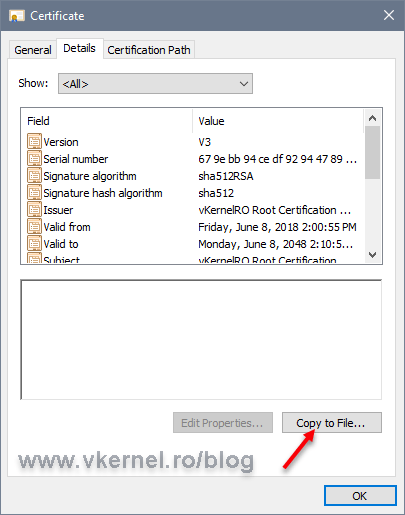
Once the certificate window opens, click the Details tab then hit the Copy to File button.
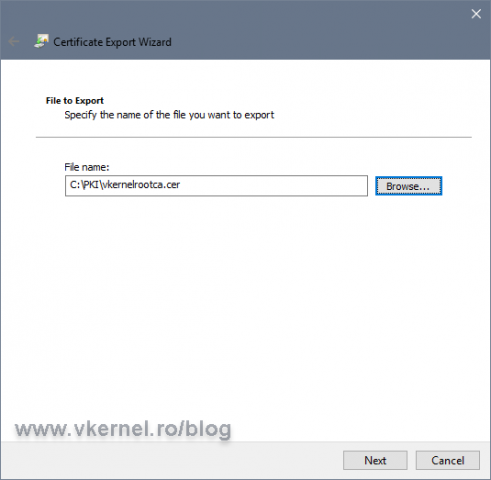
Follow the wizard and export the certificate. It is very important when you export the certificate to give it the same name as you typed in the AIA extension, or clients will not be able to find it. Export the certificate in the PKI folder on the local server.
The wizard will export the file in a .cer format, so after the export, make sure you change the file extension into .crt.
4.3. Import the new CRL and root certificate on the distribution point
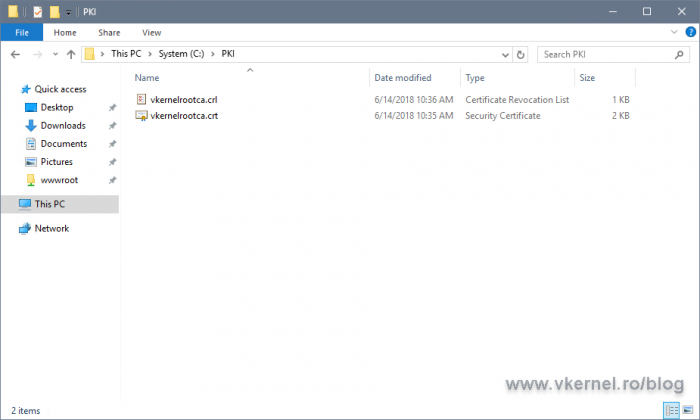
If we take a look on the local server folder we created for our CRL and AIA publication, we should now have the new CRL created and also the exported root certificate.
Now you might ask: How do we copy the CRL from the local server (publication point) to the distribution point (IIS server)? And the answer is, manually. There is no need for automation here since the server is powered on once a year to renew the CRL.
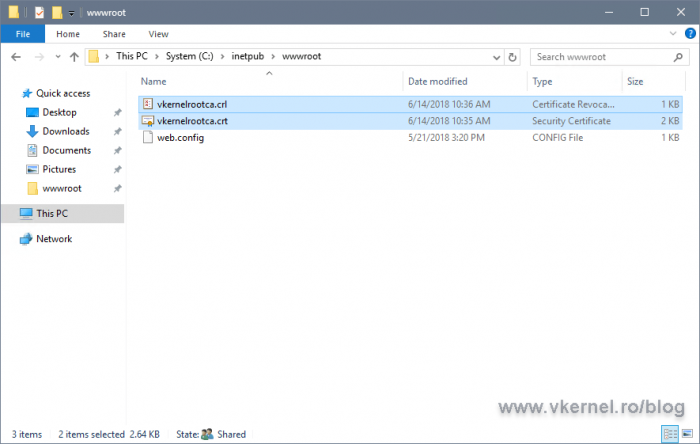
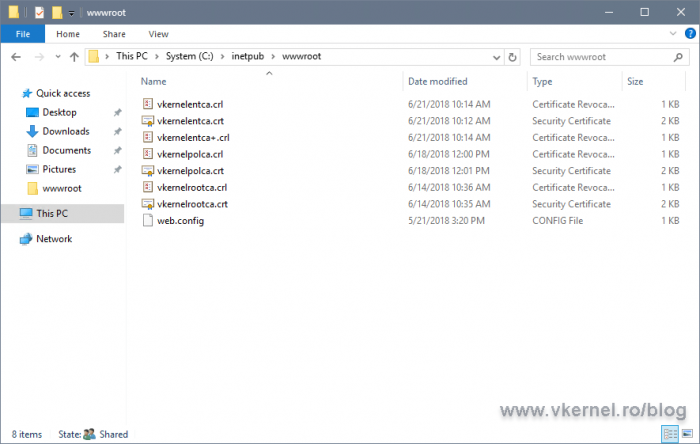
Copy this two files on the root folder of your IIS web site.
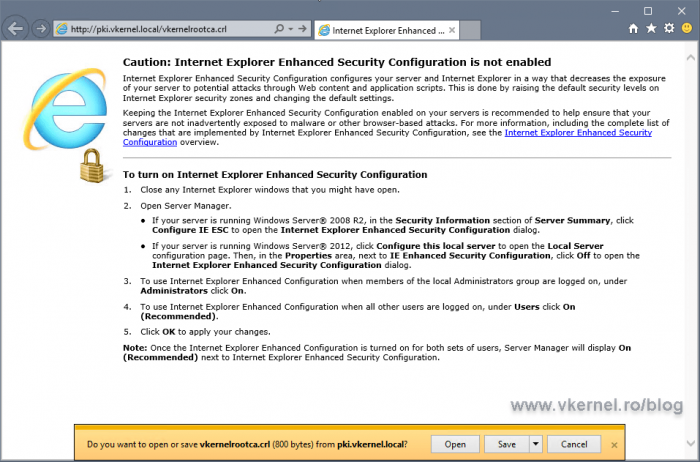
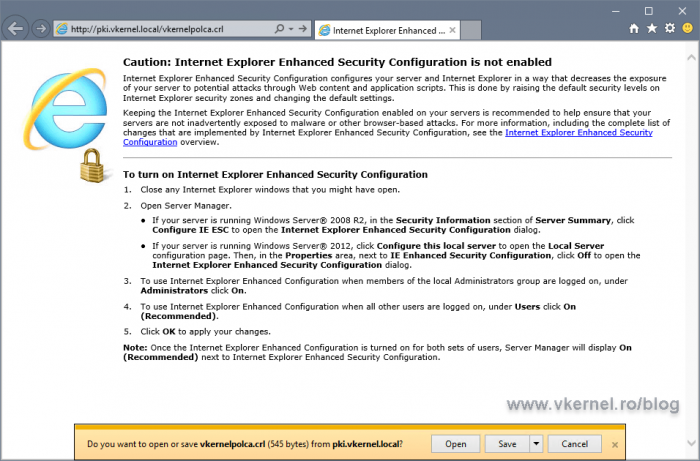
Now let’s make sure they are accessible. From a client, open a browser and type the FQDN used in the AIA and CDP extensions. The CRL and root certificate should download with no problem.
5. Configure the AIA and CRL on the Intermediate CAs and Issuing CAs
5.1. Configure the CRL and AIA on the Intermediate CAs
If you don’t have Intermediate CAs in your environment, you can go ahead and skip to section 5.2.
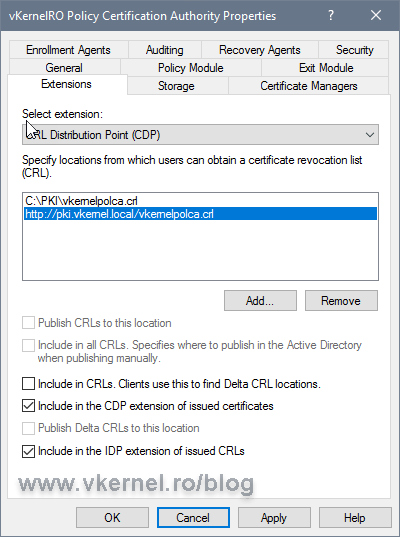
In order to configure our Policy or Intermediate CAs, all we have to do is follow the exact same steps from section three of the article and we are done. Off course, give the CRL and certificate a different name, a distinctive one.
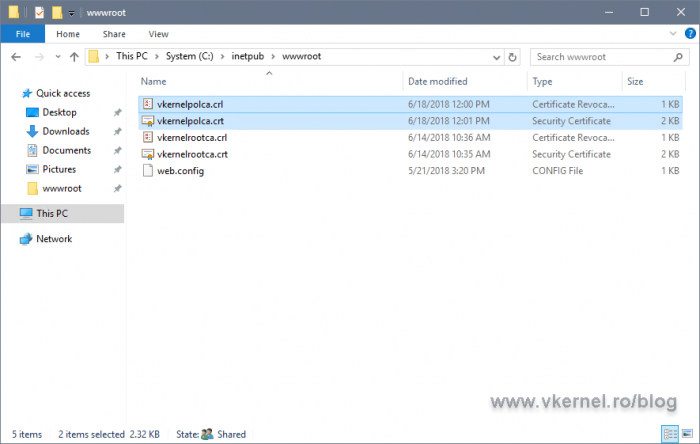
Copy the files on the root folder of our IIS server…
…then test them to see if they download correctly.
5.2. Configure the CRL and AIA for the Issuing CAs
I wanted to create a separate section for the Issuing/Enterprise CAs configurations because this are somehow special since they are the ones that “interact” with the end client.
During the CRL and AIA configuration you might want to leave the LDAP path unchanged, but remember…if you do, your Workgroup clients, Linux clients/servers will have a hard time downloading the CRLs and certificates this way. You will also have to carefully plan this and decide which path will be the first one clients will access. The HTTP one or the LDAP one? The order is very important, because having multiple paths in a CDP extension leads to time-outs, resulting in clients spending a quite amount of time attempting to connect to each URL in the listing.
By default, the maximum time-out for all CRL retrieval is 20 seconds, and the first CDP location is given a maximum of 10 seconds to succeed. After the 10 seconds retrieval interval expires, the certificate chaining engine will proceed to the next URL in the listing. Make sure the first listing in the URL list is the one that is accessed by the greatest number of computers so time-out does not occur.
[important]Consider implementing the same validity period for both the base CRL and delta CRL, but don’t make it too short so you can have enough time to recover a failed CA.[/important]
For publishing CRLs we have two options on an Enterprise CA:
- We publish the CRLs on the same server (as we did with the Root and Policy CAs) then use use a script to copy them on the distribution point server (IIS server)
- We publish the CRLs directly on the distribution point
If you are wondering why are we not configure them as the Root or Intermediate CAs, remember…for Enterprise CAs the publishing interval is way lower compared to Policy or Root CAs. By default the base CRL is published every week, but here we also have Delta CRLs which are renewed every day. In this case our only option is to either automate the file copy process, or publish the files directly on the distribution point. As you might guessed, we will use the second option.
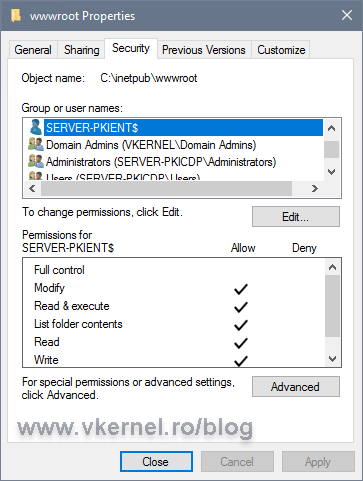
Share the root folder of your website and give the Issuing/Enterprise CAs servers(s) full Share and NTFS permission.
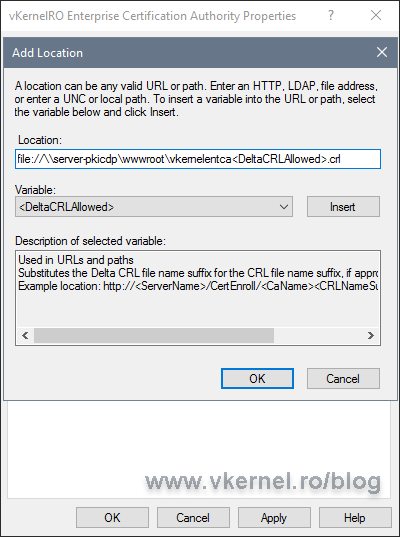
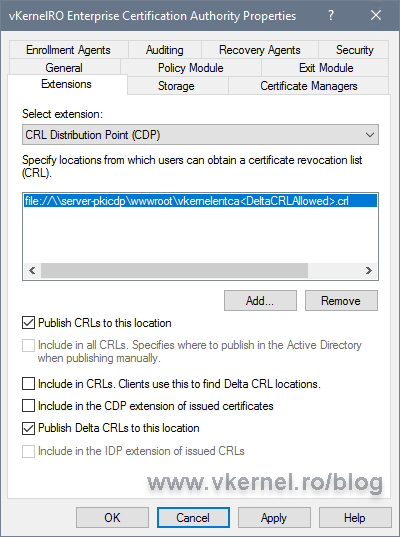
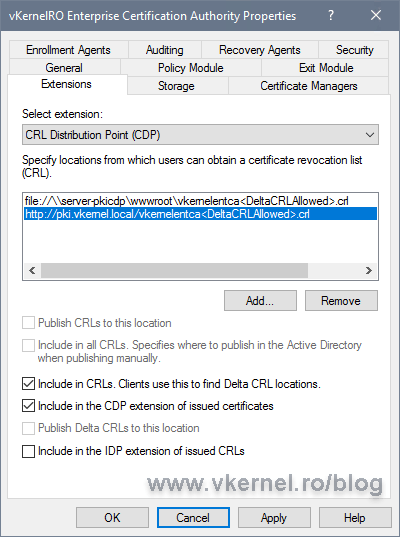
Back on the Enterprise CA server open the Certification Authority properties and go to the Extensions tab. On the CRL Distribution Point (CDP) extension option, configure the publishing path using the bellow format. As you can see, this will use a UNC path to publish the CRL, and in our case it will publish it directly on the IIS root directory folder that we shared a moment ago. This is great because once the new versions of the CRL or Delta CRL are published, they will immediately be available to clients.
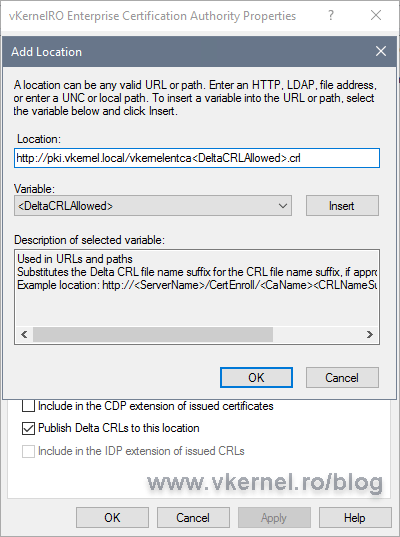
One other thing that you can observe here is the <DeltaCRLAllowed> variable. Once added to the path, we make the CA to not only support Base CRL publishing, but also Delta CRL ones. This variable needs to be added always at the end of the path, but before the file extension (don’t go after the dot).
file://<IIS Server FQDN><Share Name><CRL Name>DeltaCRLAllowed.crl
As before, check the Publish CRLs to this location box, but this time also check Publish Delta CRLs to this location.
Now let’s take care of the distribution path also, so clients can actually know where to go and download the CRLs. Click the Add button again, then type the URL to the distribution point. Don’t forget to add the <DeltaCRLAllowed> variable at the end. When done, click OK.
Check the boxes, Include in CRLs. Clients use this to find Delta CRL locations and Include in the CDP extension of issued certificates then move to Authority Information Access (AIA).
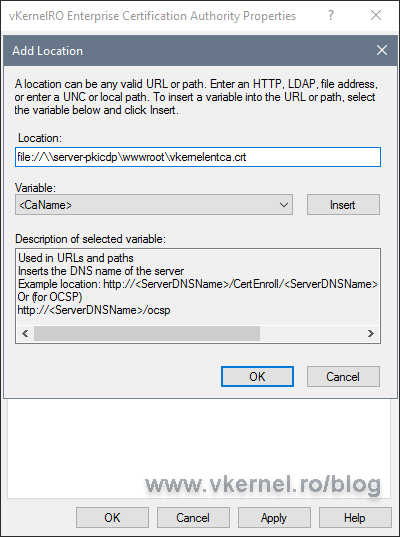
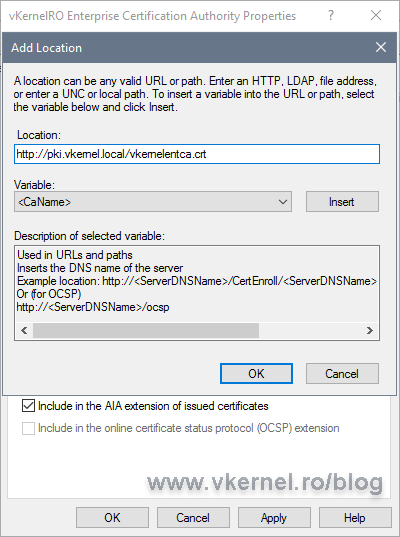
The Authority Information Access extension is configured similar to the CDP one, just make sure you use the .crt file extension. One other important thing is to NOT check the Include in the AIA extension of the issued certificates box when configuring the publication location path.
Click the Add button again and type the URL where clients can find the Enterprise certificate. This time, check the box Include in the AIA extension of issued certificates then click OK and restart the Certification Authority Services service.
Now right-click the Revoked Certificates folder and choose All Tasks > Publish. Click OK on the window that pops-up and use the default options. This will generate the Base CRL and the Delta CRL at once on the IIS server root directory.
Don’t forget to export the Enterprise certificate and rename it using the same name you set up in the AIA extension. Once you have the certificate with the proper name and extension (.crt), copy it on the distribution point folder. We should now have all the certificates and CRLs in place and accessible to clients.
6. Testing the new CRL and AIA distribution point
6.1. Testing CRL and AIA distribution point using a browser
In order to see this in action we need to issue at least one domain certificate. We can do this from our distribution point server.
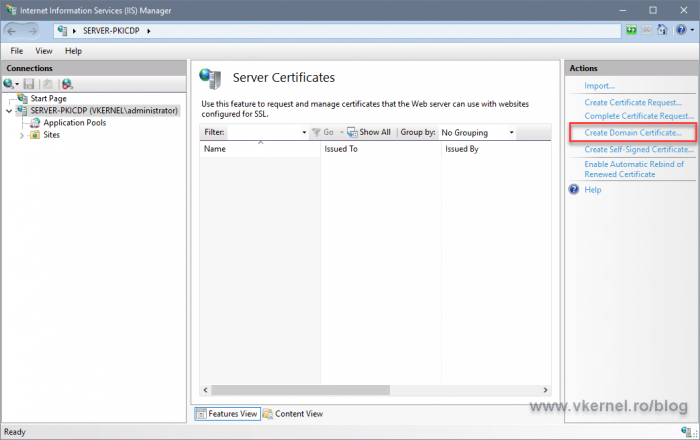
Open IIS, and from the Server Certificates section click the Create Domain Certificate link. Follow the wizard and issue the certificate.
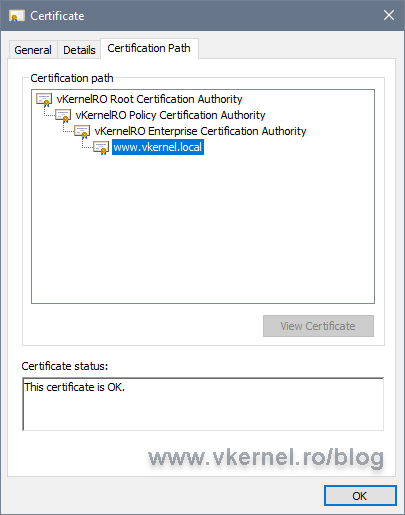
If we now open the certificate on a client and go to the Certificates path tab, everything should be trusted up to the root. If is not, then you are missing a certificate in the chain.
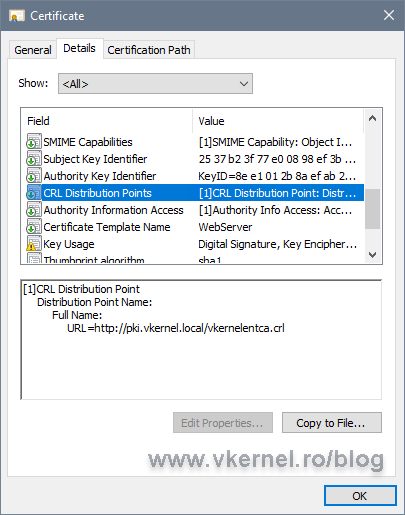
On the Details tab, in the CRL Distribution Points field, we have the URL that we configured for our CDP on the Enterprise CA server. Drill down to the Authority Information Access field where we have the URL for our Enterprise certificate.
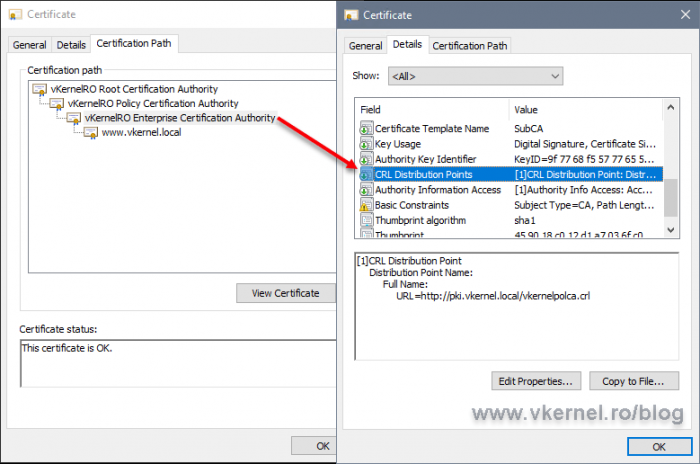
Checking the Enterprise certificate, we can see the URL(s) pointing to its upper CA, the Intermediate/Policy CA.
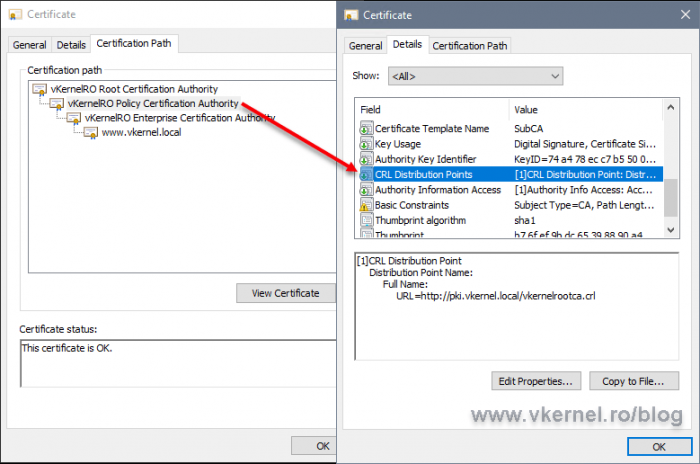
The same goes for the Intermediate/Policy CA pointing up to the root CRL and root certificate.
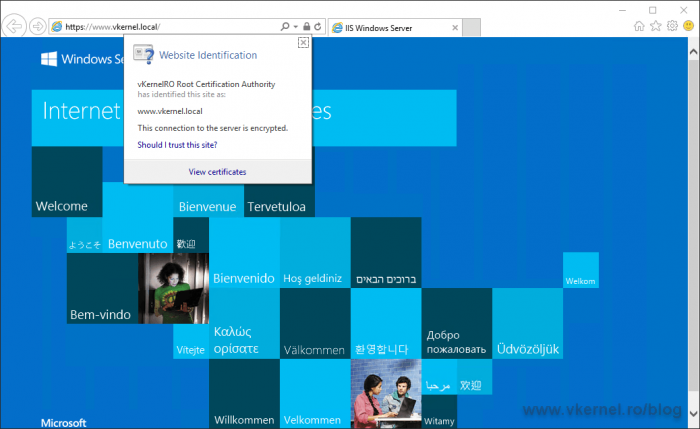
Opening a web browser secured by the certificate should be no problem if the client can download the CRLs from the URLs in the certificate.
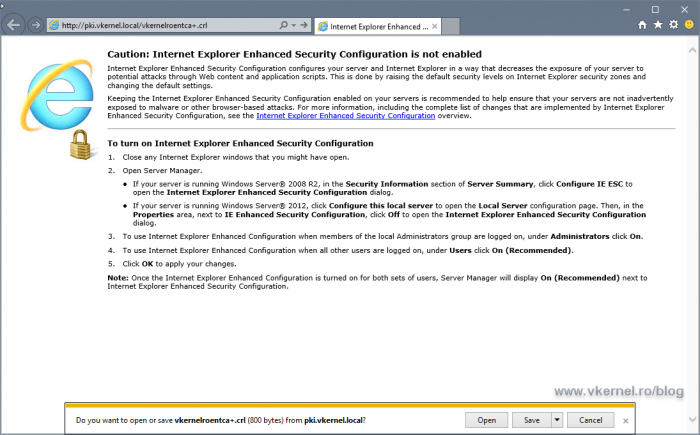
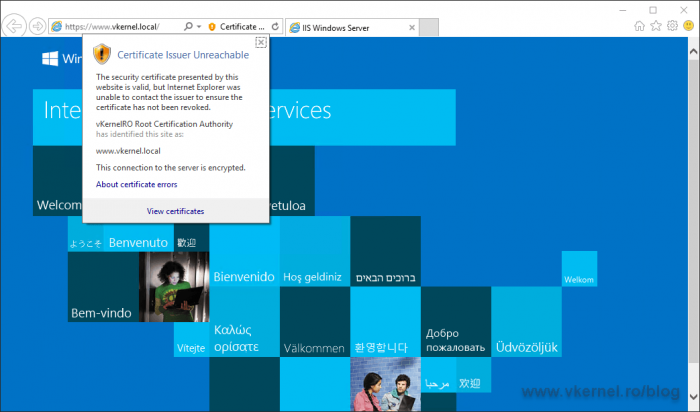
If it can’t, we will get a certificate warning.
The security certificate presented by this website is valid, but Internet Explorer was unable to contact the issuer to ensure the certificate has not been revoked.
6.2. Testing CRL and AIA distribution point using the PKI Health Tool
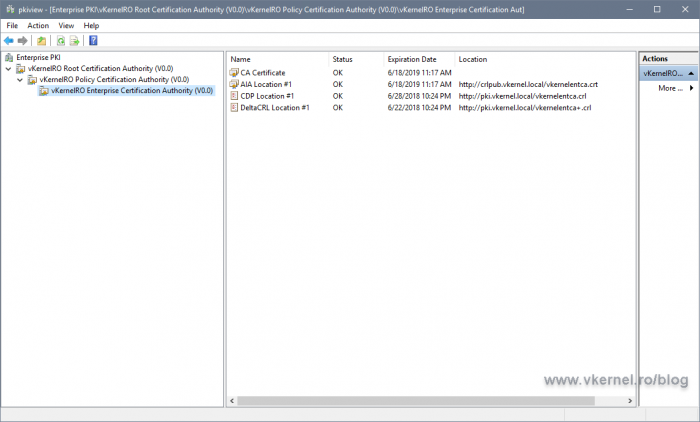
Another way we can verify we don’t have any errors and the paths we published are working, is to launch the PKI Health Tool console from the Enterprise CA server. The PKI Health Tool determines the CRL and AIA distribution point locations for the offline CAs by inspecting the certificates issued by the offline CAs. For online CAs, in our case, the Enterprise CA, the AIA and CDP locations are gathered by contacting the CA directly.
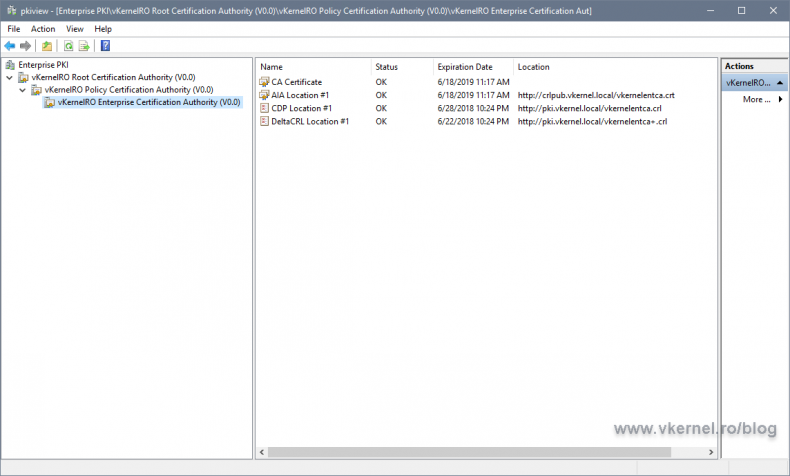
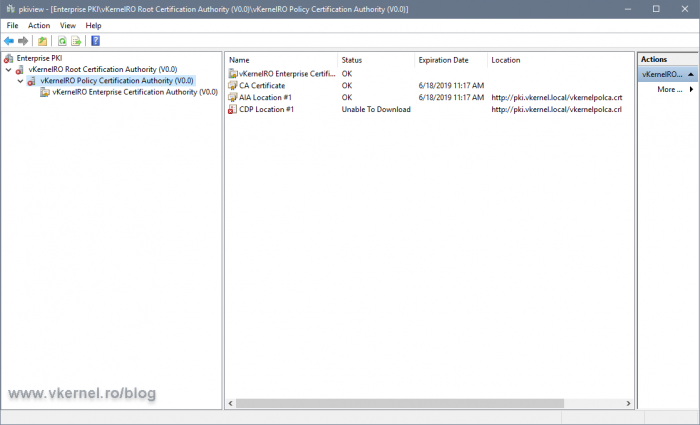
In a Run window, type pkiview.msc and hit Enter. In the console that opens we can see our entire PKI environment, but most important is that we have a view of the CRLs and AIA locations and their health.
If the PKI Health Tool can’t reach one of the URLs in the certificates, we are going to have an error displayed in the console. In my case here, the tool can’t reach the CRL of my Policy/Intermediate CA.
Summary
Having the AIA and CDP on a different server, as you can see has a lot of benefits. Besides being able to create highly available distribution points, we can customize every bit of this settings, which is the part I personally love the most. Go ahead, test it, and let the community know about your experience with CRLs and certificates in the comments area.
Want content like this delivered right to your
email inbox?





Hey there! Thanks for the guide.
I did have to modify it since our root and sub CAs (two-tier) have been renewed multiple times, so you can’t just use the hardcoded path names as each prior cert/crl needs to be published.
One other thing I noticed is that I have to renew my SubCA certificate so that the correct information about the roots CDP/AIA are updated. Otherwise, when trying to do a certutil -urlfetch, the AIA/CRL check on the issued certificate is successful, but the AIA/CRL check on the SubCA fails because it has old locations that no longer exist.
Does that make sense? Kind of a bummer to renew (same key), but seems like it is necessary.
Hi Matt,
Yes I know about the naming convention of the certificates, but I like to keep them the same. If in your case it is not possible then yes, you need to also renew the subCA certs in order to update the CRL/AIA. It makes sense.
Thanks for posting it since I cannot cover everything and every scenario in one article.
Much appreciate it
We are already using a DNS alias for our AIA and CDP locations, but the alias points to a single web server at this point (The Issuing CA actually). We plan to build out (2) web servers and configure a VIP on the load balancer and update the DNS alias to the VIP, instead of the single web server. I want to confirm with our plan we shouldn’t need to change anything from a client side of things, no forcing cert renewals, etc.
The only thing we will need to add is adding both web servers to the publication path for AIA/CDP so they are both up-to-date with Root & CRL certs.
Thank you! Great Article.
HI Adrian, This was a great and detailed explanation, tank you so much. I have a 2016 CA server that isn’t working too well and I am thinking of buikding another CA to replace the faulty one, what steps would you recommend
Hi Jones,
This is a tough one since you don’t really decommission the old one. You will still have to keep the root certificate and CRL from the old CA available until the last certificate that was issued is expired. Usually this takes about two years. Off course, until then you can use the new CA, but the old certificate and CRL need to be available.
Thinking about this I just found that I have started to write an article about the subject. Looks like it is still in progress. Thanks for the reminder :-).
Hi Adrian,
If I run two IIS servers for CRL/AIA with load balancer, How do keep the CRL files in both IIS servers. Because when I use VIP address in the CDP/AIA configuration the issuing CA to publish via load balancer, it will deliver the CRL files in one the webserver only which is behind the loadbalancer. What is the best way to keep two web servers behind the Loadbalancer?
Hi,
For this situation you will have to use a script or a software that synchronizes the files between the web servers.
Another option will be to just put the publication path in the AIA/CDP for both servers in the Extensions tab. This way when a new CRL or root certificate is renewed they will be automatically published on the web servers.
Hi there, thanks for this. Confused about the AIA publishing URL. Your guide states to have the extensions setup to publish the AIA / CRT file to the web server, exactly as it does for CDP / CRP (with CRL file). But then later in the guide it says to copy the file manually (which is what I have to do) In my tests, both in my 2019 lab, and in a live 2016 environment, I have to copy the AIA CRT file to the web server since although CRL publishes fine to the Web server UNC, the AIA / CRT file does not.
its not an access issue as the CRL file manages to copy itself there (to the Web server UNC path). But AIA doesnt.
Not a big issue since it only renews every 5 -10 years, but wondered if you could clarify please
Hi Stuart,
You have to copy the the files manually from the Root CA to the web server. For the Issuing CAs you can have it publish directly on the web server since they are all online and in the same domain.
Thank you so much for taking the time to write this guide. There is a multitude of misinformation out there on how to do this, and even my question asked on experts-exchange.com was (not) answered in a way that was worse than useless.
I had to adapt you guide slightly for my own setup, but fundementally you got me 90% of the way there, and I could read between the lines on the rest. I’m very grateful for your efforts, and now have a functioning CRL DP that is web accessible and working for my remote users using Remote Desktop Connection.
Many thanks! 🙂
Hi Bobby
Well…I cannot write an article to fit every environment, but I’m glad that you worked it out and I could help.
Thanks for passing by.
Adrian Costea,
Thank you for the feedback, I was actually thinking of using different names, and I will use different names.
I will give you feedback on how it went.
Keep up the great work.
Adian,
Thank you for the very detailed explanation and instructions on how to deploy CRL, AIA, and CDP. We have a 2 tier Microsoft PKI Infrastructure, I already upgraded the Enterprise Offline Root CA from Windows 2008 R2 to Windows 2016 ( The new Server has the same name as the old one on a new VM), I also upgraded the Windows 2008 R2 Issuing (Intermediate) CA from Windows 2008 R2 to Windows 2016 (Same server name and IP on new VM)
We have a separate CRL, AIA, CDP Server running Windows Server 2008 R2 which I plan to upgrade to Windows Server 2016 on a new VM with same IP address, and name if possible.
What is the best way to proceed?
Deploy a new Win 2016 VM, shut down the Win 2008 R2 CRL,AIA,CDP Server, rename the Win2016 Server to same name and IP as the Win 2008 R2 Server, then proceed with your instructions above except that the CRL name remains the same?
Hi Joe,
Yes, pretty much that is the process, the one you described. I would have used different names for the servers tough just so I don’t have any downtime, but since this is not very important in your environment, yes, deploy the new VM and go with the rest of the stuff you put up in the comment.
Let me and the community know how it goes just in case someone has the same setup as yours, by coming back with the results.
Thanks
Adrian,
I did the upgrade of our AIA\CRL\CDP Server from Windows Server 2008 R2 to Windows 2016 two weeks ago. I basically followed your instructions with a few modifications, since the replacement server had the same name and IP address as the old Server I skipped steps 2. and 3. in your instructions as well as skipping the AIA and CRL location configurations since they did not change with the upgrade.
Thanks for the feedback. Much apprech…
Nice article man, besides explaining how to publish the CRL and CRT on a separate location, it walks you through the process of configuring CDP and AIA at the 3 levels of the PKI environment.
Thank you