Building a three-tier Windows Certification Authority Hierarchy
Security is very important all over the internet but it’s also important in an organization, and it gets easier or harder to implement it depending on the size of the organization. Now I know, and you know, that there are many ways and many types of security implementations, but I think the one in the top is having an internal Enterprise Certification Authority (CA); because this way we can secure internal sites, services and devices at no extra cost compared to buying the certificates from a public Certification Authority.
In small companies we usually find only one Certificate Services server deployed in order to reduce the Windows licensing costs and avoid infrastructure complexities. This type of deployment is also known as a single-tier CA, and a single-tier CA will act as the root CA but also as the issuing CA for the organization and is always available to issue certificates to the requesting computers, users, services, or networking devices. It is also easier to implement and manage because it involves administration of only a single CA.
As the organization grows, this topology no longer works because if the CA fails, the Certificate Services service will not be available to process certificate requests, certificate renewals, or certificate revocation list publishing until the CA is recovered. In order to have redundancy and a better security for the CAs, we need to implement a multi-tier CA hierarchy. Determining how many tiers to include in the CA hierarchy and how many CAs will be required at each tier is a design addressed process and it all depends on how many users and devices are in the company. As a best practice, when the number of users gets pass 300, the organization needs to think about deploying a multi-tier CA hierarchy.
Now you can either go with a two-tier CA hierarchy

or a three-tire CA hierarchy. In this article however, I will treat the last one mentioned here. This type of hierarchy offers the best security and flexibility and is deployed in big environments with thousands of users and devices. As you can see, we have a root CA and at least two policy CAs which are not joined to a domain and are kept offline in a very secure location. The last line is occupied by our enterprise internal CAs also called issuing CAs.

Since certificates have a validity period, as a best practice when determining the validity period at each tier is to make the CA certificate validity period at least twice as long as the maximum validity period of any CA issued certificates. For example, if the enterprise internal CA has a certificate validity period of five years, the policy CA will have one of ten years, and off course, the root CA will have a certificate validity period of twenty years.

Besides the validity period of a CA certificate, we also need to think about the certificate key length. It is well known that some applications don’t work great or at all if a certificate key length from the certificate chain is larger than a certain value; so be sure to test your applications before deploying a Public Key Infrastructure (PKI) with larger keys.
Another point that we need to think about when deploying a multi-tier CA hierarchy is the URL publication points of the certificate revocation lists (CRLs) and the CA certificates. We either deploy an OCSP responder for these, which is recommended, use a UNC path (file protocol is deprecated and is no longer supported for file retrieval) or a web server (also recommended). Clients will need to be able to check the entire certificate chain and retrieve the CRLs in order to mark the web site or the service as trusted.
Now that we know how our PKI will look like, it’s time to start the installation and configuration of the CAs, and it always begins at the root CA and goes down until all the CAs are deployed. For all this operations to succeed, the account that we work with needs to be part of the local Administrators group or the domain Enterprise Administrators group.

1. Deploying and Configuring the Root Certification Authority (Root CA)
1.1. Deploying the Root CA
Before we actually fire up the deployment wizard, there is a configuration file that is recommended to be in place in order to properly configure the Certificate Services deployment, and this is the CAPolicy.inf file. This file is read during initial CA installation and when the CA certificate is renewed. It defines specific settings to the root CAs servers as well as settings that affect all the CAs in the hierarchy, like certificate revocation lists (CRL) publication points, CA certificate publication points, renewal configuration, Enhanced Key Usage, basic constraints, delta CRL publication interval, CRL publication interval, certificate practice statement (CSP) information.
The CAPolicy.inf file has to be manually created, populated with the proper settings then placed in the Windows directory, because this is the place where the wizard will look for the file during the Active Directory Certificate Services installation.
A CAPolicy.inf file looks like the one bellow. You can copy the content and modify some of the values to match your needs.
[Version]
Signature=$Windows NT$"

[certsrv_server]
Renewalkeylength=4096
RenewalvalidityPeriodUnits=20
RenewalvalidityPeriod=years

CRLPeriod=Years
CRLPeriodUnits=2
CRLOverlapPeriod=Years
CRLOverlapUnits=1
CRLDeltaPeriodUnits=0
CRLDeltaPeriod=days

DiscreteSignatureAlgorithm=1
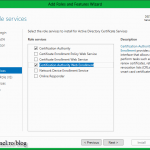
Now as I mentioned before, save the file in the Windows directory folder then launch Server Manager. Go to Manage > Add Roles and Features.

Once you get to the Server Roles page check the box next to Active Directory Certificate Services (ADCS) then hit the Add Roles button in the window that pops-up. Continue the wizard using the default settings.


Click Install to begin the Active Directory Certificate Services installation.

After the installation is done, click the link Configure Active Directory Certificate Services on the destination server to start the initial configuration of the root CA.

The AD CS Configuration wizard opens. In the Credentials box provide an account that is part of the local Administrators group then click Next.

Check the Certification Authority box then continue the wizard.

Since the server is not part of an Active Directory domain we can’t promote it as an Enterprise CA even if we wanted to. The option is grayed out and the only one available is Standard CA. Click Next.

By being the first server in the hierarchy, select Root CA and continue the wizard. We will use the second option when we get to the deployment of the policy and issuer CAs.

On the Private Key page we have two options, Create a new private key and Use existing private key. The first one is when we deploy a new CA, like in our case here, and the second one is used when migrating the CA to a new server or when restored from backup. Leave the default selection and continue the wizard.

Since SHA1 is deprecated starting with 1st of January 2016, the next hash algorithm to use is SHA256, so select it from the list then move to the Key length drop-down-box and choose a key length of your choice.
Name the CA, but make sure you give it a name that is easily recognized in the hierarchy as being the root CA, then provide a distinguished name suffix. Click Next when you’re done.

This is where we set the validity period for the root CA certificate, and best practices dictate to be 20 years. Put this number in the Specify the validity period box then continue the wizard.

The default location for the CA log files and database are on the C drive, which is good in small environments, but in large ones it is recommended to be located on a separate drive. Provide a location for this files then click Next.

On the Confirmation screen click the Configure button to save all changes and configure the CA.

After the wizard is done with the configuration, we should have a nice green Configuration succeeded message. Click the Close button to close the wizard.

Now, if we open the Certification Authority console and take a look at the CA certificate we should see that is how we set it up from the CAPolicy.inf file and from the AD CS deployment wizard.


If you want to use PowerShell to install AD CS, use the bellow commands and replace the names and paths with your own. Make sure the CAPolicy.inf file is in place before issuing this commands.
Install-WindowsFeature ADCS-Cert-Authority -IncludeManagementTools

Install-AdcsCertificationAuthority -CAType "StandaloneRootCA" -CACommonName "vKernelRO Root Certification Authority" -CADistinguishedNameSuffix "DC=vKernelRO,DC=RO" -KeyLength 4096 -HashAlgorithmName SHA256 -CryptoProviderName "RSA#Microsoft Software Key Storage Provider"  -DatabaseDirectory "D:\CAdb"  -LogDirectory "D:\CALogs"  -ValidityPeriod Years  -ValidityPeriodUnits 20

1.2. Configuring publication points and certificates validity period for the Root CA
Looks like everything worked fine with the installation, but right now if we want to issue a certificate for a subordinate (Policy) CA, or just a simple web certificate it will have only a one year validity period and the AIA and CDP extensions will be pointed to a LDAP address, which is wrong. Since the root CA is going to be offline or disconnected from the network, the AIA and CDP extensions will need to point preferably to a web address so clients can easily access the certificate and the CRL for validation.


To properly configure the mentioned settings, open the Certification Authority console, right-click the CA name and choose Properties.

Once the Properties window opens, go to the Extensions tab and remove all the locations from the list except the first one, by selecting them one by one and clicking the Remove button. I usually leave the first one enabled because I don’t mind CRLs being published to their default location; we will copy them on a web server anyway. When you’re done, click the Add button in order to add a new location. As you can see, I’m using a URL publication point, which is recommended and a custom name for my CRL file in order to remove the long name generated by the wizard and the space in it. As soon as the new location is in the list, select it, then check the box Include in the CDP extension of issued certificates.
[important]Never use the HTTPS protocol for CRT/CRL file retrieval because is not going to work. CryptoAPI will permanently fail to fetch HTTPS URLs.[/important]


Move to the AIA extension by clicking the Select extension drop-down box. As before, remove all the locations in the list except the first one, then hit the Add button to add the new location for the root CA certificate. Once added, don’t forget to check the box Include in the AIA extension of issued certificates. Click OK then Yes to restart the Certificate Services service.
You can also add multiple publication points, but for an internal PKI infrastructure one it’s enough. And if you are worried about server failure, you can always put multiple web servers behind a Load Balancer to solve the high availability problem.


Now that our publication points are in place, let’s take a look at the certificates validity period that root CA will issue to policy CAs. By default the root CA will issue certificates with only one year validity to other subordinate CAs. To modify this, open a command prompt window and execute the bellow commands to make our root CA issue certificates valid for 10 years. Remember, the root CA will issue certificates for policy CAs with half of it’s validity period, that’s why we set it to ten years.
certutil -setreg ca\ValidityPeriodUnits 10
certutil -setreg ca\ValidityPeriod "Years"
net stop certsvc & net start certsvc

Since we implemented HTTP URLs for our offline CA CDP and AIA extensions, we must manually copy the files to the referenced location. The transfer mechanism entirely depends on the web server that host the CA certificates and CRLs. Here I’m using the file sharing function in Windows to copy the files from %Windir%\System32\Certsrv\Certenroll (default location where CRLs and root certificate are published) over the network and place them in the root folder of my web server, the new publication point.


Now open a web browser on a client in your network and type the exact path that was set-up in the CRL and AIA extensions to see if the new publication point is working properly. You should get a download prompt, which means clients can access the files, the root CA certificate and the certificate revocation list. Off course, if you open the certificate it will not be trusted, but we will handle this issue later on when we configure the enterprise issuing CA.


2. Deploying and Configuring the Policy (Intermediate) Certification Authority
2.1. Deploying the Policy CA
The Policy, or Intermediate CA it’s also a stand-alone server, not joined to an Active Directory domain, so most of the steps will be the same as the ones in deploying the stand-alone Root CA. In order to reduce the space in the article and speed things a little bit for myself, I will user PowerShell to install and do the first configuration part of the Policy CA.
Before beginning the installation, copy the root CA certificate in the policy CA server certificates store. This needs to be imported in the Trusted Root Certification Authorities folder. If the root CA certificate is missing you will get an error message when trying to start the Certificate Services service because the trust chain is not completed. You can read more about it in section 2.2.
Also, make sure you have a CAPolicy.inf file in the Windows directory similar to the one bellow.
[Version]
Signature=$Windows NT$"

[certsrv_server]
Renewalkeylength=4096
RenewalvalidityPeriodUnits=10
RenewalvalidityPeriod=years

CRLPeriod=Years
CRLPeriodUnits=2
CRLOverlapPeriod=Years
CRLOverlapUnits=1
CRLDeltaPeriodUnits=0
CRLDeltaPeriod=days

DiscreteSignatureAlgorithm=1
Now that we have everything in place, open-up PowerShell an paste the bellow lines in order to install the Active Directory Certificates Services role and do the first configuration step. As you can see there is no validity period included in the configuration, and this is because the certificate validity period of a subordinate CA is given by the Root CA or the upper CA; 10 years in our case.
Running the last command line we also generate a certificate signing request or CSR, and since we didn’t specified where to save the CSR file, by default it’s saved in the root of the C drive. The file is needed in order to issue a certificate for our policy CA from the root CA. This is what the yellow warning actually tells us.
Install-WindowsFeature ADCS-Cert-Authority -IncludeManagementTools

Install-AdcsCertificationAuthority -CAType "StandaloneSubordinateCA" -CACommonName "vKernelRO Policy Certification Authority" -CADistinguishedNameSuffix "DC=vKernelRO,DC=RO" -KeyLength 4096 -HashAlgorithmName SHA256 -CryptoProviderName "RSA#Microsoft Software Key Storage Provider"  -DatabaseDirectory "d:\CAdb"  -LogDirectory "d:\CALogs"

Once the policy CA installation is done, log in on the root CA server, open the Certification Authority console, right-click the CA name and choose All Tasks > Submit New Request.

Select the certificate request file and click Open. You can copy the CSR file on the root CA server or access it via a UNC path if the two servers can talk to each other.

Inside the Pending Request folder we should have a certificate request in a pending state. Right-click it and choose All Tasks > Issue.

Now click the Issued Certificates folder and open the certificate we just issued. Go to the Details tab and click the Copy to File button. Export the certificate by following the wizard.

Back on the policy CA server, open the Certification Authority console, right -click the CA name and choose All Tasks > Install CA Certificate.

Search for the certificate we just exported from the root CA, select it and click Open. The certificate installation will take a few seconds to complete and once it’s done click the green arrow button from the Tools menu to start the Certificate Services service; which should start successfully. If not, read section 2.2 for more details.

2.2. Errors and warnings encountered during the Certificate Services service start-up
I created this section to show some errors and warnings that you can encounter during the Certificate Services service startup. If the service stared successfully on your policy CA server, skip this section and move to the publication points configuration section.
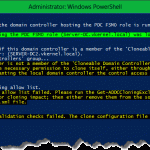
If for some reason you decided not to import the root CA certificate into the policy CA server certificates store, when you try to start the Certificate Services service you will get the bellow warning message:
Cannot find the certificate for CN=<YOUR COMMON NAME>, DC=<DOMAIN>, DC=<ROOT> to build a certificate chain. Do you wish to install this certificate now? A certificate chain could not be built to a trusted root authority. 0x800b010a (-2146762486 CERT_E_CHAINING)

If you click Cancel the Certificate Services service on the policy CA will not start. If you click Yes on the warning message it will give you the option to select the root CA certificate and if provided, another warning message pops-up. This one is because the Certificate Services service cannot find the root CA CRL. If you hit OK and you have configured a web server as a publication point and the CRL file can be reached, it will be automatically downloaded and the Certificate Services service on the policy CA will start.
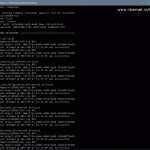
Cannot verify certificate chain. Do you wish to ignore the error and continue? The revocation function was unable to check revocation because the revocation server was offline. 0x80092013 (-2146885613 CRYPT_E_REVOCATION_OFFLINE)

If the CRL from the root CA is not installed nor it can be downloaded from the publication point, the Certificate Services service from the policy CA will throw an error message and not start until it can reach the CRL.
The revocation function was unable to check revocation because the revocation server was offline. 0x80092013 (-2146885613 CRYPT_E_REVOCATION_OFFLINE)

2.3. Configuring publication points and certificates validity period for the Policy CA
If you’ve been reading the article from the beginning, this part will look familiar with the configuration of the root CA. We can begin this section by copying the policy CA certificate and CRL file to our publication point, the web server. Again, I renamed these files to keep the FQDN more simple and short.

Once the files were copied, do a test from a client and see if you can download them. If everything is set up properly on the web server you should not have any problems accessing the files.


The next step is to configure the AIA and CDP extensions that subordinate/issuing CAs will see in the certificates issued by this CA. Let’s start with the certificate revocation list, by right-clicking the CA name then Properties. Go to the Extensions tab and remove everything except the first location path. When you’re done removing the default locations, click the Add button to add a new one. Once added, you have to check the box Include in the CDP extension of issued certificates.


Move to the AIA extension by clicking the Select extension drop-down box. Again, remove everything except the first location then click the Add button. Provide the FQDN from where the policy CA certificate can be downloaded, click OK, then check the box Include in the AIA extension of issued certificates. Click OK again then hit Yes to restart the Certificate Services service.


The last thing that we need to do on our policy CA is to increase the validity period of issued certificates, because by default they have only a one year validity. For our enterprise issuing CAs we need the certificate to have a validity period of five years. To do this, just open a command prompt and paste the bellow lines in the terminal.
certutil -setreg ca\ValidityPeriodUnits 5
certutil -setreg ca\ValidityPeriod "Years"
net stop certsvc & net start certsvc

3. Deploying and Configuring the Enterprise Issuing Certification Authorities
3.1. Deploying the Enterprise Issuing CAs
We are finally here! The last line of our PKI infrastructure. These are the Certification Authorities that issue certificates to our clients, machines and services; these are the servers that need to be online 24 hours, 7 days a week and that’s why we are deploying two of them. In case one CA fails, clients can still get certificates from the other one. Remember, we have thousands of users and devices so we needs some kind of redundancy.
The process for installing subordinate online CAs is slightly different than the process for installing subordinate offline CAs. Before installing the AD CS role on our issuing CAs we must ensure that this servers trust the root CA and the policy CA and are able to access their CRLs for certificate revocation checking. Since we are now working in a domain environment, the root CA and policy CA certificates can be deployed using Group Policy.
Open the Group Policy Management console, create a new GPO at the root of the forest, the edit it.

Once the Group Policy Management Editor opens, expand Computer Management > Windows Settings > Security Settings > Public Key Policies. Here we have two folders that are of interest, Trusted Root Certification Authorities and Intermediate Certification Authorities. Right-click the first one mentioned and choose Import. Browse for the root CA certificate and import it. Now right-click the second folder I mentioned and do the same operation but this time import the policy CA certificate. If you followed the article from the beginning, you can easily find the two certificates on the web server publication point.


For the policy to apply in the enterprise we will need to wait between 90 and 120 minutes or more, depending on your replication schedule between sites, but we can force it on our two future CA servers by issuing the gpupdate /force command. Once the policy is replicated and the root and policy CA certificates are installed on all the clients, go ahead and create the CAPolicy.inf then place it in the Windows directory on both servers.
[Version]
Signature=$Windows NT$"

[certsrv_server]
Renewalkeylength=4096
RenewalvalidityPeriodUnits=5
RenewalvalidityPeriod=years

CRLPeriod=Days
CRLPeriodUnits=7
CRLDeltaPeriod=Hours
CRLDeltaPeriodUnits=24
CRLOverlapUnits=2
CRLOverlapPeriod=Days
CRLDeltaOverlapUnits=Hours
DeltaOverlapPeriod=6

DiscreteSignatureAlgorithm=1
LoadDefaultTemplates=0
Join the two servers to your Active Directory domain, if you didn’t do this already and install the Active Directory Certification Authority role either by using PowerShell or the GUI. As you can see, this time we are also installing the web enrollment role feature, so clients can request certificates using a web portal.
Install-WindowsFeature ADCS-Cert-Authority,ADCS-Web-Enrollment -IncludeManagementTools

Install-AdcsCertificationAuthority -CAType "EnterpriseSubordinateCA" -CACommonName "vKernelRO Issuing Certification Authority 01" -CADistinguishedNameSuffix "DC=vKernelRO,DC=RO" -KeyLength 4096 -HashAlgorithmName SHA256 -CryptoProviderName "RSA#Microsoft Software Key Storage Provider"  -DatabaseDirectory "D:\CAdb"  -LogDirectory "D:\CALogs"Implementing a three-tier CA Hierarchy

Install-AdcsWebEnrollment

If you want to use the GUI, make sure you select Enterprise CA on the Setup Type screen and Subordinate CA on the CA Type screen.


After the installation, on the Role Services screen check the Certification Authority and Certification Authority Web Enrollment boxes.

Once the deployment is done on both of our enterprise CAs, log in on the policy CA server and submit a new certificate request.

Provide the CSR files from our enterprise issuing CAs that were generated during the initial configuration step. By default these were saved on the root of the C drive on the two CA servers. In the Pending Request folder we now have two requests in a pending state. Right-click them and choose All Tasks > Issue.

The certificates are now issued and all that is left is to export them. Open one of the certificates, go to the Details tab and hit the Copy to File button. Save the certificate to a USB drive or a share that is accessible by the two issuing CAs. Once you’re done, export the other certificate too.

Open the Certification Authority console on the first issuing CA and install the CA certificate we just exported from the policy CA by right-clicking the CA name and choose All Tasks > Install CA Certificate. Once the Certificate Services service starts, repeat the operation for the second issuing CA server too.
[important]During the CA certificate installation make sure you are providing the certificate to the CA that made the request. The certificates are not interchangeable.[/important]

If the two CAs can successfully access the publication point (the web server where the Root CA and Policy CA CRLs and CRTs are located), the service should start successfully with no error. If you encounter problems, please see section 2.2.


3.2. Configuring publication points and certificates validity period for the Issuing CAs
For most of the times the default locations configured on an enterprise CA where clients can go and download the certificate revocation list and the CA certificate are enough and there is no need to modify them. In large environments however, there is a need to add extra publication points to enterprise CAs so clients can reach CRLs and CA certificates in case the issuing CA fails. Think about it, clients already have certificates issued by one of the issuing CAs in your organization, and if this CA fails, clients will need to have a way to check the certificate chain and the certificate revocation list for the certificates already issued by the CA, the failed CA.
The operation is almost identical as the one we did on the root and policy CAs by right-clicking the CA name (one of the issuing CAs in this case) and choose Properties. On the Extensions tab just click the Add button to add a new CRL and AIA location. Do not remove or modify the default locations in the list, not this time.
Since it’s recommended to have an OCSP server, I deployed one in my environment too, and for the clients to find it all we have to do is type the FQDN of the OCSP Responder, then check the box Include in the online certificate status protocol (OCSP) extension.

On the CDP extension side things also look a little bit different because now we have delta CRLs that we need to make them available to clients from our publication point. Add the URL address of the publication point then make sure you select the <DeltaCRLAllowed> variable from the Variable drop-down box and hit the Insert button. Once the new location is in the list check the boxes Include in CRLs. Clients use this to find Delta CRL locations and Include in the CDP extension of issued certificates. Repeat this operation for every issuing CA you have in your PKI environment.


Now don’t forget to copy the CRLs and certificates of both the issuing CAs to the publication point repository, the web server. Since the files are updated by default every few days it will be very inconvenient to manually update them on the publishing location. To ease the job, you can implement a batch script or use a synchronization program that will copy them over the network on a set schedule.


4. Testing the Certification Authority hierarchy
If we go and request a certificate for a client or a service from our issuing CAs, we now have the option to choose which one will issue the certificate.

Also, by opening an issued certificate from one of our issuing CAs, the trust chain should be complete and with no errors.


For a deep inspection of the CDP/AIA URL availability and whether the published files are correct, open the pkiview.msc MMC snap-in. No errors or warnings should be reported if everything is working correctly.

Summary
Yes, it was a long road, and yes it takes a lot of steps to implement a three-tier Certification Authority hierarchy, but nowadays, having an internal PKI is a must since a lot of services and devices need certificates. Once you get it to work and understand it, you will see that is actually very easy to build one and maintain it. You can also do some “magic” and make the enterprise CA issue Extended validation certificates. It looks great on user’s browser, so build your test lab and make it work. For any technical questions, you can always use the comments area.
Want content like this delivered right to your
email inbox?
More similar articles
 Installing an Enterprise Certificate Authority in Windows Server 2012
- Cloning Active Directory Domain Controllers with Windows Server 2012
- Creating and configuring Windows Domain Service Accounts
- Blocking Remote Access for Local Accounts by Group Policy
- Migrating from FRS to DFSR
- How to reset forgotten Active Directory Domain Administrator password


Hi Adrian,
Thank you very much for this detailed guide.
I have one root CA (Windows 2012) and one issuing CA (Intermediate CA, windows2102) which issues cert to devices. They will be replaced with one windows 2019 root CA and two Windows 2019 issuing CAs that are in different data center, not in Windows cluster.
During migration, can I backup the issuing CA certs from Windows 2012 issuing CA and import them to two new Wndows 2019 issuing CAs?
Can three issuing CAs coexist in the domain forest at the same time so the new issuing CAs can be tested by NDES server before going live?
What precautions should be taken during migration?
Thanks,
Hong
Hi Hong,
Thanks for passing by.
During migration, can I backup the issuing CA certs from Windows 2012 issuing CA and import them to two new Wndows 2019 issuing CAs?
You can only restore the backup from the existing Issuing CA on one of the new Issuing CAs (not both of them). The second one you will have to promote it as usual.
Can three issuing CAs coexist in the domain forest at the same time so the new issuing CAs can be tested by NDES server before going live?
Yes. I have an environment with one Root and four Enterprise Issuing CAs and in a few months I will have a separate NDES server.
What precautions should be taken during migration?
You will need to have your backups in place and off course, always test in a lab before implementing in production.
I will just convert the PKI machines to VMs and put them in a test environment and test everything to see how it goes. This way you also have hands one experience before moving to production.
Hi Adrian,
Thanks for the reply.
As you said, “You can only restore the backup from the existing Issuing CA on one of the new Issuing CAs (not both of them). The second one you will have to promote it as usual.”
Do you mean that two new subordinate issuing CA servers can not have same CA cert? Should each issuing CA server should its own CA cert issued by Root CA?
Is the issuing CA cert also stored or published in Active Directory?
Thanks,
Hong
Do you mean that two new subordinate issuing CA servers can not have same CA cert? Should each issuing CA server should its own CA cert issued by Root CA?
Correct. Each Issuing CA will have their own certificate issued by the Root CA. If you want the same cert for both, then you will have to put them in a Failover Cluster.
Is the issuing CA cert also stored or published in Active Directory?
Since this is an Enterprise Issuing CA their root certificates will be automatically published in AD and all clients joined to the domain will get them on the next policy refresh cycle.
Hi Adrian,
Thank you very much for this detailed guide. Even in 2021 it is still very much relevant.
We are moving from a very broken pseudo 2 tier PKI where Root ca and subordinate CA issues certs to endpoints. Do you see any issue with implementing a whole new PKI from scratch in an existing domain?
Thanks
Hi Sami,
As long as you copy the CRLs and certificates from the old infra to a distribution point so clients can reach it, there will be no issues. The CRL and AIA URL in the certificates must be able to reach the new distribution point, so some DNS stuff must also be done in order for this to work.
That is 3 tier … not tire. it’s not a car.
Damn…somehow I could not see it. Thanks for the heads-up, much appreesh
Why the last one need to be a Enterprise CA?
I can’t deploy a non enterprise? It’s because i dont’t hava many users but i need to have a 3 tier PKI, but this environment will not have a Active Directory for decision from the managers.
Thank you so much for your post, is very good!
You can use a stand-alone CA, but the Enterprise one is easy to manage since it already has the certificates templates created, you can use Auto Enroll and other domain stuff.
If you don’t have an Active Directory domain, then a stand-alone deployment is your only choice.
Very well structure and helpful, Thank you very much for the hard work, I truly appreciated.
Thanks for passing by…