Creating virtual machines in SCVMM 2008 R2
For those of you that are just getting started with System Center Virtual Machine Manager 2008 (SCVMM) I think this will be a useful post. After you’re done installing SCVMM is time to create some virtual machines and in this guide I’m going to show you that, so read on.
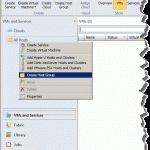
To start open your SCVMM console and in the Actions pane click New virtual machine.

On the first page of the wizard we have the option to create a new virtual disk or use an existing one. If you have an existing virtual disk and want to use it, you need to place that virtual disk on the library folder before it appears on the inventory, when you click the Browse button here. As you can see I already have a virtual disk from a Windows XP machine.

For this example we are not going to use an existing virtual disk, so click the radio button Create new virtual machine with a blank virtual hard disk then hit Next.

Give the new virtual machine a name and a description and continue the wizard.

Here is where we configure the virtual machine hardware profile; add, remove, and configure devices. After the profile is configured we have the option to save it by clicking the Save as button, in case we need to create a new virtual machine with the same hardware again. Make your changes then click Next.


On the Select Destination screen we have the option to either place this virtual machine on a host or the VMM library. If you place it in the library, you can create clones or use it as a template later on, but in this case we are going to place it on a Hyper-V host, so select the first option and click Next.

If you have more than one host select the one on which to place this virtual machine then continue the wizard.

Type the path where this virtual machine should sit on the Hyper-V host. Since I don’t have a dedicated volume to place my virtual machines, I will use the system drive, but just for the sake of this example. Under any circumstances do NOT, I repeat do NOT use the system volume for virtual machines storage on a production environment. If the path you choose here was not in the virtual machine paths on the VMM server you can check the box Add this path to the list of default virtual machine paths on the host, to add it.

Decide if you need network connection for the virtual machine, and if you do, select the adapter from the drop-down list.

On the Additional Properties page, choose if you want the virtual machine to be automatically powered on when the Hyper-V host starts (after a power failure or restart), and what should happen with the virtual machines when the host shuts down, then select the edition of the operating system. Click Next when you’re done.

On the Summary screen we have the option to start the virtual machine after is created, and view the PowerShell script for all this actions. Click the Create button to start creating the virtual machine.

The process will take just a few seconds,

and at the end we have a new virtual machine ready for installation. I will talk in a future post about virtual machines installations.

Want content like this delivered right to your
email inbox?
More similar articles
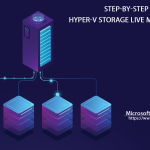
 Step-by-step Hyper-V Storage Live Migration
- Adding Hyper-V hosts to System Center Virtual Machine Manager (SCVMM) 2012
- Convert VMware virtual machines to Hyper-V virtual machines
- Add Hyper-V hosts to System Center Virtual Machine Manager (SCVMM) 2008 R2
- Patching the vCenter Server and PSC Virtual Appliance
- Removing vCenter or PSC from Linked Mode configuration