Join a Windows 7 machine to a Windows domain
This is going to be one of those short posts, because is not much to say about joining a client machine to a domain; but you may ask, why we need to do this ? Well I’m not going to give an academic definition so you can spend another half an hour reading on the internet to understand. We join client machines like Windows XP, Windows Vista, 7, etc to a domain ’cause of the ease of management. Let’s say you have 10 computers running Windows 7, and every computer has a user account; but then comes a day when you need to create another account on those ten computers, for let’s say, a software (that software need to have that specific account on every computer).No problem, you go on every computer and create those account, but what do you do if those ten computers multiply (you firm grows) to 100. I don’t think you want to go to 100 computers every time you need to create an account or change some security permissions. The easiest way is to join those computers to a domain, and on the so called Domain Controller (DC) you create a single account, and with that account you can log in to every station that is part of that domain (if you have permission, but let’s say you do). Easy haa
Now let me show you how you can join a Windows 7 machine to a domain. The process is the same for previous versions of Windows, just the way to get to the right place is different.
First we need to configure the network part, so go to Start > Control Panel > Network and Sharing Center > Change adapter settings then right click the network adapter (usually is called Local Area Connection) and click Properties. Choose the Internet Protocol Version 4 (TCP/IPv4) then click Properties. Here we need to configure the IP addressing so our machine can communicate with the rest of the network and especially with the Domain Controller, you remember the DC witch I briefly talked about before.

For large networks, machines are going to be auto configured from one or more DHCP Servers, but because I’m a good guy I’ll show you the manual step, so you can get an idea. On the new window that just opened choose the radio button Use the following IP address:. Here I am going to put an IP address that is part of my network. In the Preferred DNS Server you need to put the IP address of you DC. When you are done click OK and Close.

Now go and right click Computer > Properties > Change Settings

On the System Properties page click Change

On the Member of check the radio button Domain, and in the box bellow enter your domain and hit the OK button.

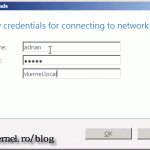
A security pop-up box appear to enter the credentials of a user account that has the permission to add this computer to the domain. In this case I used my account name that is part of the Domain Admins Goup. After entering the credentials click OK.

A few seconds later an info box pops up that welcomes you to the domain, if you click OK another one appears informing you that a restart is required for the setting to effect.

After reboot you can see that the workstation was successfully joined to the domain. Log on using a domain account, then go to System Properties (right click Computer > Properties) to check the domain the computer is part of.


Want content like this delivered right to your
email inbox?
More similar articles
 Set Up Automatic Certificate Enrollment (Autoenroll)
- Remote Group Policy update in Windows Server 2012
- Setting up a KMS Server in Windows 2008 R2
- Deploying Windows 7 with WDS and MDT 2010 – Part4
- Deploying Windows 7 with WDS and MDT 2010 – Part3
- Enable computer and user accounts to be trusted for delegation