Deploying the VMware vCenter 6.0 Appliance (VCSA) with an Embedded Platform Service Controller (PSC)
Starting with version 6, VMware has completely changed the way we deploy the vCenter server appliance (vCSA). If in older versions we had to use the import template wizard from the vSphere client, now we have a web interface just for that. I can’t say which one is better because it’s kinda the same thing, but looks like VMware want’s to get rid of the vSphere client console and focus more and more on the web stuff to manage the virtual infrastructure. Also with version 6 of the vCenter appliance we get the same performance as the Windows vCenter version, which is good news because we don’t have to pay for a Windows license anymore just to run vCenter. The comparison matrix can also be seen in the bellow table:
| Item | Windows vCenter | VCSA (Embedded vPostgress) |
| Hosts per vCenter server | 1,000 | 1,000 |
| Powered-on VMs per VC | 10,000 | 10,000 |
| VMs per VC | 15,000 | 15,000 |
| Linked vCenter Servers | 10 | 10 |
| Hosts per Cluster | 64 | 64 |
| VMs per Cluster | 8,000 | 8,000 |
As for resources, it all depends on how many hosts and VMs are running or will run in our virtual infrastructure. The minimum we can choose during the deployment wizard are 2 vCPUs, 8 GB RAM and 120 GB space to support 100 VMs and 10 hosts. The bigger the infrastructure, the more resources we need to allocate to the vCenter appliance.
A very important thing we need to do before starting with the deployment, is make sure that the time between the NTP server(s) and the ESXi host(s) is synchronized.

Also an A and PTR record needs to be created in DNS that points to the appliance IP before deploying it. As you will see later on, we will have two network options to choose from: DHCP and static IP address assignment. In this article I will go with the static IP address allocation because you never know when the DHCP server fails. Another important matter why you should not deploy the appliance using DHCP, it’s because the IP address will be bound to the certificate and if you change the appliance IP address later on it won’t boot up and you will need to redeploy or recover from backup. Now I don’t know about you, but I don’t feel like going trough the all process of re-configuring permissions and switches and all those things that tie to the vCenter or do a recovery from backup just because of an IP address change. Using a static IP address is also recommended by VMware.

If the prerequisites are met, let’s move on and mount the VMware vCenter appliance ISO image on a Windows VM or physical machine then navigate to the vcsa directory. Here we have a file called VMware-ClientIntegrationPlugin-6.0.0.exe which is actually a plugin that integrates into the browser and helps us launch the vCSA deployment wizard. Go ahead an install the package.

Once the installation it’s done, go in the root of the ISO and open the vcsa-setup.html file. This will launch the vCSA installer splash screen which will guide us trough the deployment. Click Install.


The first screen of the vCSA deployment wizard is the End User License Agreement (EULA). Check the box I accept the terms of the license agreement then click Next.

Here, in the first field we have to type the FQDN or IP address of one of our ESXi hosts on which the vCSA will be deployed on, then in the remaining ones provide the credentials (root credentials) to connect to the host. Click Yes on the Certificate Warning window in order to continue.


Provide a name and a root password for the appliance then click Next. The name you type here it’s not the name of the guest OS, it’s the name of the VM viewed in the vCenter inventory. The root password must be kept in a safe place because this will be used to manage or troubleshoot the appliance.

In the Select deployment type page we have two options in which we can deploy the appliance. Use can either install everything on one machine or we can put the Platform Service Controller (PSC) and vCenter on separate servers. The second method is used in large environments where we have multiple vCenter servers or the need for high availability. For this guide however we are going to choose the first option and install everything on a single box, so select Install vCenter Server with an Embedded Platform Services Controller then click Next.

Since this is the first vCenter server in our environment we do not have another SSO domain to join to, so we need to create one. Select the Create a new SSO domain button then fill in the boxes with the required information related to your company. The password we type here will be used to log in to the vCenter web portal and configure stuff like permissions, join the vCenter to the domain, etc., so make sure you keep it somewhere safe and don’t lose it.

This is where we select the appliance size depending on the on how big our virtual infrastructure is. As I’ve mentioned before and as you can also see in the drop-down-box, the larger the appliance, the more resources we need on the ESXi host.

Select the Datastore where to put the appliance then choose if you want to deploy using it the Thin Disk Mode. Click Next.

On the Configure database page we either go with an embedded database or a remote one running on Oracle. Since the majority of the vCSA deployments are using the embedded database, this is what we are going to use here too. Choose the first option, Use an embedded database (vPostgres) then click Next.

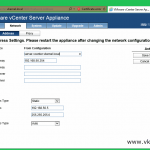
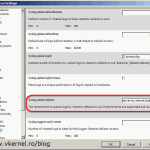
In this page we set up the network for the appliance, and as I’ve said at the beginning, a static IP address it is recommended to be used instead of DHCP. Also, the appliance clock needs to be in sync either with a time server or with the ESXi host in order to function correctly. The name we type in the System name field it’s the name we will use to manage the vCenter infrastructure and this can be the same as the appliance name or it can be different. This will be the guest name. Just make sure you have the A and PTR records created in DNS for this name.

The number ten page of the wizard and the last one gives us a summary of deployment settings so we can review them and eventually modify some in case we miss-typed them. If everything looks good, just hit the Finish button to start deploying the appliance.

The deployment will take a few minutes to finish and at the end we get a link in the wizard to access the vCenter server web portal. Click on the link to launch the portal.


By default we can login using the password and the appliance Administrator account followed by the SSO domain typed in the Set up Single Sign-on page of the deployment wizard.

Once we are logged in, we can start configuring the appliance like joining it to the domain, set-up permissions, create datacenters and add ESXi hosts to those datacenters, assign licenses and other necessary stuff to make vCenter fully functional for our virtual infrastructure.

Looks like the deployment was a success, and as you just saw, is not much different compared to the older versions, is just that now we are using a web interface and not the vSphere client. I will advice to take a look at the new vCSA and learn to work with it since it’s based on Linux, because more and more businesses are migrating to the appliance from the Windows version. Also, I kinda have the feeling that in the near future the Windows version will not exist anymore, so you better start preparing.
Want content like this delivered right to your
email inbox?
More similar articles
 Build and run Windows Failover Clusters on VMware ESXi
- Upgrading from VCSA 5.x to VCSA 6.0 with an Embedded Platform Service Controller (PSC)
- Adding a Raw Device Mapping (RDM) to a Virtual Machine
- Deploying and Configuring VMware vCenter Server Appliance 5.x
- Configure Syslog on ESXi 5.x Hosts
- Configuring VMware High Availability (VMHA)