Deploying VDI using Windows Server 2012/R2
In a previous article I talked about publishing desktops and applications to users by creating RDS Session Collections. In most cases that method works great, but as you know, there are users in the company that need dedicated resources to their virtual desktops, and by using RDS Session Collections we can’t separate those resources since everything is shared in one box. If that’s the case, Microsoft has a solution for that also and it’s called VDI (Virtual Desktop Infrastructure). By using VDI, we create the so called virtual desktop collections which are just a bunch of VMs running on Hyper-V servers and this way users have their own dedicated machine with dedicated resources. It is as they are having their own desktop or laptop, but the only difference is that they are working on a VM inside your datacenter. Now, as you will see later, virtual desktop collections are of two types: pooled virtual desktop collections and personal virtual desktop collections.
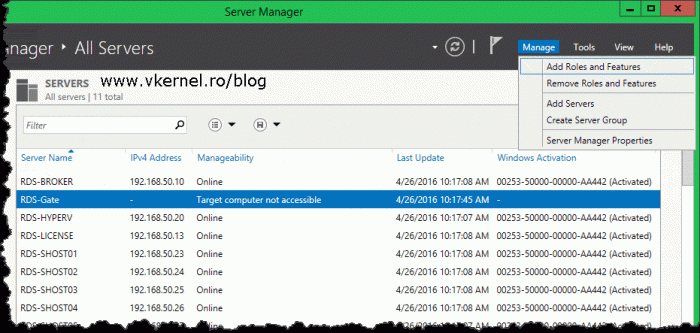
By their names you can tell a little what they are all about, but I’ll discuss in detail the deployment and configuration of every one of them in their own section. Before we can jump into the creation and configuration of virtual desktop collections we need to deploy at least one RD Virtualization Host server. Bear in mind that you need to have a RDS infrastructure already deployed before moving forward with this. If you are good-to-go, open Server Manager and click Manage > Add Roles and Features.
[notice]In order for this to work you must use the Server Manager console from where you deployed your RDS infrastructure. If you can’t remember which one is it, choose a random server from your environment that runs at least Windows server 2012 and add all the RDS servers to the server pool.[/notice]
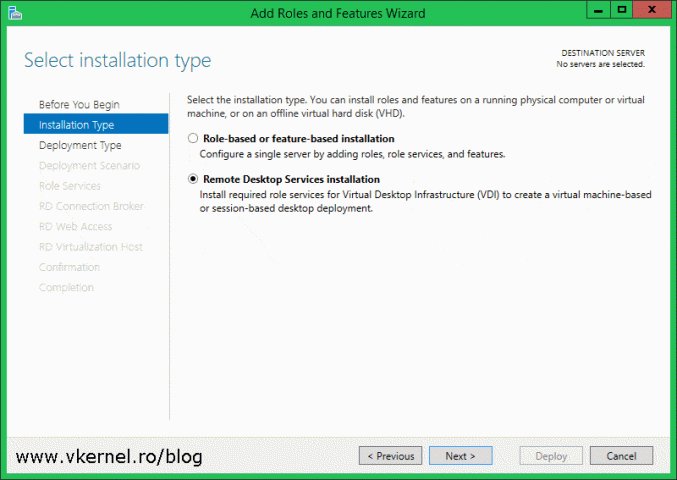
On the first page of the Add Roles and Features Wizard select Remote Desktop Services installation then click Next.
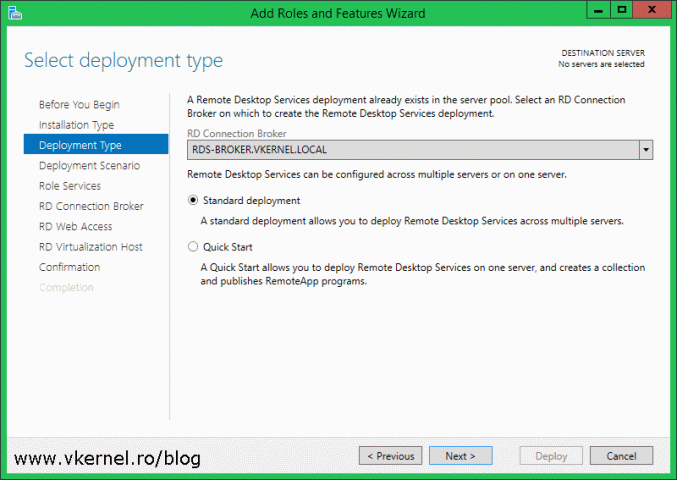
Since a Remote Desktop Services deployment already exist in the environment the RD Session Broker server it is automatically detected by the wizard. All we have to do here is click Next to continue.
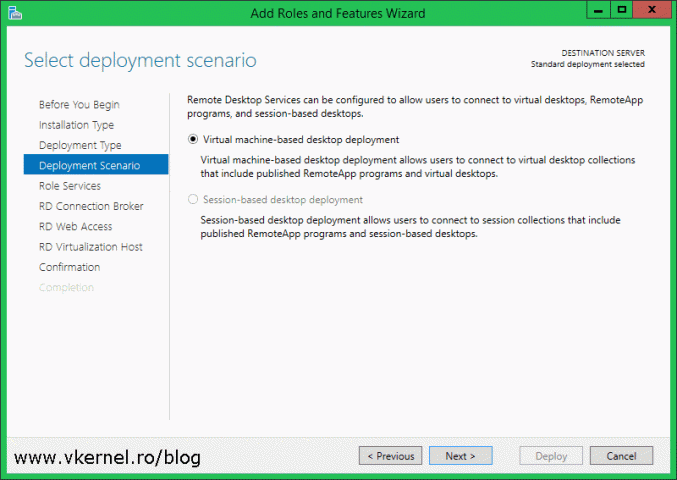
Since we already deployed RD Session Host based desktops in the environment the option is grayed out and the only one left is the Virtual machine-based desktop deployment. This is what we need in order to deploy a VDI infrastructure, so click Next and continue the wizard using the default settings until you get to the RD Virtualization Host page.
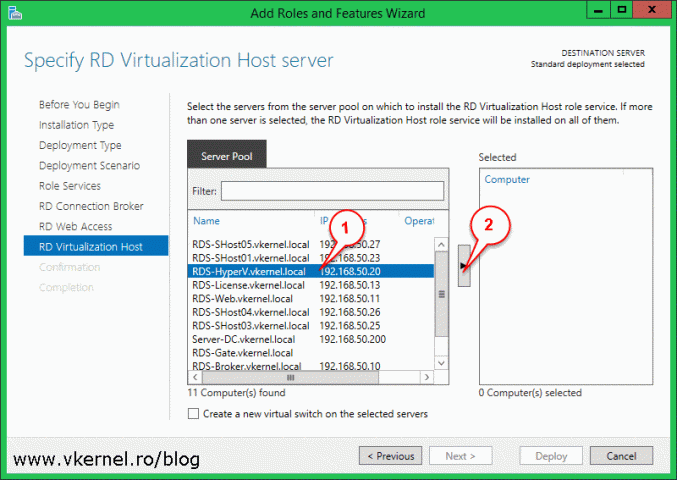
From the Server Pool list select the server(s) on witch to install the RD Virtualization Host role then click Next.
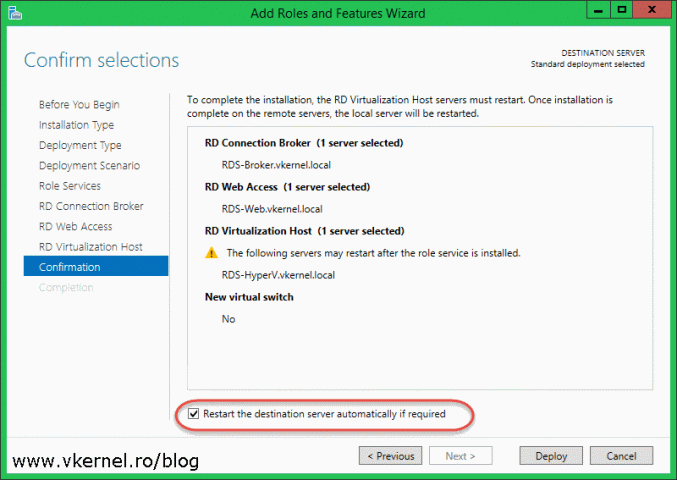
On the Confirmation screen I recommend you check the box Restart the destination server automatically if required so you don’t have to manually restart the server once the role it’s installed. Click Deploy to begin the role installation.
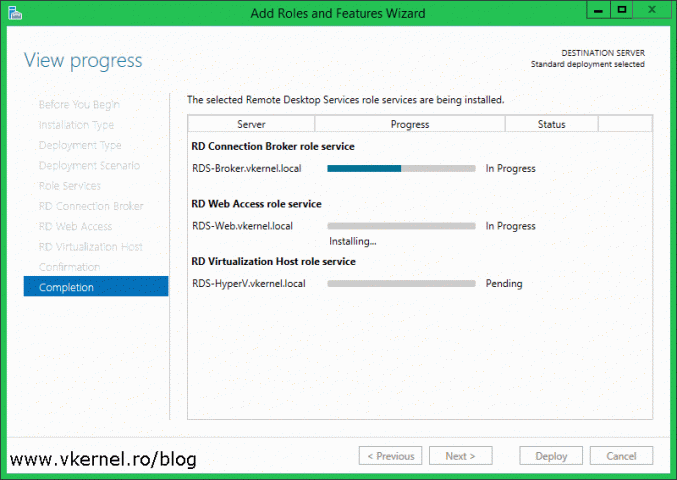
It will take a few good minutes to finish, but once it was deployed we should have a Succeeded message in the Completion page of the wizard.
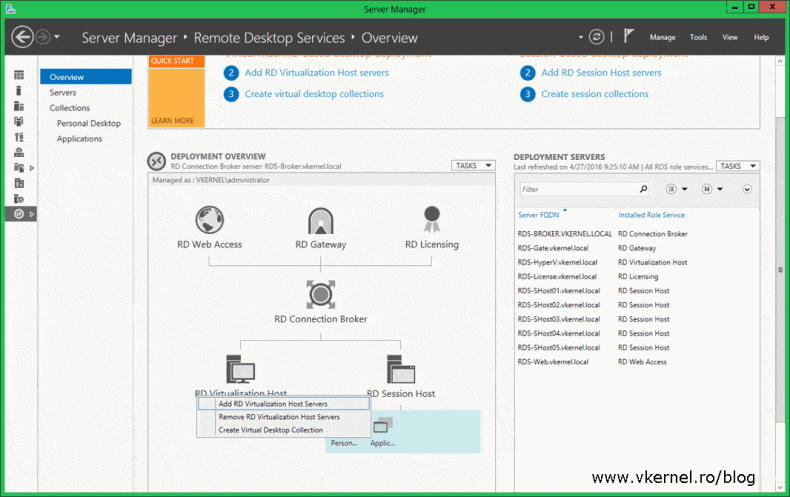
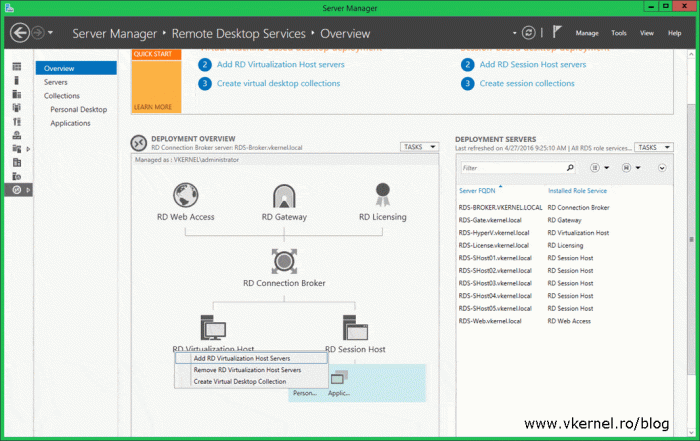
Going to the Overview page of our Remote Desktops Services we can see that the RD Virtualization Host was added to the infrastructure. If later, we want to add additional virtualization servers all we have to do is right-click the RD Virtualization Host icon and choose Add RD Virtualization Hosts Servers, then follow the wizard.
Now that our RD Virtualization host is deployed we can move into the creation of our virtual desktops, but before these desktops can be created, there are some prerequisites.
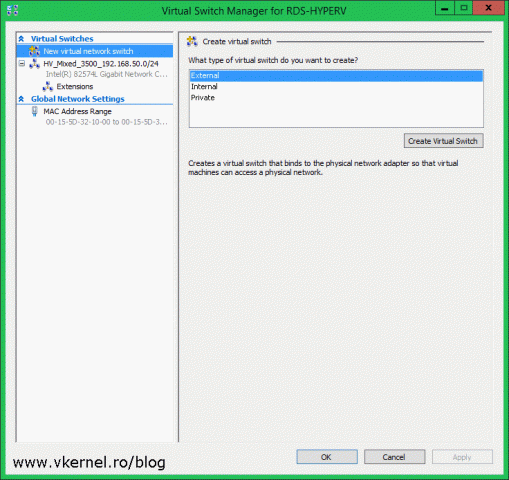
The first one is to make sure you have configured at least a Virtual Switch on your RD Virtualization Host(s). This is a must in order for the VMs to be able to connect to the network.
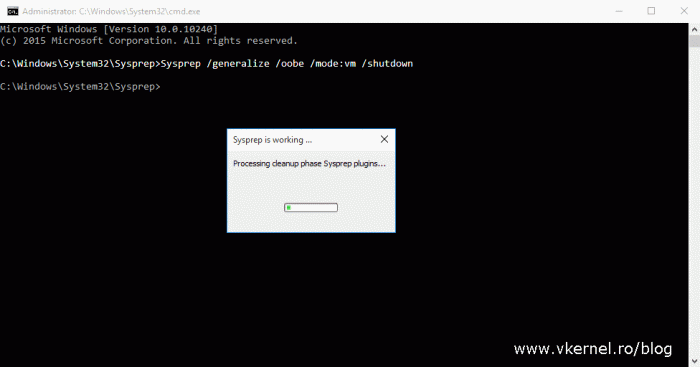
Next, we need a template which is just a VM deployed, configured, tweaked and syspreped on one of the RD Virtualization Hosts. Without the template there is no VDI, since the wizard is creating the virtual desktops based on this template. We can have as many templates as we want and we can have every one of them run different Windows versions. After you set it up the way you want it, go ahead and run sysprep with the /mode option so it doesn’t wipe out the hardware information. This makes it more efficient since the hardware information stays the same. I recommend the template be put on an SSD drive if you can afford it because it will drastically increase the performance of the virtual desktops for the users.
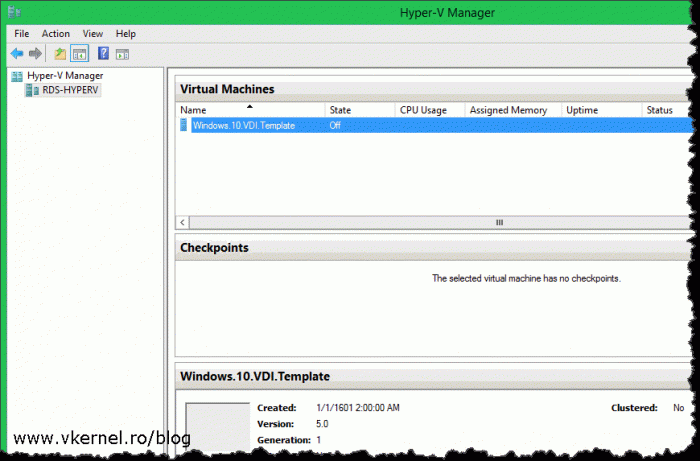
Once the VM shuts down make sure it stays that way, because the template needs to be in a power off state in order for the wizard to make use of it and create virtual desktops.
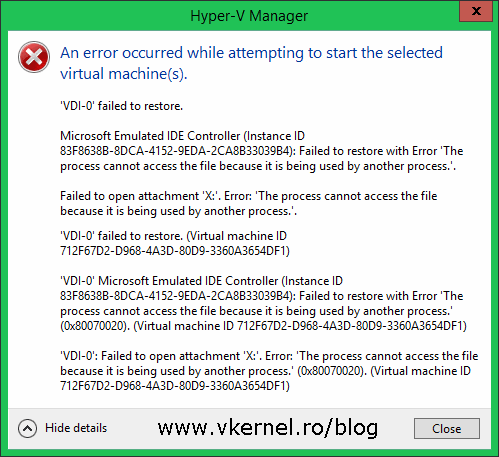
During my testing I found out that if you have an ISO image or a DVD connected to the template the virtual desktops will not power on anymore after their deployment by trowing the bellow error message:
An error occurred while attempting to start the selected virtual machine(s).
Microsoft Emulated IDE Controller (Instance ID “…”): Failed to restore with the error ‘The process cannot access the file because it is being used by another process.’
This is because they get cloned from the template and the DVD drive is in a connect state to all of the VMs.
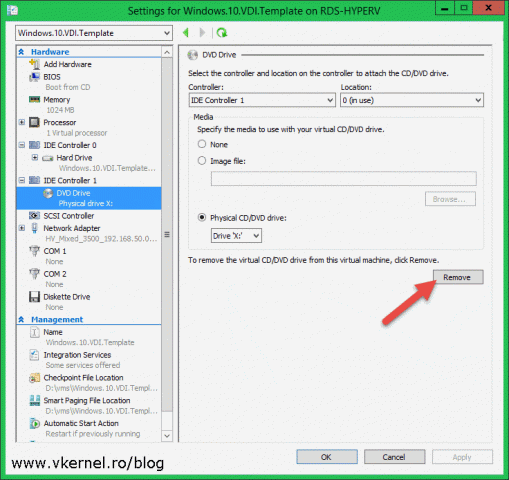
In order to solve this, so we don’t get this error message after we create our virtual desktops we are going to remove the DVD drive from the template. Open the VM settings, go to the DVD drive and click the Remove button then hit OK.
Now that all the prerequisites are in place it’s time to move forward and create our virtual desktop collections, and as I’ve mentioned in the beginning of the article, the collections are of two types: pooled virtual desktop collections and personal virtual desktop collections. Let’s start with the first one mentioned here.
Creating pooled virtual desktop collections
A pooled virtual desktop collection is a grouping of identical virtual machines that users connect to randomly and once they log off, other users will be able to connect to the same VMs. If a user disconnects from a virtual machine in a virtual desktop pool then re-connects, the user will be connected to the same virtual machine. In order for the user to be connected to a different machine, he or she needs to log off. The desktop/VM is not specifically assigned to a user, multiple users can use the same virtual desktop. As you will see later on, we can configure the VMs that are part of our pooled virtual desktop collection to automatically restore to its original state after the user logs off, which comes in handy in some environments.
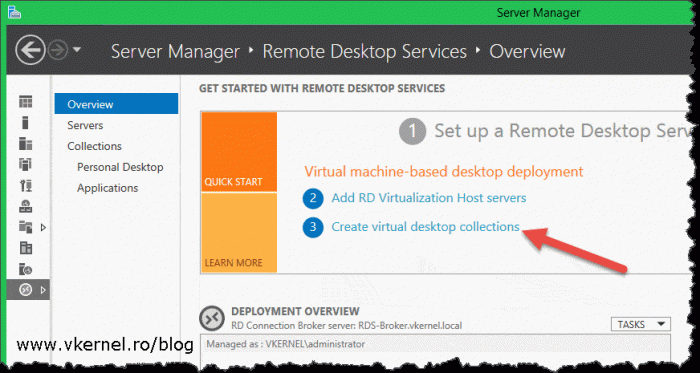
To start creating our first pooled virtual desktop collection, open Server Manager, go to the Remote Desktop Services node, and from the Overview page click the Create virtual desktop collections link.
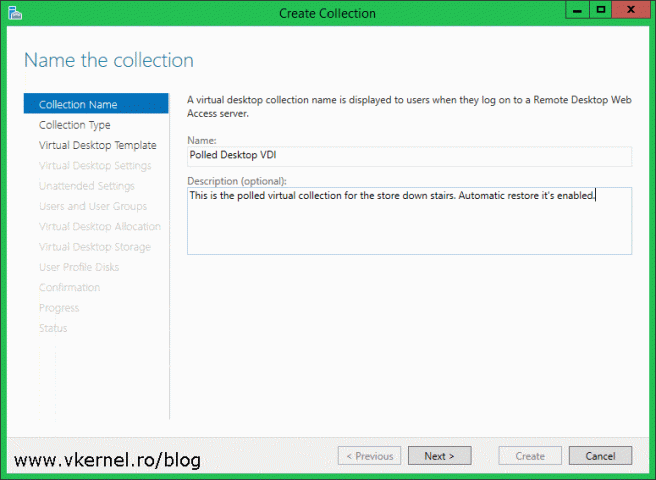
Once the Create Collection wizard opens, give the collection a name and description then click Next. Make sure you type a descriptive name, because the name you type here will be displayed to the users.
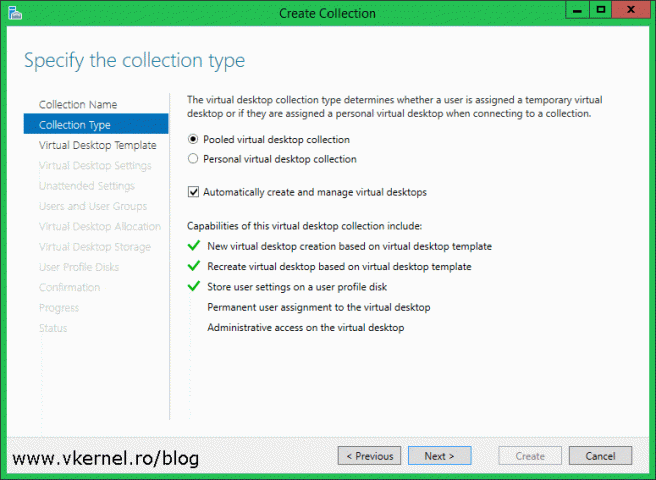
Since we are creating a pooled virtual desktop collection, select the first option then click Next. I recommend you leave the Automatically create and manage virtual desktops box selected so that most of the operations get automated. If not, you will have to manually clone the VMs from the template and also manually re-create them in case the template gets modified; not fun at all.
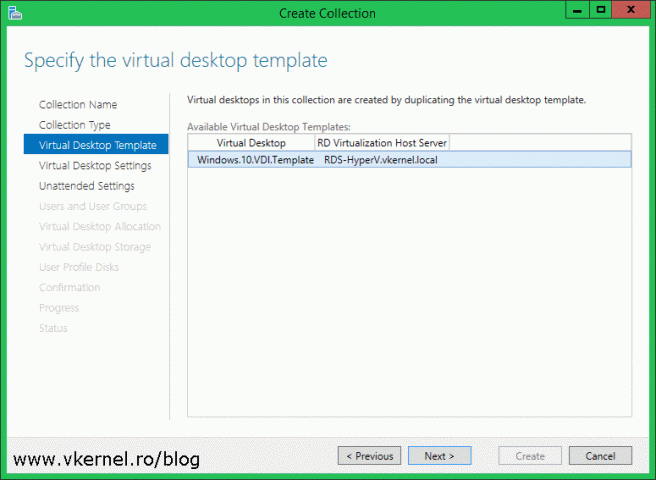
Select the VM template from the list and continue the wizard.
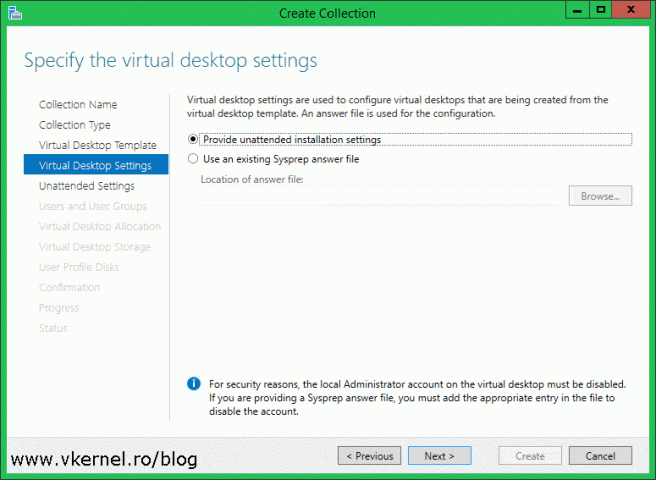
Since the VM template was syspreped, the clone VMs will be too, and in order to automatically answer the sysprep wizard questions when the machines will be powered on we need to provide an answer file. We either provide a custom answer file (.xml format) or use the wizard to create one. For the sake of this example we will go with the first option, Provide unattended installation settings.
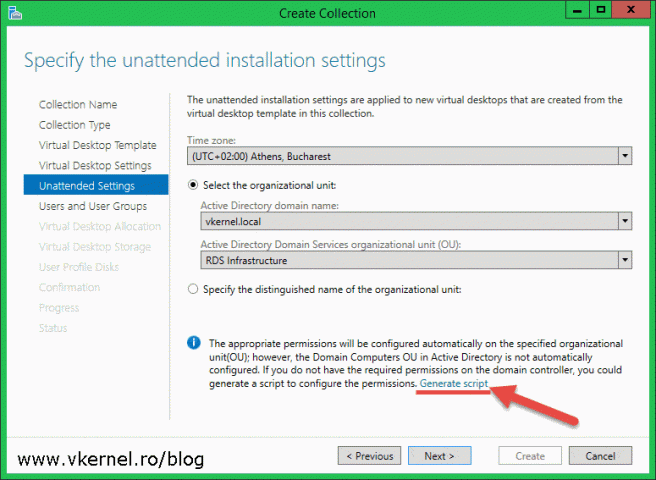
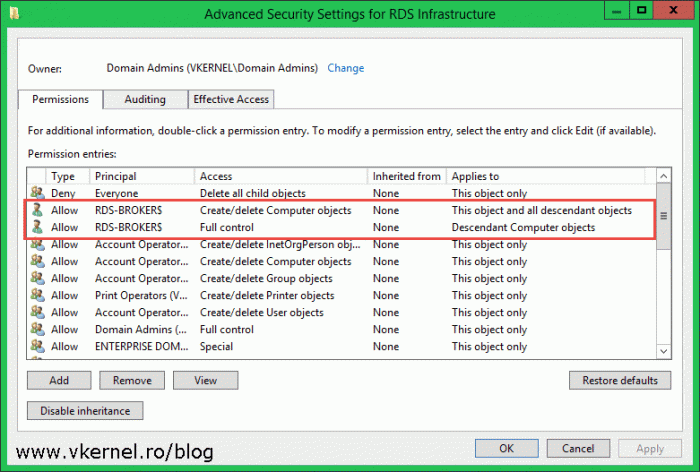
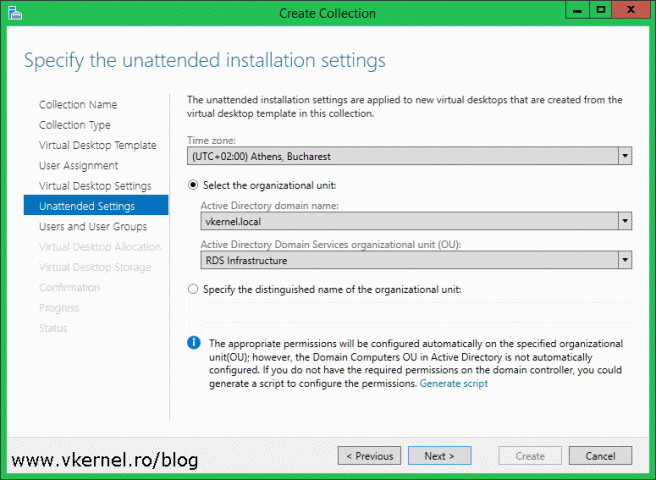
In the Unattended Settings page select your time zone, domain and the OU where the computer accounts for the cloned VMs will be created. In order for these accounts to get created, the RD Broker server needs to have the proper permissions in Active Directory on the OU specified in the wizard. The security permissions will need to be configured either manually or by running a PowerShell script on one of the Domain Controllers. The script can be generate by clicking the Generate script link in the wizard. Once generated, send the script to your Active Directory team to run it.
If the account you are logged in with has rights to modify permissions for that specific OU, just click Next and the wizard will automatically add the RD Broker server to the OU ACL list and configure the proper security permissions for it.
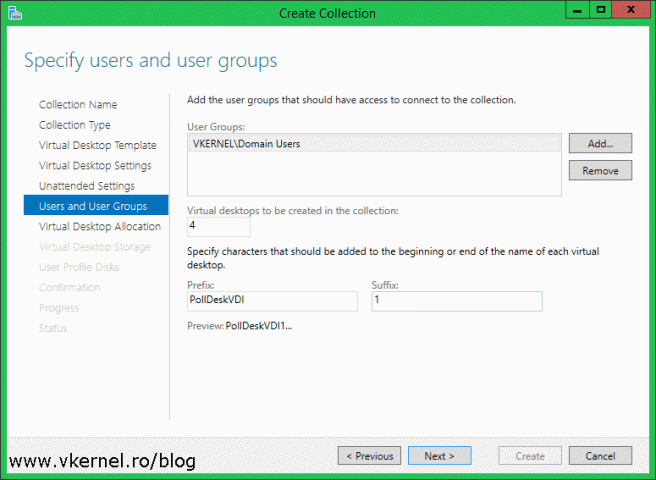
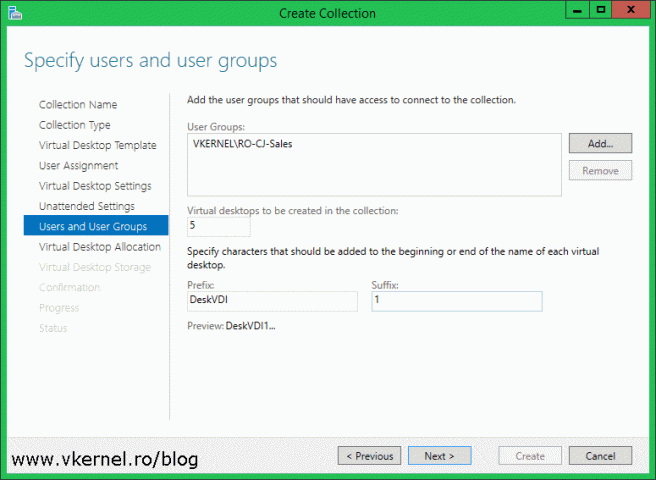
In the next page we can configure the users and/or groups that can access the collection, how many VMs should the wizard create and how those VMs will be named.
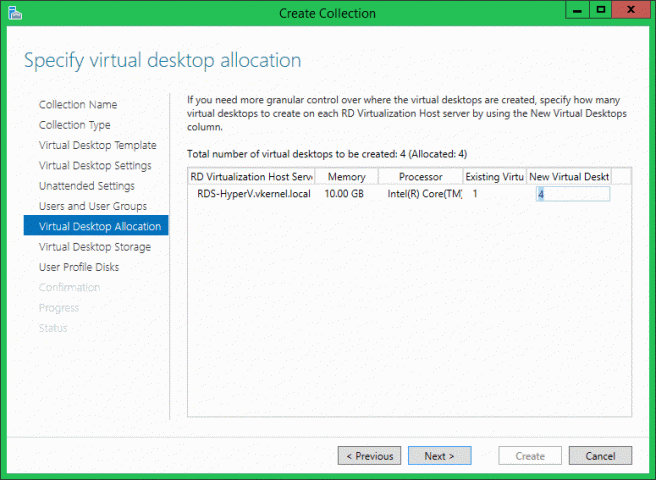
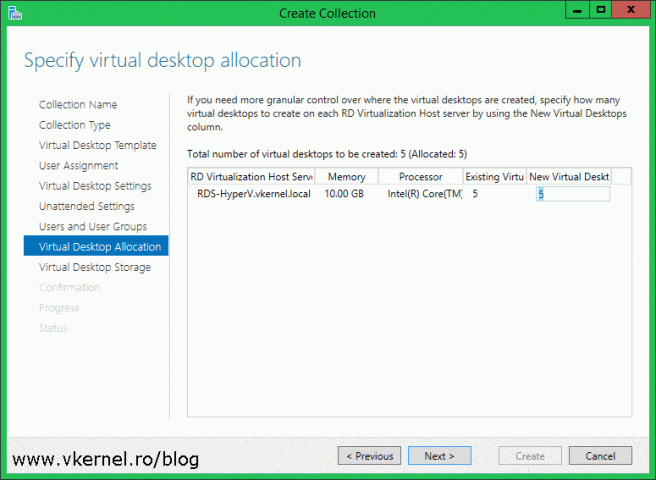
If we have multiple RD Virtualization Host servers we can spread the VMs on multiple hosts to improve performance and to minimize the load on a single host. Click Next when you’re done with the VMs assignment.
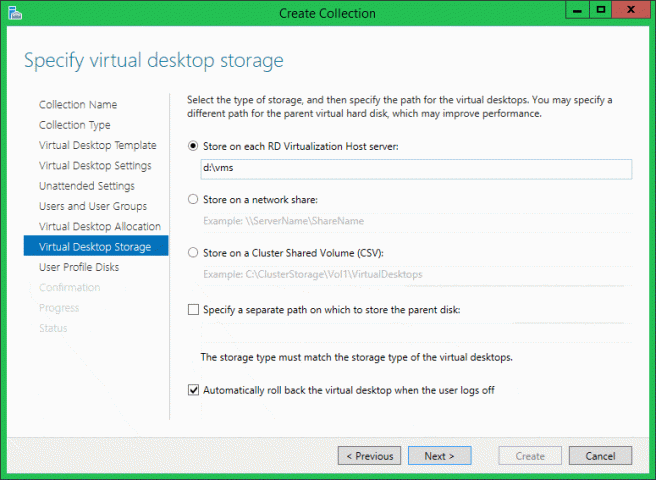
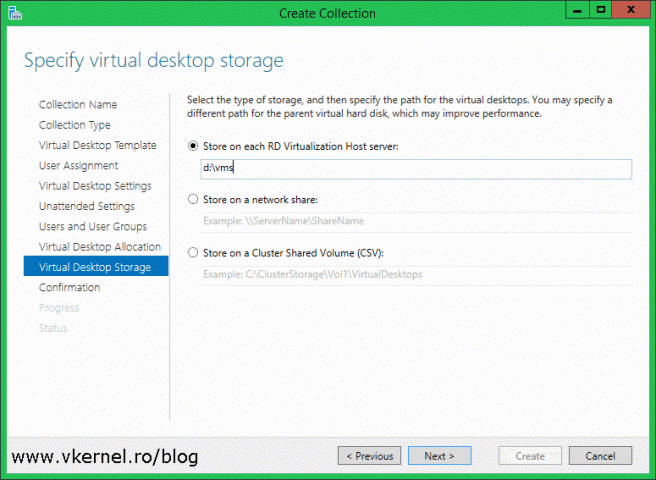
Here we need to choose the storage type and the path for the virtual desktops then decide if we want our VMs to roll back when users log off. If you make these VMs available to users that you know they will start messing up the settings and delete things from the OS, then for sure the Automatically roll back the virtual desktop when the user logs off option is for you.
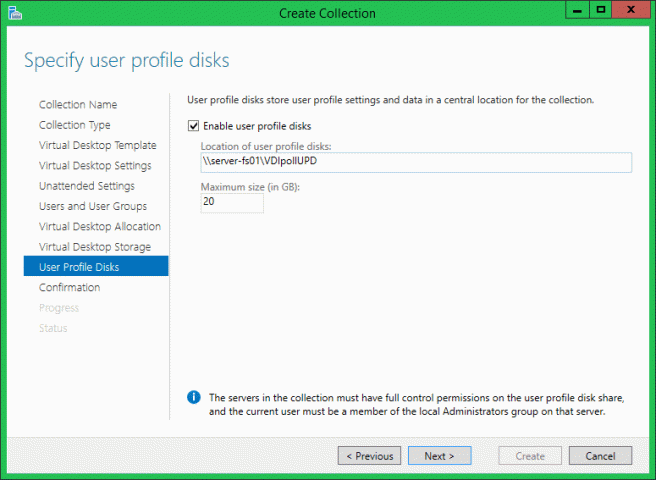
The users profile disk option should be enabled only if you think users data needs to be saved before logging off. If that’s the case type the UNC path to you file server share or where you want that user data to sit.
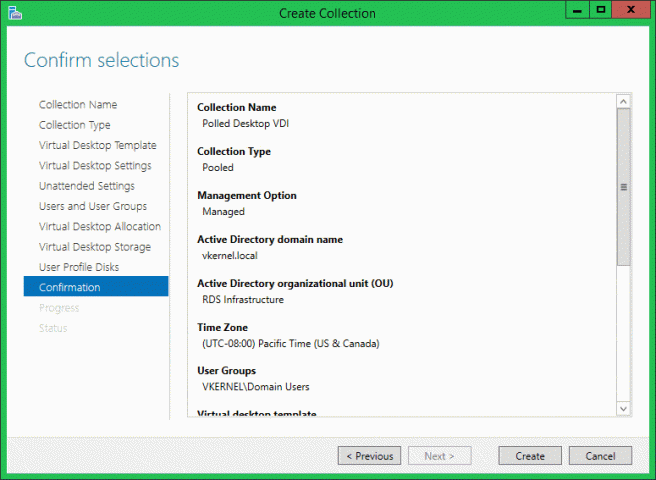
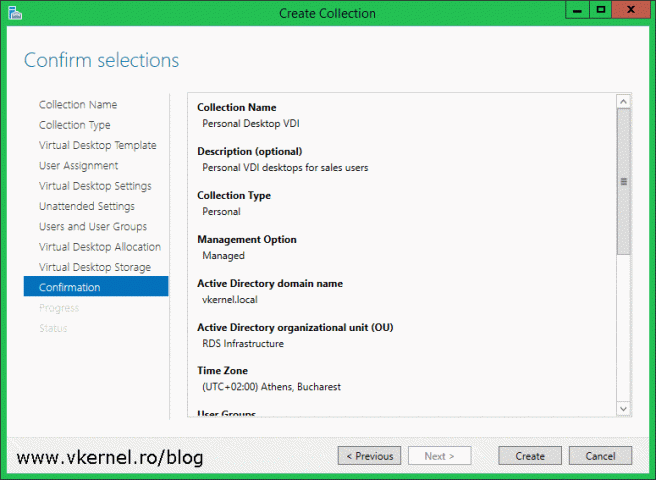
And finally, at the Confirmation screen all we have to do is click Create in order for the wizard to do it’s magic.
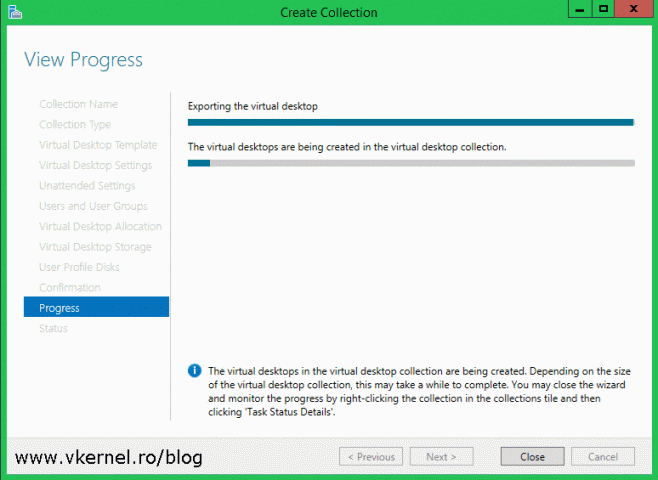
Depending on how many virtual desktops you are creating and the type of storage you have on the hypervisor(s), the operation will take some time. When everything is done, we get a Succeeded message on the Status page of the wizard.
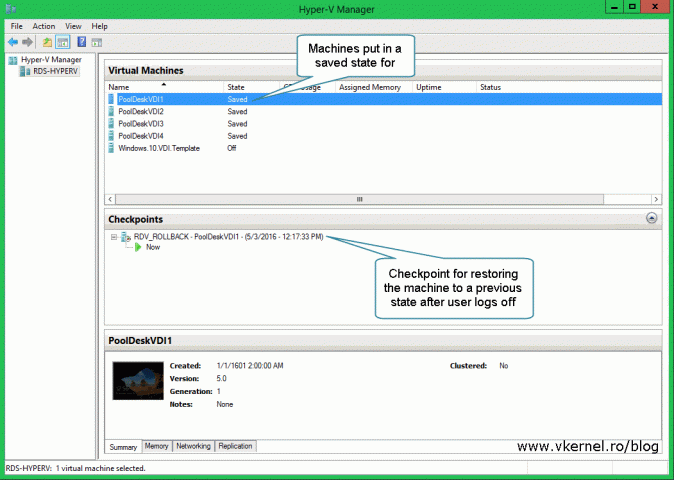
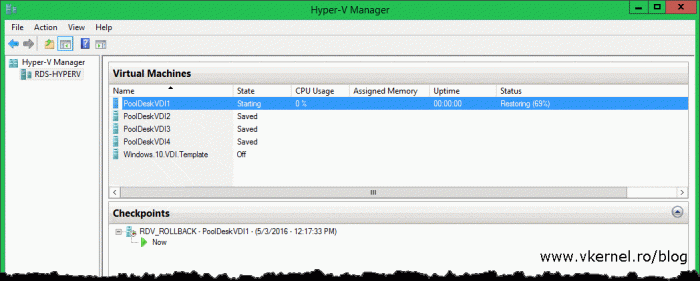
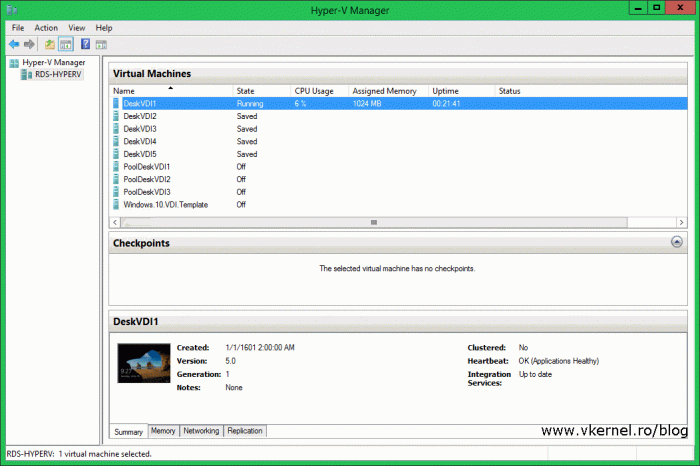
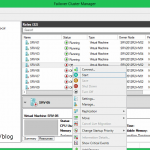
If we open the Hyper-V Manager we can see our virtual desktops created but in a saved state, not powered off. This is so they can start faster when a user connects. Clicking on one of these VMs we can also see that a snapshot was created in order for the machine to be restored to a previous state once the user logs off.
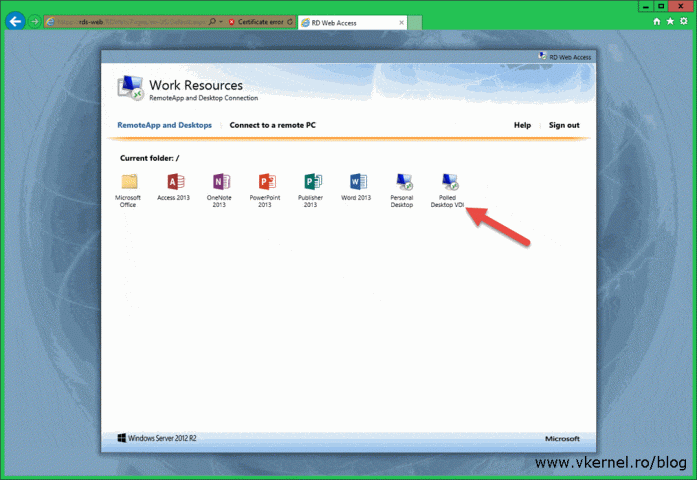
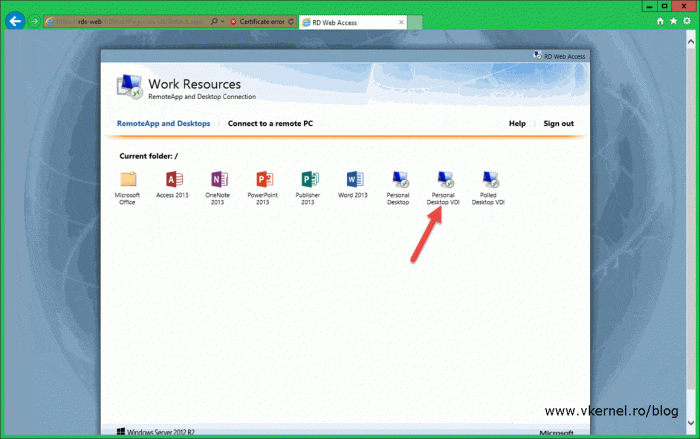
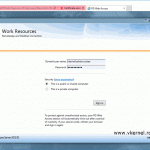
All that is left now is to open the web portal and try this out. Since we used the default permissions during the Create Collection wizard, all domain users should be able to authenticate and see the collection in the web portal. Click the icon to connect to the virtual desktop collection and ignore the certificate warning. I will handle certificates in a future article.
As soon as we click the icon, a random VM will be automatically resumed on the hypervisor to make it available to the user.
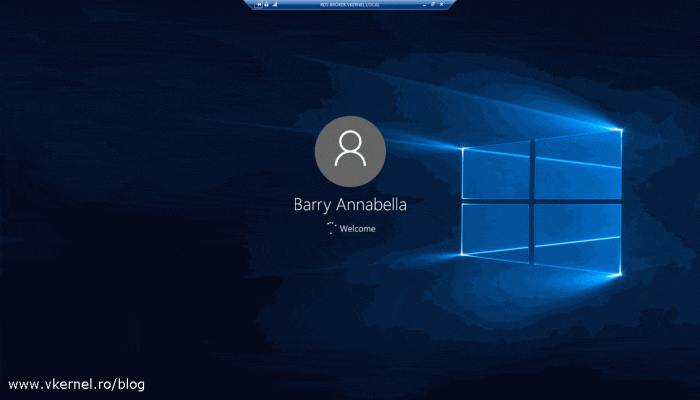
And after a few seconds the user is connected to the VM desktop using the remote desktop protocol.
Looks like we had a success with this. Now we can move forward to the next section.
Creating personal virtual desktop collections
Like the name implies, this type of desktops are personal, tight to the user; they do not roll back (only if you manually create checkpoints and revert them) nor do are interchangeable between users. When a user connects to a personal virtual desktop, he or she is directed to the same desktop every time. These are great, but they also consume more resources on the hypervisor(s) since the number of VMs is considerably higher, but again it all depends on how many personal virtual desktops you need to run.
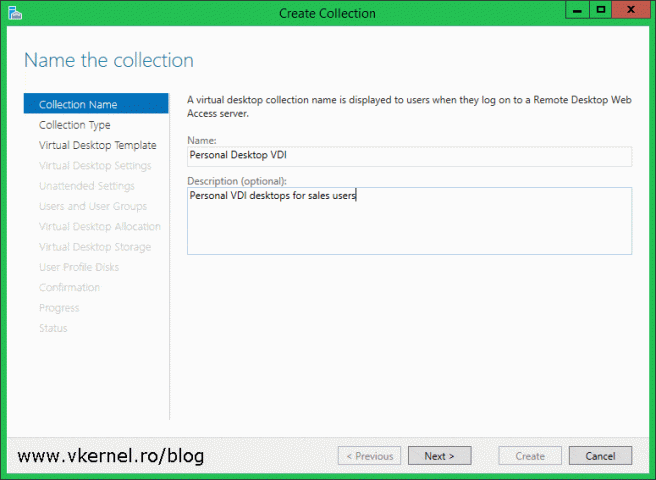
To create personal virtual desktops open the Create Collection wizard again, just like in the previous section. In Server Manager click the Remote Desktop Services node and from the Overview page click Create virtual desktop collections. Give the collection a name and description and hit Next. Make sure you type a descriptive name because the name will be displayed in the web portal for the users.
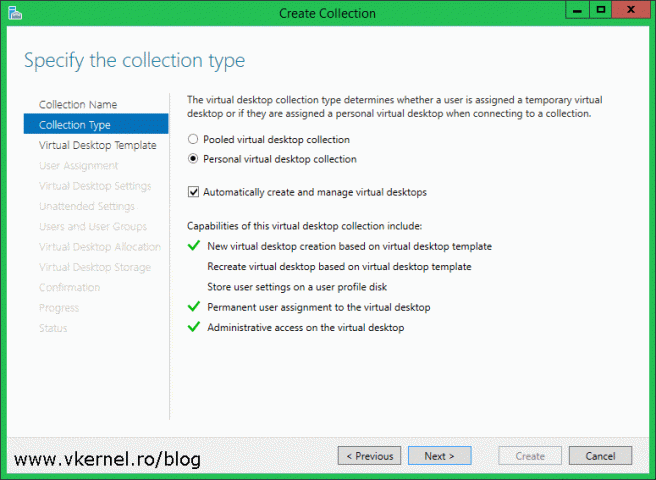
Here, select the second option, Personal virtual desktop collection and click Next. I recommend you leave the Automatically create and manage virtual desktops box enabled so you don’t have to intervene manually.
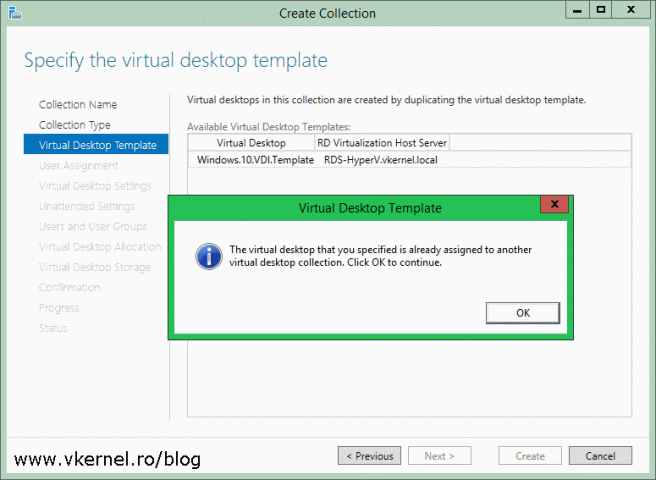
Select the VM template then click Next. If the template is already assigned to another collection we will get a pop-up message informing us about that. Just ignore it and continue the wizard.
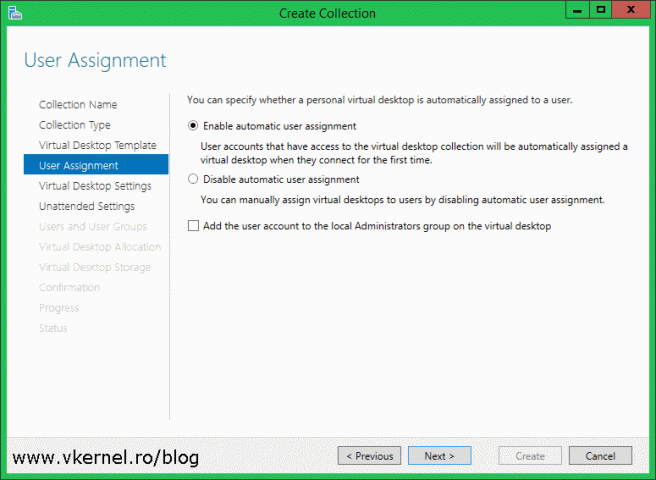
In the User Assignment page we need to choose how we assign users to virtual desktops. If we go with the first option, when a user first connects to one of the VMs in the collection, that VM will be automatically assign to that user, until manually changed by an admin. If we go with the second option we will have to manually assign users to the virtual desktops/VMs. I can’t say witch one is better because it all depends on the environment you have, but for the sake of this example we are going to choose the first option. As you can see, we also have a box to automatically add the users to the local Administrators group in the guest OS. I will leave that un-checked because I prefer using group policy for this, since I have more granular control.
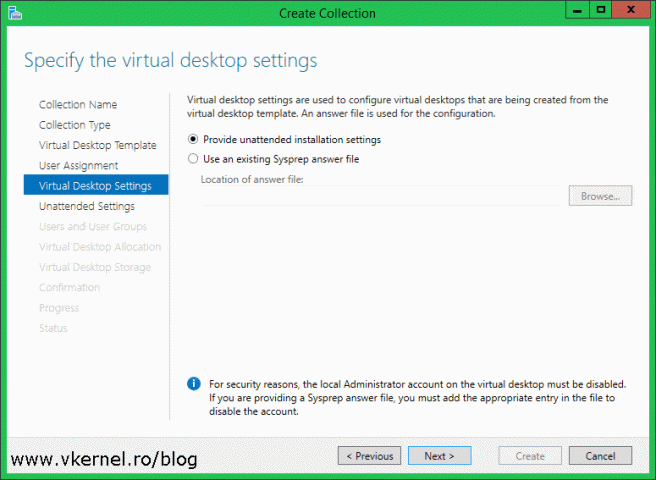
Like in the previous section we will provide the unattended installation setting using the wizard, so just click Next here and and move forward.
Select your time zone, domain and the OU where the computer accounts for the cloned VMs will be created. Like I talked about in the creating pooled virtual desktop collections section, some security permissions need to be changed on the OU specified in the wizard. We can either configure these permissions manually or by running a PowerShell script on one of the domain controllers. The third option will be to let the wizard do this on-the-fly if you are logged in with an account that has rights to change the security permissions on the OU.
Since I want only the Sales users to access this virtual desktops, I created a security group just for them. After taking care of the access permissions for the collection choose how the VMs should be named and how many should be created. When you’re done click Next.
This page of the wizard is helpful if we have more than one hypervisor so we could spread the VMs load on multiple servers, and not put everything on a single host.
Select the storage type and the path where the VMs will be created then click Next.
In the Confirmation screen hit the Create button to start building the virtual desktops.
The operation will take quite some time, and if you created more virtual desktops than the ones in this lab it will take even longer. As I’ve said before, try to put all this, especially the template on an SSD drive since all the reads are going to be from the template .VHDX file. After the wizard is done building the VMs we should be able to see them in our Hyper-V Manager console, but this time they were built with no Checkpoints so they can’t be automatically reverted.
Now, to test this and see how it works, open the web portal and log in with a domain username that has rights to access this collection; a user that is part of the Sales security group. Once logged in, the collection name should be displayed in the web page. Click the icon, and as before, ignore the certificate warning and connect.
A VM will be resumed, and in a few seconds the user will be connected to its personal virtual desktop.
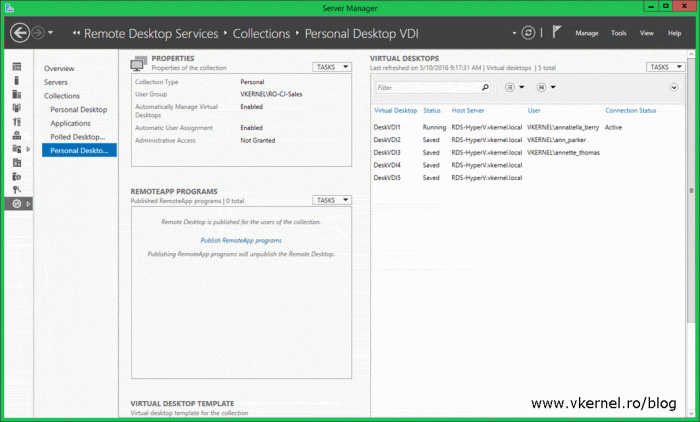
Since we choose during the Create Collection wizard to automatically assign virtual desktops to users, a random VM will be selected by the RD Broker from the collection and assigned to the user. This VM will be bond to the user until manually changed or deleted.
Looks like we had another success with our virtual desktop collection. As you can see it’s not difficult deploying these since Microsoft has put a lot of effort in Windows 2012 R2 to simplify the deployment compared to previous versions. There are still some extra configurations and tweaks we can do to our collections, but I guess this will be another subject for another time.
Want content like this delivered right to your
email inbox?
There are Major Threads going on about UPD not mounting correctly and No one not even Microsoft has a solution everyone just says it works, well it doesn’t and its endless to find a solution. Your article combined with another article gave me a thought, one guy says the UPD should mount in a like CD rom, Then you mentioned your VM’s wont boot if you forgot and left a CD connected. I put those 2 together and deleted the CD rom from the template, and now sure enough I recreated the collection and now my profile is there.
Kudos to you for indirectly solving a problem no one on the planet has a solution too.
Thanks, I’m glad I cloud help.