Configuring VMware High Availability (VMHA)
OK, you created your VMware cluster but the VM’s are not protected from hosts failure, and by not protected I mean your VM’s will not be automatically migrated to a working ESXi host and automatically powered on. They will be left in a powered off and not available state. The second bad thing about this is that you don’t even have the option to manually migrate those VM’s to another host; is grayed out for vSphere clients, and not available for web clients.


If you want to migrate them, not that you have a choice anyway if a host is down, you will need to remove those VM’s from the inventory, then browse the datastore and add them back to inventory selecting a working ESXi host during the wizard. This is if you don’t have VMware HA enabled, and if you want it, you will need to pay the vCenter price. For a better comparison of the vSphere editions take a look here.
For VMware HA to function the CPUs on each ESXi host must be compatible (same vendor and same generation) or is not going to work; VMs will not migrate, except when EVC mode is enabled on the cluster.
The best thing about VMware HA is that provides high availability for all types of virtual machines, no matter what OS is running inside that VM. So even if you have some Linux or Solaris systems they will be migrated and powered on if the host they were running on fails. What is not so great about it, is that you need to have a compatible CPU and VM’s are restarted if the host fails, but still in a production environment it will save you a lot of time, and a lot of downtime.
To enable VMware HA open your vSphere web client interface and click the Hosts and Clusters icon from the Home tab. You can also click the vCenter icon and go to Clusters, is the same result.

Select your cluster, click the Manage tab then Settings. You can also right-click the cluster and choose Settings; it will bring you to the same page.

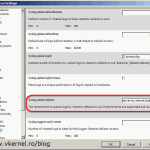
Select VMware HA and click Edit from the upper right corner.

On the window that just popped-up check the box Turn ON vSphere HA.

Before you click OK, take a second a browse the options that were enabled. If you open the Host Monitoring section you will see two options here:
Host Monitoring Status which provides an option for the ESXi hosts to “talk to each” other by using network heartbeats. This way if one of the hosts fail, the other ones will know that almost immediately, because the host is not responding to heartbeats anymore. This heartbeat talking is done trough the management network.
Virtual Machine Options provides a way on which you can configure how VMs will be restarted on the new hosts. VMs with higher priority will be restated first, then vCenter will continue with those with a medium priority, and the last will be the VMs with a lower priority. You should assign a higher priority to those VMs that have the most importance (SQL servers, Domain Controllers etc).

The second section is Admission Control which ensures that enough resources are available in a cluster to provide failover protection. Bear in mind that if a host is put into maintenance mode or disconnected it will not be taken into consideration/calculation. On how to calculate the Admission Control policy follow this VMware document.

VM Monitoring, if enabled the VM Monitoring service will “keep an eye” on the VM’s to see if they are running or not by checking for regular heartbeats from the VMware Tools service. If you want to enable this feature make sure that your VMware Tools running inside the guest(s) are up-to-date. By default VM’s are restarted after 30 seconds if not heartbeat is received, but this can be customized either by moving the slider to the left or selecting the Custom button.

Datastore Heartbeating adds an extra monitoring level, so in case there is no communication between the hosts (master and slaves) the datastore heartbeat is used to see if that host is actually down or is just not communicating via the management network. If the host is sending datastore heartbeats HA will not initiate a failover because it knows the host is up and running. In order to function you need to have at least two datastores presented to your hosts.

When you’re done configuring the options click OK. vCenter will start installing some agents on the ESXi hosts and configure those agents.

To test and see if is working all you have to do is power off one of your hosts and the VM’s should start migrating via vMotion to other working hosts in the cluster. After the migration is done vCenter will start powering on those VM’s as long s they don’t violate the Admission Control policy. I don’t need to tell you NOT to do this in a production environment right ?
Here I have three of my VM’s running on ESX1. I will power off this host and see what’s happening.

Right now my host is in an alarm state and the VM’s are not migrated yet.

After another few seconds I hit the refresh arrow and the web client shows me that the VM’s were migrated to the other host

and automatically powered on.

In a production environment and not only, this feature is life saving. Master it and use it.
Want content like this delivered right to your
email inbox?
More similar articles
 Build and run Windows Failover Clusters on VMware ESXi
- Upgrading from VCSA 5.x to VCSA 6.0 with an Embedded Platform Service Controller (PSC)
- Deploying the VMware vCenter 6.0 Appliance (VCSA) with an Embedded Platform Service Controller (PSC)
- Adding a Raw Device Mapping (RDM) to a Virtual Machine
- Deploying and Configuring VMware vCenter Server Appliance 5.x
- Configure Syslog on ESXi 5.x Hosts

Nice blog, keep up the good work.
For VMware HA to function the CPUs on each ESXi host must be compatible (same vendor and same generation) or is not going to work; VMs will not migrate.
Not entirely true, you can use different cpu generations with EVC mode.
I missed that :-), now it’s corrected. Thanks.