Upgrading from VCSA 5.x to VCSA 6.0 with an Embedded Platform Service Controller (PSC)
Since version 6 of the VMware vCenter Server Appliance (vCSA) has performance improvements, stability and new features, your management or design team decided it’s time to upgrade your existing vCenter server infrastructure running on version 5.x. I call this upgrade since VMware calls it the same, but it’s actually a migration. You are basically deploying a second vCSA using the deployment wizard, which will then migrate the settings, hosts, inventory, even the IP address of the old vCSA to the new one; and the best thing about this is that everything is done automatically.
Now, as usual, software always have prerequisites, and for this upgrade to be possible you need the to run at least version 5.1U3 or 5.5 of the VMware vCenter Server Appliance. Don’t worry if you don’t have these exact versions because you can always do an update in a few very easy steps. Just open the appliance administration page, go to the Update tab and click the Check Updates button. If there are any updates available, go ahead an install them.


One other important prerequisite is to have at least one standard vSwitch with a vmnic uplink on the ESXi host where the new vCenter appliance will be deployed. This is because the vCenter 6.0 deployment wizard does not recognize distributed switches. For this reason we have to remove one of the network adapters from the distributed port group and assign it to a newly created standard vSwitch. The port group you choose is the one that communicates with the ESXi servers, the one where the running vCenter server is connected to.
[warning]Make sure at least one network adapter remains on the distributed port group, or your VMs running on that port group will be disconnected from the network.[/warning]
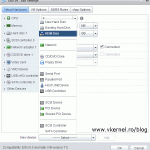
To remove the network adapter from the distributed port group and create a new standard vSwitch, open the Networking settings for the ESXi host and click the Manage the physical network adapters… icon.

In the window that pops-up select the vmnic you want to remove then click the red X button. In my case here, I will remove vmnic 8 which is linked to the port group where the actual vCenter server in connected to. Click OK.

Now click the Add host Networking icon in order to start creating a vSphere standard vSwitch.

Select the third option, Virtual Machine Port Group for a Standard Switch then click Next.

Since we have no standard vSwitch, choose the second option to create one then continue the wizard.

Here, click the green plus icon in order to assign a network adapter to the vSwitch. From the Network Adapters list, select the network adapter we previously removed from the distributed port group then click OK.


The wizard will automatically create a standard port group for the vSwitch and in this page of the wizard we can name this port group. Once you’re done click Next.

On the Ready to complete page, click the Finish button to create the standard vSwitch.

At the end we should have a working standard vSwitch with an assigned port group and network adapter. As you can see, the ESXi host got into an alarm state since it lost a network adapter on one of it’s distributed port groups. Ignore that for now, because once the vCenter upgrade is done, we will assign the network adapter back to where it was.

Another thing needed before moving forward, is to have at least two datastores/LUNs. Now this might be optional or not, and it all depends if you want to keep the same name for the new VMware vCenter Server appliance as the one that is already running in the environment. If you don’t want to keep the same name for the new vCenter appliance, then deploying it on the same datastore with the old vCenter server will work just fine. If you go with the other option and keep the name, then two datastores are needed since there can’t be two folders with identical names on the same datastore.

Also, for keeping the same name, the actual vCenter server appliance needs to be renamed in the vCenter inventory before running the upgrade wizard. It doesn’t matter what name you give it, because once the upgrade is done we will delete the appliance anyway.


There are a few other prerequisites that I want to mention briefly before we start the upgrade:
- Make sure you do a backup, or at least create a snapshot of your existing VCSA because things can always go wrong.
- Clocks on all machines need to synced.
- The SSL certificate of the current vCenter server needs to be valid.
- Verify that the ESXi host on which you deploy the vCenter Server Appliance is not in maintenance or in lock-down mode.
- Make sure any 3rd party software like backup and recovery, monitoring, workflows and orchestration, storage plugins you might have are compatible with the new vCenter server version.
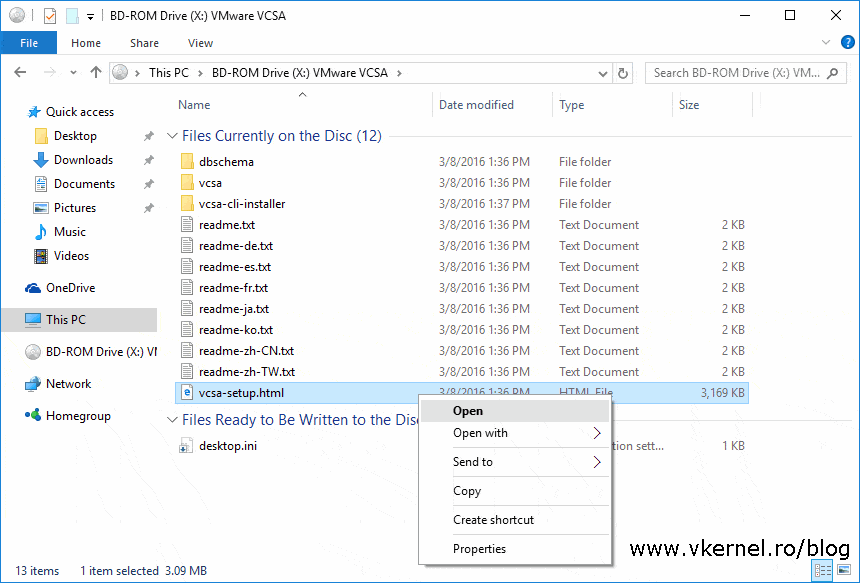
Now that all the prerequisites are met, mount the VMware vCenter 6.0 ISO on a Windows machine, and from the vcsa directory launch the VMware-ClientIntegrationPlugin-6.0.0.exe installer. Follow the wizard and install the package using its default settings.

Once the plugin got installed, from the root of the media, launch the vcsa-setup.html file and allow access on any messages that pop-up.

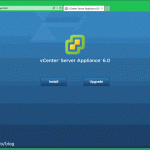
After the page is loaded, hit the Upgrade button to launch the VMware vCenter Appliance Deployment wizard.Click OK on the information message that pops-up since we are already compliant for the upgrade.


Once the wizard launches we get the EULA on the first page. Accept it, then click Next.

Here, in the FQDN and IP Address box, type the ESXi host where you want to deploy the new VMware vCenter server appliance. Provide the credentials in the rest of the boxes and continue the wizard. If the ESXi certificate is not trusted, a warning message will pop-up about that. Just click Yes to continue.


Specify the appliance name and click Next.

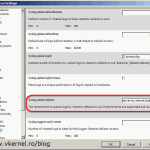
In this page we have quite a few information to put inside those boxes. From the first box we select the vCenter server appliance version that runs in our infrastructure. From the second box, select Embedded Platform Service Controller since our running vCenter server runs with an embedded PSC. In the vCenter Server Appliance section type the necessary information from the running vCenter server appliance, like the FQDN of the appliance, the SSO password and so on. The last section of this page is the one where we need to type the ESXi host information where the running vCenter appliance is located. Once everything is completed click Next.

In the message that pops-up we get warned that the database user password will be changed and set to be the same as the vCenter password, and that port 22 needs to be opened between the appliances. Click Yes to continue.

Here we need to select the appropriate appliance size depending on how big the virtual infrastructure is. Make your choice then click Next.

Choose the appropriate datastore for the new vCenter appliance then continue the wizard. Since I choose to keep the same name for the new appliance as the one running in the infrastructure, I will have to select a different datastore.

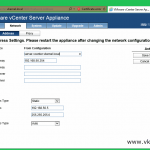
Since we have only one standard port group created, there is nothing else to select from the Temporary network drop-down-box. This is the network that is part of the standard vSwitch we created earlier. On the rest of the boxes provide the necessary network information for the appliance then click Next.
[notice]I noticed that sometimes the upgrade fails if a static IP address is provided here. If that’s the case, re-run the wizard and set it to DHCP. Never had any problems when DHCP was used.[/notice]

Join or not join the VMware Customer Experience Improvement Program, it’s your choice. Click Next after your done with your selection.

On the Ready to complete page, hit the Finish button to start the upgrade process.

This will take quite some time, especially if you choose to export the performance and historical data, but at the end we get a nice Migration Completed message screen.


Logging in on the web interface, we should have everything in order, servers, clusters, permissions etc. The only thing missing is the license, which can be seen in the message displayed up in the browser.


We should also see the new and the old appliances in the inventory. Once you verify everything is in order and running correctly, you can go ahead and delete the old vCenter server appliance.

The only thing left is to delete the standard vSwitch and assign the adapter back to the original port group, but before that we need to link the new vCenter appliance to the proper port group. Right now the vCenter server appliance is still connected to the temporary network and if we remove the network adapter from the standard switch, we will lose connectivity to our vCenter server.
To fix this, right-click the vCenter server appliance and choose Edit Settings.

From the network adapter drop-down-box select the port group on witch to connect the VM to. Make sure you connect it to the same port group where the old appliance was connected. This way you know for sure that all ESXi hosts can communicate with the vCenter server. Click OK when you’re done.

Now, to remove the standard vSwitch, click the ESXi host where it was created and go to Manage > Networking > Virtual Switches. Select the standard vSwitch then click the red X icon from above. Choose Yes on the message prompt that pops-up.
[warning]Before removing the standard vSwitch make sure no other VM’s are connected to it.[/warning]

Now it’s time to add the network adapter back to the distributed port group. Select the distributed switch from the Virtual Switches section and click the Manage the physical network adapters connected to the selected switch button.

From the Uplink Port list, select the port link that you know it is attached to our distributed port group then click the green plus icon.

Select the network adapter from the list and click OK twice.


The alert on the ESXi server should be gone and the environment should look healthy.
 Before ending this article I have to mention that there are still a few more things to be done after this, like upgrading the ESXi hosts and the Distributed Switch(es) in order to benefit from the latest features, but these are subjects for a future article.
Now as you saw, upgrading the VCSA with and embedded PSC it’s easy and can also be done after hours since it doesn’t take long, but always test in a lab before putting in production. In case of any problems feel free to use the comments area to get help.
Want content like this delivered right to your
email inbox?
More similar articles
 Build and run Windows Failover Clusters on VMware ESXi
- Deploying the VMware vCenter 6.0 Appliance (VCSA) with an Embedded Platform Service Controller (PSC)
- Adding a Raw Device Mapping (RDM) to a Virtual Machine
- Deploying and Configuring VMware vCenter Server Appliance 5.x
- Configure Syslog on ESXi 5.x Hosts
- Configuring VMware High Availability (VMHA)