Deploying Personal Virtual Desktops and Virtual Desktop Pools with Server 2008 R2
If you work in a medium to big environment you know users need to be mobile, and be able to do their job by accessing applications and internal network from multiple devices, not just their office desktops. Maybe some of them are working from home, or you start to have more and more thin clients. Well…if that’s the case, you need to implement a VDI solution (Virtual Desktop Infrastructure), in order to ease your job and make the users happy. Doing this you don’t just publish applications to the users, you are also creating personal virtual desktops that hey can use as a day-to-day basis, and they don’t even know where the machine is located. It can be right across the ocean. To create a Microsoft VDI you need a bunch of servers (physical and virtual) running 2008 R2, since this is the version I will use for this guide. I can’t tell you the exact number of servers you need, because I don’t know how big your infrastructure is, or how many users you have working with VDI.
For this example however, I’m going to use two Hyper-V servers, one domain controller, and one VM that will host the RD Connection Broker role, the RD Web Access role, the RD Session Host role and the RD License server role. One of those two Hyper-V servers (RDS-HyperV1) will be used for hosting VM’s for personal desktops, and the other one (RDS-HyperV2) to host VM’s for Virtual Desktop Pools. I will explain later what Virtual Desktop Polls are, but right now let’s just install the roles.
Open Server Manager, right-click Roles and choose Add Roles. On the Select Server Roles page, check the Remote Desktop Services box and click Next.

Here enable the roles that you want to install on this server. In an environment with high traffic I recommend you use a separate machine for every role. In this lab however, I’m going to install the RD Connection Broker role, the RD Web Access role, the RD Session Host role and the RD License server role on a single machine, a virtual machine.


Select Do not require Network Level Authentication and continue the wizard.

We will configure licensing later, after we see everything is working, so for now just move forward with the wizard using the default selection.

Because we choose to install the RD Session Host server role, we have an option here to add users or groups that are allowed to connect to this RD Session Host server. And this is right, but this server will not be used as a host where users connect and open a remote desktop session, or where you publish applications for those users. This RD Session Host server will be configured in redirection mode which is something else, so just click Next and continue the wizard. 
Leave the default setting and begin the installation.


In order for the wizard to complete the installation of those roles the server needs to be restarted. Click the Close button than choose Yes to reboot the server.

Now let’s take care of the Hyper-V servers also. We need to install the Remote Desktop Virtualization Host which is part of the Remote Desktop Services role. On the Select Role Service page check the Remote Desktop Virtualization Host box and finish the wizard. As soon as you check that box another window pops-up informing you that the Hyper-V role service is also required. Click the Add Required Role Services button then hit Next. If you need high availability for your virtual desktops, you can create a Hyper-V Failover cluster. For this lab however, I’m going to use separate machines because of the lack of resources.
Since Remote Desktop Virtualization Host service requires Hyper-V, your host need to be able to run Hyper-V and be on the compatibility list for better performance and stability.


Choose which adapter you want to use for your virtual machines to communicate with the rest of the network; the LAN network.

Click Install.

In order for the Hyper-V role to be installed the server needs to be restarted. Click Close then choose Yes to reboot.

The server will reboot a couple of times, but at the end you should have a functional Hyper-V server. Repeat this operation for the rest of your servers, or Hyper-V clusters.

Now that our Hyper-V servers are in place and Remote Desktop Virtualization Host service role is installed on every one of them, is time to create some VM’s on these hosts, install a Windows OS, and configure the guests. Don’t think the guest configuration is piece-of-cake, because is not. We will need to make some registry modifications, firewall rules, and do some scripting. Let’s start by creating the VM’s for personal virtual desktops. I will use my first Hyper-V server for this, RDS-HyperV1.
Right-click the host (Hyper-V host) and choose New Virtual Machine.

Naming the virtual machine is a very important step. The name of the VM needs to be the same with the name of the guest you will install, and it needs to be a FQDN. In this example my VM is called Desk01.vkernel.local, because I know that after I install the OS I will name the guest Desk01 and join it to the vkernel.local domain. It is not going to work if the guest and the VM name are not the same. After you finished naming the VM, provide a path where to store it then hit Next. 
Specify the amount of memory you want to allocate for this VM and continue the wizard.

Provide a network adapter for the VM to connect to your LAN.

Here you can specify the name, the location and the size of the virtual hard disk. I recommend you leave the virtual hard disk name unchanged. Click Finish.

And here we are. I created another VM to be used as a personal virtual desktop, because I want to test this using multiple VM’s. One will run Windows 7 (Desk01) and the other Windows 8 (Desk02). Go ahead and install the OS’s on these VM’s and join then to your domain.

Remember ! The name of the guest needs to match the name of the VM.


There are some scripts on Microsoft TechNet that will configure the guest OS for VDI. I tried them, but sometimes they work and sometimes they don’t, especially if you are running Windows XP. That’s why I’m going to show you how to do the guest configuration manually. If you still want to try the scripts, you can download the VBS script or the PowerShell script.
The first step in configuring the guest OS, is to enable Remote Desktop. You can do this manually, or using Group Policy; it all depends on the number of clients you have to configure. For this demonstration purpose I will use Group Policy. If you are having trouble using this method, Microsoft has a very nice article on how to do it, and you can read it here.
Don’t forget to enable the rule in firewall to allow remote desktop connections.


The next step is to assign who can RDP into this machines, because right now only Administrators can do it. For this I’m going to use Group Policy again by configuring Restricted Groups. If you want to, you can create a security group, and in this group add the users that you want to be able to login using a RDC (Remote Desktop Connection). I usually allow all Domain Users to do remote desktop, because if they don’t have the personal virtual desktop published in RD Web interface they can’t connect, since they don’t have anything to click on. If you want to restrict users to log in to RD Web Interface, I have an article on how to do it, and you can read it here. It all depends on how much security you need in your environment.


After we’ve done all this we need to enable the Remote Procedure Call (RPC), and for this the registry needs to be modified. Open the registry editor (Start>Run>regedit) and expand HKLM\System\CurrentControlSet\Control\Terminal Server. If you are doing this on a Windows Vista and above systems you will see a value named AllowRemoteRPC. Double click it, set it to 1, then reboot.

If you have Windows XP, you will need to create the value by right clicking the Terminal Server key and go to New > DWORD value.

This can be also done using Group Policy. On the GPO expand Computer Configuration > Preferences >Windows Settings then right-click Registry and choose New > Registry Item. On the Actions box you need to choose Create in order for the policy to apply to Windows XP machines also, if not just leave the default, Update. On the Key Path box go to SYSTEM\CurrentControlSet\Control\Terminal Server and select AllowRemoteRPC, then set 1 on the Value Data box. Click OK, and wait for the clients to get the updated GPO. For this to work on Windows XP machines the Group Policy Preference Client Side Extensions needs to be installed.

Make sure you have the latest version of the remote desktop client installed.
Next, configure the firewall by enabling the Remote Service Management. Check the box Remote Service Management in Windows Firewall for the domain profile and click OK.

The next step in configuring the virtual desktop clients is to grant RD Virtualization Host servers (the Hyper-V servers) permissions in the RDP-TCP listener. This can be done by using the script I mentioned above, but what I do, is I create a security group in AD and make my RD Virtualization Host servers members of that group. I then add the security group on the local Administrators group on every VM (personal desktop or desktop pool), either using group policy or by hand, if the are a small number of machines.


We are now done configuring the virtual desktops, but before we move forward make sure all the GPO’s are applied and you rebooted the machines. Remember, the registry was edited, so a reboot is needed.
On my second Hyper-V server/RD Virtualization Host server, I will create three VM’s that will run Windows XP and that I will use for Virtual Desktop Pools. Virtual Desktop Pools are exactly what the name implies, a pool of VM’s, but these VM’s need to be exactly identical in configuration, have the same software installed and they need to run the same OS. These are used in places where changes and data saved on these desktops can be discarded after the user disconnects or logs off (the VM will be reverted to a clean stated). More on this later, right now go ahead and create the VM’s on your second RD Virtualization Host server.

You now need to configure these machines like the ones we configure before, enable RDP, edit the registry, etc. When you’re done, install all the software you need, make all the modifications, tweaks on these VM’s, then power them off. In order for the VM’s to be reverted to a clean state, a snapshot is needed, so right-click the VM’s and choose Snapshot. If you are making the snapshots from the Hyper-V Manager, you will need to rename those, because the snapshots need to have a specific name of RDV_Rollback. Make sure you type it correctly or the VM’s will not be reverted to a clean state after user logs off or disconnects.


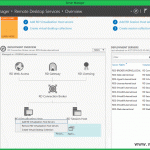
You might think is over, but is not; we still have to configure the RD Connection Broker server. I’m going to use Server Manager for this because I have all the roles available in a single console. Log in to the RD Connection Broker server and click Remote Desktop Connection Manager in the console. As you can see there are a lot of warning and errors. To fix them, we will start from the top, so click the Configure link next to RD Connection Broker is not configured for personal virtual desktops.

Click Next to skip the Before You Begin screen.

In the Server name box type your RD Virtualization Host servers that are hosting users virtual desktops then click Add. These are the Hyper-V server where we just created and configured the VM’s, the virtual desktops.

Type the name of the RD Session Host server that is running in redirection mode. We did not configured that yet, but we will with the help of this wizard. You might wonder why I typed the name of my RD Connection Broker server in the box. Because my RD Session Host service is running on this server. Remember I said at the beginning of this article that this VM will run multiple RD service roles. If you have clients that are using Remote Desktop Connection 6.1 or earlier you need to check the box Enable redirection for earlier RDC versions and type the RD Session Host server name that is running in redirection mode. I will use the same RD Session Host server for this.
As you can see, there is an option to automatically configure the provided RD Session Host server for redirection. If you check the box Do not automatically configure, you will have to configure the redirection mode manually. Don’t do that, just click Next.


Here we need to provide the name of our RD Web Access server. Again, since my RD Web Access server is running on the RD Connection Broker server, I will type it’s FQDN.

Click Apply to save the changes.

On the Summary Information screen uncheck the box Assign personal virtual desktop, because we will do this later. There are still a few configurations to be done.

The rest of the configurations are not mandatory, the Farm in this state can work without them, but sooner or later they still need to be configured. Click the Change button next to Display Name to customize the name of our RD Web Access page. In the Display name box type the name you want to appear on the web page.

Click the Specify link next to RD Licensing and type the name of the license server. Do not activate the license server right now, do it at the end when you see everything is working.

If you want to sign you .rdp files you can do that by clicking the Specify link next to Digital Certificate. Follow this guide to see how is done.
Now open a browser, type your RD Web Access server name followed by /rdweb. Log in using an Administrator account.

Click Configuration then select the radio button An RD Connection Broker server. In the source name box type your RD Connection Broker server name and hit OK. If you don’t get an error and you are redirected to the RemoteApp Programs menu, it means it worked.

Let’s publish some desktops. On your RD Connection Broker server, right-click Personal Virtual Desktops and choose Assign Personal Desktops to users.

Click the Select User button then type the user name and hit OK. On the Virtual Machine box, select the VM you want to assign to this user. I will not choose any of the WSKxx.vkernel.local machines because those VM’s will be used in a Virtual Desktop Pool very soon.

Click Assign then Finish. The bad thing is that you can’t see what desktop was assigned to what user using a GUI. You will have to rely on PowerShell for that.


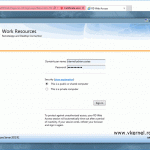
Using this user, log in to a RD Web Access page. You should see an icon called My Desktop.

Before you click on that icon, make sure the VM that was assigned to this user is powered off. Just to see the magic happens.

Provide the credentials and click OK.

Now very quickly switch to your Hyper-V server where this VM is hosted and powered off. In a few seconds the VM should be automatically started and the user be able to connect to his/her personal virtual desktop. I think this is pretty neat.


Now that our personal virtual desktops are working let’s take care of the virtual desktop pools also. On the RD Connection Broker server right-click Remote Desktop Connection Manager and choose Create Virtual Desktop Pool.

Click Next to skip the Welcome screen.

Select the VM’s that you want to add to this virtual pool and click Next.

Name the virtual pool and give it and ID then continue the wizard.

At the end click Finish.

The virtual pool should be successfully created.

Refresh the RD Web Access page or log in again, and you should see the virtual pool displayed in the web page.

By clicking the icon, one of the VM’s from the pool will be started (decision made by the RD Connection Broker server) and the user can work on its desktop.


If another user clicks on the same icon, the RD Connection Broker server will power on another VM from the pool. When the user logs off or disconnects, the VM will automatically be reverted to a clean state. All data that the user had on the VM will be gone.

If everything is working you can go ahead and activate you license server. What’s left is to make sure the RD Web Access has an external FQDN so clients get the web interface loaded in their browser, and the RD Connection Broker server is also accessible from the outside. This is not a standard and recommended procedure. To fully implement this a RD Gateway server needs to be place in your DMZ zone, but that’s for another time since is another long and complicated story.
Want content like this delivered right to your
email inbox?
More similar articles
 Deploying VDI using Windows Server 2012/R2
- Converting UEFI + GPT Windows Server to Hyper-V VM
- Upgrading 2012 R2 Cluster to 2016 using Cluster OS Rolling Upgrade
- Installing Remote Desktop Services (RDS) in Windows Server 2012/R2
- Migrating a Hyper-V Cluster to Windows Server 2012 R2
- Configuring Hyper-V Replica in Windows Server 2012/R2