Bulk import computers into the MDT Database using PowerShell
The story of every admins life; arrive in the morning and find out that new computers need to be deployed and the existing ones upgraded. So you start preparing the images and import them in MDT; you are using MDT, right ? If not you should start, because is an awesome free tool. On side of this makes you happy, because you get rid of those old OS’s, but the other side gives you a little head-each because MDT has a small problem when it comes to computer names. You either walk trough the wizard and type the computer name by hand during deployment, or configure an MDT database and populate it with computer names. I know you are thinking right now…but Adrian ! both of this methods need a lot of typing. Not necessarily, because there is a PowerShell module from Michael Niehaus (MDTDB.zip) that can populate the database with computer names, mac addresses and everything.
After you downloaded the module, unzip the MDTDB.psm1 file somewhere on your MDT server then open PowerShell and view the server current execution policy using the Get-ExecutionPolicy command. If it sais Restricted, you need to change that, in order for the script to run.

To change the execution policy, type:
Set-ExecutionPolicy unrestricted

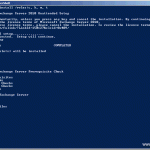
Now is time to import the module in PowerShell using the Import-Module command. I put -Verbose at the end so I can see all the details.

In order to manipulate the database, we first need to connect to it. Issue the following command:
Connect-MDTDatabase –sqlServer "Your SQL server name" –instance "Your SQL instance name" –database "Your MDT database name"
in my case is:
Connect-MDTDatabase –sqlServer Server-sql –database MDT2012
I removed the instance parameter because I’m using the default SQL instance. If you don’t get any errors, it means the connection was successful.

All that is left now is to add and a computer into the database. This is done by using the New-MDTComputer command followed by its parameters:
New-MDTComputer -macAddress FF:FF:FF:FF:FF:FF -uuid FFFFFFFF-FFFF-FFFF-FFFF-FFFFFFFFFFFF -description 'WSK001' -settings @{ OSInstall='YES'; OSDComputerName='WSK-001'}
The above example will create a single entry in MDT with the same description and computer name of WSK001. Off course you need to replace the mac address and the UUID with valid ones.


For more options and parameters you can always use the Get-Help command.

Populating computers by using the above example is still going to take you a lot of time. Think of it, for every workstation and server you need to create a line like that. It will be much easier to have a computer list with their mac addresses and names, and import that list into the database. This is what I’m going to show you next, but first let’s do that list. Open Excel and create something similar like you see in the bellow image; just replace the letters and numbers with your own.

When you’re done save it as CSV.

In order for the script to work we need to put the computers list in a variable (computers) using the following command:
$computers = Import-Csv C:\pc.csv

You know that it worked, because if you type the variable name and press Enter, all the computers on the .csv file should be listed.

We are now ready to populate the database with the computers list from the .csv file we just created. You can paste the command in PowerShell or save it as script and run it.
For ($i=1; $i -le $computers.count; $i++)
{
New-MDTComputer -macAddress $computers[$i-1].mac -uuid $computers[$i-1].UUID -description $computers[$i-1].name -settings @{ OSInstall='YES'; OSDComputerName=$computers[$i-1].name;}
}

If you now take a look in the Computers folder in MDT, all the computers from the .csv file should be listed here.
You might have to close and re-open the MDT console to see the results.


Most of the times you are not going to need the UUID in order to successfully finish a deployment, the MAC address is enough.
What do you do to get the MAC address ? export the DHCP list into a file, then use that data.
You might need more settings populated in the Details tab of a computer entry like organization name, administrator password or product key. All you need to do is modify the script and add the settings you want.
For ($i=1; $i -le $computers.count; $i++)
{
New-MDTComputer -macAddress $computers[$i-1].mac -uuid $computers[$i-1].UUID -description $computers[$i-1].name -settings @{
OSInstall='YES';
 OSDComputerName=$computers[$i-1].name;
 OrgName='vKernel Technology';
 ProductKey='xxxx-xxxx-xxxx-xxxx';
}
}

After the import was successful, you can issue the Get-MDTComputer command to list all the computers in the MDT database.

If for some reason you need to remove computers, you can always use the Remove-MDTComputer command followed by the entry ID.

Learn to use this, and it will ease you life, your deployment life.
Want content like this delivered right to your
email inbox?
More similar articles
 Migrating the WSUS database from WID to SQL Server
- Installing and Configuring NFS on Windows Server 2012/R2
- Adding and removing the GUI in Windows Server 2012
- Remote Group Policy update in Windows Server 2012
- Creating Exchange 2010 Mailbox Databases using the Exchange Management Shell
- Install Exchange 2010 with SP1 using PowerShell

I have an issue with this script i keep getting an error saying “Missing expression after ‘&’ in the pipeline element” I am very limited with powershell and I can’t troubleshoot what’s wrong with it. Could you possibly help me out?
For ($i=1; $i -le $computers.count; $i++)
{
New-MDTComputer -macAddress $computers[$i-1].mac -uuid $computers[$i-1].UUID -description $computers[$i-1].name -settings @{
OSInstall='YES';
OSDComputerName=$computers[$i-1].name;
OrgName='vKernel Technology';
ProductKey='xxxx-xxxx-xxxx-xxxx';
}
}