Creating virtual machines with VMware Workstation 8
OK, so you heard about VMware Workstation and what it can do for you, but now you need to start using the program; ohh and by the way, if you have no clue about VMware Workstation please read this post then come back here. Now I’m going to show you how to create virtual machines (called VMs from now on) using this great piece of software. Don’t worry is not difficult at all, because everything is done using wizards.
To start, just click the link on the Home tab Create a New Virtual Machine, and a wizard pops-up. If it’s more comfortable for you to open this wizard in another way, you can try by clicking the File Menu > New Virtual Machine, or press Ctrl+N from the keyboard (witch I prefer). On this page there are two choices Typical (Recommended) and Custom (Advance). The difference between the two, is that the first one is skipping some of the steps that need to be performed in creating a virtual machine, because those steps are already preconfigurred for you. The second option let’s the user configure every step of the wizard; as you might guess by now we will go with the second option, so click the radio button Custom (Advance), then click Next.

Here we choose the hardware compatibility Workstation 8. The higher the compatibility the more features you have.

In the Guest Operation Installation Screen we have the option to provide the path or the drive where the OS installation media is located. The first option Installer disc is using the physical CD/DVD drive from your host computer; the second option Installer disc image file (iso) is for those that have an ISO image of the OS; and the last option I will install the operating system later, well…it’s self explanatory. Choose the where the OS installation media can be found and click Next.

This screen can help you with the installation, by inserting the serial and password that you provide, in the installation setup of the OS. Never used this option in my life. Be sure to select the edition of Windows, or OS that you are installing, if not you are going to be in trouble later when you install VMware Tools. VMware Tools are specific drivers that enhance the VM performance like video, mouse, keyboard etc.

Just give your VM a name and a location for the VM files then click Next.

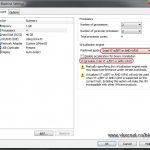
Set the number of processors that this VM should have.

Set the amount of RAM for the VM and hit Next. The more RAM you configure for the VM, the less you will have on the host system, but this is only when the VM is eating allot of resources.

Here choose the network that fits you more.

On the Controller Types screen I recommend you leave the defaults, because if you change this is a small possibility that the OS is not going to recognize your hard drive; you will need drivers.

Since we are creating a new VM we need to create a new virtual disk, witch is the hard drive for the VM. Choose to Create a new virtual disk.

Again I recommend you take the defaults here too, so you won’t have any problems later with your storage device.

How big the hard drive should be for the VM is up to you. There are a few more options here, like Allocate all disk space now, witch is going to create a so called fixed disk. VMware Workstation will create a file at the size specified in the box above (Maximum disk size); if you specify a hard drive of 200 GB, a 200 GB file will be created. Not checking this option will create a so called dynamic disk, that increases in size ’till the size specified in the Maximum disk size box. If you specify a hard drive of 200 GB, it will create a hard drive of a few KB that is going to increase ’till the size specified. Hope you get the idea. I always go with dynamic disks, and thats way I will choose not to check that box. The last two options are self explanatory, so I will skip those.

Give your virtual hard drive a custom name if you prefer and a location if the default location does not suits you. Once you’re done click Next to continue.

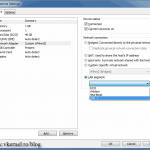
The last screen is a summary of what we’ve done ’till now, but you have an option to further customize this VM by clicking the Customize Hardware button.

As you can see it give you the option to remove or add devices for the VM, or change those device parameters. When you finished configuring the devices, click Close and it will bring you to the Summary screen again. When you click Finish, the VM will be created and ready for action.

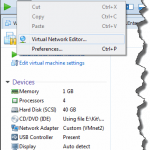
You can power on this VM if you click the link Power on this virtual machine or the green (Play) button on the menu. If you are like me and prefer keyboard shortcuts you can do this, by pressing Ctrl+B.

In my opinion creating VMs with VMware Workstation is a peace of cake. Practice and explore all the options this software gives you and soon you will work with VMs like a PRO.
Want content like this delivered right to your
email inbox?