Creating Snapshots in VMware Workstation
One great feature of VMware Workstation is the ability to take snapshots of your VMs. This means that you can go back in time. Yes, that’s right. If you take a snapshot before you install a program on that VM and the installation goes bad, you can revert to that snapshot and your VM will be in the original state before the program installation. Isn’t that cool or what !
When you create a snapshot, it will automatically create a separate VMDK file on the VM working folder. From this point forward only the VMDK created trough snapshot will increase and change. Here I have a screen from one of my VMs in Explorer. As you can see there are a lot of virtual drives and machine states, and that’s because I have a lot of snapshots for this VM. By the way, I’m using VMware Workstation 9 for this article.

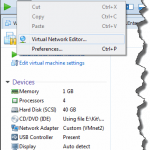
You can create a snapshot of a VM when is powered on or when is powered off. If the machine was powered on when you took the snapshot, when you revert back it will be in the powered on state with all the programs opened and running. You might think is great to do snapshots with the VMs in a running state, but it has some “side effects”. You can’t clone the VM using that state and second, it need more space on your host drive because it will save the VM memory state. If you have 2 GB of memory on that VM it will create a 2 GB file on the hard drive when creating the snapshot. If you want to see the snapshots of a VM open Snapshot Manager. Right-click the VM, go to Snapshot > Snapshot Manager; or VM from the Tools Menu > Snapshot > Snapshot Manager.


From this window you can view, delete and manage snapshots. The ones with a lock on it have linked clones, so if I delete one of those, the VM hat is linked clone it will stop working. More about virtual machine cloning in this article.

To create a snapshot, you simply right-click the VM go to Snapshot > Take Snapshot; or click the Take snapshot icon from the tool-bar.

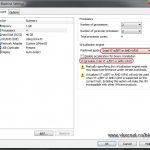
Give the snapshot a name and description. I recommend you type something in the Description box, or you will forget in what state the VM is. I always like to put the date when I took the snapshot and what version of VMware Tools does the VM has. This snapshot was made with the VM in a powered on state.

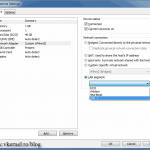
In Windows Explorer, open the location where this VM is located and take a look at the files. As you can see there is a .vmem file which is the memory state of the VM in the moment the snapshot was taken. The Windows.7.Enterprise.x64-cl1-000001 file is the virtual disk, or delta disk of the VM at the time of the snapshot. If you have multiple drives for that VM all those drive will be snapshotted simultaneously.

You might wonder now to revert back the machine state, and I’m going to give you another example. Here I have my Windows 2008 R2 machine with multiple snapshots/states, and I want to revert the machine in a state that has Active Directory installed. When I power on this machine it will be domain controller. I just open Snapshot Manager select the snapshot I want, and hit the Go To button.

Be very carefull when you revert back to a snapshot because you can lose the actual state of the VM if you did not save it. And that is what the message is saying when you want to revert to a previous state.

If you don’t need a snapshot anymore you can simply delete it from the Snapshot Manager. The files (virtual disks, memory states) will also be deleted from the host drive. If linked clones VMs were created from a specific snapshot, and you want to delete that snapshot you will be warned. Those linked clones machine are not going to be functional any more if you delete the snapshot because the base disk is deleted.
As you just saw, working with snapshots is not difficult and can help you a lot when you create test labs for your exams; all you have to do is just practice.

Want content like this delivered right to your
email inbox?
More similar articles
 Building an Active Directory (AD) Test Lab using VMware Workstation
- Configuring networks in VMware Workstation
- Cloning Virtual Machines in VMware Workstation
- Install VMware (vSphere) ESXi 5 in VMware Workstation 8
- Creating virtual machines with VMware Workstation 8
- Install Hyper-V inside VMware Workstation 8