Creating a Hyper-V Server 2012 Cluster
If you want to virtualize your network, and if you want to use Hyper-V for that, I recommend you go with server 2012. Hyper-V version 3 works great and has PowerShell support without you buying SCVMM. Now that your environment is growing, soon you will need highly available VM’s and you can do that by creating a Hyper-V Cluster. Then if a Hyper-V host goes down, your VM’s will be migrated to another available host in the cluster. Well yeahh, those VM’s will be powered off, but as soon as they are migrated, they will be automatically powered back on. This means that users can resume their work in a few minutes, instead of hours or even days in some cases. Before you have a Hyper-V cluster, first you need to create a Windows Failover Cluster. After you’re done with that, you can go ahead and install the Hyper-V role on those clustered servers, as we are going to do in just a sec.
For this guide I have three Windows server 2012 Core servers already in a Windows cluster. I presume you have your Windows Failover Cluster created so let’s move on.

Since this is a test environment I will use the domain controller as a central station, to install and manage the environment remotely, being possible with server 2012.

Right now if you right-click the cluster name and try to create a VM you can’t since the Hyper-V role is not installed. To install the role open Server Manager, right-click one of the servers that are part of the cluster and choose Add Roles and Features.

From here on just follow the wizard using the default options, and when you get to the Select server roles page check the Hyper-V box then click Add Features.


On the Create Virtual Switches page select the network adapter you want bind to the virtual switch. Without a virtual switch VM’s will not be able to communicate with other machines in the network. Most of the times this is the adapter that is part of the LAN, and users can access it. If you don’t want to make a choice now, you can skip it and do it later from the Hyper-V Manager console.

Here if you want to use live migrations, you have to check the box Allow this server to send and receive live migrations of virtual machines. Since I’m not going to do live migrations in this lab, I’ll just continue the wizard.

I don’t recommend you leave your VM’s to run on the C drive. Since we are in a cluster environment provide the drive letter for your cluster disk, the one that all cluster nodes can access. Maybe you are using CSVs (Cluster Shared Volumes); in that case provide the path to the CSV.

On the Confirmation screen just click the Install button to begin the installation. Don’t forget to check the box Restart the destination server automatically if required, because Hyper-V will definitely require a few restarts. Don’t panic if the wizard is not finished even after 5 minutes of running, because is waiting for the server reboots; and you know the server will reboot a couple of time until the Hyper-V role is successfully installed. Repeat this step for the rest of the servers that are part of the cluster.


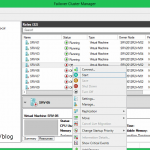
Now that all nodes in the cluster have the Hyper-V role installed, we can now create high available VM’s. Just right-click Roles in Failover Cluster Manager and choose Virtual Machines > New Virtual Machine. You can also use the Hyper-V Manager console.

Select the node in the cluster where you want to place this VM.

From here on is just the usual New Virtual Machine Wizard. Right after you past the Before you begin screen you get to the Specify name and location one. Here you have to be careful where you place the VM, because the default path is on the C drive. This happens only when you are using the Failover Cluster Manager console to create VM’s. Continue the wizard and create the VM.


To test this, leave the VM running and power off the cluster node where is running. In my case is running on HV-Node1.

As soon as I power off the Hyper-V host (HV-Node1) the VM is migrated to another node in the cluster and automatically started. The only downtime clients have is until the OS is booting. There is a downside of this. If a user has a document opened on a VM and is not saved when the Hyper-V host fails, the user will lose that unsaved data.


Looks like it works, and it works pretty damn good. Another benefit of this, is that you don’t have to pay for those enterprise virtualization software to have high available VM’s.
Want content like this delivered right to your
email inbox?
More similar articles
 Deploying VDI using Windows Server 2012/R2
- Installing Remote Desktop Services (RDS) in Windows Server 2012/R2
- Migrating a Hyper-V Cluster to Windows Server 2012 R2
- Configuring Hyper-V Replica in Windows Server 2012/R2
- Delegate Access Control and Management in Hyper-V
- Configuring Live Migration on Hyper-V 2008 R2
Great Article,
Just a quick question regarding state of disk to be made on cluster node before validating cluster.
In all your clustering kb’s you have mentioned “Do not initialize the disks on the other server(s), or your disks will become corrupted” and looking at the KB : point 12, bring disks online on all the nodes which makes real confusion what would be the best practice.
Should the disk be brought online only one node and offline on rest of nodes? Please let me know.
Hi,
Well…there are two steps before you can use a disk: put it online and the initialize the disk. Until you put the disk online you can’t format it, so you can’t use it. Don’t worry to much about this in a cluster environment because the cluster service will manage the disks and put them online when needed. All you have to do is format the disks, give them a drive letter on one of the nodes and you are done. One the other nodes, just make sure the disks are present in the Disk Management console, and they are offline. Let me know if you need more clarification.