Installing Windows 2008 R2 Server Core
If you’re reading this post, it means you already know what Windows Server Core is, so I don’t need to tell you is a Microsoft operating system without a graphical user interface. After installation all you have is a terminal console, so bye-bye Start Menu and Control Panel. I think is a great operating system which offers better security, small footprint, and low resource consumption. Not only you can use it as additional domain controller, web server, file server for your network but is also a perfect candidate for branch offices and Hyper-V hosts. Now that you have a bit of understanding about Server Core, I think is time to start the installation, so put your Windows Server 2008 R2 disc into your DVD drive, or mount the ISO if you are in a virtual environment. The loading files screen should appear on your monitor.

At the installation page wizard choose your language, time format and keyboard input, then click Next.

Here click Install now.

Select Server Core Installation.

Read and accept the EULA then click Next.

Because this is a fresh installation on a new server we have nothing to upgrade from, so click Custom (advanced) to continue.

Create your partitions and select the one for the operating system installation. Since I have a small hard drive I will use all the available space for the operating system. Click Next to start the installation process.

Now the wizard starts copying the necessary files for the installation, but don’t go too far because in a few minutes it will finish.

Click OK and provide a complex password.


We now have completed the system installation. As you can see there is no Start Menu, and all you have is a terminal console. In future posts I will show you to configure this 2008 R2 Core Server.

Want content like this delivered right to your
email inbox?
More similar articles
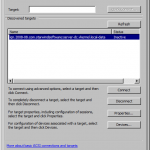
 Configure the iSCSI Initiator on Windows 2008 R2 Server Core
- Installing server roles on Windows 2008 R2 Server Core
- Join a Windows Server 2008 R2 Core to a domain
- Step-by-step Hyper-V Storage Live Migration
- Creating and configuring Windows Domain Service Accounts
- Deploying and configuring the Remote Desktop Gateway Server Role