Configuring VMware vSphere vNetwork Standard Switches
Creating or configuring networks in vSphere in not a big deal, well…not at the beginning anyway. Is going to be a big deal when you want to create a cluster, because you have to configure multiple adapters, create multiple virtual switches, port groups and so on. You will see later what I’m talking about.
For small environments the default network configuration will work just fine, but as your infrastructure grows you will need to put more network adapters on the ESXi hosts, and create more virtual switches. This needs to be done in order to separate the LAN traffic from the Datacenter traffic and to create high available networks.
For this lab I have a vCenter server since everything is centralized with two ESXi hosts. Now, if you go to the Configuration tab and click the Networking link from the left, you should see your default vSphere Standard Switch, named vSwitch0. A virtual switch is like a physical Ethernet switch, it has ports, it maintains a MAC address table and make it possible for virtual machines to communicate with each other using the same protocols used with physical switches.

The name can be changed if vShwitch0 is not good for you; Ok not only the name can be changed, but a lot of settings. Just click the Properties link to open the vSwitch configuration properties window. If you click one of the items in the list, on the right hand side you can see a summary with all the configurations of that port.


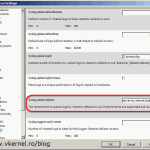
If you want to change the virtual switch settings, or any other port from the list just hit the Edit button. As you can see the virtual switch, by default has 120 ports assigned. If you want more ports on the vSwitch click the drop-down list and choose your number. Now imagine a physical switch with 4088 ports; that will be a big switch, and here is just a small box. Pretty neat haa ! Going with this change will require a reboot of the ESXi host, so be careful if you are in a production environment.

You can take a look at the rest of the tabs and see what options you have in there. I’m not going to explain every single one, since the explanation is already available in a nice formated file. Click the Help button of the window and search your settings. The NIC Teaming tab is the one you will work with most of the times by configuring and overriding the network adapters Failover order. Right now you can’t configure it since only one network adapter is assigned to this vSwitch. Later you will see how is done.

Before moving on with this lab we need to make sure that our ESXi hosts are seeing all the physical network adapters present on the system. For that click the Network Adapters link under the Hardware section. On the right side, a list with all the network adapters should be displayed. My ESXi hosts are all equipped with eight NIC’s each. If for some reason you don’t see one or more of the adapters here, it means it was not recognized by the ESXi installer; no drivers were found during the installation. Usually this happens when the hardware is not VMware certified. If on the Speed column says Down, is because the network adapters has no physical link, no network cable is plugged in or is broker. If is all good, then let’s move on.

Right now if you have let’s say… twenty VM’s, they will all communicate on the same network as the management network. Is not good, and it needs to be changed. We separate traffic by creating another vSwitch. Go back to the Networking section and click the Add Networking link.

Since this will be a virtual machine network, we go with the first option.

Select the network adapters you want to assign to this vSwitch. I choose two, because I want a high available vSwitch, so in case one of them fails, my VM’s can still communicate with the network.

Give the port group a name and a VLAN ID if necessary.

On the Summary screen click Finish to create the second vSwitch.

Now you should have something similar.

We created the new vSwitch but the VM’s are still communicating on the old one. Before removing the old port group reconfigure your VM’s to the new one. Be careful that network connectivity will be lost during this operation.

After all your VM’s are in place, is time to remove the old VM Network port group. On the vSwitch0 click the Properties link, select the VM Network port, then click the Remove button. Choose Yes to confirm the operation.

And now all the VM’s are sending and receiving packets on vSwitch1.

If you want to put one of those network adapters in standby mode (meaning that no traffic will pass trough this NIC until the other one fails) you can, by clicking the Properties link of the vSwitch1. Usually you would select the VM Network port group and edit its settings. Since only one type of network traffic is passing this vSwitch we can configure the Failover from the switch itself and the port group will inherit its settings. Select the vSwitch and click the Edit button.

On NIC Teaming tab select the adapter you want to put in standby mode, then hit the Move Down button until the adapter is under the Standby Adapters section. Click OK when done.

It now sais that one of the network adapters is in stand-by mode.

If for some reason you need to attach more network adapters to one or more vSwitches, open the vSwitch properties and from the Network Adapters tab click the Add button.

From the Unclaimed Adapters section select the one(s) you want to attach to the vSwitch then click Next. If you don’t have any network adapters under this section, is because they are assigned to another vSwitch. You will have to shut down the ESXi host, put some NIC’s in the server the come back to this wizard.

Chose the ones you want to put in stand-by mode or in active mode.

On the Summary screen click Finish.

The network adapters were now attached to the vSwitch. Two of them are in active mode (traffic will be balanced between this two) and the other two are in stand-by mode.


One more thing before I close. There are more types of vSwitch/port groups that you can create for a specific type of traffic; vMotion traffic, Fault Tolerance traffic etc. These are used in a Failover Cluster environment, and need to be dedicated just for this, because of the high amount of traffic that passes trough them. Right now we will create another vSwitch just for the vMotion traffic, so click the Add Networking link. This time from the Add Network Wizard we need to choose the second option, VMkernel.

Select the network adapters you want to attach to this vSwitch then click Next.

Give the port group a name and a VLAN ID if necessary then check the box Use this port group for vMotion.

The vMotion network has its own IP address. Every ESXi host that is in a cluster and is using vMotion needs to have a vMotion port group and an IP address for it.

On the Summary screen click Finish.

An voilà, another vSwitch with a port group dedicate just for the vMotion traffic.

If for some reason you need to change the port group configuration all you have to do is click the Properties link of the vSwitch, then click the Edit button of the port.

On the General tab you can modify the port group name and disable it for vMotion. On the IP Settings tab you can change the IP configuration of the port group.


Configuring a VMware vSphere Standard Switch is not rocket science, but it needs practice, because you need to know when to create vSwitches and for what.
Want content like this delivered right to your
email inbox?
More similar articles
 Build and run Windows Failover Clusters on VMware ESXi
- Upgrading from VCSA 5.x to VCSA 6.0 with an Embedded Platform Service Controller (PSC)
- Deploying the VMware vCenter 6.0 Appliance (VCSA) with an Embedded Platform Service Controller (PSC)
- Adding a Raw Device Mapping (RDM) to a Virtual Machine
- Deploying and Configuring VMware vCenter Server Appliance 5.x
- Configure Syslog on ESXi 5.x Hosts

tk info