Configuring Live Migration on Hyper-V 2008 R2
Live Migration is a Hyper-V 2008 R2 feature that allows you to move running virtual machines from one cluster node to another without downtime. In my tests I had only one request time out during migration and sometimes none. This is more than acceptable, because users or application will not even notice this time out. For Live Migration to function a Hyper-V Failover Cluster needs to be already configured. Here you have part 1 and part 2 on how to create a Hyper-V Failover Cluster. For Live Migration we need to enable the so-called Cluster Shared Volumes (CSV), which is a new concept in 2008 R2 that makes it possible for cluster nodes to access the shared volumes at the same time. If you want more information about Cluster Shared Volumes you can go to this Microsoft technet website. Now that your Hyper-V Failover Cluster it’s up and running we can continue with our Live Migration configuration.
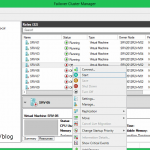
Open Cluster Manager, right-click the cluster name and choose Enable Cluster Shared Volumes. You can also click the link in the details pane.

On the message that pops-up check the box I have read the above notice and click OK. This informs the user that CSV is only supported on Windows Server 2008 R2.

Another object appeared in the Console Tree called Cluster Shared Volumes.

Now it’s time to add some storage. Right-click the CSV and choose Add Storage.

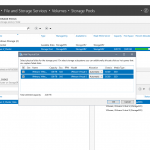
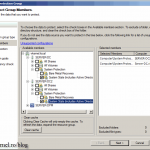
On the Add Storage window check the box next to the drive you want to add as storage for your VMs and click OK.

The drive was added as resource for the cluster. As you can see the resource is appearing as a local directory on the C drive (C:\ClusterStorage\Volume1), not as a disk with a random drive letter that you would expect.

If you take a look at your C drive on every Hyper-V server that is part of the cluster, you will see a folder called ClusterStorage. This is where the VMs will sit. You might think what ?? Well…they are not actually sitting on the C drive, you only see them there. This is for Hyper-V nodes to be able to access the storage simultaneously.

We now need to create a VM that will sit on the CSV so we can test the migration. Right-click Services and Applications and go to Virtual Machines > New Virtual Machine. Here choose the node you want the VM to be created on.

Give the VM a name and check the box Store the virtual machine in a different location. Give the path of the CSV which is C:\ClusterStorage\Volume1; this is where the VM should sit. Inside Volume1 I created a folder with the same name as my VM, just for ease of management.
You can change the path where the VMs are located from the Hyper-V Settings on cluster nodes. This way you don’t have to check the box Store the virtual machine in a different location every time you create a VM.

Continue the wizard and when you get to the Connect Virtual Hard Disk section, verify that the VHD file will be created also on the CSV. Finish the wizard, power on the VM and install the operating system.

Now it’s time to test the Live Migration feature. Open a terminal and do a continuous PING command on the VM. On the Cluster Manager right-click the VM and choose Live migrate the virtual machine to another node, and select from the list the node you want it to migrate.

The migration will only take a couple of seconds.

And looks like this time I didn’t have a request, only some replies with big latency.

Now the VM is migrated to the second node in the cluster, meaning our test worked great.

Want content like this delivered right to your
email inbox?
More similar articles
 Configuring Hyper-V Replica in Windows Server 2012/R2
- Working with Storage Spaces in Microsoft Windows Server
- Deploying VDI using Windows Server 2012/R2
- Installing Remote Desktop Services (RDS) in Windows Server 2012/R2
- Migrating a Hyper-V Cluster to Windows Server 2012 R2
- Backing up Domain Controllers using Windows Server Backup and DPM