Creating a DHCP Failover Cluster on Windows Server 2008 R2
I know is frustrating when the DHCP server fails, all your network is down, been there. That’s why is recommended to have a fault tolerant DHCP service, so in case one of the DHCP servers fails, the other one takes the job. In this guide I have two servers running Windows 2008 R2 that will hold the DHCP role, and everything happens in a domain environment. To start we need to create the Failover Cluster, and for that I have a guide right here. Now that the Failover Cluster is created and working properly let’s move over with our configuration. If you try to configure the DHCP service in the cluster right now you will get an ugly error:
The required role or feature for this service or application cannot be found on any node. User Server Manager to add roles or features.
and this is because the DHCP server role is not installed on any of the cluster nodes. Log to the every node in the cluster and install the DHCP server role by following this guide, but do not configure the scopes.

When you get to the Add or Edit DHCP Scopes screen, just click Next.

If the DHCP role is missing on one of the cluster nodes you will be notified with an error message again. The best part is that the message is actually telling you on which cluster node(s) the role is not installed.
The required role or feature for this service or application is either missing or cannot be verified as installed on the following node(s): cluster node(s). Use Server Manager to add roles or features.

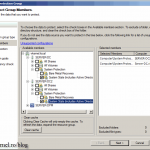
Now that you have the DHCP role installed on every cluster node, let’s configure the DHCP service in a cluster. Open the Failover Cluster Manager and right-click Services and applications then choose Configure a Service or Application.

From the list select DHCP Server and click Next.

Give the DHCP cluster a name and IP address. I don’t need to remind you to use a static IP address.

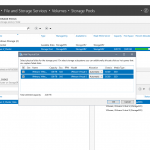
Select the storage where the DHCP database will sit.
If you don’t see any storage, it means you either did not configure the cluster in a right way or you didn’t add a storage resource to the cluster.

Click Next on the Confirmation screen.

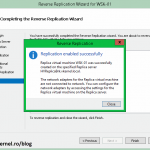
The configuration will take just a few seconds and if everything went well you should not get any errors on the report screen.


The DHCP service is now installed in a Failover Cluster environment. The next step is to configure the DHCP service so clients can get IPs. Right-click the name of the DHCP service in the Failover Cluster Manager and choose Manage DHCP.

You can follow this guide on how to configure a DHCP server.

Want content like this delivered right to your
email inbox?
More similar articles
 Working with Storage Spaces in Microsoft Windows Server
- Configuring Hyper-V Replica in Windows Server 2012/R2
- Backing up Domain Controllers using Windows Server Backup and DPM
- Creating a Windows Server 2012 Failover Cluster
- Configuring Live Migration on Hyper-V 2008 R2
- Creating a Windows Server 2008 R2 Failover Cluster