Clone virtual machines in Hyper-V
As you know Hyper-V does not have an option to clone virtual machines, except when you use SCVMM. Because of this many admins need to use tricks so they don’t have to install and configure a new virtual machine from scratch every time they need a copy of Windows 7, or any other operating system. In this guide I’m going to show you two of the most popular ones, and they free. For this lab I have a Hyper-V server running on Windows Server 2008 R2 SP1, and a Windows 7 machine (reference machine) for cloning called Windows.7.Enterprise.
In this first example is important that the virtual machine should not have snapshots. The reference virtual machine (Windows.7.Enterprise) is located on the Hyper-V host C: drive, in a folder called HV-Machines. Inside HV-Machines folder create another folder and give it a distinctive name, so you can recognize it. I called mine Windows 7 Clone. Now copy the virtual disk (the *.vhd file) from the Windows.7.Enterprise machine to the Windows 7 Clone folder. If you want to, you can rename the copied virtual disk after the folder name, but is not necessary, is just that I like to have the virtual disk files named after the virtual machine that I will create.


Open Hyper-V manager and create a new virtual machine from the Actions pane. Give the virtual machine a name, and I recommend you name the virtual machine after the folder we just created “Windows 7 Clone”. It will be much easier when troubleshooting. Now choose to store the virtual machine in the folder “Windows 7 Clone”. This is only if you want to have the configuration files and the virtual disk in the same folder.

Continue the wizard until you reach the Connect Virtual Hard Disk page. Here instead of creating a new virtual disk we will go with the second option and use an existing virtual disk. Click the Browse button and select the virtual disk we just copied in the “Windows 7 Clone” folder.

Finish the wizard. Now we have an exact copy of the reference virtual machine. Don’t forget to change its name an IP address, if is a static one.

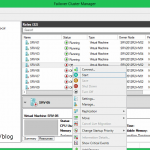
In the second example we are going to use the Hyper-V export function to clone the virtual machine. Using this method you can have snapshots and still being able to clone the machine. To start click the reference virtual machine (Windows.7.Enterprise) in the Hyper-V console, then in the Actions pane click the Export link.

On the Export Virtual Machine window click the Browse button and choose a place where to save this virtual machine, then click Export to start the process. Is going to take a while so be patient. When the export process is finished the Cancel export link in the Actions pane will disappear.

Back in Hyper-V manager console click the link Import Virtual Machine in the Actions pane.

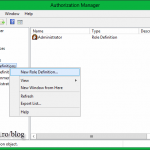
In the window that opens we have two radio buttons and a check box. The first radio button, Move or restore the virtual machine (use the existing unique ID) is going to import the virtual machine and preserve its ID’s. This option is used when importing to a different Hyper-V server. If you import a virtual machine, and on the same Hyper-V server that ID already exists you will get an error message, and the import process fails.

The second radio button, Copy the virtual machine (create a new unique ID), like the name implies, it will create a new ID for the virtual machine you are importing. This is used when you use the same Hyper-V host to export and import virtual machines, like in our case. The check box is there if you want to import the same virtual machine for more than one time, without going through the export process again. Since we are using the same Hyper-V host to import the virtual machine, and another one (the reference machine) exists with the same ID, select the second radio button. Now click Browse and select the exported virtual machine folder, then hit Import. I changed the folder name because this is how I’m going to call my virtual machine in the Hyper-V console.


Looks like I have a warning message after the import process finished. This is because I forgot to unmount the Windows 7 ISO from the reference virtual machine before exporting. I’ll just ignore it and click Close.

The last step is to rename the virtual machine in the Hyper-V console so we can distinguish it from the original one. Again don’t forget to change its name and IP address if is a static IP.


That’s it folks, hope it was informative for you.
Want content like this delivered right to your
email inbox?
More similar articles
 Converting UEFI + GPT Windows Server to Hyper-V VM
- Upgrading 2012 R2 Cluster to 2016 using Cluster OS Rolling Upgrade
- Deploying VDI using Windows Server 2012/R2
- Migrating a Hyper-V Cluster to Windows Server 2012 R2
- Configuring Hyper-V Replica in Windows Server 2012/R2
- Delegate Access Control and Management in Hyper-V