VMware vSphere 6: Configure VMCA as a Subordinate CA
I must say that VMware has done a great job with the vCenter server appliance. Not only is easy and fast to deploy but it also gives us the ability to change its certificate using a nice menu screen that they called it vSphere 6.0 Certificate Manager. As you know, changing certificates in most environments is a must since this environments are accessed by partners and it will be kind of an unprofessional thing and untrusted provider to get the certificate error message in the browser when accessing vCenter, and also is kind of annoying.
The VMware vCenter Server Appliance (VCSA) gives us two methods to change the certificate. The first one, and the one that will be treated in a future article is to replace the vCenter certificate with our own, from a trusted provider. The second option is to use the appliance already built-in Certification Authority (CA) and make it a subordinate of our Enterprise PKI in order to be trusted in the environment. Yes, VMware has built a Certification Authority into the appliance which they named, the VMware Certificate Authority (VMCA).
Before we begin, make sure you have a snapshot or a backup for the appliance(s), because I found out during my testing that this procedure sometimes fails and you have to start all-over again. I will use a multi-tier Certification Authority for this demonstration, but if you don’t have this level of PKI in your environment, don’t worry, the process is the same with that of using a single-tier CA. Since the PSC is the one that handles the VMCA I will use it’s name interchangeably with vCenter because an embedded deployment already has the PSC on the same machine as vCenter.
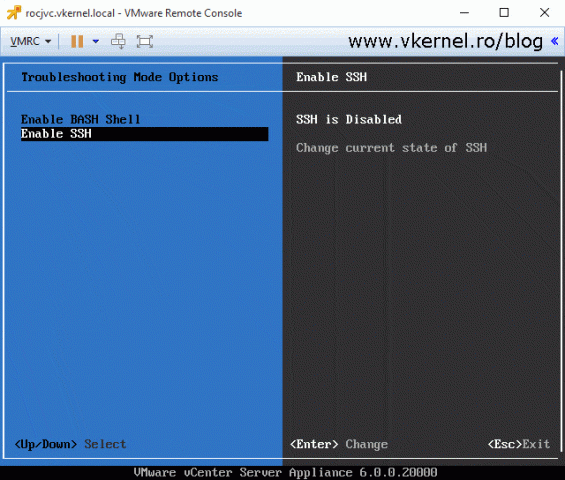
If you are good-to-go, log on to the Platform Service Controller (PSC) console and enable SSH.
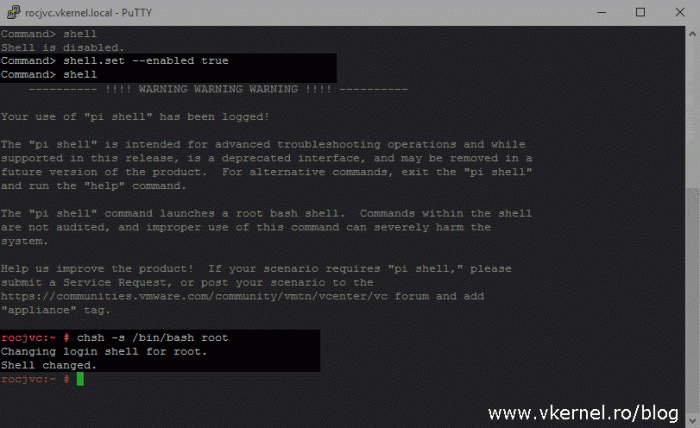
By default the VCSA appliance is bundled with two supported shells, the appliance shell, which is the default one, and the BASH shell, which we need to enable in order to do some advance configurations. Later on we will also need to copy some files (certificate and CSR) back and forth from the appliance so we need to enable this access too. Connect to the PSC appliance using your favorite terminal emulator program then issue the bellow commands to enable them.
shell.set --enabled true
chsh -s /bin/bash root
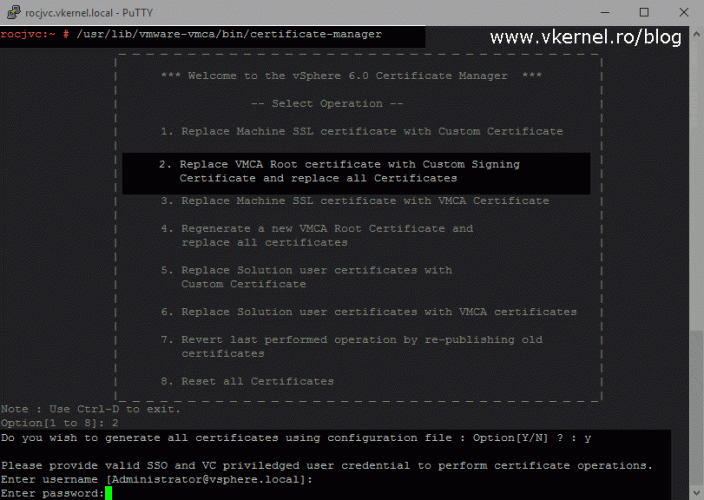
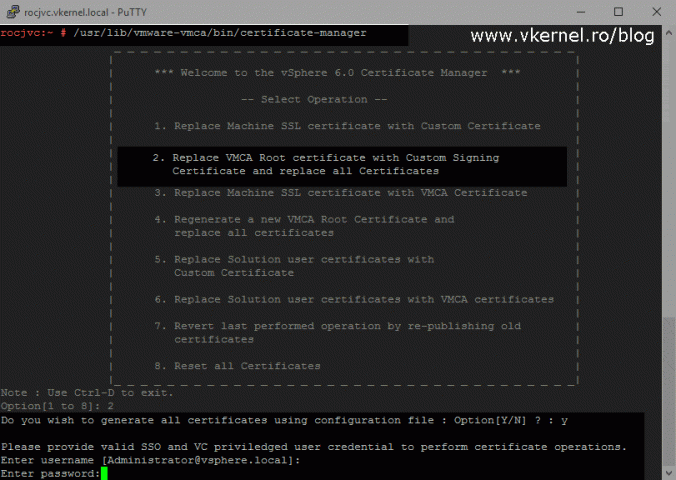
Now launch the vSphere Certificate Manager using the bellow command. Once it’s launched we get quite a few options to manage the appliance certificates, but since we want to make the VMCA a subordinate of our Enterprise CA choose the second option, Replace VMCA Root certificate with Custom Signing Certificate and replace all Certificates then type Y to use the configuration file to generate the Certificate Signing Request (CSR).
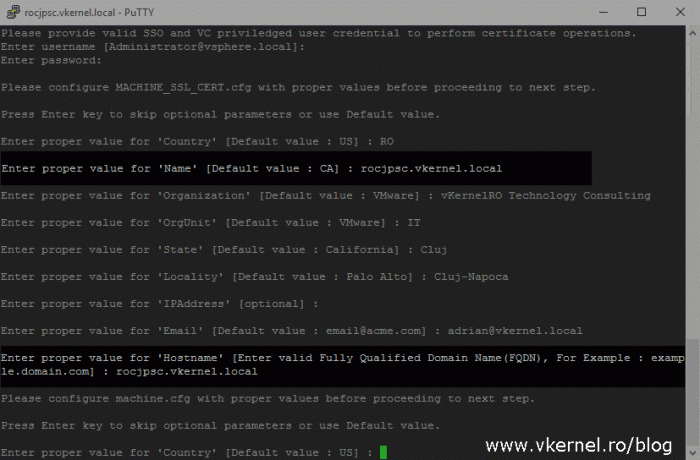
After we hit Enter we are asked to provide the SSO administrator password, so go ahead and type it then complete the Machine_SSL_Cert.cfg configuration values.
/usr/lib/vmware-vmca/bin/certificate-manager
I will stop a moment on this configuration file because it needs more explanation since the data we provide here will affect most of the time the end users.
The certificate issued based on this Machine_SSL_Cert.cfg configuration file is going to be the certificate used to secure the vSphere Web Client portal, the certificate that the end user will see when he clicks the padlock in the web browser. The fields that are the most important to us are the Name field and the Hostname one. The text we type in the Name field will actually be the common name in the certificate, and the name that we provide in the Hostname field will be the Subject Alternative Name attribute of the certificate. As you can guess, this will be a SAN certificate but it will be issued by the VMCA, not by our Enterprise CA.
If you have a deployment with an external PSC you will type the FQDN of your PSC in both of these fields, and if you have a deployment with an embedded PSC you will type the FQDN of your vCenter server.
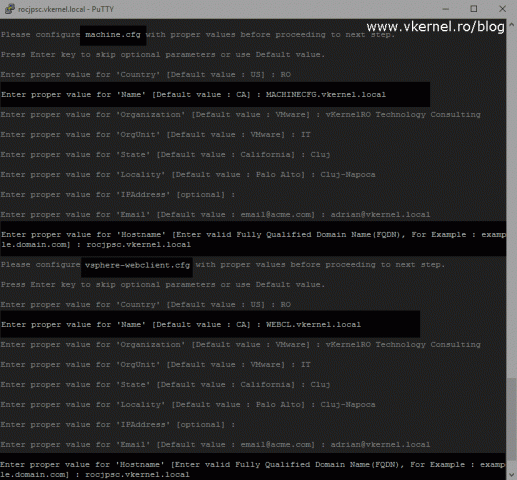
Complete the rest of the configuration files that come up, but make sure you type unique names in the Name field for every one of them or the certificate replacement process will fail and you will also get a lot of errors when login in on the vSphere Web Client interface. It doesn’t have to be a FQDN registered in your DNS server. In the Hostname field however, depending on the deployment type, we will have to put the FQDN of our PSC or vCenter server. If you have a deployment with an embedded PSC, you will have to complete two more extra configuration files, the vpxd.cfg and vpxd-extension.cfg.
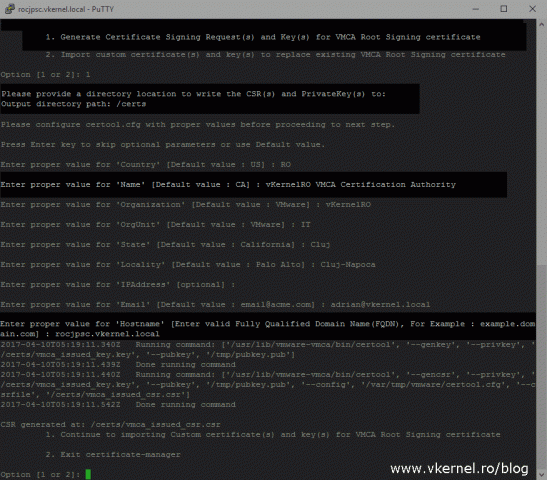
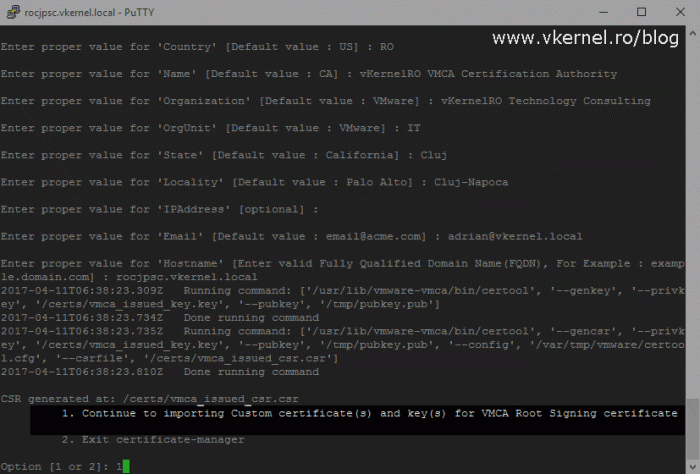
Once done with those configuration files, we get two options at the end: to generate the CSR for the VMCA root certificate, or to import the VMCA root certificate. Right now we don’t have a certificate to import and we need to issue one from our Enterprise Certification Authority. Select the first option, Generate Certificate Signing Request(s) and Key(s) for VMCA Root Signing certificate by typing 1, then press Enter.
Now we have to provide a location where to save the CSR file and the private key that the VMCA will generate. Since I like to keep things clean, I went ahead and created a new folder on my appliance to store these files, but you can use any directory you want.
And we get another configuration file to complete, the certool.cfg. I’ll stop again for a moment here, because like Machine_SSL_Cert.cfg this one also needs some explanation.
This configuration file is the one that generates the CSR for the VMCA certificate, so the name that we type in the Name field will be the name of the VMCA, the one we see in the certificate as being the issuer. By default the name of the VMCA is CA, which is not very intuitive and nice to have. I’ll leave this you to decide if you want to change the VMCA name or not, but you don’t have to put a FQDN in this field because this is a SAN certificate, and the FQDN is read from the SAN certificate attribute if none exist in the common name. In the Hostname field however, a FQDN needs to exist, and depending on your deployment type you will have to put the FQDN of your PSC or the vCenter server.
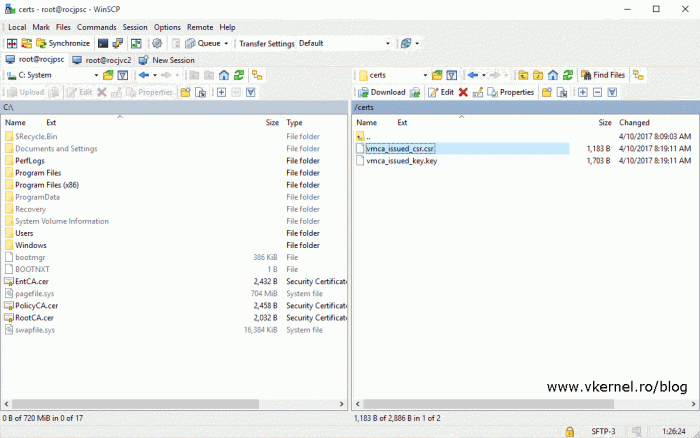
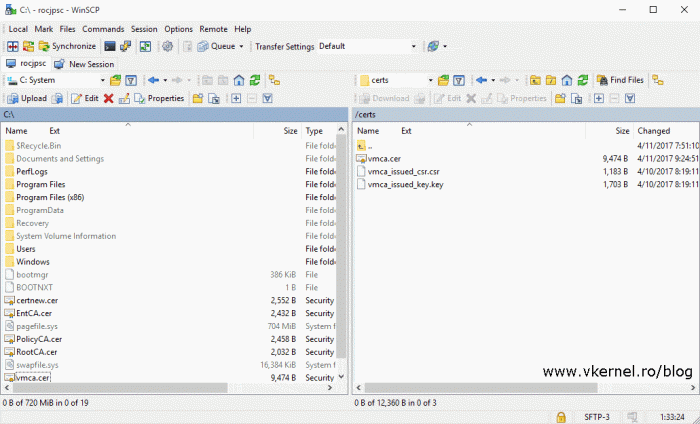
Now connect to the appliance using WinSCP and browse to the directory where you saved this files. Open vmware_issued_csr.csr using your favorite editor and copy its content on the clipboard.
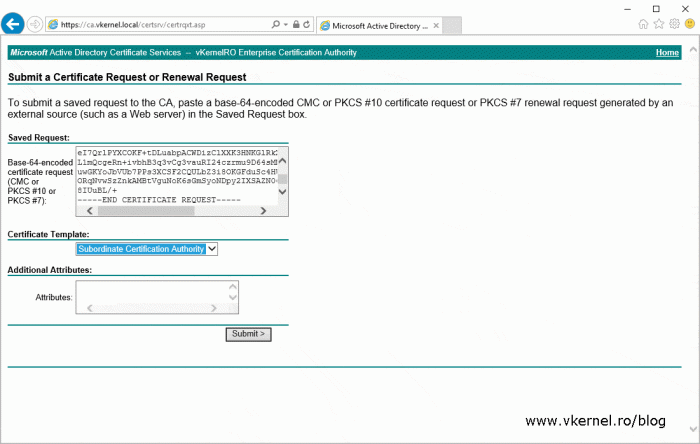
Launch the Microsoft Active Directory Certificate Services web portal then click Request a certificate > Advanced certificate request > Submit a certificate request by using a base-64-encoded CMC or PKCS #10 file, or submit a renewal request by using a base-64-encoded PKCS #7 file then paste the CSR content in the Saved Request box. From the Certificate Template drop-down-box select the Subordinate Certificate Authority template then click Submit.
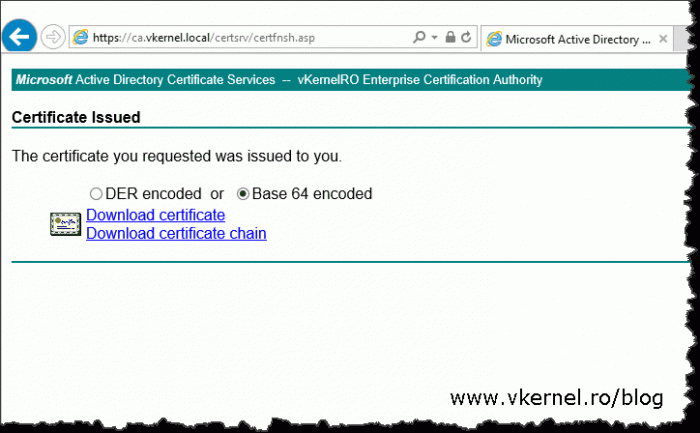
Download the certificate in base 64 encoded format.
Now here comes the confusing part, because we can’t just upload the issued certificate to our PSC appliance and import it, it won’t work. We need to create a certificate chain file starting from the issued certificate up to the root CA.
Download the CA certificates from the Root, Policy, Enterprise CAs if you have a multi-tier PKI, or just download the Enterprise CA certificate if you have a single CA server. All these certificates need to be downloaded in base 64 encoded formats. Now do the following:
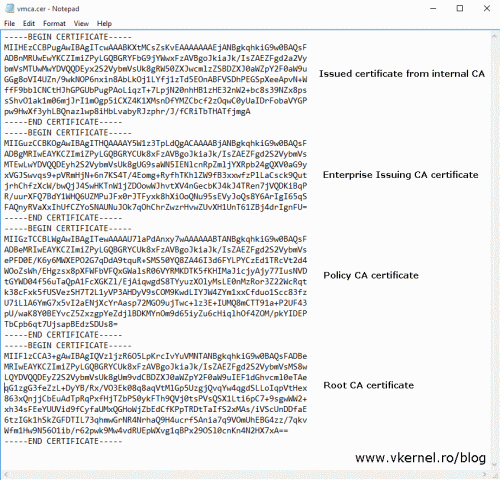
- Open the certificate we just issued with Notepad, copy its content then paste it in a new Notepad file. Save the file as vmca.cer or whatever you want to call it. Do not close the file.
- Open the Enterprise CA certificate with Notepad, copy its content an paste it at the end of the vmca.cer file.
- Open the Policy CA certificate with Notepad, copy its content an paste it at the end of the vmca.cer file.
- Open the Root CA certificate with Notepad, copy its content an paste it at the end of the vmca.cer file. Save the file and close it.
- Upload the file to the PSC appliance next to the private key and the CSR.
As you can see, the chain goes from the issued certificate up to the root but in a reverse order. I you have a single internal CA the certificate file is constructed in the same way, but it will have just the issued certificate and the Enterprise CA certificate in the chain.
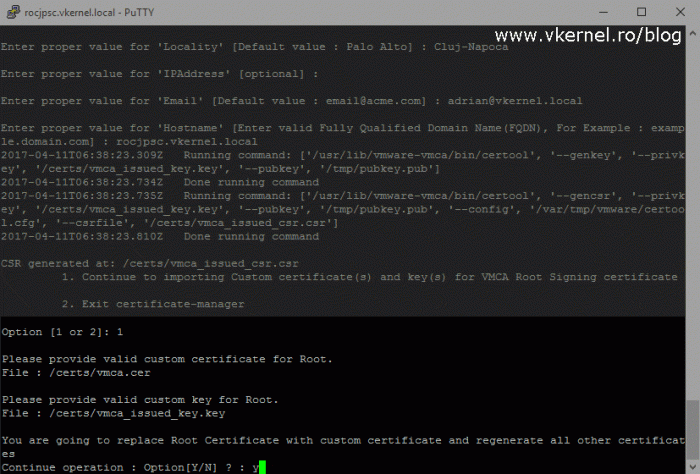
We now need to go back into our SSH session and choose the first option, Continue to importing Custom certificate(s) and key(s) for VMCA Root Signing certificate. If the SSH session timed-out you will have to re-launch Certificate Manager and get to this point, but this time the option is second in the list and re-named in Import custom certificate(s) and key(s) to replace existing VMCA Root Signing certificate.
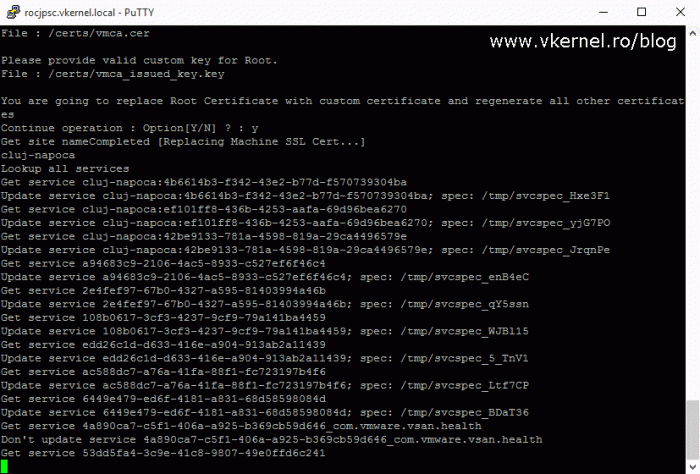
The first file that we need to provide is the certificate we built and uploaded into the appliance a moment ago, then the second file will be the certificate private key that was generate by the VMCA. Once this two files are provided type Y and press Enter so the certificate replacement process can start. This it will take a while, so be patient and do not interrupt it.
Most of the times this should complete with no problems, but there are situations where it will fail, and if that happens you will have to start all over again. Trying to troubleshoot this will be a huge time consuming, so just revert from snapshot and start over. When the operation is successful we will get a status message of 100% Completed [All tasks completed successfully].
If you are using a deployment with an embedded PSC, your job is done, you should now have a nice trusted certificate in the browser when accessing the vSphere Web portal, but if your deployment has an external PSC, then read on.
Replace the vCenter self-signed certificate with one form the new VMCA
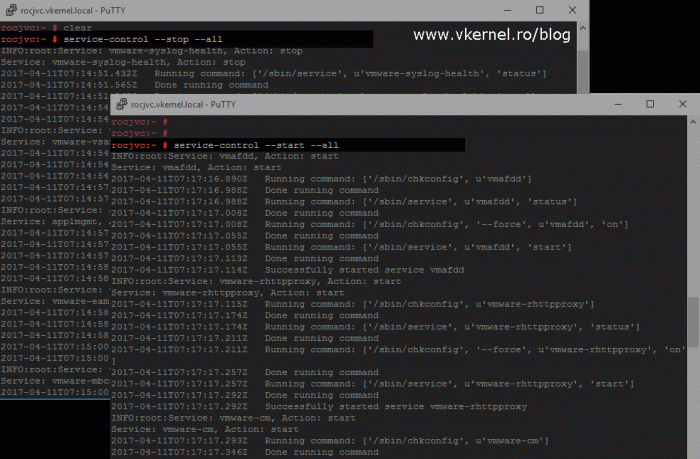
For vCenter deployments with an external PSC two more extra commands need to executed on the vCenter server appliance (not on the PSC appliance) to restart the services, plus re-issue the vCenter certificate.
service-control --stop --all
service-control --start --all
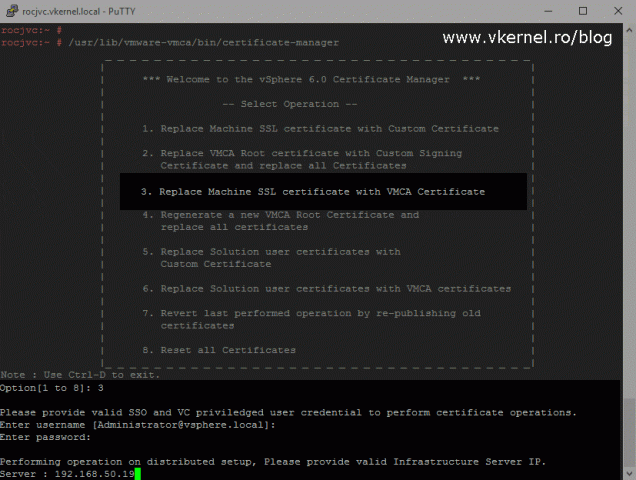
Once all services have been restarted launch Certificate Manager (from the vCenter appliance), and choose the third option, Replace Machine SSL certificate with VMCA Certificate. In the Server line type the IP address of your PSC appliance then press Enter.
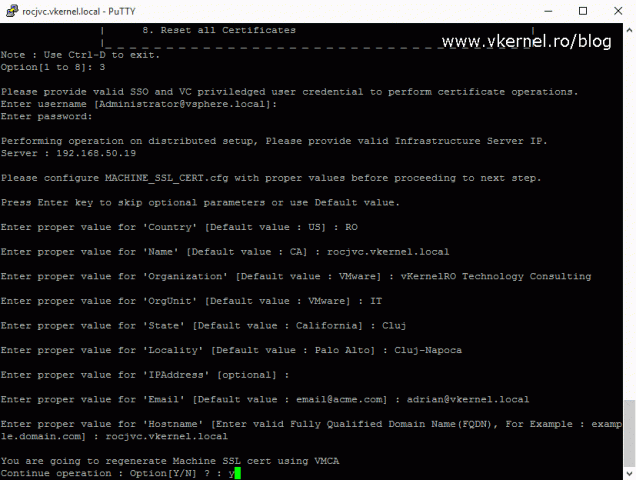
And once again, we need to complete a config file so a CSR can be generated from it. The certificate we will issue based on this CSR will be seen in the web browser by the end user so make sure in the Name and Hostname section you type the FQDN address you are using to access the vSphere Web Client, the FQDN of your vCenter server.
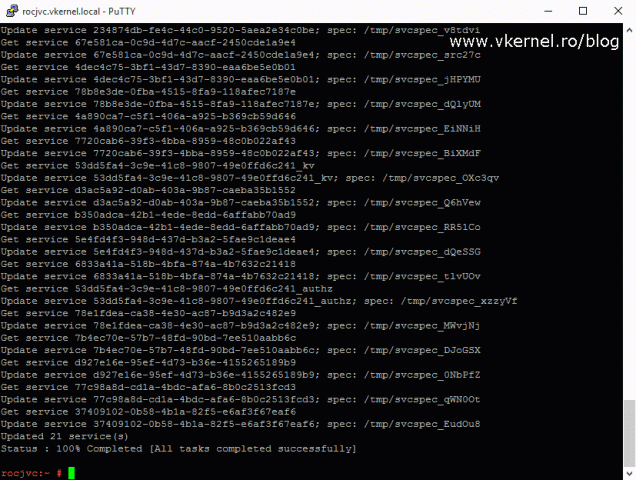
It will take some time to complete, and even more time until all the services are started.
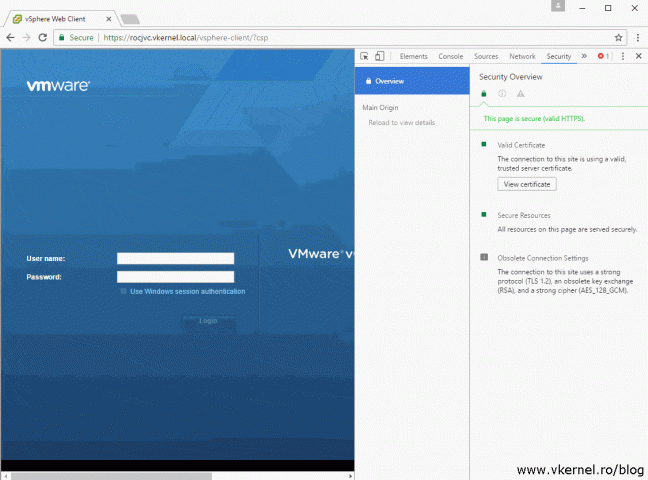
In the end we should have a nice green padlock in the web browser, and the certificate error should not appear anymore.
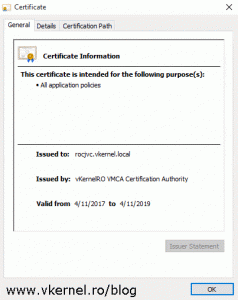
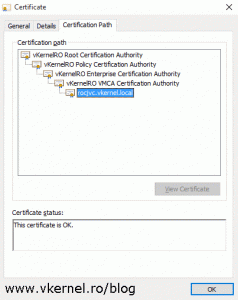
Looking at the certificate we can see all the names are in accordance with our CSR’s configuration and the certificate chain is working and completed until the root CA.
The great thing about this is that if we attach a new vCenter server to our existing PSC or new ESXi hosts, they will automatically be issued a trusted certificate from the VMCA we just configured. We don’t have to go anymore and manually replace the certificates on the hosts or use the vSphere Certificate Manager to replace the vCenter certificate. Unfortunately this does not apply for the already existing ESXi hosts even if you remove them from the inventory and add them again.
If you get the bellow error message when trying to add a new ESXi host to the vCenter inventory list, please see VMware’s KB2123386.
A general system error occurred: Unable to get signed certificate for host:
Summary
As you can see, replacing the self-sign certificate for a vCenter appliance is an easy work. Well yeahh…it gets a little bit complicated for environments that have a multi-tier PKI, but that’s manageable also. We did this with an internal Certification Authority, but it can easily be implemented with a public PKI if you have external clients that access the virtual environment. You can also take this further in order to have a little bit of fun and issue extended validation certificates from your internal CAs.
Want content like this delivered right to your
email inbox?

Excellent work Bro.
Appreciated
Thank you.