Deploying the VMware vCenter 6.0 Appliance (VCSA) with an External Platform Service Controller (PSC)
As you know, starting with vSphere 6.0 VMware introduced the Platform Service Controller (PSC) which changed quite a bit how their Data Center applications interact with each other. They are all tight to the PSC, because the PSC is the one that deals with the identity management, generation of SSL certificates, license keys, global permissions, is the one that makes it possible for applications and services to authenticate to a LDAP server; like a Microsoft Active Directory domain controller.
The Platform Service Controller is available on both the Windows vCenter Server ISO and the vCenter Server Appliance (VCSA) ISO, but in this article we are going to focus on the appliance since VMware is pushing it more and more.
VMware vCenter is one of those applications that can’t function without the PSC and can be deployed with an embedded PSC or an external one. External here is just a term, meaning not on the same machine as vCenter but as a separate virtual appliance. When deploying a vCenter infrastructure with an external PSC, the PSC always needs to be the first one deployed so this will be the one that we are going to start with.
Deploying the Platform Service Controller (PSC) appliance
Download the vCenter server ISO from VMware’s site then mount it on a Windows VM or on your technician workstation. Browse the media and open the vcsa folder. Here, double-click the VMware-ClientIntegrationPlugin-6.0.0.exe and follow the wizard to install the package. This is a plugin that integrates in the majority of web browsers and the installation setup is dependent on it.

Once the plugin is installed go back to the root of the media and launch the vcsa-setup.html file.

The default web browser registered in the system will open and we will get a few pop-up messages warning us that a new plugin wants to run in the browser. Click Allow or Yes on all the messages.


Now click the big Install button to start the deployment.

Accept the End User License Agreement and click Next.

This is the part where we tell the wizard to which ESXi host to deploy the virtual appliance. Type the hypervisor FQDN or IP address in the first text box, then provide the credentials to connect to the host. If you have an un-trusted certificate on the ESXi host, a certificate warning will pop-up. Click Yes to continue.
In this page of the wizard we name the virtual appliance. This name will appear in the vSphere inventory and later on in the vCenter inventory. Type a name for the appliance then set a password, and once you’re done click Next.

This is where we choose what type of deployment we want, and since we are going with an external PSC deployment, click the Install Platform Service Controller radio button then hit Next.

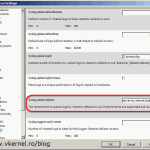
By being our first deployment we have to create a new SSO domain, so click the Create a new SSO domain radio button then fill in the bellow boxes. Name the site and the SSO domain according to your company naming policy or according to the site where you are deploying this PSC. Make sure you don’t loose the password you type here because is needed later on to attach the vCenter server to the PSC, and is also needed for troubleshooting and configuration.

Being an external PSC deployment, the appliance hardware configuration can’t be changed, so click Next since there is nothing to configure on this page.

Select the datastore where the virtual appliance will be deployed then continue the wizard. In a production environment it is recommended to go with thick disks since they provide better performance, meaning you will leave the Enable Thin Disk Mode box unchecked.

Here we will have to populate the boxes with the IP address information for the PSC, and it is recommended to go with a static IP address. The FQDN we type in the System Name box needs to have an A and PTR record created beforehand in the DNS zone in order for the deployment to succeed. Try not to use DHCP or an IP address instead of a FQDN because I found during my testing that a lot of errors will pop-up and the deployment will fail most of the time. Click Next when you’re done.

Join or not join the VMware Customer Experience Improvement Program, but once you decided click Next to continue the wizard.

Review the settings and if everything looks good click Finish to begin the PSC deployment.

It is going to take a few minutes, but at the end, if succeeded, we will get a message that the installation was successful. Close the wizard but do not close the web browser because we will need it in the next section.


Now that our PSC is up and running, the next step is to deploy the vCenter server appliance and attach it to the PSC.
Deploying the vCenter server appliance
In the web browser, once again, click the big blue Install button to open the VMware vCenter Server Appliance Deployment wizard. Most of the screens here will be similar to the ones we saw when we deployed the PSC virtual appliance.
Accept the EULA and continue the wizard.
Provide an ESXi host for the wizard to connect to and deploy the virtual appliance. Again, if you don’t have a trusted certificate on the hypervisor you will get a certificate warning. Click Yes to continue.


Name the virtual appliance and set up a password for it the click Next.

Since this time we are deploying the vCenter server, we need to select the option Install vCenter Server (Requires External Platform Service Controller) then click Next.

This is where we attach the vCenter server to our PSC. In the first text box, type the FQDN (recommended) or IP address of the PSC we deployed earlier then move down to the password box and provide the SSO password that you set up in the PSC deployment wizard. Click Next when you’re done.

Depending on how big the virtual infrastructure is going to be (how many VMs and ESXi hosts) we need to choose the appropriate appliance size in order to support the load. The larger the virtual environment, the larger the appliance needs to be. Select the appliance size that fits your environment then continue the wizard.

Here, choose a datastore for the virtual machine files then click Next.
For the database, it is recommended to go with the embedded one since it performs very well. Oracle database is also an option but there are licenses involved and I don’t know how much performance you get compared with the PostgreSQL database, never tested it.

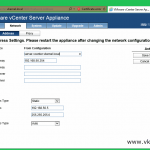
And again, we have the Network Settings screen where we need to provide the IP address information that the wizard will configure for the vCenter virtual appliance. Make sure the FQDN of the appliance needs to have the proper A and PTR records in DNS before the actual deployment starts, if not, it will fail.

On the Ready to Complete page click the Finish button to start deploying the vCenter virtual appliance.

It will take some time to complete and at the end we are presented with a link to access the new deployed vCenter server.

Once we click that link, the vSphere Web Client portal will open and the only method to login for now is by using the SSO password and domain we set-up during the PSC deployment wizard. In order to use our domain account to log in, we have to join the PSC to our Active Directory domain.
Also, by having that certificate error in the web browser is very annoying, and to get rid of it we either replace the vCenter appliance self-signed certificate with a custom one, one issued from a trusted Certification Authority or make the vCenter appliance internal CA (VMCA) a subordinate of a trusted CA.


Now go ahead and deploy another vCenter server and attach it to your existing PSC.
Summary
As you can see, deploying vCenter with an external PSC is fast and easy, but the order in which these virtual appliances are deployed needs to be followed strictly in order to succeed. You might think this is too complex, but once your virtual infrastructure grows, separating the PSC and vCenter is something needed because of the performance improvements and the flexibility it provides. Test it, play with it, then deploy it in production.
Want content like this delivered right to your
email inbox?
More similar articles
 Build and run Windows Failover Clusters on VMware ESXi
- Upgrading from VCSA 5.x to VCSA 6.0 with an Embedded Platform Service Controller (PSC)
- Deploying the VMware vCenter 6.0 Appliance (VCSA) with an Embedded Platform Service Controller (PSC)
- Adding a Raw Device Mapping (RDM) to a Virtual Machine
- Deploying and Configuring VMware vCenter Server Appliance 5.x
- Configure Syslog on ESXi 5.x Hosts