Transitioning from Exchange 2007 to Exchange 2010
Exchange 2010 is out for a while now with great new features compared to his predecessors. What I love most about Exchange 2010 is new HA using database replication. Beside this, Exchange 2010 delivers anti-spam and anti-virus protection for your mailboxes, archiving, backup, voice mail with no need for third-party tools. For more information about Microsoft Exchange 2010 follow this link. The upgrade that I’m going to present happens in a single forest/domain, so it’s basic and simple. Before we begin with the upgrade first we need to test and prepare the environment for Exchange 2010, and there are quite a few steps to follow.
Go to one of your domain controllers (if you have more than one) and do a domain controller diagnostic using the Dcdiag.exe command. This will analyze the state of all domain controllers in a forest. Open a terminal and run the command. After the diagnostic make sure that every test passed, if not debug and resolve any issue. If you don’t want to run the command from the domain controller itself you can install the Windows Server 2003 Support Tools on your workstation and run it from there.
![]()
Open the Event Viewer on the machines that are running Exchange 2007 and look for any errors. Fix them if necessary.
![]()
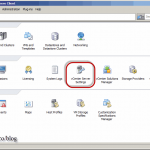
If everything is good until this point, open the Exchange 2007 Management Console, go to Tools and right-click Best Practice Analyzer and choose Open Tool; or you can just double-click to open the tool.
![]()
Here I recommend to select the option to check for updates, and the second one I will leave it to you if you want to participate on the Microsoft CEIP program. If your Exchange is up-to-date, click the Go to Welcome screen link, and on the second page click Select options for a new scan.
![]()
In the Active Directory Server box type the name of one of your domain controllers, then click Connect to the Active Directory server.
![]()
Type a name for the job in the Enter an identifying label for this scan box then select a Health Check scan to perform. Click the Start scanning link after you made your selections. When is done, come back to this screen and also do an Exchange 2007 Readiness Check.
![]()
![]()
Make sure your Exchange servers have the latest service pack installed. Service Pack 2 is the minimum requirement for the upgrade to succeed. Here are the builds numbers:
Exchange 2007 SP1 Version 8.1 Build 240.6
Exchange 2007 SP2 Version 8.2 Build 176.2
Exchange 2007 SP3 Version 8.3 Build 83.6
![]()
We are not done yet, so bear with me here. The forest and domain functional level must be at least at 2003 level or your Exchange 2010 installation wizard will stop with an ugly error.
![]()
The domain and forest functional level needs to be raised, but before you do that read this article about the impact of the procedure. Now go to one of your domain controllers and open Active Directory Domains and Trusts. Right-click your domain and choose Raise Domain Functional Level. Select Windows Server 2003 from the drop-down-box then click Raise. Now right-click Active Directory Domains and Trusts and choose Raise Forest Functional Level. From the drop-down-box select Windows Server 2003 then click Raise. Now the domain and forest are at 2003 functional level, and if you have multiple domain controllers you will need to wait for the replication to occur on all of them.
![]()
Insert the Exchange 2010 DVD on one of your domain controllers, open a terminal and change the target to your DVD drive letter. We need to upgrade the schema and for that, issue the following command:
Setup.com /PrepareSchema
This needs to be done only on the server that holds the schema master, witch is only one in the all forest.
![]()
Don’t close the terminal, instead issue the command:
Setup.com /PrepareAD
![]()
One more command here and we are done:
Setup.com /PrepareDomain
This command needs to be issued on all your domains where you want to install Exchange 2010, if you have more than one domain.
![]()
Now wait a few minutes for the replication to occur on all your domain controllers. If you have sites you will need to wait a bit longer, depending on your sites replication configuration topology. We can now start the installation of Exchange 2010 and for that there is a guide here. The easy part is done, the hard part begins which is the migration. Microsoft recommends the following sequence on Exchange migration/transition: Exchange Server 2010 Client Access Server, Exchange Server 2010 Hub Transport Server, Exchange Server 2010 Mailbox Server, The Edge Transport Server, Exchange Unified Messaging.
The first part of the migration will be the public folder. Open the Exchange 2010 Management Console, go to Organization Configuration > Mailbox > Database Management tab and from the Actions pane click the New Public Folder Database link.
![]()
Give the database a name, and using the Browse button, choose the Exchange 2010 server to host this database.
![]()
Type the path where the database will be located on the Exchange server. I have a different hard drive for this, so I’m not using the default path. Off course I leave the Mount this Database box checked so the wizard will automatically mount the database after creation. When you’re done click Next then New.
![]()
![]()
Now we need to make the public folder database the default one for the mailbox database. Right-click on your mailbox database and choose Properties.
![]()
Once the properties are opened for the database go to the Client Settings tab and hit the Browse button for the Default public folder database.
![]()
From the Select Public Folder Database window, select the Exchange 2010 public folder and click OK twice.
![]()
Still on the Exchange 2010 Management Console go to the Toolbox section and open the Public Folder Management Console tool. We need to create a replica for the public folder database.
![]()
Right-click Public Folders and choose Connect to Server.
![]()
Hit the Browse button and from the list select the Exchange 2007 server click OK then Connect.
![]()
![]()
Now you can see all the public folders that exists on the Exchange 2007 public folder database. Right-click the first one and choose Properties.
![]()
Go to the Replication tab, click the Add button and from the list select the Exchange 2010 public folder database. Click OK, then OK again to close public folder properties. Repeat this operation for the rest of the public folders.
![]()
![]()
![]()
If you still have Outlook 2003 clients you will need to replicate the SCHEDULE+FREE BUSY public folder. Expand System Public Folders click the SCHEDULE+FREE BUSY folder then right-click the folder in the center and choose Properties. Create a replica as we did above.
![]()
![]()
Now you need to wait for the replication to occur, and if you want you can force it use this PowerShell command:
Update-PublicFolderHierarchy -Server EX2007
replace EX2007 with you Exchange 2007 server name.
![]()
On the Exchange 2010 server install a proper certificate, or export the certificate from the Exchange 2007 server, then redirect OWA, ActiveSync, and Outlook Anywhere traffic to the CAS server by reconfiguring your router.
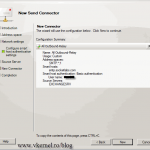
Another traffic that needs to be redirected is the SMTP traffic. If you have and edge server you will need to create a Send connector on the Exchange 2010 server that points to it, if not you simply reconfigure your router. Test to see if emails are coming and going through the new server(s).
Now it’s time to move the mailboxes to the new Exchange 2010 server(s). If you want to take advantage of the new Exchange 2010 Mailbox Database Availability Group (DAG) you can configure it by following this guide. To move the mailboxes expand Recipient Configuration and click the Mailbox object. Select the mailboxes you want to move, then right-click and choose New Local Move Request.
![]()
Hit the Browse button and select an Exchange 2010 mailbox database.
![]()
![]()
Choose what happens if during the move the wizard finds some corrupted messages. I leave this to default.
![]()
To start moving those mailboxes just press the New button. If you have hundreds of accounts to move it will take a while, and I recommend you don’t move them all at once, and not during work hours. Move a couple of accounts and test the mail flow, then move the rest.
![]()
![]()
![]()
The next task is to change the offline address book server. On the Exchange 2010 server go to Organization Configuration > Mailbox > Offline Address Book. Right-click the Default Offline Address Book and choose Move.
![]()
Press the Browse button and from the list select one of your Exchange 2010 server. Click Move when your done.
![]()
![]()
![]()
After all this, wait for a couple of days, or even weeks then start to decommission Exchange 2007. By now the public folders and the SCHEDULE+ FREE BUSY should be in sync with the Exchange 2010 server(s). You can check that by opening the Public Folder Management Console from the Tools section on the Exchange 2007 and 2010 server(s). See if the number of items and size are the same on both versions of Exchange, and if is OK go and remove the replicas from the Exchange 2007 server(s) by selecting the server from the list then click the X button. Do this for all the public folders that you have.
![]()
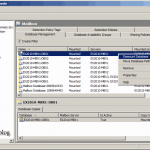
It’s time to remove the mailbox and public folder database(s) from the old mailbox server(s). Just right-click the database and choose Remove. The database and log files are not going to be deleted from the hard drive, so you will have to do it manually.
![]()
![]()
When you try to remove the public folder database, you might get an error “The public folder database…contains replicas. Before deleting the public folder database, remove the folder or move the replicas to another public folder database…“.
![]()
If you follow that Microsoft article there is PowerShell command to force the removal of those public folders from the public folder database. So open the Exchange Management Shell (Start > All Programs > Microsoft Exchange Server 2007 > Exchange Management Shell) and type the following command:
Get-PublicFolder -Server "" -Recurse -ResultSize:Unlimited | Remove-PublicFolder -Server -Recurse -ErrorAction:SilentlyContinue
replace <server name> with your Exchange 2007 mailbox server.
![]()
The system public folders need to be removed also, by using the shell again.
Get-PublicFolder -Server "Non_Ipm_Subtree" -Recurse -ResultSize:Unlimited | Remove-PublicFolder -Server -Recurse -ErrorAction:SilentlyContinue
replace <server name> with your Exchange 2007 mailbox server.
![]()
If is not working even after you issued this commands, you need to open ADSIEdit and remove it from here. On the ADSIEdit console right-click ADSI Edit and choose Connect to. On the naming context box select Configuration. Expand Configuration > CN=Services > CN=Microsoft Exchange > CN={Oraganization name} > CN=Administrative Groups > CN=Exchange Administrative Group > CN=Servers > CN={Exchange 2007 server name} > CN=Information Store > CN={Storage Group name}. Here right-click the public folder and choose Delete. Reboot the Exchange 2007 server.
![]()
![]()
After reboot, the public folder is gone from the Exchange 2007 console.
![]()
Now you can safety go in Add or Remove Programs and decommission Exchange 2007. Clear all boxes and click Next to continue. The wizard is doing a readiness check of the Exchange infrastructure and if everything is good you can click the Uninstall button.
![]()
![]()
At the end click Finish. You have successfully transitioned Exchange 2007 to 2010.
![]()
Want content like this delivered right to your
email inbox?