Restoring Exchange 2010 Mailbox Databases using DPM 2012
I know is bad when something in your infrastructure fails, and email is the worse one. All users start screaming, and calling that they can’t work anymore and can’t see their emails. Now, I like to think that I’m right, and you already have a backup of your Exchange databases, or this is not going to work. Even if you have an Exchange DAG you still need backups and you can restore those backups only on the protected nodes. The recover procedure is the same for stand-alone databases and for those that are par of a DAG.
I presume you already performed a DPM full backup and a synchronization with your Exchange databases, so we can move forward. To test this we don’t need to wait for a database to fail, we can simulate it. Open the Exchange Management Console, right-click a database (the one you want to test on), and choose Dismount Database. You can also use PowerShell.
Dismount-Database "database name"


Now go to the location of the database you just dismounted and delete all files you see there. Do NOT do this on a production environment; this is just to simulate a fail of an Exchange database so I can move on with this guide.

After you deleted the files mount the database. You will get the following warning: “At least one of this store’s database files is missing. Mounting the store will force the creation of an empty database. Don’t take this action if you intend to restore an earlier backup or recover using a continuous replication copy of your database. Are you sure you want to continue?“. If you continue a new empty database will be created, and this is what we want right now. Click Yes.
Mount-Database "database name"


Right now your Exchange database is in a failed mode, and users have no emails available. Depending on the database incident users might not even be able to sent emails until restoration is done. If you are in this situation you can create a dial-tone database so users can be able to send and receive emails. I’m not going to talk about dial-tone databases here, this will be a subject for another article.

Before we actually start the recovery, go to the Mailbox server that has the crashed database, right-click that database, and on the Maintenance tab check the box This database can be overwritten by a restore.

If you don’t do this and go directly to the recovery step you will get the following error message in the DPM Recovery Wizard: “Recovery failed for the Exchange Mailbox Database (database name) because the overwrite flag is not set for…”

Now to start the recovery process, go and open the DPM console then click the Recovery button from the navigation bar. Expand your Exchange server from the Browse section and click All Protected Exchange Data. As soon as you do this, all the protected databases on that specific server will be listed under the Path section. Click the one you need to recover then from the calendar click the most recent day of the recovery point. Days that have backups are differentiated from those that don’t by being in bold. From the Recovery Time box choose Latest, since you want to recover from the last backup. Click the Recover button to launch the Recovery Wizard.

On the Review Recovery Selection screen you can see some information regarding the database. Click Next to continue.

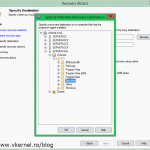
I want to say select Recover to original Exchange Server location, but this is the only option available so just click Next here.

Leave the box Mount the databases after they are recovered checked, so you don’t have to go on the Mailbox server and manually mount the database.

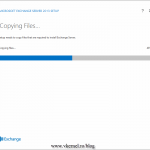
On the Summary page click the Recover button to start restoring the database.

Depending on the size of the database this can take some time, from a few minutes to a few hours. If the database is huge and want to get rid of the Recovery Wizard so you can perform other tasks, you can safely click the Close button without interrupting the recovery process. You can monitor the progress later, if you wan to from the Monitoring section.


Once the recovery process is done, users will have their emails back.

Don’t log off your session from the DMP server. As soon as the database was recovered you need to run a consistency check on it. Go to the Protection section, right-click the database and choose Perform consistency check. Now you’re done.

Want content like this delivered right to your
email inbox?
More similar articles
 Backup Exchange 2010 Mailbox Databases with DPM 2012
- Microsoft System Center Data Protection Manager 2012 R2 Cookbook
- Restoring failed Active Directory Domain Controllers
- Enabling the Active Directory Recycle Bin in Server 2012/R2
- Installing Exchange Server 2013
- Configuring Exchange 2010 Edge Transport Server Role