Install Windows Server 2008 R2 Hyper-V Role
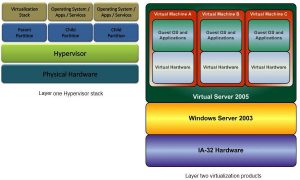
Starting with Windows Server 2008 Microsoft entered in the era of true Windows server virtualization with Hyper-V. Hyper-V is a level 1 virtualization software from Microsoft. I sad level one because it work directly with the hardware, meaning there is no operating system between Hyper-V and the hardware (this are also known as Hypervisors). Level two virtualization software is running on top of the operating system (VMware Workstation, Virtual Server, Virtual PC etc). For a better understanding a think a picture might help.
Before we proceed with the installation the hardware must meet the minimum requirements, and I’m not talking specifically about RAM and CPU, witch are very important, I’m talking about the Virtualization Technology that the CPU must support. This technology improves the performance of the hypervisor allot, and if your processor does not support it, an info box appears just before Hyper-V installation.
But with now days hardware I don’t think this is going to be a problem since almost all processors support this technology. If you want to see if your processor supports Virtualization Technology you can check using this application. For detailed information about minimum system requirements for Hyper-V click here.
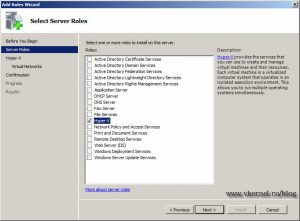
To start installing Hyper-V just open Server Manager by going to Start > Administrative Tools > Server Manager. Here right click Roles and choose Add Roles. Click next to pass the initial page. On the second page of the wizard we can see all the roles that can be installed, but we are interested only of Hyper-V. Check the box next to the Hyper-V role then hit Next. The page that come after is just an information page witch I’m going to skip, but if you want to read more about Hyper-V just click the links on the page.
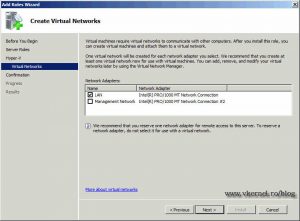
The Create Virtual Networks screen is where you create the networks, so that virtual machines can communicate with your part of the lan. Think of this virtual network as a real switch that connects devices. You simply attach the network card from a virtual machine, or multiple virtual machines to this virtual network and you created a LAN. In this case I am going to choose just LAN to create the virtual network, because the other one is for management only, not required, but recommended.
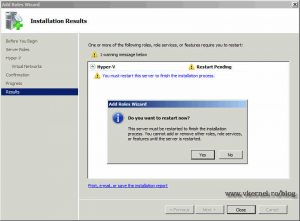
Now just click the Install and setup wizard will copy the necessarily files for the next part of the installation. At the end just click the Close button then OK when the message pops-up to reboot the server and continue with the installation.
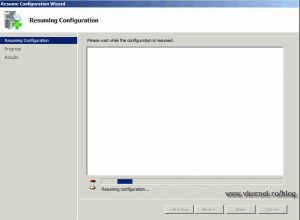
After reboot another wizard appears that configures the Hyper-V role, so don’t start using the server until this wizard finish his job.
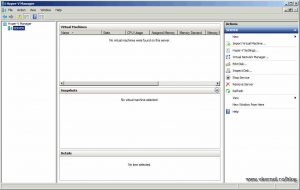
The lest step is to see if we got Hyper-V installed, and for that we need to go to Start > Administrative Tools > Hyper-V Manager or just open Server Manager and expand roles.
As you can see installing the Hyper-V role is a straight forward process that any junior admin can do, without any headache.
Want content like this delivered right to your
email inbox?

Hi,
Thanks for passing by. You can install Hyper-V on 2008 systems but only for the 64 bit editions; the 32 bit does not support it.
hi Thanks for this post, actually i am having the same problem starting my VM installed over HYper-v which in its turn running on a 2008R2 server which installed over VMware Workstation 8.0
I followed your instraction, but i can not find the file you are talking about the *.vmx, however, after creating the new VM, the wizard does not ask for restart as you mentioned, though i restart the whole environment manually, but still can not find any *.vmx file
i can see only the VHD file for the new machine, but not the *vmx
please tell me if i am missing some thing.
many thanks
I think you are talking about installing Hyper-V inside VMware Workstation. For that you need to follow this post http://www.vkernel.ro/blog/install-hyper-v-inside-vmware-workstation-8, it should be all you need in here. Let me know if you need further assistance.