Create and configure a Hyper-V Failover Cluster – Part2
In the first part of this guide I showed you how to install Hyper-V in a cluster environment, and now it’s time to create our first High Available (HA) VM to see if the cluster works. Before we start creating the VM, we need to check if the cluster service assigned the correct volume for the quorum; sometimes is not assigned correctly.
To do this right click the cluster name, go to More Actions, and choose Configure Cluster Quorum Settings.

Click Next to skip the introduction page. On the Select Quorum Configuration page choose the second option Node and Disk Majority.

Verify if the service assigned the correct volume for the quorum, if not select the right one and click Next to continue.

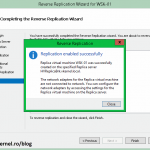
On the Configuration screen click Next to continue, and Finish on the Summary screen to apply the changes.

Now it’s time to create the VM. Because this is an Active/Passive cluster you can’t create the VM on any server, you can do this only on the server that has the cluster storage available. For example, if you go on Node1 and open Windows Explorer you can see a volume for the Quorum (Q) and another one for virtual machines nesting (V). On Node2 no volume V and Q exists yet because those are active on Node1, and are going to be available here only if Node1 fails or is shut down. I hope you get the idea.

Open the Hyper-V console on Node1, and click New > Virtual Machine on the Actions pane .

On the Specify Name and Location page give the VM a name, and choose where to store this VM. Be sure to select the cluster disk (V drive in my case) for the VM location.

Specify the amount of RAM the VM should have.

From the list, select the network adapter the VM is connected to.

Because this is a new VM we need to create a new virtual disk. Verify the location of the virtual disk. It should be on the V drive.

Choose where the installation media is located and continue the wizard.

On the Summary screen click Finish to create the VM.

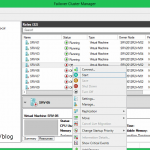
We are not done yet, one more step needs to be done before the VM is highly available. You need to open the Failover Cluster Manager console, right click Services and applications and choose Configure a Service or Application.

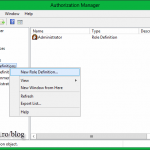
Select Virtual Machine and click Next.

In the Select Virtual Machine page we can see all the VMs in the cluster. Since we have only one, click the box next to the VM and finish the wizard.

We now have a highly available VM, so if one of the Hyper-V nodes fails or is shut down for maintenance, the VM resources will be moved to another node in the cluster.

Shut down Node1 and watch how the VM fails on Node2. As you can he is the owner now.

The same thing happened for the cluster volumes.

Looks like we had a success here. This conclues the two part series of the guide, and I hope it was informative for you.
Want content like this delivered right to your
email inbox?
More similar articles
 Deploying VDI using Windows Server 2012/R2
- Migrating a Hyper-V Cluster to Windows Server 2012 R2
- Configuring Hyper-V Replica in Windows Server 2012/R2
- Delegate Access Control and Management in Hyper-V
- Manage Hyper-V on Server Core from a remote console
- Create and configure a Hyper-V Failover Cluster – Part1