How to enable WinRM (HTTP) via Group Policy
Windows Remote Management or WinRM for short, exist in the Windows world for a long time and until now you probably never had anything to do with it. WinRM is a Microsoft implementation of WS-Management Protocol, that allows hardware and operating systems, from different vendors, to interoperate. If enabled, you can run scripts, install roles and features on servers and clients or run the Remote Shell command line tool, and all this remotely. Practically you can do everything on a remote station the same way you are doing it locally. It is enabled by default on Windows server 2012/R2 but disabled on all client platforms and servers prior to server 2012. If for some reason you are still running Windows XP or server 2003, which are End of Life (EOL) now, you will need to install the Windows Management Framework Core package for this to work, since WinRM is not part of these operating systems. The service can be configured in two ways: secured (HTTPS) or un-secured (HTTP) and in this article I will treat the last one since it doesn’t require a complex infrastructure and configuration.
To enable WinRM, which is practically configuring the WinRM listener, starting the service and allowing the traffic trough the Windows firewall, first, create a Group Policy Object that targets the workstations that you want to enable WinRM on.


After the GPO was created and linked to the proper OU, right-click it and choose Edit.

In the Group Policy Management Editor console expand Computer Configuration > Policies > Administrative Templates > Windows Components > Windows Remote Management (WinRM) > WinRM Service. On the right hand side edit the Allow remote server management trough WinRM policy setting.

This is a policy setting that a lot of people misunderstand it, mostly because is very confusing. Here, you do not specify which IP addresses are allowed to connect, you specify which IP addresses the WinRM service binds to. Just like in IIS for example, you bind a site to a specific IP on the server. Usually you will want to bind the WinRM service to all IPs by putting an “*” on the boxes, so you don’t encounter problems later when you change the IP of a server or workstation. In case you want to be more granular, type the IPs to which the service binds to, but I fount out that this creates a lot of connection problems. Once you’re done click OK to save the changes.

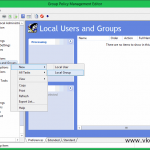
The next policy that we need to configure, is the one that enables and starts the WinRM service. Expand Computer Configuration > Preferences > Control Panel Settings > Services. Right-click the Services node and choose New > Service.

The New Service Properties window opens. From the Startup drop-down-box choose Automatic (Delayed Start) then click the ellipse button from the Service Name box and search for Windows Remote Management (WS-Management). Once you find it, click on it then hit Select. The last setting here to configure is the one from the Service Action drop-down-box which needs to be set on the Start service action. Once you’re done setting up all this, click OK.

The last policy we need to configure in order for WinRM to work, is to open the proper Firewall ports. Expand Computer Configuration > Policies > Windows Settings > Security Settings > Windows Firewall with Advanced Security > Windows Firewall with Advanced Security > Inbound Rules. Right-click the Inbound Rules node and choose New Rule.

On the New Inbound Rule Wizard click Predefined then from the list select Windows Remote Management.

From the Predefined Rules window, make sure you un-check the Public profile box. It’s not that you are expose to the internet with this, because you already have a firewall in place for the company, but consider it as a best practice.

Go with the default option here by allowing the connection.

Now that Group Policy is in place and set up all you have to do is wait for it to apply, or if you run 2012 domain controllers you can force the policy by using the Remote Group Policy Update feature. Once the clients get the new policy, you can check the firewall and the WinRM service to see if they actually work:
winrm e winrm/config/listener

Also you can run a remote command to live test it:

This is a nice feature to have it running in the environment because for so many times you need to execute remote scripts and in the end you notice they don’t work because of the WinRM service. With WinRM enabled it’s not an impediment anymore, just make sure you give the right permissions to the right people.
Want content like this delivered right to your
email inbox?
More similar articles
 Blocking Remote Access for Local Accounts by Group Policy
- Add Domain Users to Local Groups using Group Policy Preferences
- Set Up Automatic Certificate Enrollment (Autoenroll)
- Remote Group Policy update in Windows Server 2012
- Setting up a KMS Server in Windows 2008 R2
- Creating and configuring Windows Domain Service Accounts