Installing Remote Desktop Services in Windows 2008 R2
I’ve been thinking for quite some time now, how to start some articles about Microsoft VDI (Virtual Desktop Infrastructure) and RDS (Remote Desktop Services), and I’ve got it; I will just start with something simple, like the installation, then continue with services configurations. In this guide I’ll show you how to install the Microsoft RDS role services, which in previous versions of Windows it was called Terminal Services.
I will use a single 2008 R2 server joined to the domain, which will hold all the RDS role services, well…almost all; you will see there are quite a few. All this role services can be installed on separate servers, and is recommended for large environments, but for the sake of this example we are going with a single host. To start open Server Manager, right-click Roles and choose Add Roles.

On the Select Server Roles page check the Remote Desktop Services box and click Next to continue.

I told you there are quite a few RDS role services, and since we are here I want to tell you something about each one of them before continuing.

Remote Desktop Session Host – formerly known as Terminal Server, enables users to connect and run applications just like they where using a full desktop. Clients connect to the RD Session Host using RDP client, which is integrated in every version of Windows.
Remote Desktop Virtualization Host – this is a Hyper-V server that is holding virtual machines for users or pools of virtual machines. They connect to this virtual machines using a RDP client and use them as a day-to-day workstations. Think about hospitals, if a doctor works on a computer connected to a virtual machine on the RD Virtualization Host, and that computer crashes, the doctor simply moves to another physical computer and reconnects to his virtual machine; the session or data is not lost.
Remote Desktop Licensing – this service is taking care of the licenses used by clients and licenses issued to them.
Remote Desktop Connection Broker – is used for load balancing and reconnection to RD Session Host servers. If one of the RD Session Host fails, users are redirect to another one available without losing their work. A small interruption of the session is possible or users have to reconnect to get their session back.
Remote Desktop Gateway – is for those users that need to connect from outside of the company. This is very useful for administrators, because they only need to open port 443 on the firewall, witch may already be opened if the company has a secure web site publish to the internet.
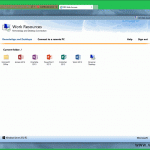
Remote Desktop Web Access – this service enables users to connect to remote applications and desktop from a web browser. If users are working from a Windows 7 machine they can connect to those applications from the Start Menu.
Now that you know what each role service does, let’s continue with the installation. Select all the role services except RD Virtualization Host and choose to add the required role services when the Add Roles Wizard window pops-up. The RD Virtualization Host is a more “delicate” role service, and is treated in this guide. Click Next to continue.

On the following screen we have a warning, telling us that applications should be installed after the RD Session Host installation, or they might not work as expected.

In the next screen we have two authentication methods:
Require Network Level Authentication – it enhances the security of a RD Session Host server by authenticating the user before the session is created. It is supported only by clients with a Remote Desktop Client version 6 and greater, running on Windows XP SP3 or Vista. Windows 7 is already equipped with version 7 of the RDC.
Do not require Network Level Authentication – using this option the authentication occurs later in the connection process. This should be used only if yo have RDC older than version 6.
Select Require Network Level Authentication and click Next to continue.

Specify the licensing mode you are using in your company and click Next.

Here you can add which user groups can connect to this RD Session Host server.

You can provide extra functionalities to users, so they have a similar experience to a Windows 7 desktop if you check those boxes. By doing this more bandwidth is required and processing power on the RD Session Host server.

The RD Licensing Configuration screen is for those that still have RD Session Host servers running on Windows versions older than 2008 R2. In this example we have only 2008 R2, so leave the defaults and continue. If you are using only 2008 R2 server Microsoft recommends you configure the license server from the RDS Host configuration tool.

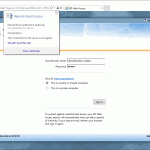
For clients to be able to communicate in a secure matter a certificate is needed on the RD Gateway server. You can use a commercial certificate, an internal one or a self signed certificate. For this example we are going to create a self signed certificate, even if is not the best choice. I will show you in a future post how to install a proper certificate on the RD Session Host server and the RD Gateway server. The RD Gateway server is very sensitive when it comes to security, so you need to have a proper certificate, if not users will not be able to connect.

Now we need to configure which uses and computers have the right to connect to this RD Gateway server. Click the Now button to start creating the polices, but first let me explain what RD CAP and RD RAP are.
RD CAP or Remote Desktop Connection Authorization Policy – by configuring this policy you specify which users and groups will have the ability to connect to a RD Gateway server. You can even specify that only users using a smart card can connect.
RD RAP or Remote Desktop Resource Authorization Policy – after RD CAP is authenticating users and groups, with RD RAP you can specify which computers in the internal network those users or groups can access.

In this screen we have the option to add the user groups that will be associated with RD CAP and RD RAP.

Here enter the name for the RD CAP policy; we also need to select the authentication method, but since I don’t have a smart card I will let users authenticate using their passwords.

Name your RD RAP policy, and create a group in your Active Directory where you put all the computers that users can access through this RD Gateway server. If you want to you can go with the second option and let users connect to any computer in your network that has Remote Desktop enabled.

Now just click Next and finish the wizard using the default settings. After everything is installed choose to reboot the server.


After reboot the wizard is resuming the installation and when is finished you will have some warnings. Just ignore them, because we are going to configure them in a future guide.

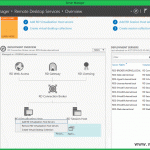
If you expand Roles > Remote Desktop Services from Server Manager you can see all the RD role services installed.

Want content like this delivered right to your
email inbox?
More similar articles
 Deploying and configuring the Remote Desktop Gateway Server Role
- Configuring certificates in 2012/R2 Remote Desktop Services (RDS)
- Deploying VDI using Windows Server 2012/R2
- Creating RDS Session Collections in Windows Server 2012/R2
- Deploy and configure a Windows Server 2012 R2 RD License Server
- Installing Remote Desktop Services (RDS) in Windows Server 2012/R2