Deploying Windows 7 with WDS and MDT 2010 – Part2
In the first part of these series, I showed you how to install WDS and MDT on the deployment server. In this second part, we are going to configure these services before we deploy a clean image of Windows 7. Don’t worry, configurations are driven by wizards most of the time, and when they are not I will try my best to explain those settings for a better understanding.
First, we need to create a Deployment Share where MDT will hold the boot images, the operating system images and the scripts. This is a shared folder that clients access through the network during deployment to download all the necessary files for installation. To create the Deployment Share open the MDT console, right-click Deployment Shares and choose New Deployment Share.

Type the path where the Deployment Share should be created. I recommend you use a different partition, or even better, a different hard drive for the Deployment Share to sit.

Here we have the option to change the share name, but for this example I’m going with the default one.

Give the Deployment Share a description then continue the wizard.

On the Allow Image Capture screen clear the box Ask if an image should be captured. We are going to configure this option later.

Here leave the defaults and click Next, because we don’t want users to be able to set a local Administrator password. This is done using scripts, or group policy without user interaction.

Product keys can be inserted during deployments, using a simple MDT rule, so again do not configure this option here.

On the Summary screen click Next to start creating the Deployment Share.

If everything was successful no errors should appear on the Confirmation screen. Click Finish to close the wizard.


Now if you look under Deployment Shares in the MDT console, a new Deployment Share was created.

You can explore the folder if you want, using Windows Explorer and open the volume where you created the Deployment Share.

Once the Deployment Share is created, the next step is to import an operating system. Like I told you in the first part, I will use a Windows 7 Enterprise x64 image for deployment. In the MDT console right-click the Operating Systems folder and choose Import Operating System.

Since this is a clean image, select Full set of source files, then click Next.

Here select your DVD drive where the Windows 7 installation media is mounted.

Type the name of the directory that will be created in the Deployment Share folder for this operating system.

On the Summary screen click Next to start the import process. Here we have the option to stop the process by clicking the Stop Execution button. I recommend you do not click this button, or your Deployment Share can become corrupted and you’ll have to recreate it. I’m talking for my own experience, so let the wizard finish the job then delete the operating system if you don’t want it, but do not click that button.

On the Confirmation screen click Finish to close the wizard.

I usually like to rename the image generated by the wizard so I can better distinguish it if I have multiple images on the same deployment share.

Before we deploy the operating system we need to create a so-called Task Sequence. This is for customizing and automating stuff like partitioning, running scripts during deployment, installing updates from a WSUS server during deployment etc. In the Deployment Share, right-click the Task Sequence folder and choose New Task Sequence.

Type and ID, name and a description for the Task Sequence then continue the wizard. The description is optional.

On the template page select Standard Client Task Sequence.

From the operating system list select the Windows 7 image we previously imported, then click Next to continue.

Do not specify a product key right now, so leave the first option selected.

Complete the required information in the OS Settings boxes, then click Next.

If you want to protect the local Administrator account with a password select the first option and type the password.

On the Summary screen click Next to create the Task Sequence, then Finish on the Confirmation screen.


Back to our MDT console we can see the Task Sequence created.

Now we need to update the Deployment Share so our Task Sequence and the Windows 7 image can really work. The Deployment Share needs to be updates after every modification on a Task Sequence or Rules. I know I didn’t talk about rules, but I will when we are going to deploy the customized image of a Windows 7 system. To update the Deployment Share, right-click the name of your Deployment Share and choose Update Deployment Share.

On the Update Deployment Share Wizard leave the first option selected and finish the wizard.

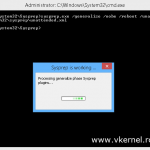
The process is going to take a while, because it will create some boot images, which later we are going to use them to boot clients over the network.

This concludes the second part of these series. See you in the next one.
Want content like this delivered right to your
email inbox?
More similar articles
 Customizing the Default Local User Profile before imaging
- Sysprep and Capture a Windows Image with MDT 2012
- Deploying Windows 7 with WDS and MDT 2010 – Part1
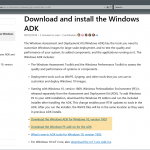
- Installing and Configuring MDT with Windows 10 ADK
- Blocking Remote Access for Local Accounts by Group Policy
- How to configure Windows Event Log Forwarding