Creating virtual machines in VMware vCenter 5
Creating virtual machines was an easy job in previous versions of vCenter, and it’s still is, just a couple of options changed during the wizard. In this post I’ll show you how to create a new virtual machine on a ESXi 5 host using vCenter 5.To start open your vCenter console and right click the Datacenter object, Cluster object or ESX/ESXi host and choose New Virtual Machine.

Select Custom, so we can configure all the options for the VM.

Give your virtual machine a name, and select the datacenter (if you have more than one) under Inventory Location. Click Next to continue.

Select the datastore where this VM should be placed.

If you are using ESXi 5 the recommended option is to go with version 8 of the VM hardware, but if you still have some ESX/ESXi 4.x in your environment go with version 7.

Here select your OS and platform and click Next. For this guide I’m going to create a Windows 7 x64 VM.

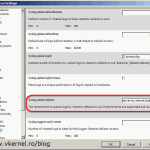
Select the number of processors and cores per processor for the VM.

Configure the amount of memory for the VM and click Next to continue.

Here you can attach the VM to a virtual network, if you choose to do so. Under Adapter type select VMXNET3, since this is the latest network adapter from VMware.

Leave the default SCSI controller selected by the wizard and just click Next.

Select to create a new virtual disk, since this is a new VM. You can also attach an existing virtual disk if you have one already created.

Configure the disk capacity this VM should have, and under Disk Provisioning make a choice.
Thick Provision Lazy Zeroed – will allocate all the disk capacity configured, but the virtual disk blocks aren’t actively zeroed out. In this case vCenter will create a 32 GB virtual disk on the datastore, and the vSphere host will need to prepare the space on this virtual disk as it grows, taking a bit of time for this operation.
Thick Provision Eager Zeroed – will allocate all the disk capacity configured, and the space is actively zeroed out. In this case vCenter will create a 32 GB virtual disk on the datastore, but the vSphere host doesn’t have to do any additional work as the space is consumed on the virtual disk.
Thin Provision – vSphere/ESXi will tell the VM that it has a 32 GB disk, but on the datastore this virtual disk will consume just a few KB at the time of creation. The virtual disk will increase in size when you begin to consume more space on the .VMDK file (installing the OS, copying files on the VM etc). Be careful when using this option, since you can create a lot of VMs on single datastore. You need to calculate the effective space those VMs will consume, or you are going to run out of space on the datastore.
You can choose to store the VMDK file on different datastore, or you can leave the default option and store it with the VM.

Because we are not going to configure Independent disks, just click Next to continue.

In the Ready to Complete page we have a check box Edit the virtual machine settings before completion. If you check the box and click Continue, the VM properties will be presented to you. Here you can add or remove hardware and change some advance settings for the VM before is created.

After you’ve made your changes click the Finish button and the virtual machine will be created.

Want content like this delivered right to your
email inbox?
More similar articles
 Build and run Windows Failover Clusters on VMware ESXi
- Upgrading from VCSA 5.x to VCSA 6.0 with an Embedded Platform Service Controller (PSC)
- Deploying the VMware vCenter 6.0 Appliance (VCSA) with an Embedded Platform Service Controller (PSC)
- Adding a Raw Device Mapping (RDM) to a Virtual Machine
- Deploying and Configuring VMware vCenter Server Appliance 5.x
- Configure Syslog on ESXi 5.x Hosts