Publish HTTP Web site with TMG 2010
A lot of times you might need to make your internal website available to the internet, so users can access it from different locations. With TMG 2010 this is possible, and believe me is piece of cake ’cause everything is wizard driven.
For this lab I have a Windows Server 2008 R2 SP1 with TMG installed; everything is up to date. I have another server witch is the Web server at IP address 192.168.50.210.
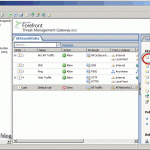
To start open your TMG Management Console and go to Firewall Rules. On the right pane select Tasks and click the link Publish Web Sites. We need to give this rule a name, mine will be IIS WebSite.

Now we need to select either Allow the web site or Deny, but I’m guessing that you already know witch one we are going to select; yes we select Allow.

In the Publishing Type screen we have three options, but we are interested only on the first one (witch is the default). Make sure the Publish a single Web Site or Load Balancer is selected then click Next.

Since we are not going to publish a secure Web Site, select the second option Use non-secured connections to connect the published Web server or server farm using HTTP and hit Next.

In the Internal site name on this screen we need to type the name of the site that is used internally. For most of the times I put the same name as the external site name, because it’s easier for user to remember one site name than two. Check the box Use a computer name or IP address to connect to the published server, and enter the name or IP address of the internal server that host the Web site. If you don’t have a good name resolution between TMG and the Web server I recommend using the IP address.

To be able to access all parts of the Website in the Path box put this /* . If you have only a directory in the website that needs to be published, let’s say a calendar you will type in the Path box /calendar. If you have a website that need the original header check the box Forward the original host header instead of the actual one specified in the Internal site name field on the previous page, else leave it unchecked.

Here in the Public Name Details on the public name box we need to put the FQDN of the website. This is going to be the name that external users are using to connect to the website.

In this screen select HTTP Web Listener so TMG will start listening for HTTP traffic that comes from the outside.

Authentication Delegation is where you tell TMG if the website is going to take care of the authentication, if any, or TMG itself. Since this is a public We site we are going with the second option No delegation, but client may authenticate directly.

Here we tell TMG witch users have permission to access the website. Again since it’s a public website we leave the default option and click Next.

On the Summary screen click Finish and your rule will be created.

Until the Apply button at the top is not pressed the rule just created is not going to work, so press the button then press Apply again on the box that appears, ad finally OK. Wait a few seconds ’till TMG applies the rule.

As proof that it worked I accessed the website from an external client using www.vkernel.local. Since this is not a public domain I edited the local host file of the external client and pointed the domain name to the external IP address of the TMG server. Just go in C:\Windows\System32\drivers\etc\hosts, open with notepad and at the end put this line:
192.168.1.2 www.vkernel.local
The IP is my external IP address. If you are using a public domain you don’t need to edit the host file since DNS will take care of everything.

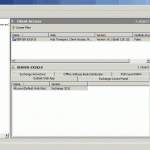
As you can see TMG allows the traffic for that specific domain name then, passes that traffic to the webserver.

Want content like this delivered right to your
email inbox?
More similar articles
 Publishing Multiple HTTP Web Sites with TMG 2010
- Publishing Exchange 2010 Outlook Anywhere with TMG 2010
- Configure TMG 2010 for certificate request from internal CA
- Configuring a PPTP Site to Site VPN with TMG 2010
- Publish Outlook Web App (OWA) with TMG 2010
- Install Forefront TMG 2010 on Windows Server 2008 R2