Installing System Center Virtual Machine Manager (SCVMM) 2012
I was anxious for the latest version of VMM, so I taught I’ll give it a try here. For those of you that are still using VMM 2008 or 2008 R2 this new version will be so much different, especially on the GUI part. I never had time to really test it and see how it works, but I’ll tell you in a future post. Before we get into it I think you should know what software and hardware prerequisites are necessary to run SCVMM, so let’s start with hardware:
| Role | Hardware Component | Minimum requirement | Recommended requirement |
| Management Server<= 150 hosts | Processor | Pentium 4, 2 GHz (x64) | Dual-Processor, Dual-Core, 2.8 GHz (x64) or greater |
| RAM | 2 GB | 4 GB | |
| Hard disk space (without a local VMM database) | 2 GB | 40 GB | |
| Hard disk space (with a local, full version of Microsoft SQL Server) | 80 GB | 150 GB | |
| VMM Console | Processor | Pentium 4, 550 MHz | Pentium 4, 1 GHz or greater |
| RAM | 512 MB | 1 GB | |
| Hard disk space | 512 MB | 2 GB | |
| VMM Self-Service Portal<=10 connections | Processor | Pentium 4, 2.8 GHz | Pentium 4, 2.8 GHz |
| RAM | 2 GB | 2 GB | |
| Hard disk space | 512 MB | 20 GB | |
| Database | Processor | Pentium 4, 2.8 GHz | Dual-Core 64-bit, 2 GHz |
| RAM | 2 GB | 4 GB | |
| Hard disk space | 80 GB | 150 GB |
As software requirements it goes like this:
| Role | Software Requirement | Operating System |
| Management Server | Windows Remote Management (WinRM) 2.0At least Microsoft .NET Framework 3.5 Service Pack 1 (SP1)Windows Automated Installation Kit (AIK) for Windows 7SQL Server 2008 R2 Datacenter (64-bit) Service Pack 1 or earlierSQL Server 2008 R2 Enterprise (64-bit) Service Pack 1 or earlier
SQL Server 2008 R2 Standard (64-bit) Service Pack 1 or earlier SQL Server 2008 Enterprise (64-bit) Service Pack 2 or Service Pack 3 SQL Server 2008 Standard (64-bit) Service Pack 2 or Service Pack 3 |
Windows Server 2008 R2 (full installation) Standard, Enterprise, and Datacenter Service Pack 1 or earlier |
| VMM Console | Windows PowerShell 2.0At least Microsoft .NET Framework 3.5 Service Pack 1 (SP1) | Windows Server 2008 R2 (full installation)Windows 7 |
| VMM Self-Service Portal | Web Server (IIS)Windows PowerShell 2.0At least Microsoft .NET Framework 3.5 Service Pack 1 (SP1) | Windows Server 2008 R2 (full installation) Standard, Enterprise, and Datacenter |
For more details about system requirements please visit this website. For this lab I will use a Windows Server 2008 R2 SP1 for the VMM server, as for the database I will use SQL Server 2008 R2 Enterprise. Everything is in a domain environment, and all VMM roles will be installed on the same box. If you don’t meet all the prerequisites, installation will not continue and the wizard will notify you which are the missing ones.

As a first step install .NET Framework 3.5 by opening Server Manager, right-click Features and choose Add Features.

Check the box next to .Net Framework 3.5.1 and click Next then Install.

If you don’t have the Windows AIK kit for Windows 7 and 2008 server, go to this website and download it. Now mount the ISO (because you are using virtualization, right ?) and on the splash screen click the Windows AIK Setup link. Follow the wizard and use the default settings.

After you are done with Window AIK is time to install IIS for the Self Service Portal. Open Server Manager, right-click Roles and choose Add Roles.

Check the box next to Web Server (IIS) and click Next. One the Role Services page check the following boxes: .NET Extensibility, ASP.NET, Default Document, Directory Browsing, HTTP Errors, IIS 6 Metabase Compatibility, IIS 6 WMI Compatibility, ISAPI Extensions, ISAPI, Filters, Request Filtering, Static Content. Click Next then Install.

The SQL Server 2008 R2 Command Line Utilities must be installed, so mount the SQL server 2008 R2 DVD, click Installation then New Installation or add features to an existing installation. Or go to Microsoft’s page and download the Command Lines Utilities from there, if you can’t find the SQL server ISO or DVD.

When you get to the SQL Feature Selection screen check Management Tools – Basic box and click Next to continue.

Is time to install SCVMM; mount the SCVMM DVD and on the initial screen click Install.

After the wizard launches select all three features check boxes and click Next.

Provide product registration information and continue the wizard.

Accept the EULA and click Next.

Right now I don’t want to participate on the CEIP program, so I will choose No, I am not willing to participate.

Choose the location where all the components will be installed then click Next to continue.

The wizard will start checking if all the requirements are met.

Now is time to tell the wizard the name, the instance and other information about our SQL server. In the Server name box type the name of the SQL server. In the Port box type the port name you are using to connect to the SQL server. If you are using the default port, like I am in this example, you can leave the box empty. The same goes for the Instance Name, if you are using the default one you can leave the box empty. I am not going to type a user name and password here, because I am logged in with a domain admin account, and the wizard is using the current log on credentials to connect to the SQL server. If you want to you can use a different domain account to connect to the SQL server and create the database. The last option is to create a new database on the SQL server or use an existing one; in this case we are creating a new database.

A very important thing to remember is that the SQL service needs to run under domain credentials or you will get this error when trying to connect to the VMM service.

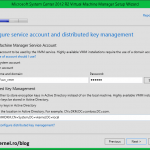
On the Configure service account and distributed key management click the Select button and type the account that is going to be used for the VMM service. Because I don’t like my services to run under the default Administrator account, I created a separate account in AD for this. Don’t check the box Store my keys in Active Directory, because we are going to store them on the local machine for now.
If you want to use Active Directory to store the encryption keys, I have an article right here that explains how to configure Distributed Key Management (DKM) in VMM 2012.

Here leave the default ports and click Next to continue.

Since the Self-Service portal is running on this server, just type the local server name in the box. Leave the ports alone and click Next.

Choose where to store the VMM library, if the default path is not good for you.

On the Summary screen click the Install button to start the installation.


At the end click the Close button to launch the VMM Console.

Because I want to connect to this address/server every time I open the console, I checked the box Automatically connect with this settings.


Now we can start adding hosts and create virtual machines using the VMM console;

and by using the Self-Service portal your users can benefit from the virtualization technology by running their own virtual machines.
To log in to the Self-Service portal you need to create a User Role, by selecting Settings > Create User Role from the VMM console.


Want content like this delivered right to your
email inbox?
More similar articles
 Step-by-step Hyper-V Storage Live Migration
- Microsoft System Center Data Protection Manager 2012 R2 Cookbook
- Restoring failed Active Directory Domain Controllers
- Upgrading from SCVMM 2008 R2 to SCVMM 2012 R2
- Configuring Distributed Key Management (DKM) in VMM 2012
- Restoring Exchange 2010 Mailbox Databases using DPM 2012