Configuring Hyper-V Replica using Certificate-Based Authentication (HTTPS)
You know that starting with Windows Server 2012 Hyper-V has a new feature that replicates VMs from one host to another for a disaster recovery scenario! I talked about it in this article; but configuring replication that way over non-trusted networks or for hosts that are not in the same Active Directory forest is not suitable for some environments. There are companies out there that need strong security when using Hyper-V replication and that’s why you need to look at a HTTPS alternative. You can implement this in Hyper-V but the source and replica hosts must have certificates that are mutually trusted. In other words, they must both trust the same parent or come from the same certificate authority (CA). If you have Windows Active Directory Certificate Services in your network, you can use it to issue certificates for your Hyper-V hosts, if not you need to look at some free solutions (MakeCert.exe) or buy the certificates from an online Certification Authority. The CA certificate(s) can be deployed via Group Policy, thus ensuring that any issued certificates from that CA or CAs would be trusted by both the source and the replica hosts.
In this article we will look at how to configure Hyper-V HTTPS Replica in a domain environment, in a clustered environment and in a workgroup environment. They are all different in some way especially from a certificate perspective, and the requirements for the certificate that is being requested are as follows:
Enhanced Key Usage – This field in the certificate must be set up for both Client and Server authentication.
Certificate Subject Field – The certificate is bound to the name of the machine.This field must be set to the FQDN of the host, or the NetBios name if the host is not part of a domain. If the server is part of a cluster, the subject field must be set to the FQDN of the Hyper-V Replica Broker (HVR Broker), and this certificate must be installed on all the nodes in the cluster.
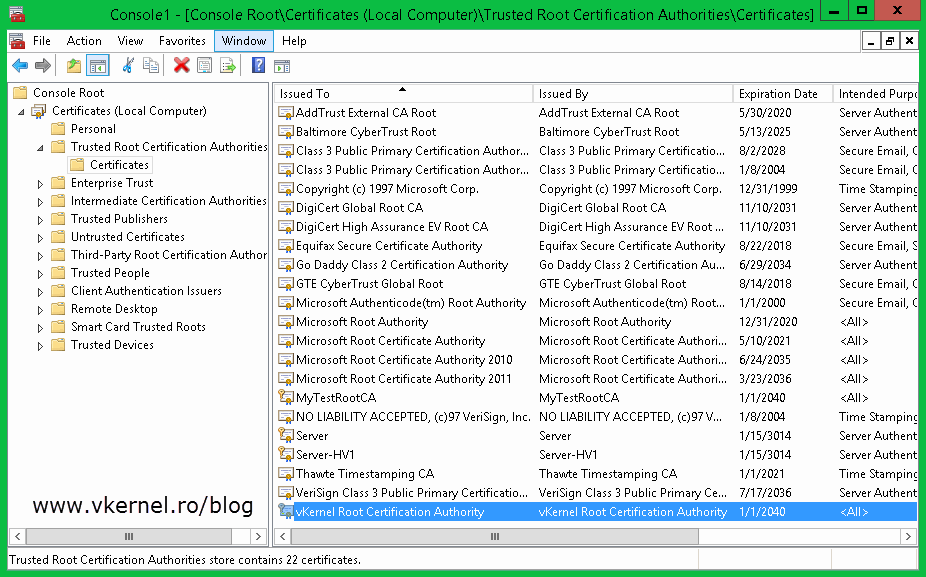
The certificate must be a valid X.509v3 certificate that is not revoked and trusted on the machines. The root certificate must be present in the Trusted Root Certification Authorities.
With this in mind let’s start with the simplest deployment,
Configure Hyper-V Certificate-Based Authentication (HTTPS) Replica in a domain environment
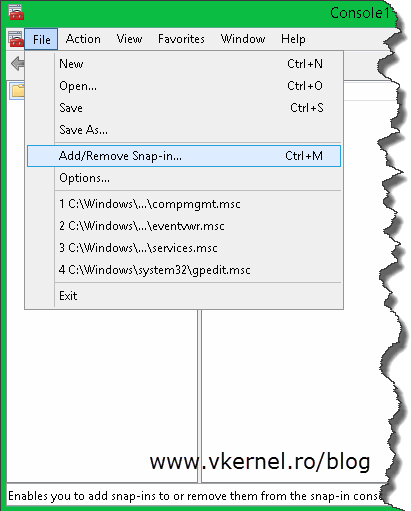
For this I presume you already have an Active Directory Certificates Service running and functional. We are going to use this internal CA to issue the certificates needed for HTTPS replication. Now log in to one of your Hyper-V hosts, go to Run, type mmc.exe and hit Enter. From the File menu choose Add/Remove Snap-in.
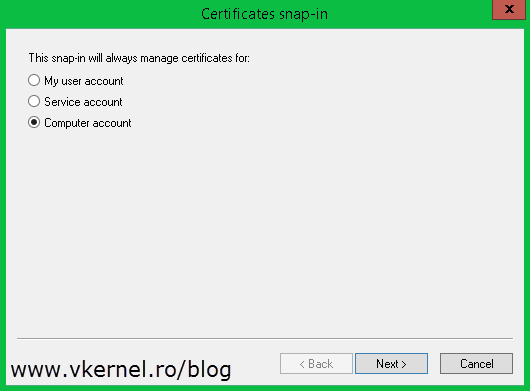
In the Add/Remove Snap-ins window select the Certificates object and hit Add, then on the wizard choose Computer account > Local Computer.

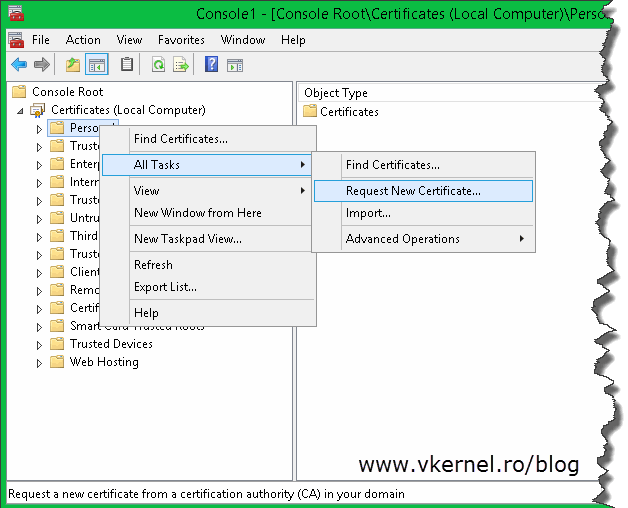
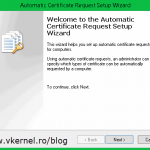
Here, expand Certificates (Local computer), right-click the Personal folder and choose All Tasks > Request New Certificate.
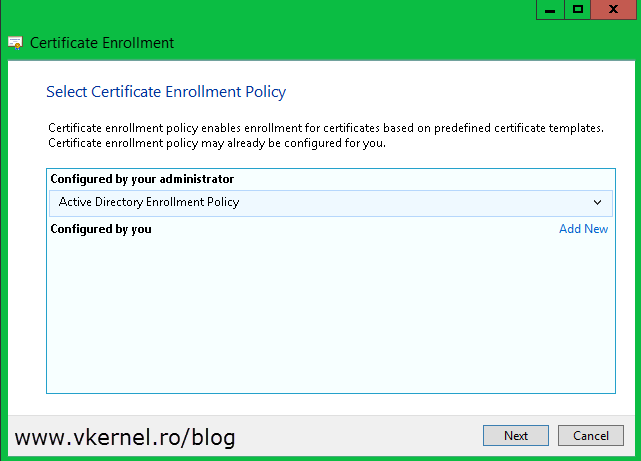
On the Certificate Enrollment wizard select Active Directory Enrollment Policy (it should be selected by default) and click Next.
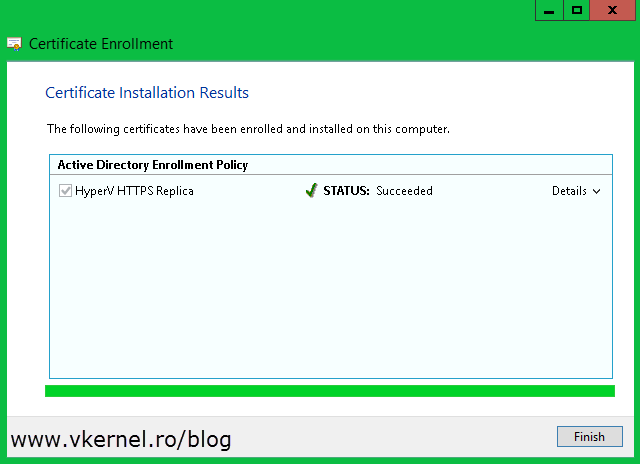
You get to the Request Certificates page. All you have to do here is check the box next to Computer and hit the Enroll button.
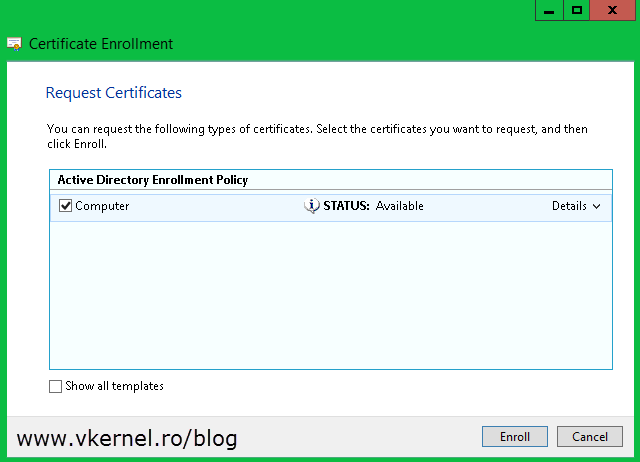

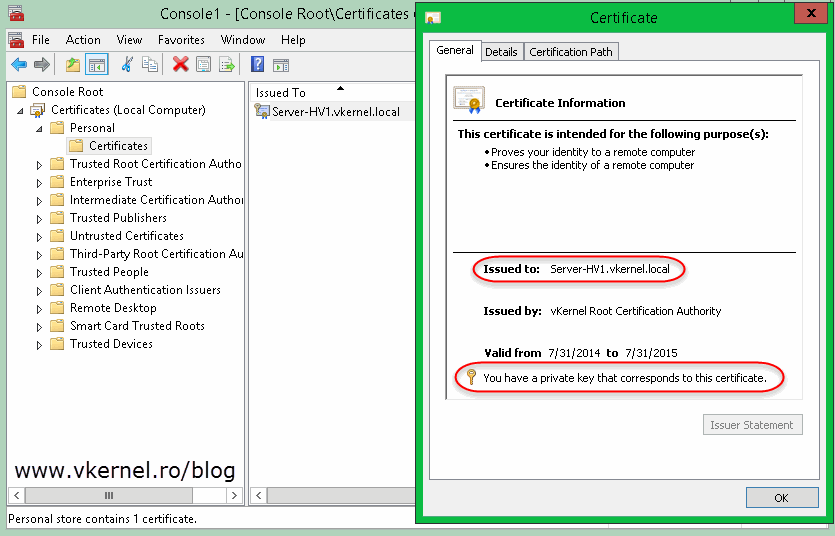
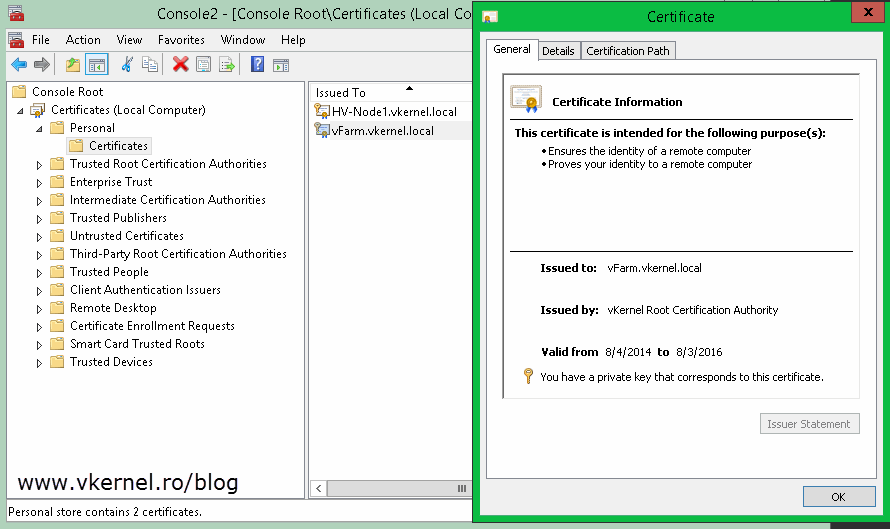
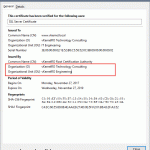
At the end you should get a certificate with a private key and a common name that corresponds to the server name.
Repeat this for all your Hyper-V hosts. And since you have an Active Directory environment why not use the Auto-Enrollment policy. All you have to do is create a GPO and link it to the appropriate OU (where your Hyper-V hosts are located). On how to configure Auto-Enroll using group policy read this article.
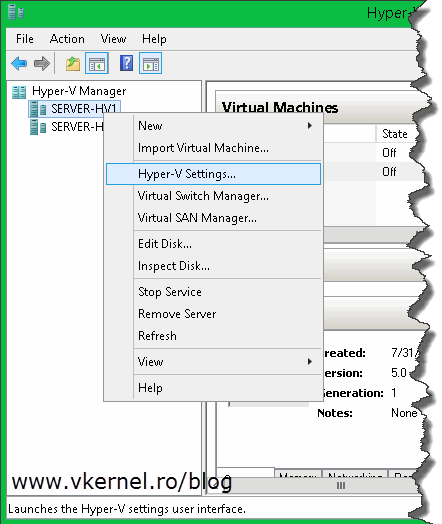
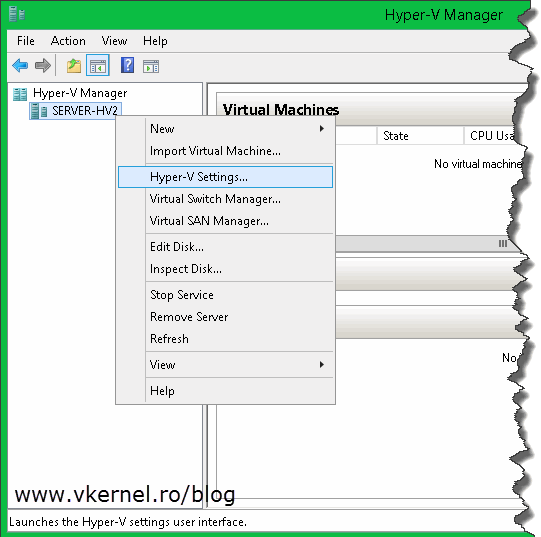
The next step is to open the Hyper-V Manager and configure the hypervisor as a HTTPS replica server. Right-click the server you want to be a replica server and choose Hyper-V Settings; or you can use the Actions pane.
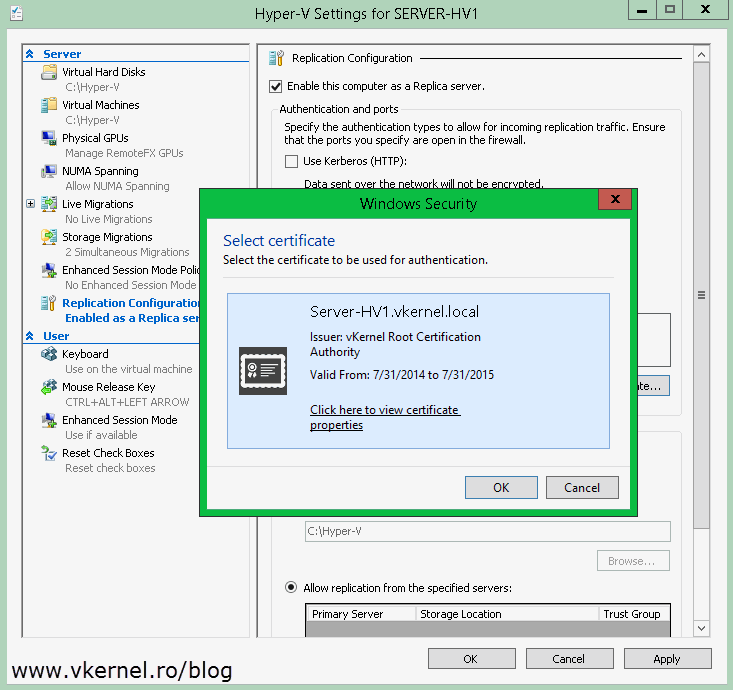
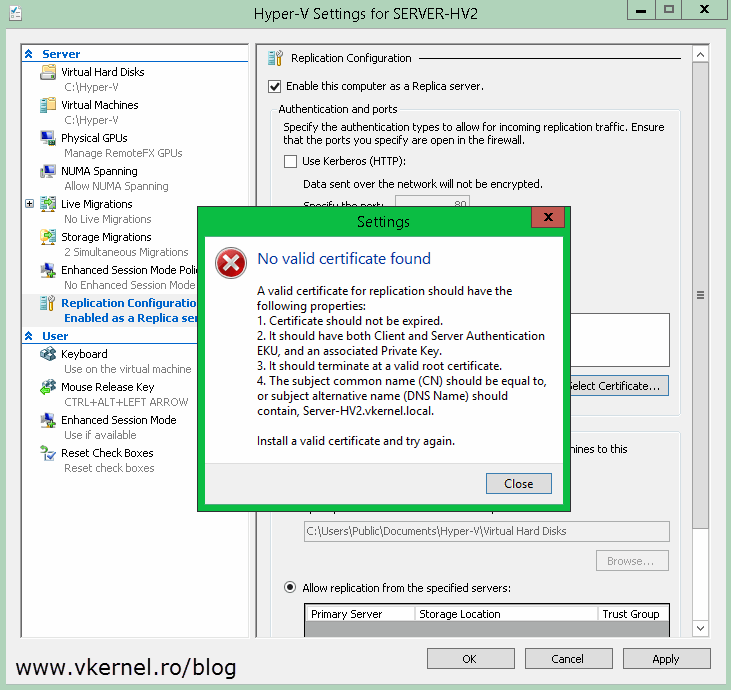
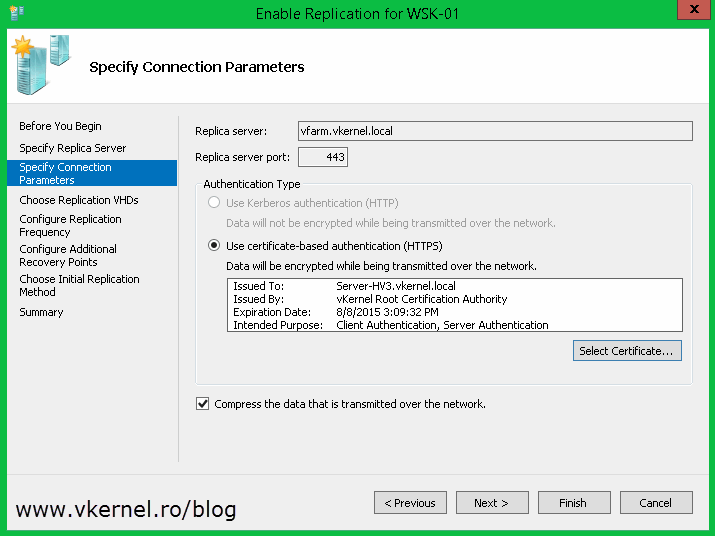
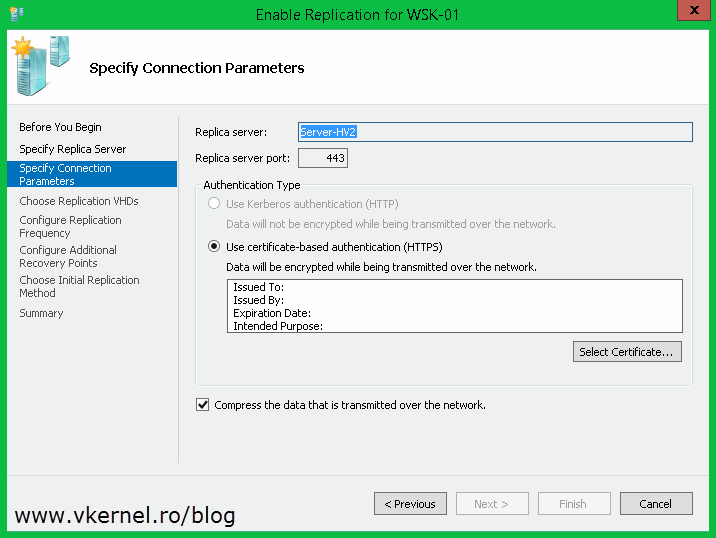
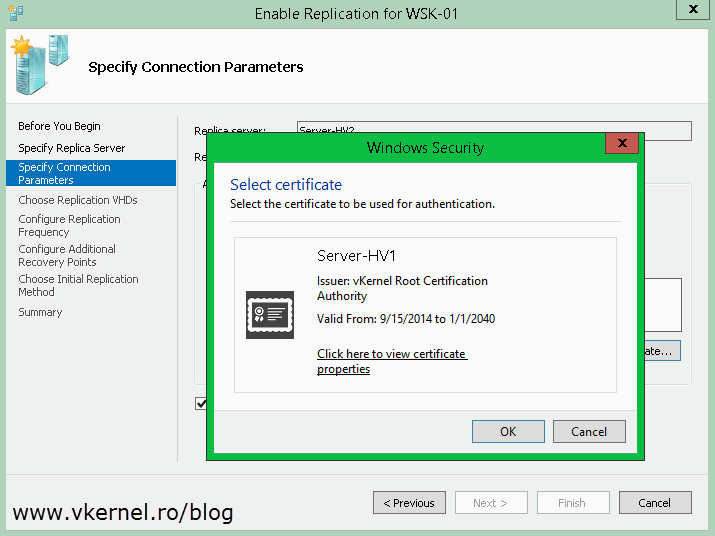
Once the Hyper-V Settings window opens, go to the Replication Configuration section and check the box Enable this computer as a Replica server. Now since we want to secure the replication traffic, we need to enable the Use certificate-based authentication (HTTPS) box. After this, click the Select Certificate button. As soon as you click it, another window with the available and compatible certificates is presented. In our case we have just one certificate. Select it then click OK.
If for some reason there is no certificate available, the certificate is incompatible or the certificate chain in not complete, you will get the bellow error message window:
No valid certificate found. A valid certificate for replication should have the following properties: “…”. Install a valid certificate and try again.
On the Authorization and storage section choose where you want to store the VMs that are replicating to this host and from where it should accept the connections. Click OK when done. You immediate get the following message:
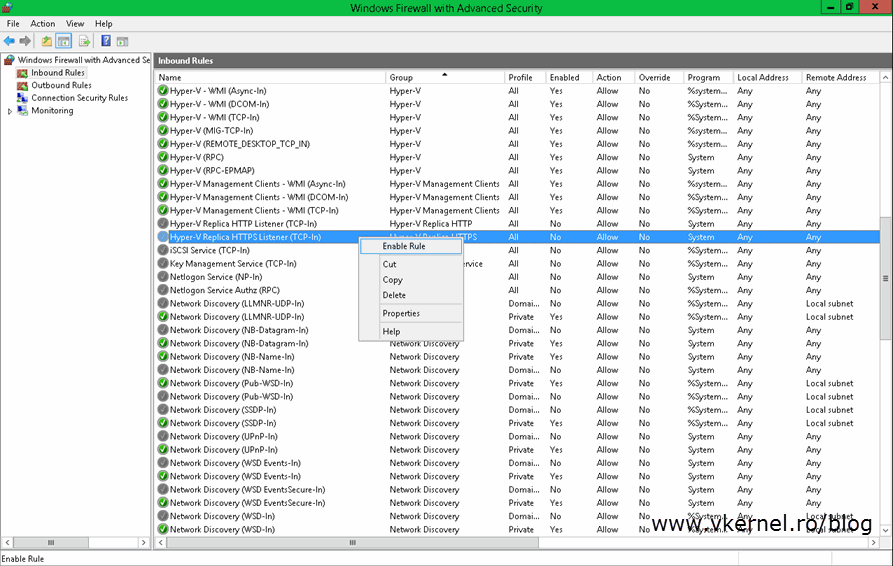
Ensure the inbound TCP exception for port ‘443’ is enabled in the firewall. If you are using Windows Firewall , enable “Hyper-V Replica HTTPS Listener (TCP-In)” rule.

What actually is saying is that port 443 has to be opened on this server in order for the replication to work. If you don’t use Windows Firewall as a security measure you will need to configure this port on the product you are using. If that’s not the case, just open Windows Firewall with Advance Security, click Inbound Rules then right-click and enable Hyper-V Replica HTTPS Listener (TCP-In).
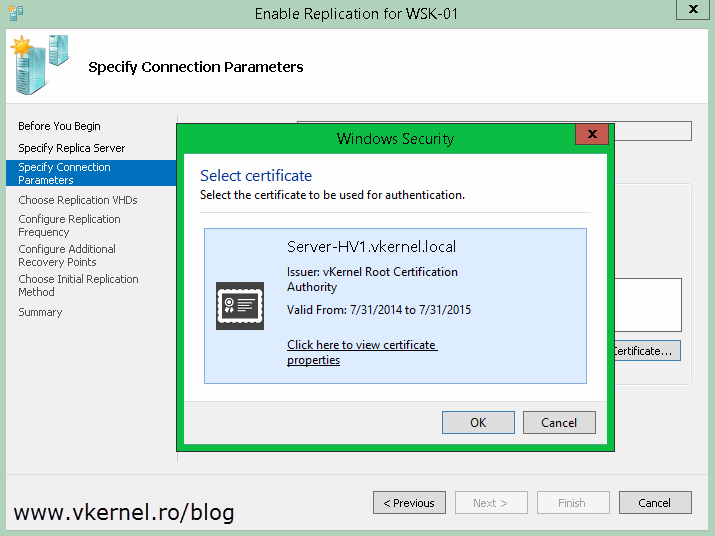
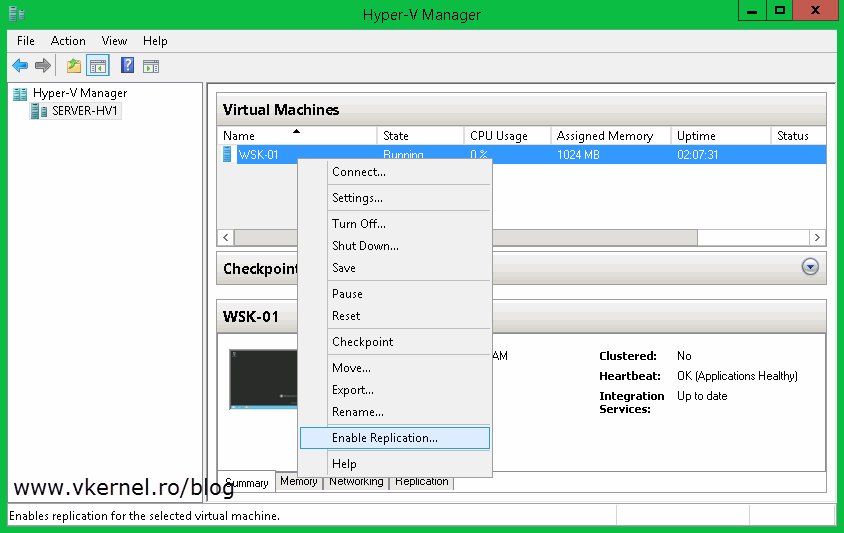
Now let’s enable replication for a VM. When you do this for the first time, you will have to select a certificate during the wizard. This is done by clicking the Select Certificate button. After this continue the wizard and choose the options that best suit your needs. For more information about enabling replication on a VM read this guide.

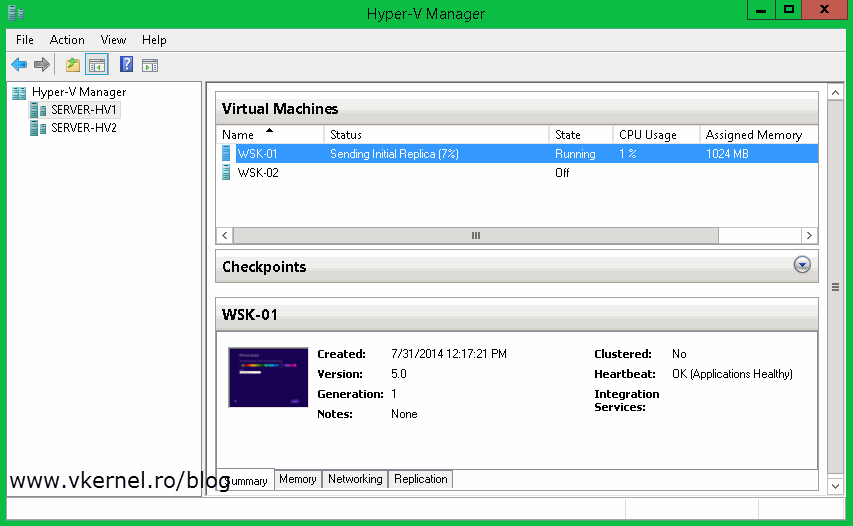
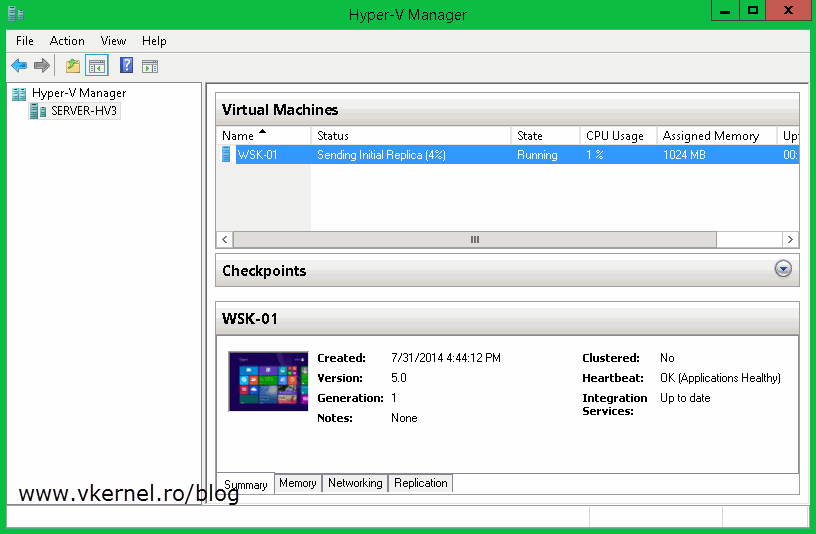
Once you click Finish the VM starts replicating to the specified replica server.
And looks like is working like a charm, and without loosing any more time I will jump to the next HTTPS Replica example, and that’s
Configure Hyper-V Certificate-Based Authentication (HTTPS) Replica in a clustered environment
Again, we are going to use our AD Certificate Services to issue the required certificates. Now, for the cluster, the certificate needs to have the FQDN of the Replica Broker name in the Common Name field or in the Subject Alternative Name field. Don’t worry, I’ll go trough this and show you how to issue the certificate as we move forward, but first you have to request a computer certificate for all your Hyper-V servers that are participating in replication. I already talked about how to request computer certificates in the section above, so in case you skipped it, click here to see how it’s done; and again if you want to automate the certificate enrollment using group policy read this guide. For this I’m going to use a Hyper-V host joined to the domain that will replicate VMs to a Windows 2012 Hyper-V cluster.
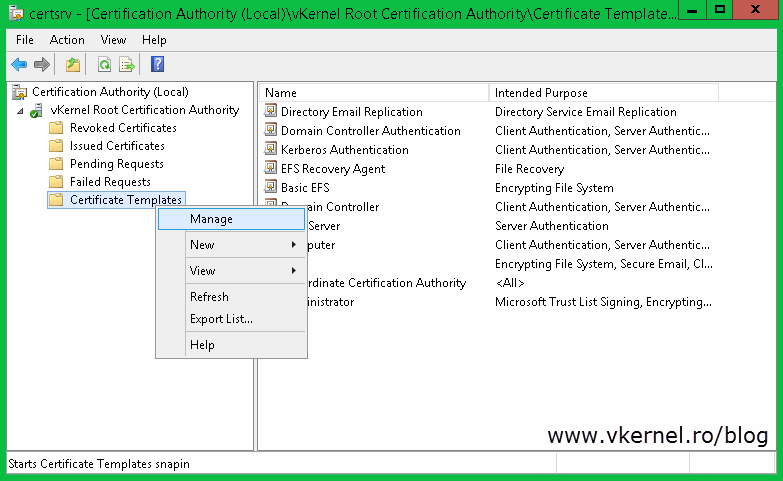
Before we can issue a certificate for the Replica Broker we need to create a new certificate template on our AD CS. This is because the actual Computer certificate template takes the information from AD (the name of the computer), and it will issue the certificate with the Hyper-V host name in the Common Name of the certificate. This is not good, we need to have the Replica Broker name in that field. Log in to your AD CS server, open the Certification Authority management console, right-click Certificate Templates and choose Manage.
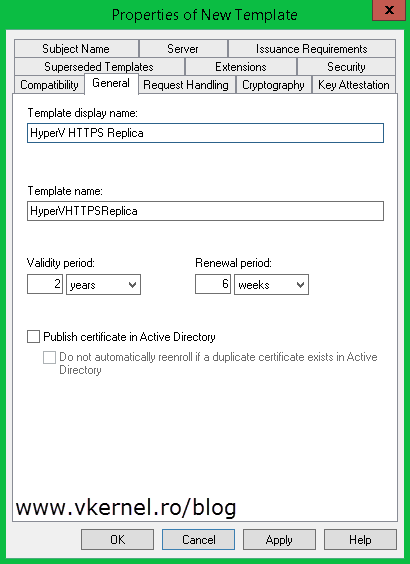
Find the Computer template, right-click it and choose Duplicate Template. Once the template properties window opens, click the General tab and in the Template display name field type a name for this template. Still here, you can increase the validity period so you don’t have to renew the certificate every year. I increased mine to two years, but I’ll leave this up to you.
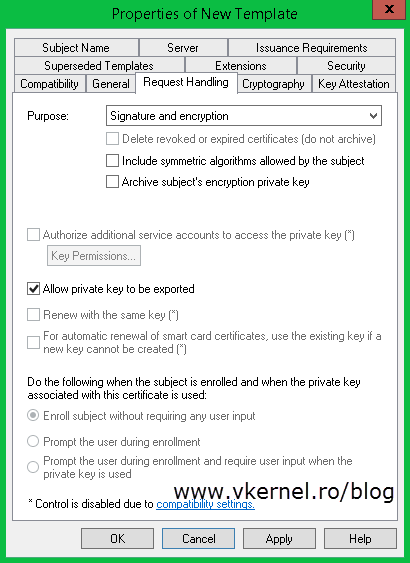
Click the Request Handling tab and check the Allow private key to be exported box. This is so we can export the certificate with it’s private key, later on.
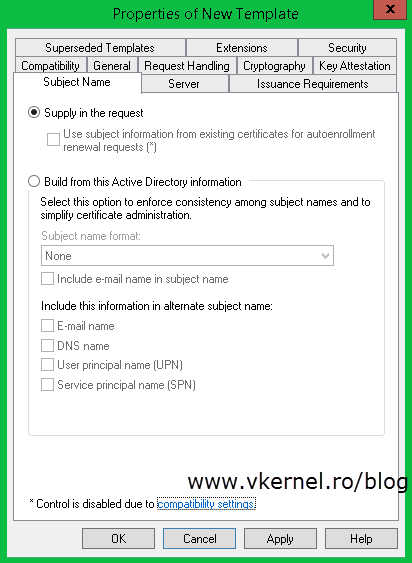
The most important tab here for us is the Subject Name tab. As you can see, and as I told you, the information in the certificate using the Computer template is build from AD. To change that just click the Supply in the request radio button, and OK on the warning message. Don’t worry about that message because you can secure the template ( Security tab ) so only specific users can use it to request certificates, but I am not going to worry about this right now. Click OK when done.
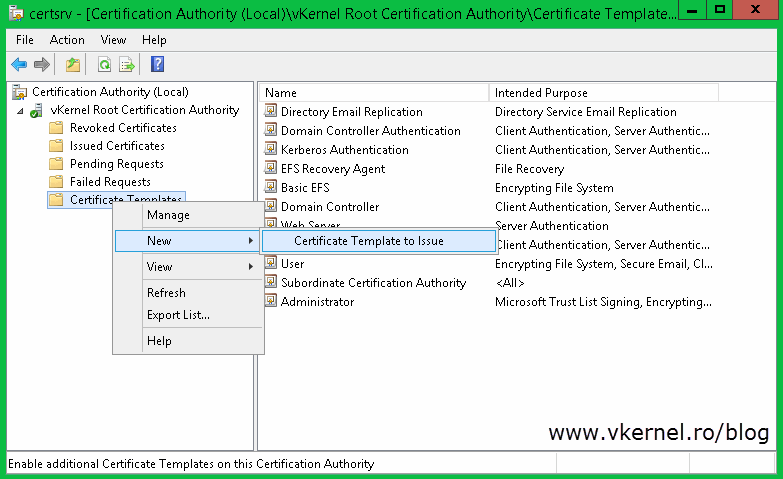
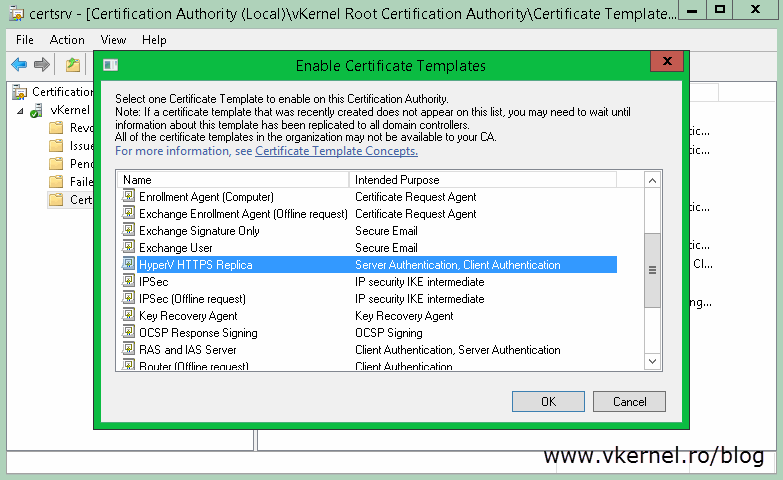
Go back to your Certification Authority console right-click the Certificate Templates folder again and choose New > Certificate Template to Issue. Search the template you just created, select it and hit OK.
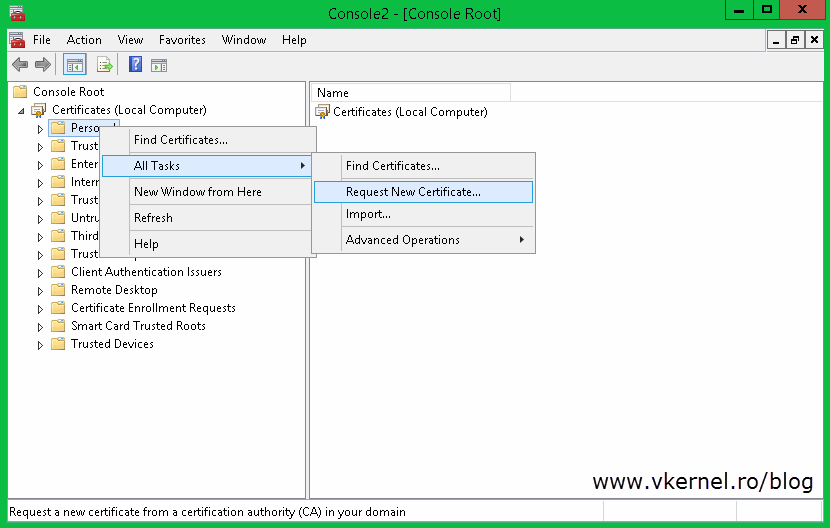
Now we need to request a certificate for the Replica Broker role using the new template, so log in to one of your cluster nodes, open the Certificates store console (Start > Run > mmc) and choose Computer account > Local computer. Right-click the personal folder and choose All Tasks > Request New Certificate.
On the wizard that opens, accept the defaults until you reach the Request Certificates page. As you can see, you now have a new template in the list, but this new template needs more information before the CA can issue a certificate from it. Click the link bellow the template to open its properties.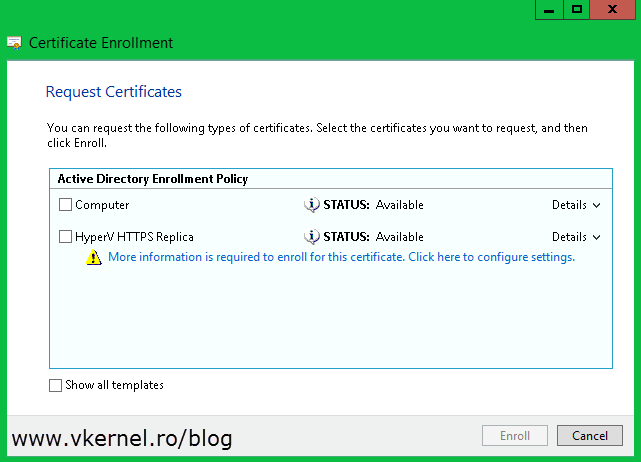
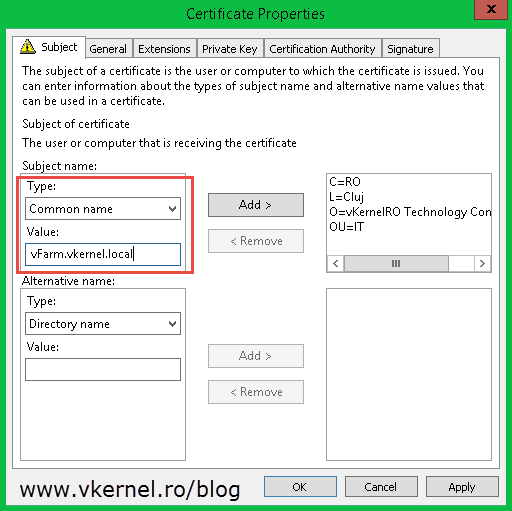
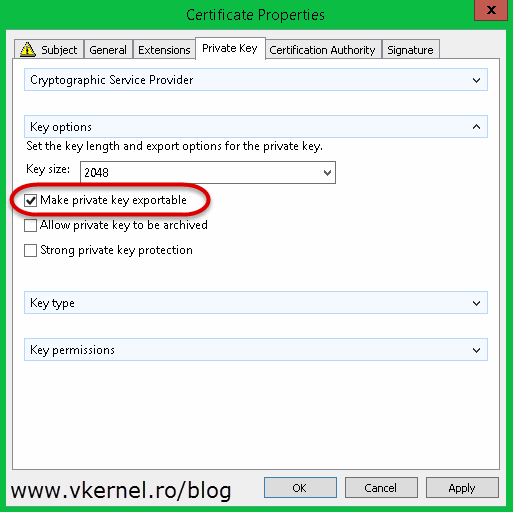
On the Subject tab, the most important setting to configure is the common name of the certificate. From the Type box choose Common Name and in the Value box type the FQDN of your Replica Broker role. Hit the Add button when you are done. Before you click OK, verify that the private key is exportable. You can check this from the Private Key tab > Key options. This is so you don’t have to request a certificate with the same name on all your cluster nodes, it is way easier to just export it once and import it on the rest of the servers. Click OK
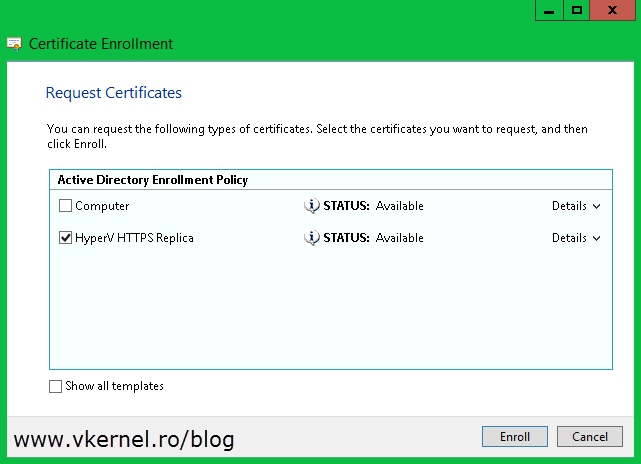
and Enroll.
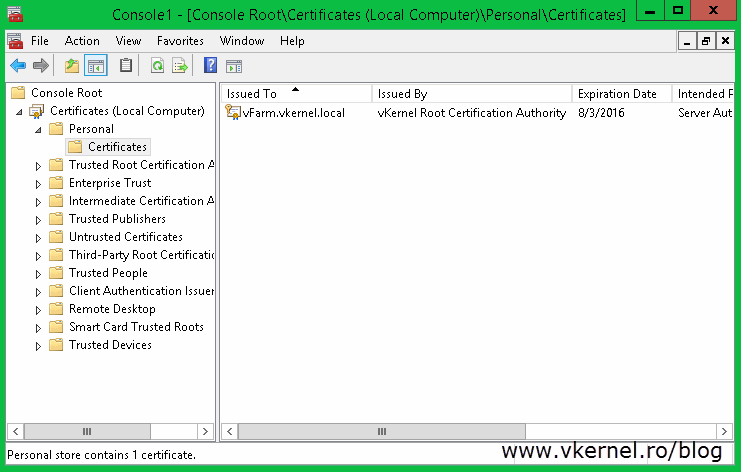
Once you click Finish on the wizard a new certificate with its private key appears in the console. By now you should have two certificates on this Hyper-V host, one that has the name of the machine in the common name field and the other one with the common name of your Replica Broker role.
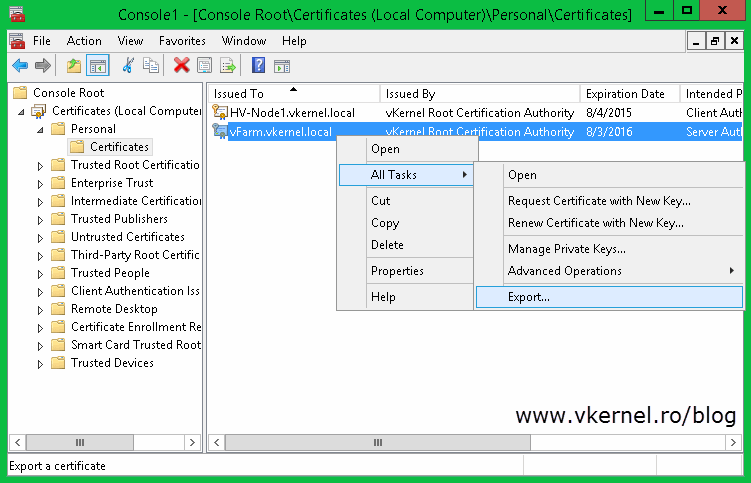
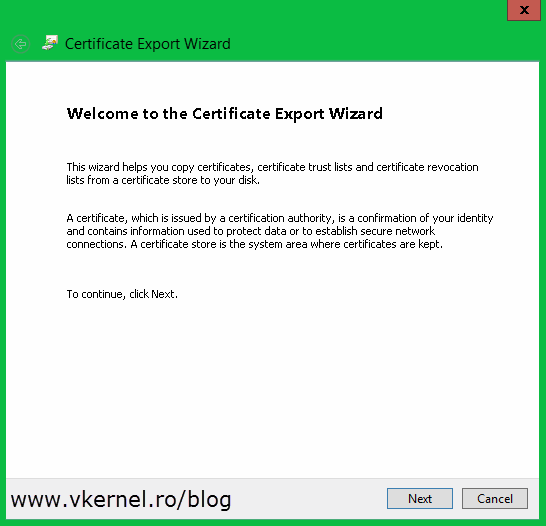
The next step is to export this certificate with its private key and import it on all the cluster nodes. Right-click the certificate and choose All Tasks > Export.
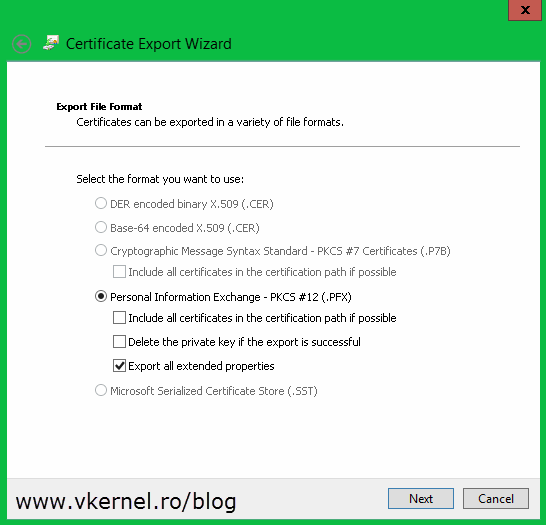
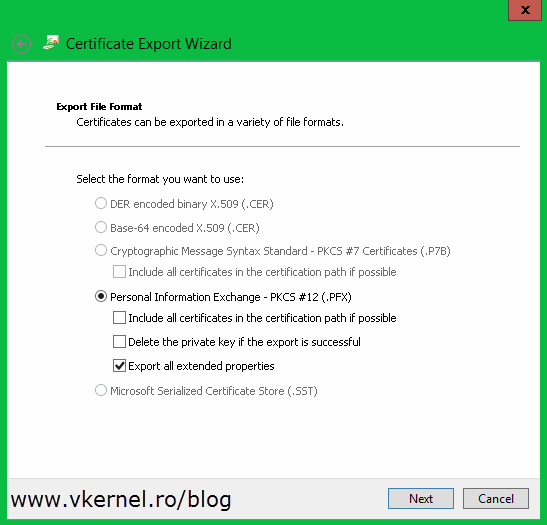
Once you get to the Export Private Key page make sure you choose the first option Yes, export the private key.

On the next page of the wizard check the Export all extended properties box.
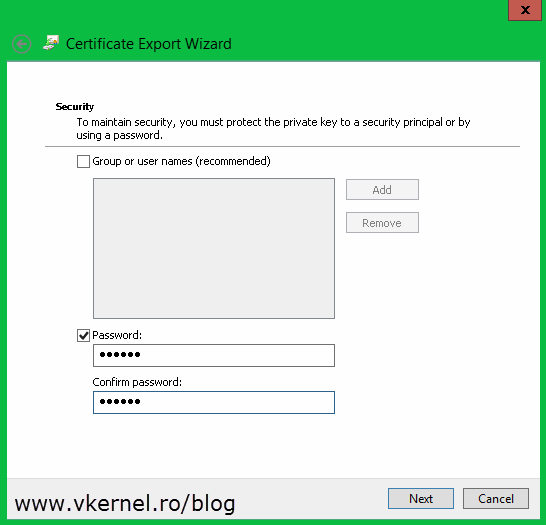
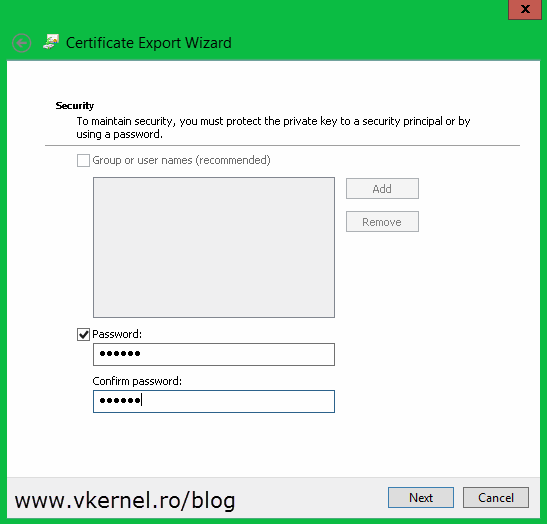
Type a password for the certificate and click Next. Make sure you remember this password because it’s needed on the import process later on.
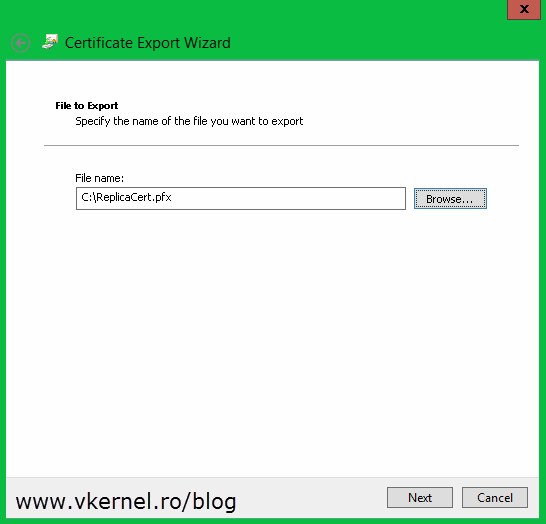
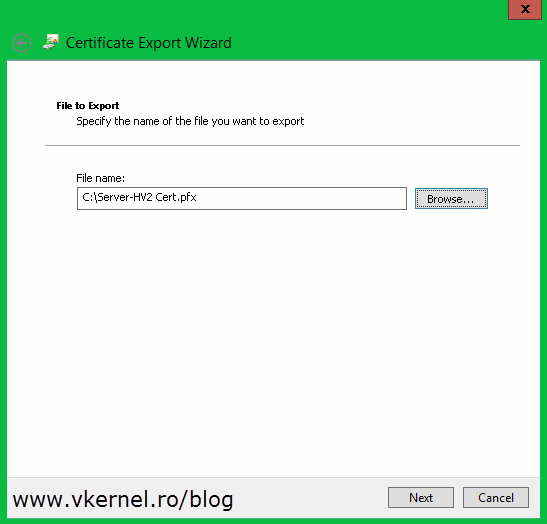
Click Browse and choose where to store the certificate, then continue the wizard.
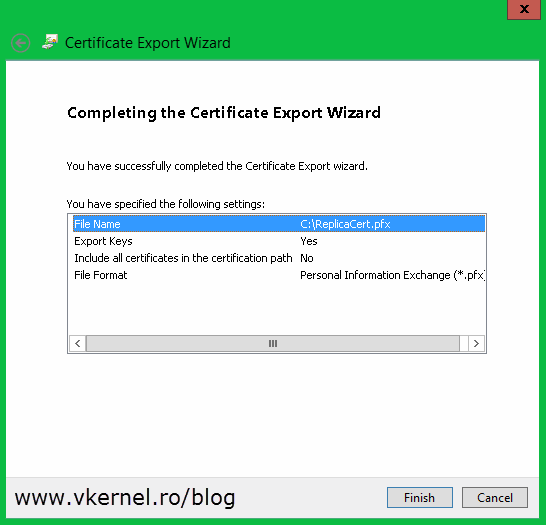
Once you click the Finish button, you should get a message that the export was successful.

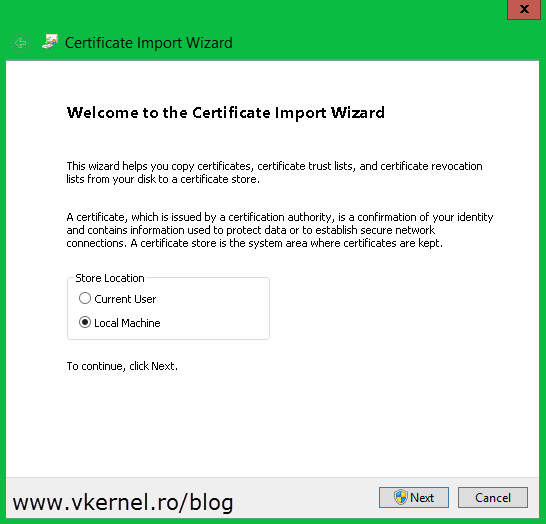
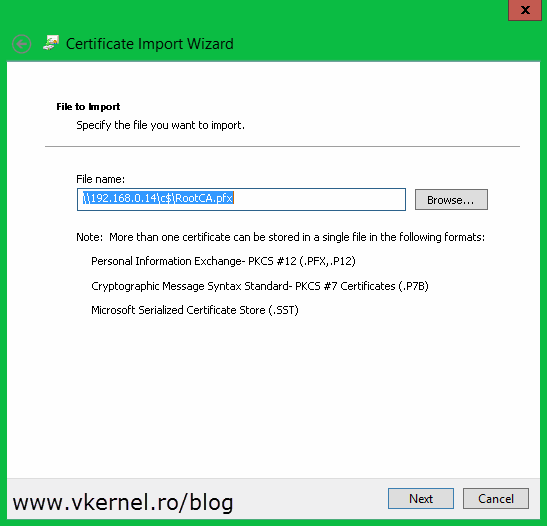
Now go and import the certificate to your other Hyper-V servers that are part of the cluster. The easiest way is to just double-click the certificate and follow the Certificate Import Wizard. On the first screen select Local Machine.
Click Browse and provide the certificate. I had the certificate on another server and used and UNC path to import it, so don’t get scared about what you see in that box.

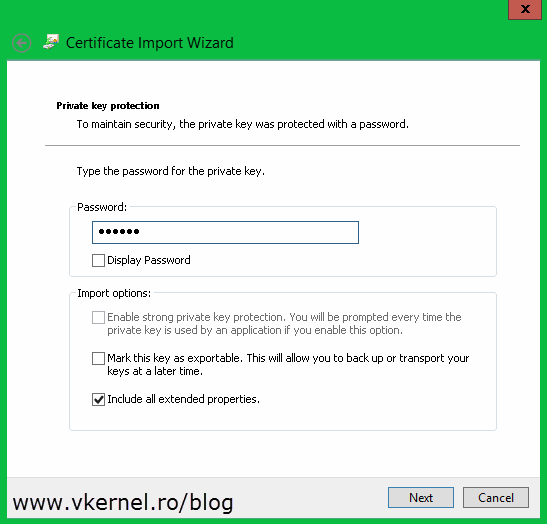
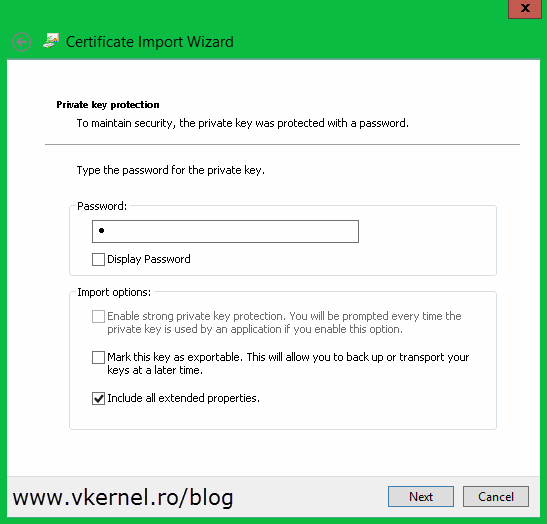
Here is the part where you need that password that you typed during the export wizard. Put in the password and click Next. As you can see you also have the option to mark the certificate private key as exportable. In my opinion, if you already have the certificate and its private key somewhere safe, you don’t have to go with this option, but it is up to you.
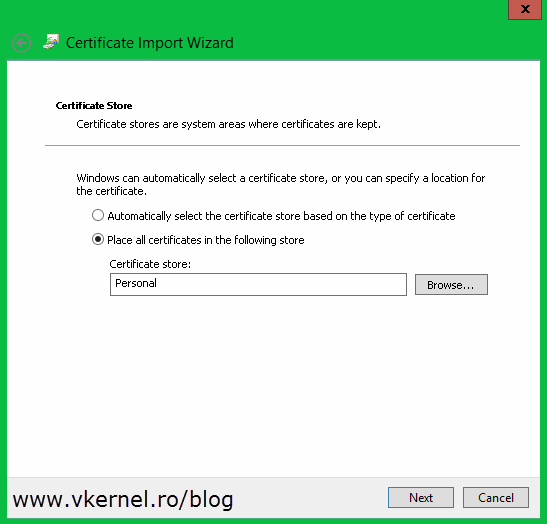
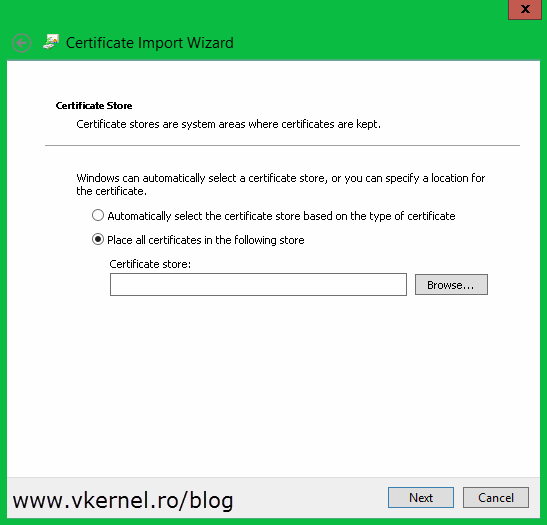
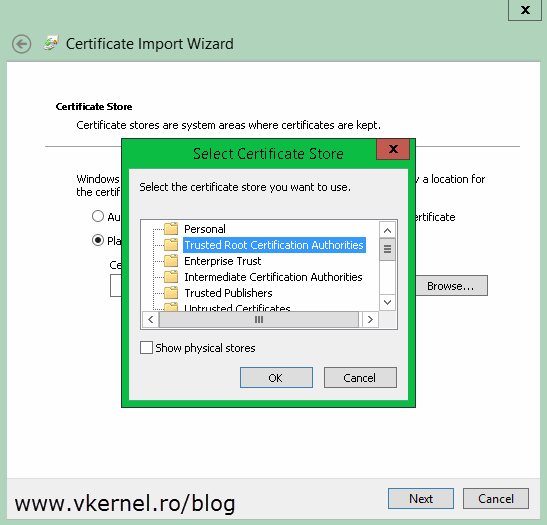
Do not let the wizard to automatically select the certificate store, instead go with the second option, Place all certificates in the following store. Click Browse and choose Personal.

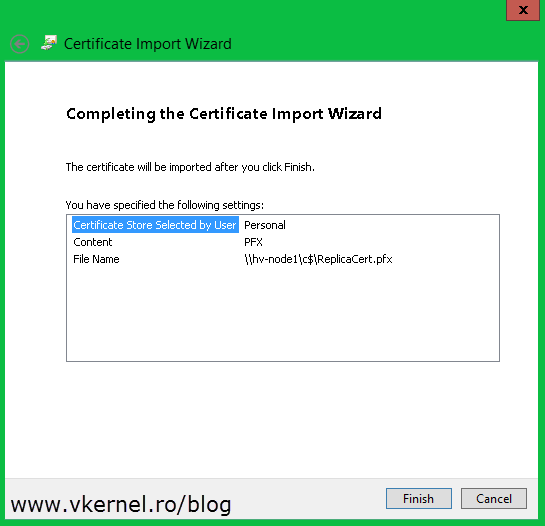
Click Finish. You should get a message that the import was successful. Repeat this for all the remaining nodes in the cluster.
Right now certificates are in place, every Hyper-V server has a computer certificate and the cluster nodes also have the Replica Broker certificate. If only one of the two certificates is missing from one of the cluster nodes, you will get the following error message:
In addition to the certificate for Hyper-V Replica Broker, each node of the cluster must also have a valid certificate with following properties: “…” Each node of the cluster must also have a computer authentication certificate that can be validated to the same root certificate as the certificate for Hyper-V Replica Broker.
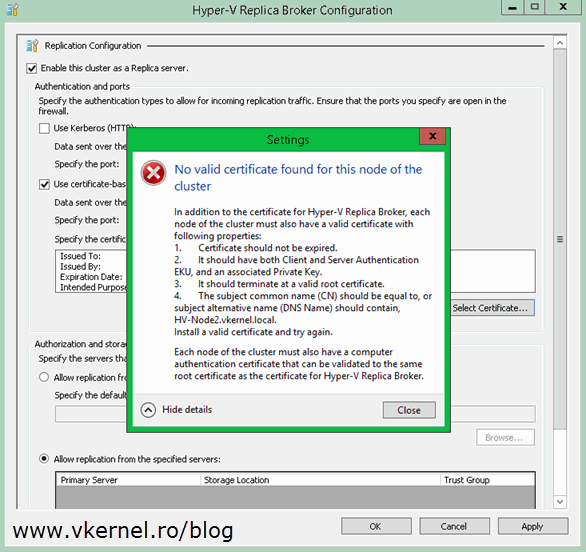
I got this because one of my nodes was missing the computer certificate. It only had the certificate for the Hyper-V Replica Broker; so make sure you have all the certificates in place.
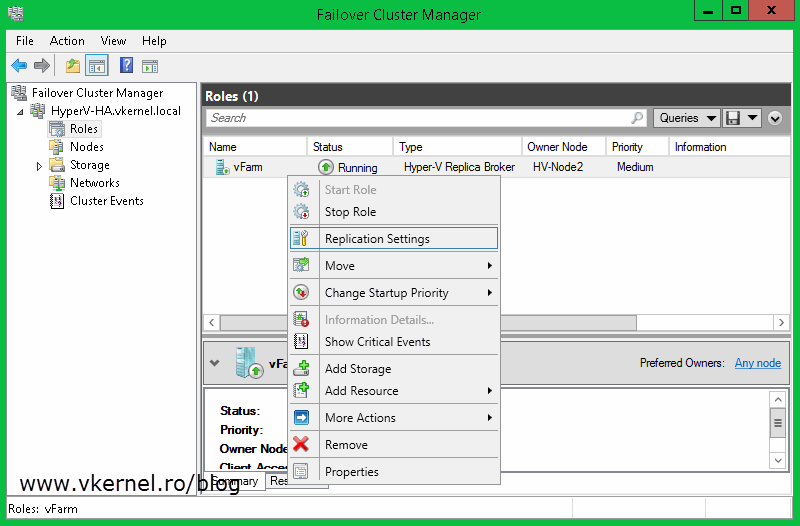
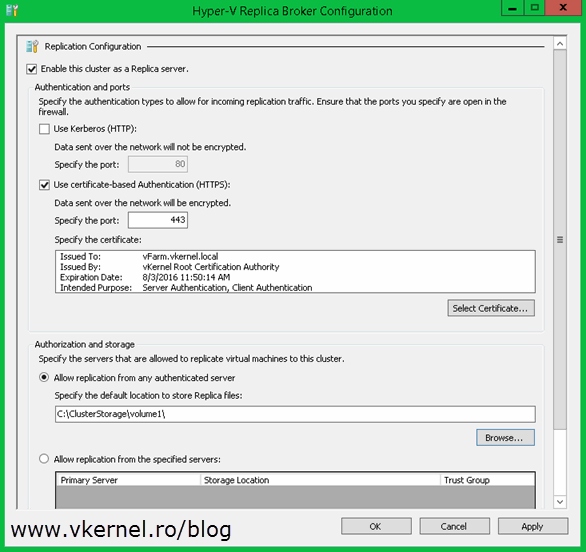
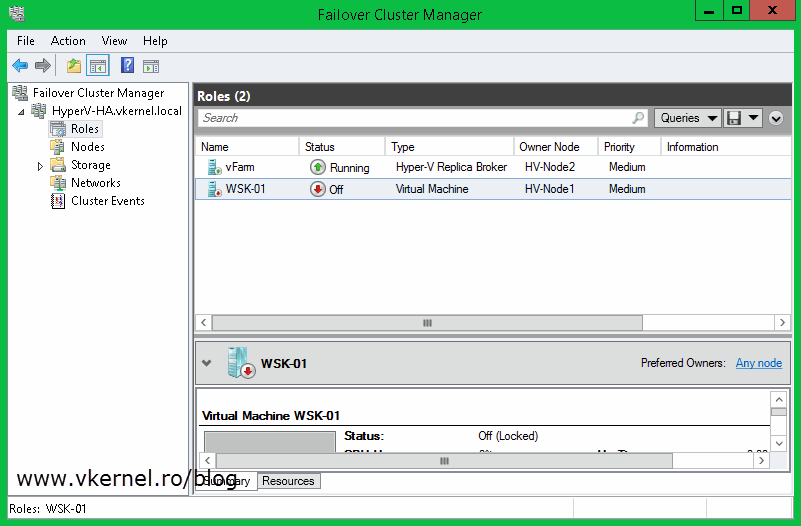
Now let’s go and configure the Hyper-V cluster as a replica server. From one of the nodes open the Failover Cluster Manager console, go to Roles, right-click the Replica Broker role and choose Replication Settings.
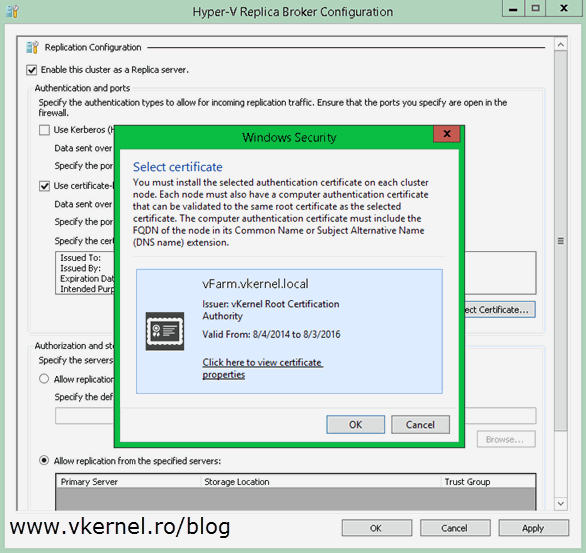
If you followed this guide from the begging you should already be familiar with this view. Check the box Enable this cluster as a Replica server then Use certificate-based Authentication (HTTPS). Now click the Select Certificate button, select the certificate and click OK, then choose where to store the replica VMs and OK again. Don’t forget to open port 443 if the servers are protected by a firewall.
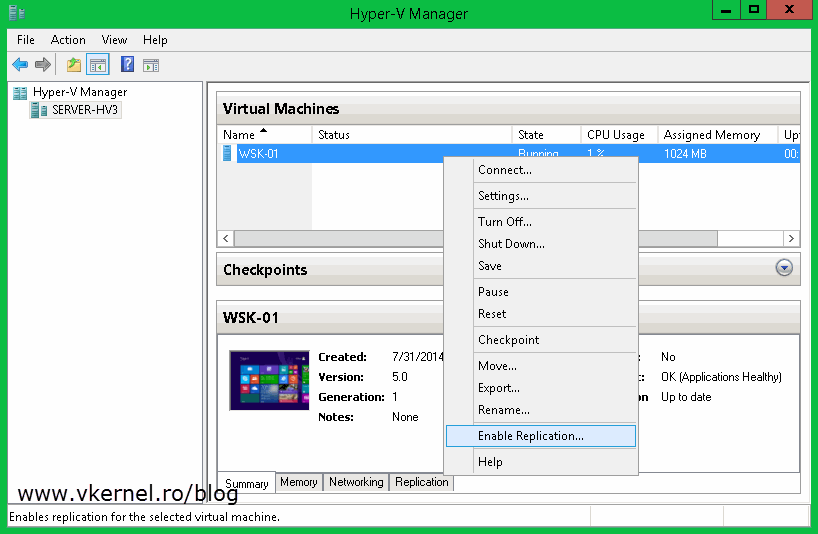
To test this, move to the stand-alone Hyper-V server, right-click on one of the VMs and choose Enable Replication.
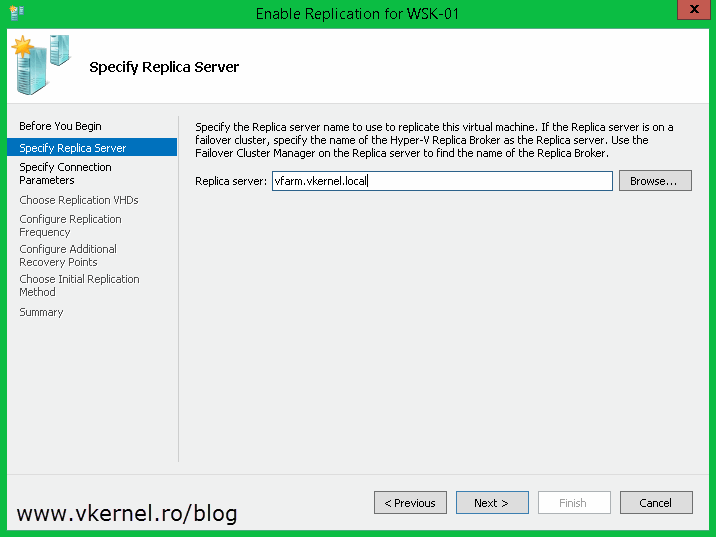
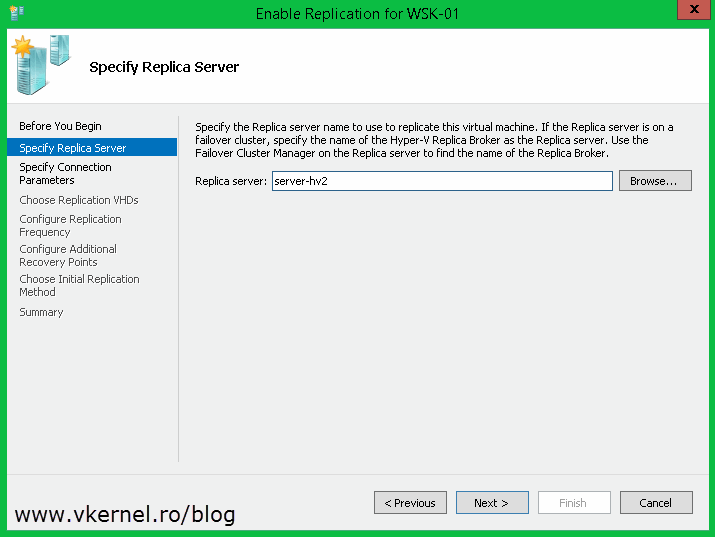
On the Specify Replica Server page you need to type the Hyper-V Replica Broker FQDN, NOT the name of one of the nodes in the cluster. To be more specific, the name you type here needs to correspond to the name from the Replica Broker certificate.
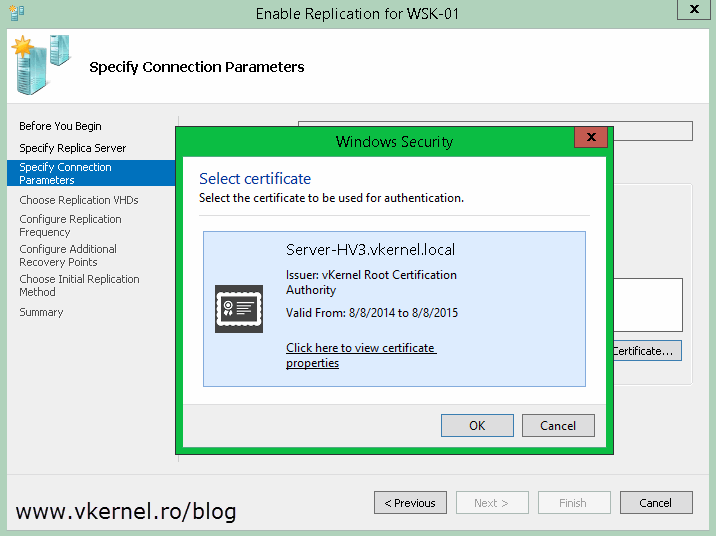
Click the Select Certificate button and choose your certificate.
Follow the wizard and configure your own settings. Once you click Finish the VM will start to replicate.
And the replication is working great. Now before I move forward to the last section of this article I want to mention that you can also issue SAN certificates and wildcard certificates to configure the HTTPS replication. It is up to you, and the company needs.
Configure Hyper-V Certificate-Based Authentication (HTTPS) Replica in a workgroup environment
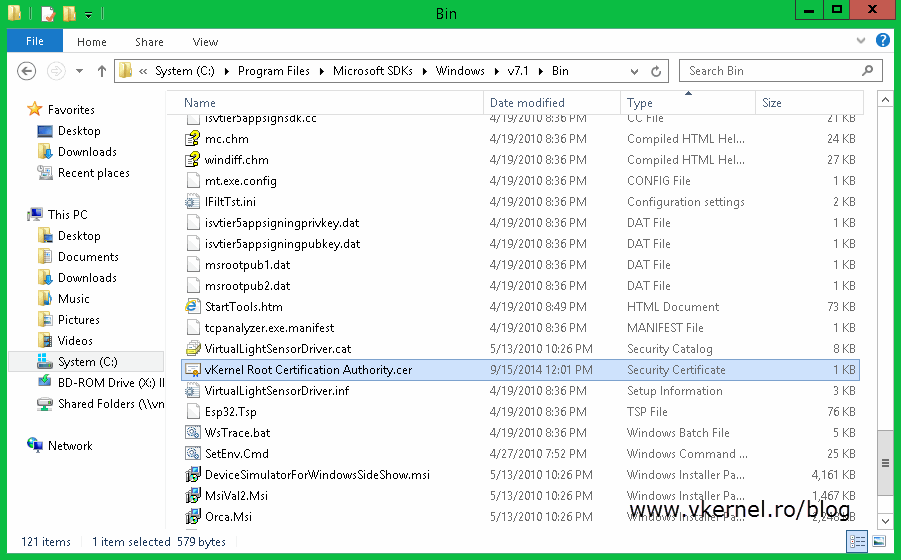
Doing this in a workgroup environment involves more work if you don’t want to buy the certificates from a commercial CA and go with a free solution. You don’t have an internal Enterprise CA anymore either; you could, but I presume your Hyper-V servers are in a workgroup environment because the business is not mature enough for a domain. Now we will have to create a root CA certificate and import it into the certificates store on every Hyper-V server, then issues the computer certificates and import those also. For this I will use a free tool called Makecert.exe, which is a command line tool from Microsoft to issue certificates. After you install the tool you can find it in C:\Program Files\ Microsoft SDKs\Windows\v7.1\Bin. Open an elevated command prompt to this path and issue the following command to create our root authority certificate (replace the name of the certificate in the command line with your own):
makecert -pe -n "CN=vKernel Root Certification Authority" -ss root -sr LocalMachine -sky signature -r
"vKernel Root Certification Authority.cer"
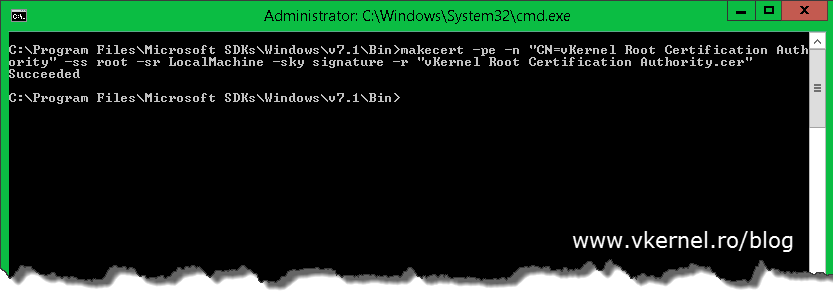
The command also installs the certificate in the root store of the local machine and saves it as a local file in the folder where Makecert.exe is located (C:\Program Files\ Microsoft SDKs\Windows\v7.1\Bin.)
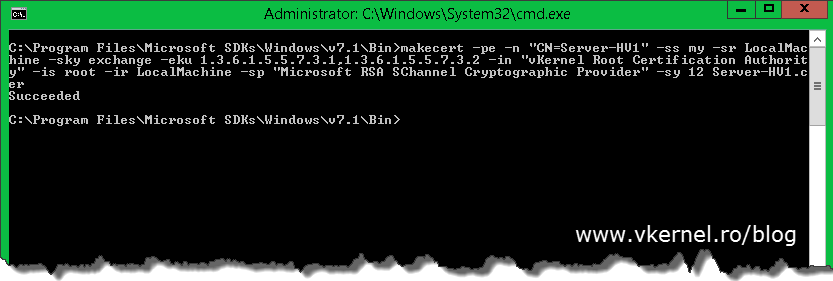
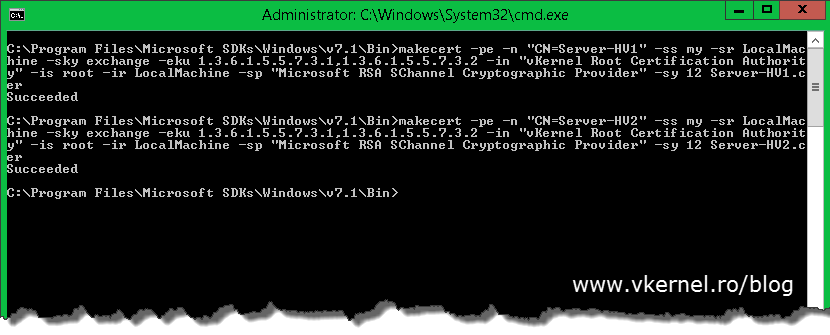
The next step is to create our certificates for our Hyper-V hosts. As before, the command also installs the certificate in the Personal store of the local machine and is saved locally as a file. The certificate can be used for both Client and Server authentication. Use the following command to create our first computer certificate:
Replace vKernel Root Certification Authority with the name of your root certificate and Server-HV1 with the name of your Hyper-V host. In case you added a name suffix to your infrastructure you will need to type the FQDN after the CN.
makecert -pe -n "CN=Server-HV1" -ss my -sr LocalMachine -sky exchange -eku
1.3.6.1.5.5.7.3.1,1.3.6.1.5.5.7.3.2 -in "vKernel Root Certification Authority"
-is root -ir LocalMachine -sp "Microsoft RSA SChannel Cryptographic Provider"
-sy 12 Server-HV1.cer
Run the following command a couple of times to issue certificates to all of your Hyper-V hosts.
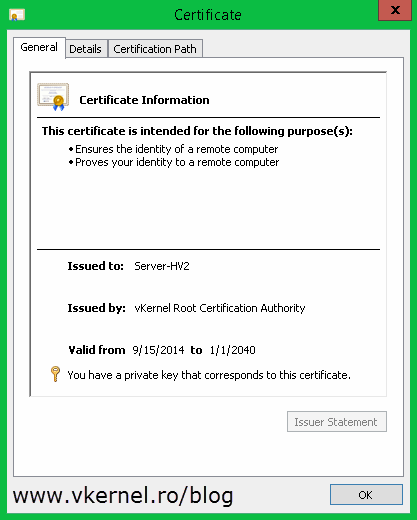
By now all the hosts certificates should be installed in the Personal machine folder store on the Hyper-V host where you used the Makecert.exe command.
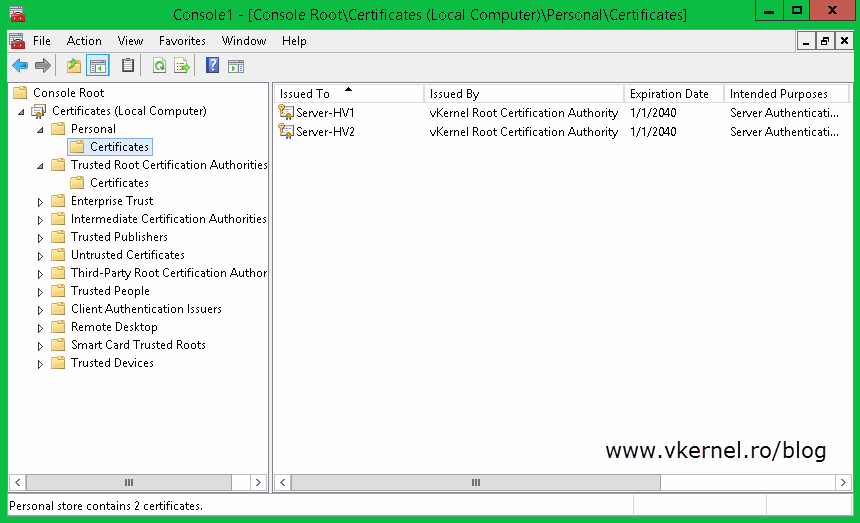
Also if you open a certificate it should have a private key, and the certificate chain should be OK.
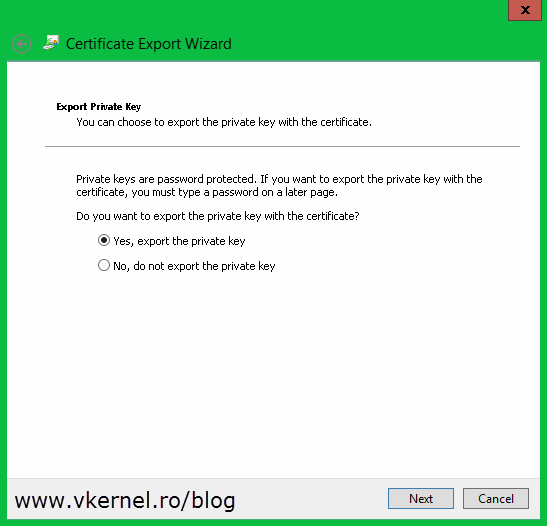
The next step is to export the certificate(s) from this certificate store and import them on the right hosts. Right click one of the certificates, choose All Tasks > Export. The Certificate Export Wizard should open, and once you get to the Export Private Key page select the first option, Yes, export the private key and click Next.
Here check the box Export all extended properties and continue the wizard.
Type the password for the certificate then on the File to Export page provide the path where to save the certificate. Finish the wizard.
Repeat this step for the rest of the certificates. When done with the computer certificates go to the Trusted Root Certification Authorities store, find your root certificate and export this to, following the above procedure.
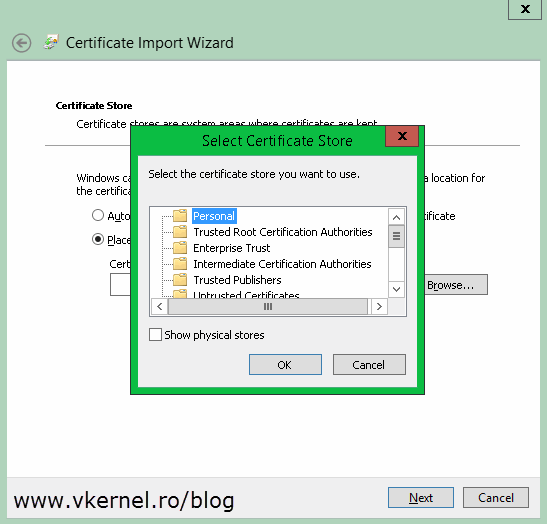
Now that we have all the certificates exported we need to put them on the right host(s) in the right place. Let’s start with the root certificate. Copy this one on every Hyper-V host then open it. The Certificate Import Wizard will pop-up. On the Welcome page of the wizard select Local Machine and click Next.

Continue the wizard by providing the necessary information.
When you get to the Certificate Store page choose the second option Place all certificates in the following store then hit the Browse button.
Select Trusted Root Certification Authorities and click OK then Next to import the certificate.
Repeat this on every one of your Hyper-V servers. Once you’re done, move on by importing the computer certificates on their specific hosts. Let’s say you have a certificate with a Common Name field of Server-HV2; you will have to import this certificate on the Hyper-V server with the same name (Server-HV2). Follow the above procedure to import the certificate, but once you get to the Select Certificate Store window, make sure you select the Personal folder this time.
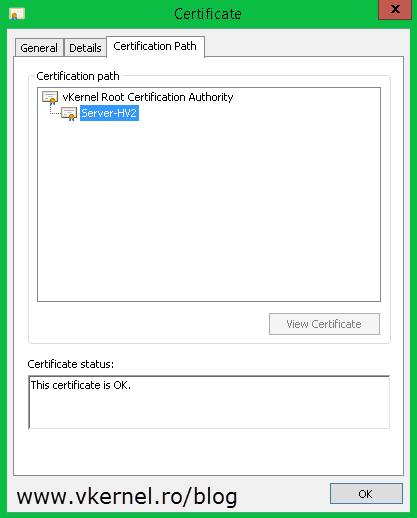
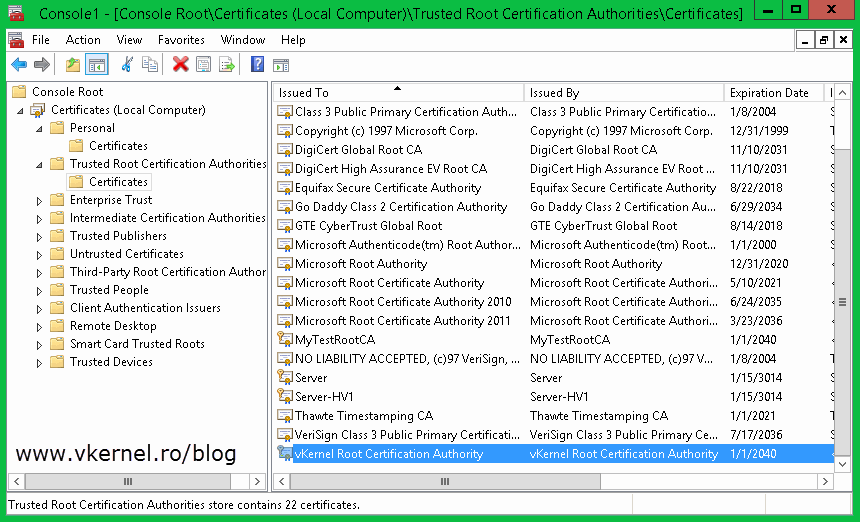
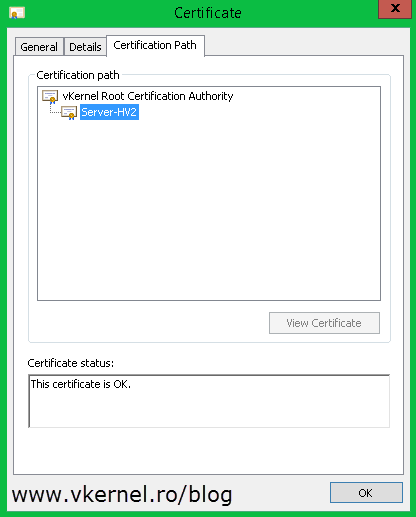
Now if you look in the certificates store on one of your Hyper-V hosts you should see the root certificate and the computer certificate imported.
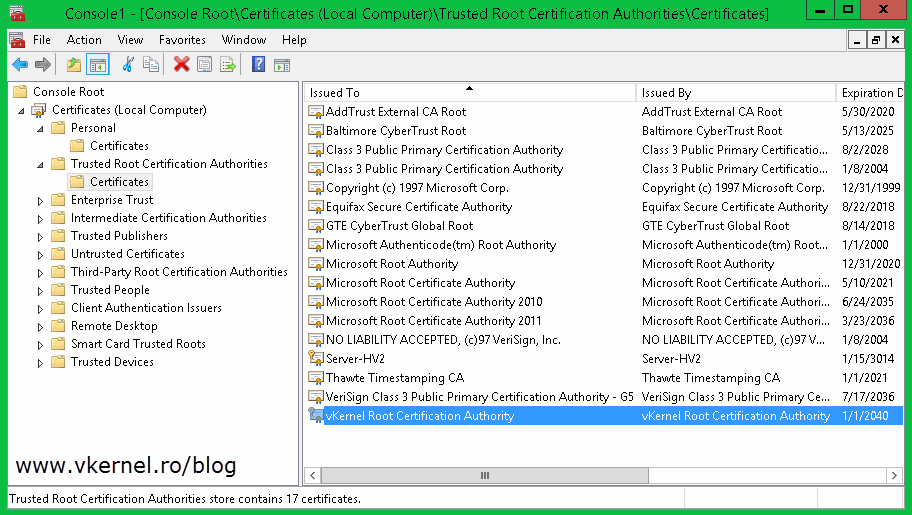

Also, the certificate has its private key and the chain looks good with no problem whatsoever.
You might think that we are done, but there is still one thing left to do before we start configuring the Replica server, and that’s the CRL (Certificate Revocation List) checking. You know that every browser when you go on a secure site checks if the certificate is revoked or not by downloading the CRL. Hyper-V does that too, but since we used a not so advanced tool to create our certification authority, our certificates don’t have the CRL field; and by Hyper-V not being able to check for the certificate CRL will trow an error when you try to enable it as an HTTPS Replica server:
Failed to modify service settings. Failed to validate certificate in Personal certificate store of local computer. Failed to modify service settings. Could not validate certificate with thumbprint ‘…’ in the Personal certificate store of local computer. Error: The revocation function was unable to check revocation for the certificate. (0x80092012).
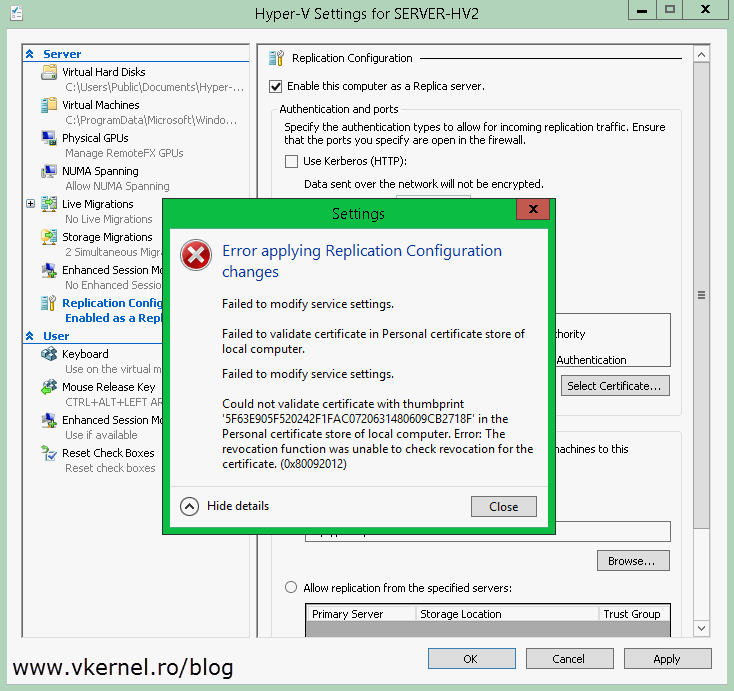
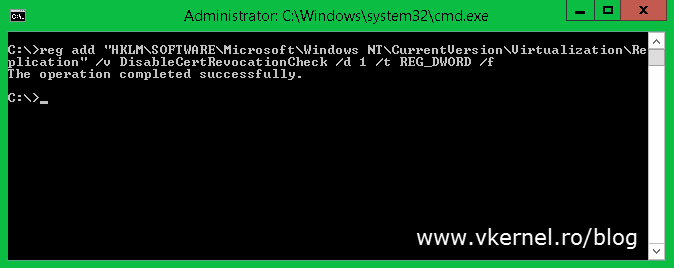
To pass this, you either use commercial CA certificates or implement an Enterprise Internal CA with an OCSP Responder. Those two are valid, but remember, you are in a workgroup environment and a small business, and you can’t afford a domain, there is to much licensing cost involved. The third option is to edit the registry. Run the bellow command to disable the CRL checking on your Hyper-V servers:
reg add "HKLM\SOFTWARE\Microsoft\Windows NT\CurrentVersion\Virtualization\Replication" /v
DisableCertRevocationCheck /d 1 /t REG_DWORD /f
Now we can go ahead and configure a Replica server. From the Hyper-V Manager console, right-click the server and choose Hyper-V Settings.
On the Replication Configuration setting check the box Enable this computer as a Replica server then enable the HTTPS authentication from the Use certificate-base Authentication (HTTPS) box. Hit the Select Certificate button and select your certificate. On the Authorization and storage section choose where to put the VMs that are replicating and from which hosts to accept replication. Click OK when done but don’t forget to open port 443 in the host firewall so it can accept replication traffic.


Now from the Hyper-V server where you have your VMs running, right click the one(s) you want to replicate and choose Enable Replication.
On the wizard that just opened, on the Specify Replica Server page, type the server name you configured as a Replica Server.
Here by clicking the Select Certificate button you will be give a list with all the compatible certificates for Hyper-V replication. In our case we have just one. Select the certificate and click OK.
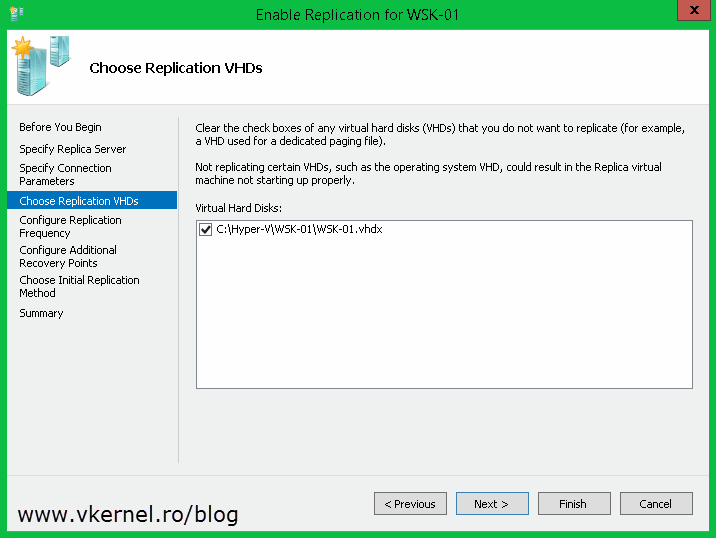
Choose which drives you want to replicate for this VM. As a best practice is better to put the guest pagefile on a separate virtual disk and exclude it from replication to save bandwidth, time and storage.
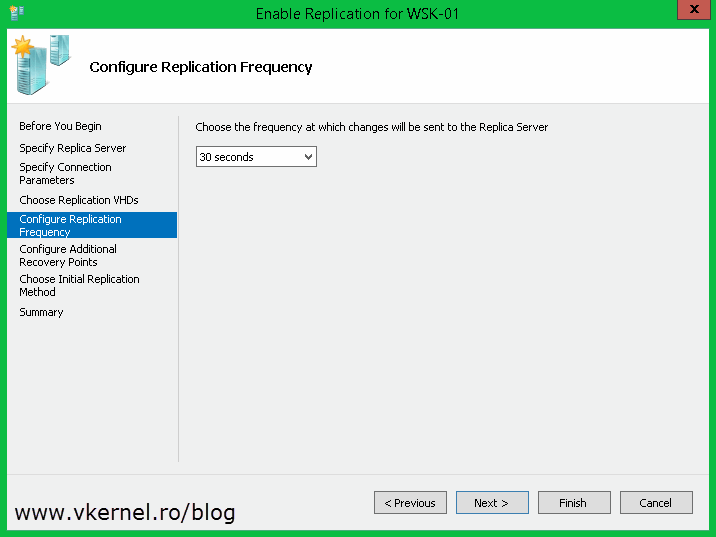
Select the replication interval then how many recovery points you want to have for the VM. 30 seconds is only if you have enough bandwidth to support the replication traffic, if not you should select another one.
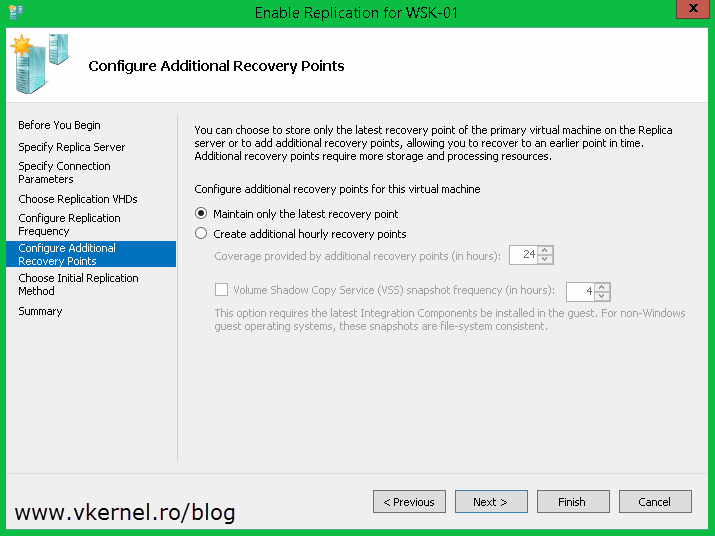
If you don’t want to start the replication right away, you can schedule it for later from the Schedule Initial Replication section. Also you have the option to send the initial replica using an external media. In this example however I will use the default settings.
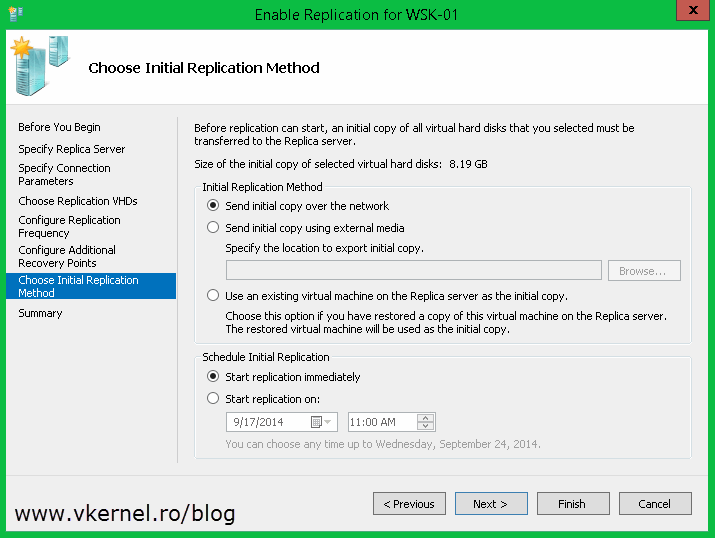
Click Finish to start the replication process.
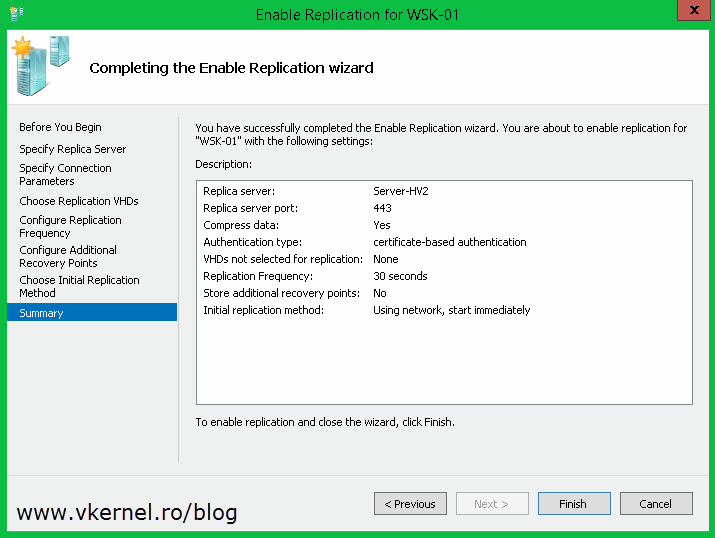
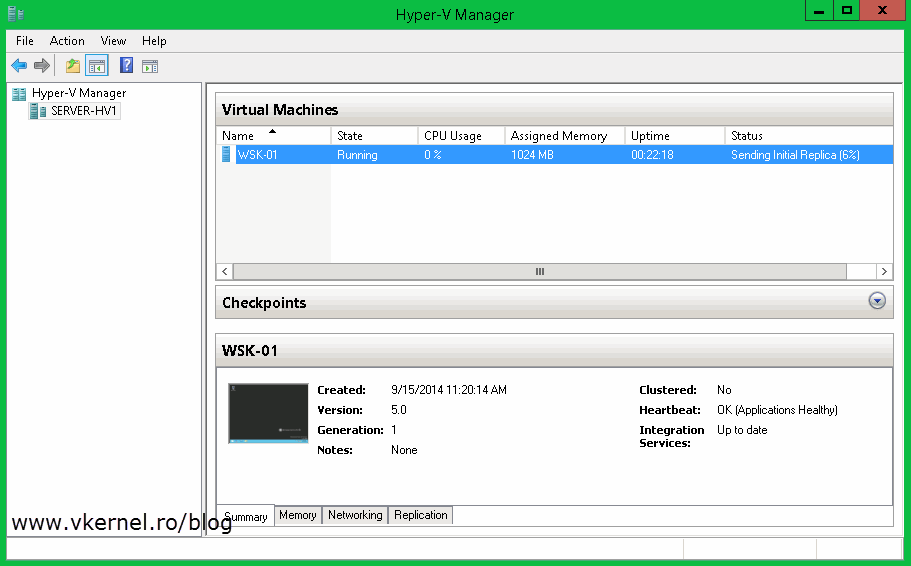
Depending on the size of the VM and how fast your internet connection is (if you are doing replication over WAN) it will take a while, but at the end you should have your VM(s) replicated and in good shape. Now if there is a problem on the VM from the first site, you can just go ahead and failover to the other VM from the second site (replica VM) so users can still do what they were doing.
We’ve come a long way, but at the end everything is working as it should. Now you can have encryption between your Hyper-V servers during replication; and I know it’s a little bit of work on some cases, but you have to choose between costs and difficulty.
Want content like this delivered right to your
email inbox?
More similar articles
 Configure Certification Authority Distinguished Name
- Set Up Automatic Certificate Enrollment (Autoenroll)
- Changing the Directory Services Restore Mode (DSRM) Admin Password
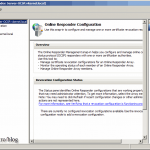
- Installing and configuring a Microsoft Online Certificate Status Protocol (OCSP) Responder
- Deploying and Configuring an Read-Only Domain Controller (RODC)
- Installing an Enterprise Certificate Authority in Windows Server 2012

I still get No Valid Cert Found.
I used new-selfsignedcertificate to create cert. It has private key, EKU server and client, CN/subject is FQDN, and is not expired.
Hi Daniel,
As state before, the certificate needs to be trusted on the machine. Making a certificate valid is more than just having a private key and FQDN.
I will recommend you read my building internal CA articles to familiarize yourself with the cryptography and PKI.
I am still getting No Valid Cert Found message. I used new-selfsignedcertificate to create the cert. The cert has the FQDN as the CN/subject. It has Server and Client EKU. It has private key. And is not expired. My 2016 server is fine. But I have 2 2012 R2 servers that are getting this error. What else can be done to allow server to recognize cert.
Hi Daniel,
If you are using self-signed certificates they will have to be present in all of the Hypervisors, imported in the Trusted Root Certificate Store. Me personally, I don’t like self-signed certificates, not even in the lab. I will recommended you build an internal CA and everything will be much easier and trusted. Off course…then you will have to manage this CA, but everything can be learned.