Install WSUS 3.0 on Windows Server 2008 R2
I’ll start with a little introduction about what WSUS is and what you can you do with it, even if some of you know and heard about WSUS. For those of you that are unclear, WSUS or Windows Server Update Services is an on-site patching mechanism for Windows systems. This means that all clients and servers in your company download updates from this server, and only the WSUS server downloads from Microsoft. As a result you get reports, so you know witch clients and servers are updated in your network or need updates, you can choose and test the updates before approving them for installation, and your internet bandwith consumption is reduced allot. I created a diagram if you are more like a visual person.

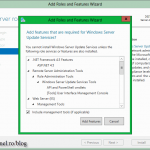
Before we start the installation some prerequisites are needed, in order for WSUS to function.
Microsoft Internet Information Services (IIS) 7.0. Ensure that the following components are enabled:
Windows Authentication
ASP.NET
6.0 Management Compatibility
IIS Metabase Compatibility
Microsoft Report Viewer Redistributable 2008. download here
Microsoft SQL Server™ 2005 Service Pack 1.
For more information you can go here.
You can download WSUS from to this address. At the time of this writing the latest version is 3.0 with SP2.
In this post I will install WSUS using the local database, so SQL Server is not needed in this situation. After the prerequisites installation, we can start installing WSUS, so double click the installation package. On the Welcome screen click Next, since is nothing important here. When you get to the installation mode go with the defaults Full Server installation including administration console.

Accept the License Agreement and click Next.

On the Select Update Source screen provide the path for WSUS to store the updates downloaded from Microsoft. I recommend a separate partition or a different drive. Click Next.

Here if you have an existing SQL Server in your network choose Use an existing database server on a remote computer, if not go with the defaults.

Now we need to choose if our WSUS server is going to run on the Default Web site on port 80, or the wizard should create a different site on port 8530. If you already have a website on this server on port 80, go with the second option. In this example I’m going with the defaults.

At the end of the wizard we have a summary of our configurations, just click Next to start installing WSUS.

The installation is finished but some configuration still needs to be done, so click the Finish button to launch the WSUS configuration wizard. In this wizard we tell WSUS what updates to download, in what language, from where to download those updates and other stuff; just click Next to skip the Welcome screen and the Microsoft Improvement Program.
Now we tell WSUS where to go for updates, and we have two options, from Microsoft or from another WSUS server. Since this is our first WSUS server in the network choose from Microsoft (the default option).

If your connection is trough a proxy server, set the proxy information, else just continue the wizard.

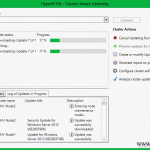
Here click Start Connecting, so your WSUS server downloads some information from Microsoft about what products should be included in WSUS for updates, what languages are available, etc. This is going to take a while, so don’t panic.

The Languages screen give us the option to select in what language the updates should be downloaded. Select your language(s) and click Next.

Now select the products you need updates for and continue the wizard. If you don’t need updates for a specific product be sure not to select it, because it will cost you hard drive space.

Choose your updates classifications and then click Next to continue. Again, the more you select here, the more hard drive space will be used.

Configure the time and the number of synchronizations for the WSUS server to check if new updates are available on Microsoft updates servers.

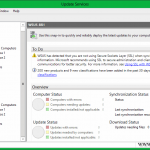
The final screen of the wizard let’s us choose if we want to start the first synchronization with Microsoft, and if we want to open the WSUS console. Actually there is one more screen but it’s about documentation and how to configure and securing your WSUS server.

Just click Finish to launch the WSUS management console.

Want content like this delivered right to your
email inbox?


The link for downloading WSUS goes to a 404 Site
Do you have an alternative, functioning source ?
Best regards
Hi Elena,
Indeed, Microsoft removed this package from their website since starting with Server 2012 or 2012 R2 (can’t remember) it is included in the OS. If you really needed, I can provide it for you, I have it in my software archive.