Upgrading from ESX 4.x to ESXi 5.x using VMware Update Manager
Upgrading ESX 4.x hosts to ESXi 5 is a straight forward process, if you have just a few hosts. You just put the ESXi 5 installer CD in the server DVD drive and do an in-place upgrade. This changes if you have a big number of ESX hosts, because you can’t just go to every one of them with the CD and do the upgrade; it’s just taking too much time and effort. The simplest and recommended procedure is to use VMware Update Manager. With Update Manager you select which hosts you want to upgrade, and by doing a few clicks, the upgrade process begins on all hosts. Now to be able to use Update Manager you need vCenter, and I presume you already upgraded your vCenter infrastructure to version 5, if not read this post and see how its done. For this guide I have a mixture of ESX 4.0 and 4.1 hosts, that I will upgrade to ESXi 5. There is no cluster involved, that is for another time. All the VMs are on a iSCSI storage, so on the local hard drive on the server only the ESX system is installed/running. For how to configure ESX with iSCSI storage go and read this post. For a better view I put my ESX 4.0 and 4.1 hosts into different folders.

Now open your vCenter Infrastructure and click the Update Manager icon from the Home view, because we need to create a baseline for the upgrade.

Once on the Update Manager Administration click the ESXi Images tab then the link Import ESXi Image. The ESXi installer image must be in ISO format. Click Ignore on the certificate warning when it pops-up.


Now the image is verified and imported in vCenter. You have to use the same version of ESXi that your vCenter server has. For example I have vCenter 5.0 and I tried to import an ESXi 5.1 image, but it didn’t work. It works for builds, but not for major versions.


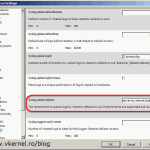
The wizard is offering us the possibility to create a baseline once the image is imported. You can continue if you want and the wizard will automatically create a Host Upgrade Baseline, but for now just click Cancel, because I want to show you step-by-step how to create a Host Upgrade Baseline.

As you can see the image was imported and is present in vCenter.

Now go to the Baselines and Groups tab and click the Create link from the Baselines section.

Give the baseline a name and on the Baseline Type select Host Upgrade. This step is very important, so be sure you select the correct baseline type.

From the list select the ESXi image to witch you want to upgrade. If you don’t see any image on this list is because you did not follow the above steps on how to import an ESXi image in vCenter.

On the Ready to Complete page click the Finish button to create the baseline.

Now the baseline is created and ready to be used.

Go to the Hosts and Clusters view and click the server you want to upgrade. In this case (since is a test environment) I will select a Datacenter in my vCenter Infrastructure, so all the hosts will be upgraded at the same time. Off course in a production environment is not recommended. Click the Update Manager tab than the Attach link.

From the Attach Baseline or Group window select the baseline we created earlier and click the Attach button.

Since I selected the Datacenter from the top, all hosts that exists in this Datacenter will be scanned and added to this baseline. Click the Remediate button to open the Remediate wizard.

Select the hosts included in this remediation then click Next.

Accept the EULA and continue.

If you have third party software installed on your ESX hosts that are not compatible with the new hypervisor version (ESXi 5), check the box Remove installed third party software that is incompatible with the upgrade, and continue with the remediation to remove the software so the upgrade can be successful.

By creating a Schedule Task we can opt if we want to run the remediate process now or later. Choose the option you want then click Next.

On the Host Remediation Options screen we need to select what to do with the VMs running on those hosts, because those hosts will need to be put in maintenance mode. Since no cluster is present in the infrastructure the VMs can’t migrate to other hosts, so I choose to power them off. Leave the rest at their default settings and click Next.

At the Ready to Complete screen click the Finish button to start the remediation (upgrade) process.

The upgrade process will take some time, and you will see your hosts restart and get disconnected from the vCenter server.


After the ESX host is upgraded you get the message “The system has finished upgrading and must reboot… Press <Enter> to continue“. Now when I saw this message for the first time I said myself: what ? I have to go to every host and press ENTER ? What’s the point of using Update Manager then ? But I waited, and after five minutes or so the host automatically rebooted himself. I calmed down .

Hosts are automatically put online and VMs that were powered on before maintenance mode are started.


If you click on the hosts you can see the version has changed, which is good, our upgrade worked. All I need to do now is rename those folders so I don’t have 4.0 and 4.1 names any more. What’s left is to put the licenses for those ESXi 5 hosts, because right now, as you can see they are in evaluation mode for 60 days. How to install the license on ESX/ESXi hosts can be found on this guide.

Want content like this delivered right to your
email inbox?
More similar articles
 Build and run Windows Failover Clusters on VMware ESXi
- Upgrading from VCSA 5.x to VCSA 6.0 with an Embedded Platform Service Controller (PSC)
- Deploying the VMware vCenter 6.0 Appliance (VCSA) with an Embedded Platform Service Controller (PSC)
- Adding a Raw Device Mapping (RDM) to a Virtual Machine
- Deploying and Configuring VMware vCenter Server Appliance 5.x
- Configure Syslog on ESXi 5.x Hosts

I noticed you had a mix of esx 4.0 & esx 4.1 hosts. Did you have any issues with the 4.1 upgrade?
Nope, no problem. The upgrade went very well.