Sysprep and Capture a Windows Image with MDT 2012
Since MDT 2012 is out for a while now, I taught I’ll create a post on how to capture a clean and configured OS (reference computer), so this can be deployed later to multiple machines on your network. I will show you how to capture a Windows 7 and an XP system, especially XP because some problems occur on this one sometimes. O yeahh…if you are using MDT 2010 no worries, you can follow along.
Let’s start with Windows 7 first because it’s easier. I will capture a Windows 7 Enterprise x64 since this is used in companies and small business, but you can use whatever edition you want; and I hope you are not using the Starter edition ’cause that’s for children. Before we can actually capture the OS we need to create a Task Sequence in MDT. Go to the Task Sequence object, right-click it and choose New Task Sequence.

Type and ID, a name and description for this task sequence and click Next.

Because we want to capture a system, on the Select Template page select Sysprep and Capture from the drop-down-box.

Choose an operating system from the list and continue. You should select the type of OS that matches the one you want to capture. Don’t select an XP image here if you want to capture a Windows 7 system. If no images show up in the list you need to add them, by following this article.

I will choose here the default option not to specify a product key at this time, because I am capturing Windows 7 Enterprise. Once I deploy this OS to all the systems in the network I will use KMS for activation. If you are capturing a Windows 7 Ultimate, a Retail or OEM product key needs to be presented, or you need to do some manual work after the deployment.

This is a simple one; just fill in the boxes with the name and organization and click Next.

I recommend you specify and administrator password. This is the password for the local administrator account, not the domain one.

If your details are in order, click Next on the Summary screen, then Finish, to close the wizard.


Now the task sequence should appear in the Deployment Workbench console.

Before we go ahead and capture the system, verify that your MDT rules allow to capture systems. The option SkipCapture needs to be set to NO. Don’t forget to update the deployment share after making this change.

If everything is in order let’s go to our Windows 7 system and capture it. Open the path to your deployment share and go the Scripts folder. Type the credentials of a domain admin account when asked, then from the Scripts folder launch the LiteTouch.vbs script.
The system that you capture should not be joined to a domain, it needs to be in a workgroup environment.

After the wizard launch, select the capture task sequence that we’ve created earlier, then hit Next.

Here we have multiple choices, but only the first one will prepare the system and create an image of it. Select Capture an Image of this reference computer, and in the Location box type the path where the image will be saved, if the default one is not good for you. On the File Name box I recommend you type a descriptive name for the image.

Here click the Begin button to start the capture process.

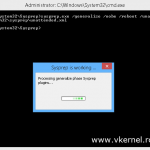
The preparation will take a few minutes,


then the computer will reboot into WinPE environment and starts capturing the system.

The capture process take quite a while, but after is finished the image should be uploaded in the specified path that you typed during the wizard. If you followed along the image should be on your deployment share folder > Captures. Looks like I had a warning here, but nothing bad. Now you can start deploying this image to the rest of your workstations.


Let’s see how the capture works for Windows XP. First a task sequence needs to be created, but this time choose a Windows XP image on the Select OS page during the wizard.

XP doesn’t have an embed product key like Vista, 7 and Windows 8 does, so you will need to provide it now, or you will have some problems later when you deploy this image.

Open again the path to the deployment share, go in the Scripts folder and execute the LiteTouch.vbs script. Follow the wizard like before.
This is what I wanted to show you. The wizard pops-up with an error which tells you that an older version of sysprep is present in the deployment share, even tough is not correct. In my case I am using the same version of Windows XP, in MDT and the one I want to capture.
Error: “….”. Using older versions of Sysprep is not supported. Ensure that you have the appropriate version.

In this case you need to go the Microsoft web site and download the latest deployment tools. On the deployment share go in the Operating Systems folder. Here you will have the Windows XP system that you imported from the CD and used during the Sysprep and Capture task sequence wizard. Open the folder and browse to Support > Tools. Paste the deploy.cab that you just downloaded from Microsoft and replace the one that exists here.

Now reopen the capture wizard by executing the LiteTouch.vbs script. This time sysprep is working, and the system is captured with success.


Want content like this delivered right to your
email inbox?
More similar articles
 Customizing the Default Local User Profile before imaging
- Deploying Windows 7 with WDS and MDT 2010 – Part2
- Deploying Windows 7 with WDS and MDT 2010 – Part1
- Installing and Configuring MDT with Windows 10 ADK
- Blocking Remote Access for Local Accounts by Group Policy
- How to configure Windows Event Log Forwarding

Thnx for your answer Adrian, Already got it working 🙂
one more question,
Is it possible to have one image for different systems?
For example, i need to upgrade 3 different Latitude Dell systems, 5510, 5520 and 5530.
Now i am capturing seperate images for those 3 systems.
Yes, it is possible if you are deploying systems from Vista and above, since those OS’s are not HAL (Hardware Abstraction Layer) dependent, like XP is. So go ahead and try it, and it should work just fine.
Ok, but what about drivers? The out of the box drivers are only for the PXE boot i understand.
How do i inject drivers for those different systems?
thanks,
Ron
You can go to driverpacks.net and D/L the drivers. These are generic drivers designed to encompass most machines. You may need to get specific drivers from the manufacturer website (I had to get specific sound drivers for some of my machines) but if use MDT, you can set it up with a Selection Profile after importing all the drivers to your MDT setup.
As long as you have the drivers associated with each machine, yes it can be done. You may need a different task for the respective machines or you can use the task and maybe have all drivers available. You have to work with it to find out the best install route.
I’m trying to migrate an XP PC to Windows 7 with all the programs and profiles from the XP box. It installs W7 but does not carry over the programs.
Hi,
The programs are not migrated, you will have to install those manually or use the Applications option from MDT to automatically install those after the migration.
Yeah I figured it out after looking up the info. It will only do it if I’m going from x86 to x86 and 64 to 64 but not x86 to 64. It will only migrate it but not transfer programs.
Can i use captures image for upgrade XP machines keeoing the users data? I do not have a WDS environment.
Same steps as here “Migrating from Windows XP to Windows 7 using MDT” but then with the captured image?
thanks,
Ron
Yes, you can use a captured image of a Windows 7 machine to upgrade from XP. This is how I used them actually, because I don’t like to have for my users those effects and color, I like to customize my system, then capture the image and deploy. So go ahead, install a base Windows 7 machine, customize it the way you want, create a new default profile, capture the OS, then upgrade. Good luck, and let me know how it works.
I’ve followed the steps and successfully captured an image. No errors at all with the capture. However after the capture is complete on reboot it runs sysprep which then throws an error:
Windows could not parse or process unattend answer file [C:\windows\Panther\unattend.xml] for pass [specialize]. A component or setting specified in the answer file does not exist.
I did not make any changes to the answer file, googling this error hasn’t been very helpful, so hopefully someone has an idea of what’s wrong?
Thanks!
Try recreating the task sequence see if that helps. Never encounter this error.
The path is probably C:\Windows\System32\sysprep\Panther ?
If I remember correctly, the specified error message is related to sysprep and you have to set the SKIP REARM=1 in \\server\deploymentshare$\control\TASk-ID\unattend.xml
pls use google on where and how to set this.
also, see: http://social.technet.microsoft.com/Forums/en-US/w7itproinstall/thread/d54b34fa-f542-4b98-88da-13ffe7df16a4
for a suggestion to set this parameter in generalize section
Also verify that the original installer is run from a full set of source files as those files are required for proper sysprepping.
i.e.:
1 import genuine OS media
2 build and capture reference computer
3 deploy the captured wmi file to your clients
Update/FYI:
I also learned more or less recently if IE10 is included in your deployments, the error message “[C:\windows\Panther\unattend.xml] for pass [specialize]” might be thrown as well.
For me the solution was to delete the row from the unattend.xml in
\\server\deploymentshare$\control\TASK-ID\unattend.xml
See this link for full details:
http://social.technet.microsoft.com/Forums/en-US/c41a2b69-a591-4cd3-86ab-6a0f8a73b858/getting-windows-could-not-parse-or-process-the-unattend-answer-file-for-pass-specialize-with
Note: only commenting the line didn’t work for me, I had to delete it.
Thanks for the tip.
I am not receiving the window to “Capture an Image of this reference computer” window. It it skips this, shows the process has completed and it does not save a file. Please help!
Take a look at your DeploymentShare rules, set SkipCapture to NO.
I had the same issue and am still looking for a neat solution.
Even setting the SKIP CAPTURE to NO didn’t resolve this.
For now I am using 2 shares (1 deploy and 1 build) with 2 boot images in WDS (one called deploy and another one called build).
For the build share I use a special set of rules which helped me solve this issue. I get a screen up front asking me where to save the capture.
Notice that I do NOT add the ref computer to the domain to keep the image as clean as possible.
[Settings]
Priority=Default
Properties=MyCustomProperty
[Default]
OSInstall=YES
SkipAdminPassword=YES
SkipApplications=YES
SkipAppsOnUpgrade=YES
SkipBDDWelcome=YES
SkipBitLocker=YES
SkipCapture=NO
SkipComputerName=YES
SkipComputerBackup=YES
SkipDeploymentType=YES
DeploymentType=NEWCOMPUTER
SkipDomainMembership=YES
JoinWorkgroup=WORKGROUP
SkipFinalSummary=YES
SkipLocaleSelection=YES
KeyboardLocale=en-US
UserLocale=en-US
UILanguage=en-US
SkipPackageDisplay=YES
SkipProductKey=NO
ProductKey=AAAAA-BBBBB-CCCCC-DDDDD-EEEEE
SkipSummary=YES
SkipTaskSequence=NO
SkipTimeZone=YES
TimeZoneName=W. Europe Standard Time
TimeZone=110
AreaCode=010
SkipUserData=Yes
FinishAction=REBOOT
Adrian,
Could you please assist me?
I’m attempting to capture an XP image in MDT 2012, and deploy that image with all user data included.
I’m having some trouble.. the capture works fine, but when I deploy it none of the user data is being restored.
I’m a bit confused on how the UserDataLocation works.. does the initial capture actually include user data?
Could you possibly give me a step by step tutorial or point me in the right direction on what I need to do, and what my customsettings.ini file needs to look like in order to make this work?
It’s driving me crazy..
Thanks for your help,
Ryan
Just see the reply above. Soon I will create an article where I elaborate the capture process, with user profiles and stuff, until than I think Google is your friend. The explanation will be too long for a comment.
I could not capture an XP Image that way. The capture function always error-ed. What I was able to do was take an image of the XP machine after sysprepping the XP machine and modified the Task to inject a generic set of drivers plus certain ones for for certain models of machines in a way that it injected drivers to the specific PC or laptop. It was a trial and error issue, sometimes it would inject drivers, sometimes it wouldn’t.
Where you able to male copyprofile to work? I am still confused on which Unattend should I modify; the one on the capture task or the one on the deployment task. Thanks you!
Hi,
You need to specify this on the deployment share Rules. Right-click your deployment share > Properties > Rules.
You need the following rules:
SkipCapture=NO
SkipUserData=NO
If you don’t want to intervien where the user data should be located this can be done automatically. Pu this too in the Rules:
UserDataLocation=AUTO
or
UserDataLocation=NETWORK
UDShare=\\server-dc\userdata
UDDir=%ComputerName%
I get that network error as well but my question is when you say integrate the drivers in the WINPE ISO file, which ISO would that be? When it reboots it’s not booting up using the CD, it’s booting up and trying to connect to the network share. So where would the ISO file be to update it and also allow it to connect back to the deployment server?
You need to integrate the drivers in the WinPE image (boot image). After that you should have a successful connection to the deployment share.
If everything is in order let’s go to our Windows 7 system and capture it. Open the path to your deployment share and go the Scripts folder. Type the credentials of a domain admin account when asked, then from the Scripts folder launch the LiteTouch.vbs script.
The system that you capture should not be joined to a domain, it needs to be in a workgroup environment.
As you mention should not be joined a domain, so i disconnect domain on the PC.
But how can i connect on the mdtserver\Deploymentshare$ to run the Scripts folder launch the LiteTouch.vbs script. ?
Just use an UNC path \\servername\DeploymentShare$. It will ask for the domain credentials.
i am facing this error kindly help me out. tell me where i am lacking
A connection to the deployment share (\\ServerName\DeploymentShare$) could not be made. Cannot reach the DeployRoot. Possible Cause: Network Routing error or Network Configuration Error”,
This usually happens if no network drivers are present in the WinPE ISO file or the DHCP is down or can’t be contacted. To verify your network is fine in the WinPE environment hit Shift+F10 to open a terminal. In the terminal window just type ipconfig. If you have an APIPA address (169.x.x.x) it means you have DHCP network problems. If no IP is provided it means the network adapter does not have the correct drivers and you should integrate those drivers in the WinPE ISO file.