Sysprep and Capture a Windows Image with MDT 2012
Since MDT 2012 is out for a while now, I taught I’ll create a post on how to capture a clean and configured OS (reference computer), so this can be deployed later to multiple machines on your network. I will show you how to capture a Windows 7 and an XP system, especially XP because some problems occur on this one sometimes. O yeahh…if you are using MDT 2010 no worries, you can follow along.
Let’s start with Windows 7 first because it’s easier. I will capture a Windows 7 Enterprise x64 since this is used in companies and small business, but you can use whatever edition you want; and I hope you are not using the Starter edition ’cause that’s for children. Before we can actually capture the OS we need to create a Task Sequence in MDT. Go to the Task Sequence object, right-click it and choose New Task Sequence.

Type and ID, a name and description for this task sequence and click Next.

Because we want to capture a system, on the Select Template page select Sysprep and Capture from the drop-down-box.

Choose an operating system from the list and continue. You should select the type of OS that matches the one you want to capture. Don’t select an XP image here if you want to capture a Windows 7 system. If no images show up in the list you need to add them, by following this article.

I will choose here the default option not to specify a product key at this time, because I am capturing Windows 7 Enterprise. Once I deploy this OS to all the systems in the network I will use KMS for activation. If you are capturing a Windows 7 Ultimate, a Retail or OEM product key needs to be presented, or you need to do some manual work after the deployment.

This is a simple one; just fill in the boxes with the name and organization and click Next.

I recommend you specify and administrator password. This is the password for the local administrator account, not the domain one.

If your details are in order, click Next on the Summary screen, then Finish, to close the wizard.


Now the task sequence should appear in the Deployment Workbench console.

Before we go ahead and capture the system, verify that your MDT rules allow to capture systems. The option SkipCapture needs to be set to NO. Don’t forget to update the deployment share after making this change.

If everything is in order let’s go to our Windows 7 system and capture it. Open the path to your deployment share and go the Scripts folder. Type the credentials of a domain admin account when asked, then from the Scripts folder launch the LiteTouch.vbs script.
The system that you capture should not be joined to a domain, it needs to be in a workgroup environment.

After the wizard launch, select the capture task sequence that we’ve created earlier, then hit Next.

Here we have multiple choices, but only the first one will prepare the system and create an image of it. Select Capture an Image of this reference computer, and in the Location box type the path where the image will be saved, if the default one is not good for you. On the File Name box I recommend you type a descriptive name for the image.

Here click the Begin button to start the capture process.

The preparation will take a few minutes,


then the computer will reboot into WinPE environment and starts capturing the system.

The capture process take quite a while, but after is finished the image should be uploaded in the specified path that you typed during the wizard. If you followed along the image should be on your deployment share folder > Captures. Looks like I had a warning here, but nothing bad. Now you can start deploying this image to the rest of your workstations.


Let’s see how the capture works for Windows XP. First a task sequence needs to be created, but this time choose a Windows XP image on the Select OS page during the wizard.

XP doesn’t have an embed product key like Vista, 7 and Windows 8 does, so you will need to provide it now, or you will have some problems later when you deploy this image.

Open again the path to the deployment share, go in the Scripts folder and execute the LiteTouch.vbs script. Follow the wizard like before.
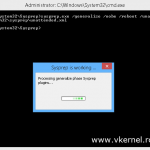
This is what I wanted to show you. The wizard pops-up with an error which tells you that an older version of sysprep is present in the deployment share, even tough is not correct. In my case I am using the same version of Windows XP, in MDT and the one I want to capture.
Error: “….”. Using older versions of Sysprep is not supported. Ensure that you have the appropriate version.

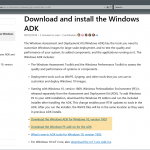
In this case you need to go the Microsoft web site and download the latest deployment tools. On the deployment share go in the Operating Systems folder. Here you will have the Windows XP system that you imported from the CD and used during the Sysprep and Capture task sequence wizard. Open the folder and browse to Support > Tools. Paste the deploy.cab that you just downloaded from Microsoft and replace the one that exists here.

Now reopen the capture wizard by executing the LiteTouch.vbs script. This time sysprep is working, and the system is captured with success.


Want content like this delivered right to your
email inbox?
More similar articles
 Customizing the Default Local User Profile before imaging
- Deploying Windows 7 with WDS and MDT 2010 – Part2
- Deploying Windows 7 with WDS and MDT 2010 – Part1
- Installing and Configuring MDT with Windows 10 ADK
- Blocking Remote Access for Local Accounts by Group Policy
- How to configure Windows Event Log Forwarding

hello goodnight, congratulations on the page, I have a problem and I
I would like some advice, I have taken the necessary measures
http://www.vkernel.ro/blog/sysprep-and-capture-a-windows-image-with
-mdt-2012, run the sysprep, I’m doing a VMware Virtual Machines Lab
when you reach the part of the catch, the system reboots and does loop, I
know that I can have done wrong, I love your help thanks
Hi,
Can you please provide some more details about your problem please ?
Thank you for a amazing explanation. I am using MDT 2013 to create image of an existing server, my LiteTouch.iso file is only 300 MB, I have selected sysprep and capture option but still same.I have MDT running on the same server of which i want to capture the image, not sure if it makes any difference.
So let me get this right. You are trying to capture a system with MDT and that system is the MDT server ?
I have ServerA which currently has 2012R2 installed with all necessary drivers, i want to take image of ServerA as it is in form of .iso file and use the .iso file to build other servers. I did install MDT on serverA.
Appreciate prompt response.
Hi,
Install MDT on another computer on your network then start to capture Server A.
The server where i am installing MDT does it have to be Windows 2012 R2? My ref and target servers would be 2012 R2.
The server where you install MDT can be whatever Windows OS you like, even Windows 7/8 and you can capture whatever Windows OS you want. They have to be separated tough, you can’t capture the same system where MDT is also installed.
Hi,
thank s for you post! really great and well commented!
so i have a question : I’m facing a problem with a task sequence “sysprep and capture”
each time i’m trying to capture via this task, i see that the process skip all the times the sysprep and capture phase and goes directly to MDT DO NOT ENABLE OR DELETE – and after the deployment siummary prompt shows succes without erroes or warnings.
I have some others deployments task sequences which work perfeclty!
I get this trouble since i’ve migrate from MDT 2010 to MDT 2012 sp1.
my cs.ini :
[Settings]
Priority=Default
Properties=MyCustomProperty
Other]
TaskSequenceID=CAPTURE
SkipTaskSequence=NO
SkipComputerName=YES
SkipCapture=NO
DoCapture=YES
Default]
OSInstall=Y
UserID=**************
UserDomain=*************
UserPassword=test
SkipAppsOnUpgrade=NO
SkipCapture=NO
SkipAdminPassword=YES
SkipProductKey=YES
DeploymentType=NEWCOMPUTER
DeploymentMethod=NETWORK
SkipDomainMembership=YES
JoinDomain=*********
DomainAdmin=*******
DomainAdminDomain=*********
DomainAdminPassword=******
SkipSummary=YES
SkipLocaleSelection=YES
SkipTimezone=YES
TimeZoneName=Romance Standard Time
UILanguage=fr-FR
UserLocale=fr-FR
KeyboardLocale=040C:0000040C
SkipUserData=YES
SkipBitLocker=YES
***********************
Please give me a solution 3 days without fixes…..
Thanks a lot
Hi,
Did you created a Sysprep and Capture task sequence ? That is what prepares MDT to capture an image and since yours is not working at all… just check. If is not working create another task sequence and try with that.
Hi Adrian and thank you for this guide. It is very nice and clear yet I am encountering a problem I am not sure what to do with. As few people here before I get this error: “A connection to the deployment share (\\ServerName\DeploymentShare$) could not be made. Cannot reach the DeployRoot. Possible Cause: Network Routing error or Network Configuration Error” but when I open the terminal and run ipconfig I can see that the correct IP/DNS etc. has been given from DHCP yet I am unable to ping or access any network resources. The connection is listed as Intel Ethernet IAxxx so I guess the driver has been loaded. Any suggestions? I know this is very brief for proper answer but was hoping you might have had encountered this before. Otherwise on this machine network connectivity is not an issue and initial PXE boot is also fine. Thanks a lot
Vita
Hi,
If you go from another machine in the network and try to access the Deployment Share using the same credentials, is it working ? try that and let me know.
Hi Adrian, thanks for the response, that’s very kind of you. I actually already resolved the problem. I must have had something wrong with the task sequence or something similar. What I did was that within the same deployment share I imported the Windows 7 OS again and recreated the capture task sequence. I did not change customsettings.ini or bootstrap.ini but I did update the deployment share after all the changes and replaced the boot image in WDS. When running the capture again all went smoothly. Thanks again and keep writing your great blogs. Thanks Vita
I’m glad you figure it out. 🙂
Hey Adrian, you guide is very good and I have been trying to capture a image but i got an error after the first reboot saying that is missing the NIC driver. You mentioned that the driver will be to added into WinPE image, how I can do that?
Hi,
Here you go Adding drivers to WinPE boot image in MDT 2010/2012
I created a lite touch pe with msdart tools everything is working fine i imported an image of windows 7 sp1, I made with winpe some time ago when I loaded my new lite touch with the image of windows 7 sp1 the screen with the options to choose to install os, dart tools, command prompt but NO WINDOWS RECOVERY double checked wim versions both the same 6.1.7601. the procedure works fine if I use original install disk but not the disk that has the image. I thinking of doing an imagex of my c:\ and try it again
Hi,
To be able to deploy the WIM file that you captured you must have a full set of source files present in the OS that is the save version with one that you captured. If you just add the WIM fie in MDT it won’t work for deployment.
I am getting an error at the end of the installation stating that windows got restarted unexpectedly… and the solution i came to know is changing the registry settings using regedit by pressing shift f10. Can some one let me know why this error occurs and what is the solution for this? when we are using mdt for installing windows 7..
Hi,
Can you post some logs, picture etc…? This is the capture image section, not the deployment one. Have you tried using the install.wim from the DVD, not a custom one ?
Will this process of capturing the Win7 reference computer keep all my customizations I have made to the desktop and other items?
Off course it will. I recommend you create a default profile before capturing the image. This way every new user will have that customized profile when he/she logs in.
can perform the same steps to capture an image of windows server 2012
Yes, you can use the same steps if you want to capture a Windows 8 or a Server 2012 image with MDT, but a small modification on the LTIApply.wsf needs to be done, or the capture will fail. Just follow this Microsoft article and you are good to go. I tested it and it works great.
I’m deploying both Win7 x32 and Win7 x64. When I create my sysprep & capture task sequence it asks me to select an OS. Can I use only task sequence for capturing both x32 and x64 images, or do I need to create two task sequences?
Hi,
You will need to create two task sequences, it’s better to use the same platform so you don’t have troubles later on.