Installing WSUS in Windows Server 2012
Installing WSUS in Windows Server 2012 can be possible only trough Server Manager or PowerShell. You can’t download WSUS from Microsoft and double click the installer like you did in Windows Server 2008 R2, because is just not going to work; not for now anyway. Who knows, maybe in a future release of WSUS.
In this guide I’m going to treat the WSUS installation using a remote SQL server. Installing it using the built in database is just clicking Next a couple of times and you’re done. The database will be create on a Microsoft SQL Server 2008 R2 Enterprise joined to a Windows domain. Off course the server that will hold the WSUS role is also joined to the domain. The minimum hardware requirement for WSUS are:
Processor: 1.4 gigahertz (GHz) x64 processor (2 Ghz or faster is recommended)
Memory: 2 gigabytes (GB) of RAM or greater
Available disk space: 10 GB (40 GB or greater is recommended)
Network adapter: 100 megabits per second (Mbps) or greater
To start, launch Server Manager, go to Manage and click Add Roles and Features.

Skip the Before you begin page by clicking Next.

Leave the default selection here and continue the wizard.

Select the server from the list on witch you want to install the WSUS role. You don’t have to use the local Server Manager to install roles in server 2012, you can do it remotely as well, as shown here.

From the list select Windows Server Update Services, and in the new window that pops-up click the Add Features button.


Don’t select anything here, just click Next.

When you get to the Select role service page, you can see we have two option for the WSUS database. The one that is selected by default “WID Database” is the internal database that WSUS can use. However, as stated at the beginning of this guide, we are going to use a remote SQL server for the WSUS database. Clear the WID Database box and check Database.

Provide a local path where WSUS will store the updates files then click Next. I recommend you use a different drive and not store them on the system volume.

Type the name of your SQL server and instance then click the Check connection button. If you get Successfully connected to the server message, you’re golden, and can continue the wizard.

Move forward by using the default settings until you hit the Confirm installation selections screen. Here press the Install button to begin the WSUS installation.


After the installation finished successfully, we need to make some additional configurations on the WSUS server before we can actually use it. We do that by clicking the Launch Post-Installations tasks link.


After you click the link, not much is shown to the user, but you use the Tasks Details option in Server Manager for more information about a specific task.


Is not done yet, we still need to connect to Microsoft and select the products we want to update. Launch the WSUS configuration wizard by using Tools > Windows Server Update Services in Server Manager.

Click Next on the Before you begin screen.

If you want to participate in the Microsoft Update Improvement Program just check the box Yes, I will like to join the Microsoft Update Improvement Program. For this example I will choose not to.

Select if the updates are downloaded directly from Microsoft or from another WSUS server. Since this is our first WSUS server in the network leave the default selection and continue the wizard.

If you have a proxy in your network check the box Use a proxy server when synchronizing then provide the connection details in the bellow boxes.

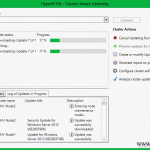
To download and synchronize information about available products and languages from Microsoft click the Start Connecting button. It will take while to finish, so be patient.


Here you have the choice to select in what language(s) WSUS will download updates. These settings can be modified later if you want to from the WSUS console.

Select for what products WSUS will get updates. Enable only the ones you need, or there is going to be one large WSUS storage to keep on your hard drive. These settings also can be modified later if needed.

In the Choose Classifications screen you select what type of updates you want to download. Don’t worry, these also can be changed later.

If you want to manually synchronize your WSUS server with Microsoft Update leave the default option, but I recommend not to. I don’t think you want to come every day and click the Synchronize Now button from the WSUS console. Instead you can set a schedule and let WSUS synchronize automatically.

If you want to start synchronizing with Microsoft Update after you finish this wizard, check the box Begin initial synchronization.

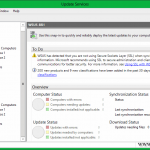
Here are some help links that might be handy for you. Check them out if you want to, if not click the Finish button to launch the WSUS Administration console.

Ad here it is. All you have to do now is direct clients to your new WSUS server to get updates.

Want content like this delivered right to your
email inbox?


Which permissions to grant to which accounts to have post install task succeeded. Our remote DB admin granted some permissions for installation account and WSUS server computer account ($) then I got user doesn’t have permissions error message
Try local admin, it will work. Put his domain account into the local Administrators group on the WSUS server.
What rights did you have to give the account on the remote SQL server for it to install properly and did you use a special account?
Hi,
The account that you are using for the installation of WSUS needs to have writes permissions/create database on the SQL server. You will have to log in to your SQL server and give it those rights from the Security section. In this article I just used the default administrator domain account. Let me know if you need more help.