Installing server roles on Windows 2008 R2 Server Core
You have your server core up and running, but now you need to install some roles, so the server won’t be useless. If you think you can connect using Server Manager from another server with a graphical interface and install the required role(s) remotely, you’ll have to think again, because you can’t; well…not now anyway, who knows maybe in the future. Roles on server core edition can be installed only from the console.
First you need to know what’s the name of the role you want to install, and for that use the oclist command.

As you can see the list is huge and you can’t see all the roles names in the console window, even if you scroll the bar up to the top. This is the reason why I like to export all the roles names to a text file on the local machine by issuing the following command:
oclist > c:\roles.txt
If you open the file you can see all the role names.


Now that you know how to list all the roles is time to install some of them by using the ocsetup command. With the command typed bellow we are installing the IIS role. The bad news is that you don’t know when a role is finished installing since no progress bar appears during installation.
ocsetup IIS-WebServerRole

Let’s install another role, for example Hyper-V, since is so popular.
ocsetup Microsoft-Hyper-V

Click Yes to reboot the server.

Now if you do the oclist command again you can see on the left side it says the role is installed.


Installing a role in server core is very easy, all you have to know is the actual name of the role. This is easy to, because you know now how to export those names in a text file and read the names from there.
Want content like this delivered right to your
email inbox?
More similar articles
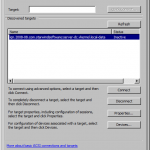
 Configure the iSCSI Initiator on Windows 2008 R2 Server Core
- Join a Windows Server 2008 R2 Core to a domain
- Installing Windows 2008 R2 Server Core
- Step-by-step Hyper-V Storage Live Migration
- Creating and configuring Windows Domain Service Accounts
- Deploying and configuring the Remote Desktop Gateway Server Role


thanks
very good