Installing Remote Desktop Services (RDS) in Windows Server 2012/R2
In previous versions of Windows, deploying a RDS infrastructure was a little bit difficult, but starting with server 2012/R2 this was simplified a lot. Not only you have a single central console from where you manage all your RDS infrastructure, but you can also install all the RDS roles remotely from this console. You don’t have to go anymore and do this on server by server basis, even tough you still have the option to do so. Also, if you want to deploy all the roles on a single box you can do that with just a few clicks. In this article I’m not going to treat this type of installation since it’s to easy, instead I’m going to show you how to install the RDS roles on separate boxes. Without further ado, let’s dig in.
For this lab you will need at least five virtual machines: one is the domain controller, then the other ones will be the machines that will hold the RDS roles -RD Connection Broker service, RD Session Host, RD Virtualization host and the RD Web Access server-. As for hardware requirements, I can’t tell you how many resources you need on these servers because it all depends on how many users you will have. But since you are running this in a virtual environment, and I hope you do, it shouldn’t be hard to increase or decrease server resources.
I’m presuming you already joined all the machines to the domain, and name them accordingly. Now log in on the domain controller and add all the servers to the Server Manager console. Follow this guide on how to do it. At the end you should have something similar to the bellow image.

Once that was taking care of, go to Manage > Add Roles and Features.

On the Installation Type page select the second option, Remote Desktop Services installation then click Next.

I told you at the begging of the article that we are going to deploy every RDS role on their own server, and to do that choose the Standard deployment type. If for some reason you want to deploy all the roles on one box, select the Quick Start option.

Here, you need to choose the type of scenario that you are going to run in your RDS infrastructure, either virtual desktops or remote sessions. I’m going to treat both of the scenarios in this article, but since there is no option in the wizard to do this in one shot we will deploy the session-based server later on. For now, just go with the default option.

To successfully install the roles on the remote servers the account that you are logged in with right now needs to have local admin rights on all off them. For this demonstration I’m using the domain admin account which is already added to the servers local Administrators group.
Choose the RD Connection Broker from the list then move it to the Selected area. Click Next when you’re done.

The same goes for the RD Web Access role. As you can see in this screen there is the Install the RD Web Access role service on the RD Connection Broker server check box just in case you want to put the RD Web Access and the RD Connection Broker service on the same box. Right now, leave it un-checked, because we have dedicated servers for every RDS role.


The last server that we need to provide to the wizard is the RD Virtualization Host. This is the box where we will run all our virtual desktops.


On the Confirmation page there is a warning that some servers will need to be restarted. This is normal since on the RD Virtualization Host the Hyper-V role service will be deployed. If you don’t want to reboot the host manually, check the box Restart the destination server automatically if required then hit the Deploy button.

The RDS roles installation processes will begin, and after a few minutes you should be almost done.


I said almost, because as you remember we still need to install the RD Session Host role. For that run the Add Roles and Features Wizard again until you reach the Select deployment scenario page. Once on this page the only available option to choose is Session-based desktop deployment; so just click Next to continue.


As we are going trough the wizard everything will be grayed out, since we already deployed those RDS roles. When you reach the Specify RD Session Host servers page choose the server that is going to be your session host box and add it to the Selected area. Click Next.


As before, click the Deploy button to begin the role installation. Also, choose to automatically restart the server so you don’t have to it manually. Just saying…since the option is there!

After reboot everything should be in place.


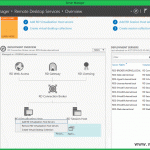
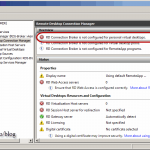
If you now click the Remote Desktop Services snap-in from Server Manager you will see all the RDS infrastructure. There is a diagram in the center, which is not just a diagram. We can hover over it to configure it, and the green crosses indicate the servers that we haven’t set up; the RD licensing and the RD Gateway server in this case.

Using a web browser from an internal client you can access the web interface by typing your RD Web Access server name followed by rdweb ( https://YOUR RD WEB SERVER/rdweb). Off course, everything will be blank since we did not published any virtual desktops or virtual pools for the users. Another thing to mention is that all domain users can log into this, which is not a best security practice, but it can be restricted by following this guide.


Told you it’s easy to deploy this in server 2012/R2! As you saw, it was done with just a few clicks. Also, if you are doing this in a virtual environment you can use automation and other cool stuff that virtualization offers to ease your job. Just make sure you don’t put this in a production environment the way it is now because other things like certificates, redirection, making the infrastructure available for external users need to be configured. All these things in future articles.
Want content like this delivered right to your
email inbox?
More similar articles
 Deploying VDI using Windows Server 2012/R2
- Deploying and configuring the Remote Desktop Gateway Server Role
- Migrating a Hyper-V Cluster to Windows Server 2012 R2
- Configuring Hyper-V Replica in Windows Server 2012/R2
- Delegate Access Control and Management in Hyper-V
- Deploying Personal Virtual Desktops and Virtual Desktop Pools with Server 2008 R2
Really interesting and helping.