Creating and configuring an Exchange 2010 Database Availability Group (DAG)
Those of you that come from Exchange 2007 will love the way High Availability for databases are done in Exchange 2010. No more Single Copy Clusters (SCC), Standby Continuous Replication (SCR), Local Continuous Replication (LCR), or Cluster Continuous Replication (CCR), is only Database Availability Group or DAG. Exchange database and log files are replicated over a private network to Mailbox member serves that are part of the DAG. If the active Mailbox server fails, clients are automatically redirected to another Mailbox server that holds a copy of the database. More information can be found on the Exchange 2010 product documentation.
For this guide I have the following lab configuration

Now let’s configure the networks on the Mailbox servers, and will start with the MAPI (public) network.

The second one is the private network, the one that is used for database replication.

Don’t close the properties of the TCP/IP protocol yet for the private network. Click the Advance button an go to the DNS tab. Here clear the box Register this connection’s address in DNS.

Now change the binding NIC order by going to Advanced > Advanced Settings.

Make sure the public network is on top.

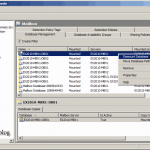
Now open the Exchange management console. Here expand Organization Configuration and click the Mailbox object. To create a DAG you can either click New Database Availability Group on the Actions pane, or click the Database Availability Groups tab. On the New Database Availability Group wizard we need to configure three components:
Database Availability Group Name – the name of the new DAG; no more than 15 characters.
Witness Server – a host that maintains the cluster quorum. This host can be a Windows server joined to the domain, but is recommended by Microsoft to be an Hub Transport server. The witness server can’t be a member of the DAG, but it must reside in the same Active Directory forest as the DAG, and not also running the Mailbox server role. If no witness server is specified in the box, a Hub Transport server in the same site as the DAG is automatically selected.
Witness Directory – a folder on the witness sever that stores some cluster information.
After you complete the required information click the Manage button to start creating the DAG.

If everything worked out well you should have a green check mark.

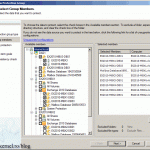
Now we need to add the Mailbox servers that are going to participate in the replication process. For that right click the DAG and choose Manage Database Availability Group Membership.

Here click the Add button and select the Mailbox servers.

Click the Manage button to start adding the members to our newly created DAG. This is going to take some time because the Windows Failover Cluster feature must be installed on those Mailbox member servers.

Because the wizard assigns all the available networks to the DAG the replication may occur on the MAPI (public) network creating an increase of traffic. For this reason we need to disable it so the replication can take place only on the private network. Click the DAG, find your MAPI network on the Networks section, right click Replication Enabled and choose Properties.

Clear the box Enable Replication and click OK.

Now our MAPI network is disabled and replication will only take place on the private network, witch is what we want.

We have created a DAG, we configured the network for the DAG, the next step is to add database copies. If your database is located on a different drive than the default one, all the Mailbox servers that will keep a copy of the database will need to have the same drive letter. In my case I have a database called Finance Database located on the E drive, and the same E drive needs to be present on the other Mailbox system(s). If the same path is not found on one of the replication partners an error message appears when you try to add a database copy.

Now go to Database Management tab, right click the database you want to replicate and choose Add Mailbox Database Copy.

On the Add Mailbox Database Copy page click the Browse button to select the replication partner.


Click the Add button to start creating a copy of the database on the selected server.

If the operation succeeded a green check box appears on the wizard.

Now we have a healthy copy of the database on another Mailbox server as you can see in the Database Copies section.

Let’s see if it really works.
To be able to verify this properly, a user mailbox needs to be created on the mailbox database that is part of the DAG (Finance Database).
Shut down the Mailbox server that holds the active (mounted) copy of the database; in this case is EX01. After a few seconds the Mailbox database should be mounted on the second Mailbox server witch is EX02. You can see this by opening the Exchange management console on EX02.

And user(s) can still access their mailbox(es), even if one the Mailbox servers is down.

Off course you can create multiple databases and configure them for replication, and if you have more then two Mailbox servers who are members of a DAG you can mix and match those databases for better performance and HA.
Want content like this delivered right to your
email inbox?
More similar articles
 Restoring Exchange 2010 Mailbox Databases using DPM 2012
- Backup Exchange 2010 Mailbox Databases with DPM 2012
- Working with Storage Spaces in Microsoft Windows Server
- Deploying and Configuring VMware vSphere Replication Appliance 6.0
- Microsoft System Center Data Protection Manager 2012 R2 Cookbook
- Restoring failed Active Directory Domain Controllers
Hi Adrian,
sorry for my English, do you have installed the Failover Clustering feature on ex01.vkernel.local and ex02.vkernel.local ?
I did not see your doing this.
Hi,
The Failover Cluster Service is automatically installed when you configure the DAG, that’s why you see it in Administrative Tools.