Create and configure a Hyper-V Failover Cluster – Part1
In this post I will show you step-by-step how create a Hyper-V Failover Cluster, so your virtual machines will never stop. For this environment I have on DC with StarWind iSCSI target installed (I know, I know… I’m using the domain controller as a iSCSI target, but it’s OK for demonstration purposes), and two Hyper-V servers (Node1 and Node2) already joined to the domain vkernel.local. If you want to go with other iSCSI target solutions be sure those softwares support iSCSI Persistent Reservation.The Hyper-V servers are equipped with two network cards each, but I recommend another one for the iSCSI network. The OS’s in this lab are all Windows Server 2008 R2 with SP1. More information about Hyper-V installation can be found here. Because I don’t want to write a big introduction I attached a little picture with the lab configurations.

To start we need to configure the iSCSI targets, so open the StarWind management console and right click Targets and choose Add Target.

First we will create the so called quorum. On this disk the Windows cluster will hold the data for the cluster configuration. Type a name for the quorum and click Next.

Continue the wizard by choosing Hard Disk > Basic Virtual > Image File Device > Create new virtual disk. Here set the location for the quorum virtual disk and the size; the size must be at least 512 MB.

Now select the option Allow multiple concurrent iSCSI connections (clustering)

and finish the wizard. The next step is to create a storage device where virtual machines will be located; so do the previous steps once again and create a new target. I named my target VMs1, with a size of 10 GB.

We now need to install the cluster services and management console on those Hyper-V servers, in this case Node1 and Node2. Open Sever Manager, right click Features and choose Add Features. Select Failover Clustering and finish the wizard. Remember you have to install this feature on every server that is going to be part of the cluster.

Before we start configuring the cluster we need to make the quorum and VMs1 disks we created earlier available to Node1 and Node2. We do this using the Microsoft iSCSI Initiator. Go to Start > Administrative Tools > iSCSI Initiator. A message appears telling you that the Microsoft iSCSI service is not running and the service needs to start before continuing. Just click the YES button to start the service. On the Target box in the iSCSI Initiator Properties just type the name or IP address of the server that holds the iSCSI Target service (StarWind software). In this example we connect to our DC so I’ll just type Server-DC, and click Quick Connect.

The targets are discovered and presented, all we need to do now is connect to them; so click on every target that appears in the list then hit the Connect button. When you’re done click OK to close the iSCSI Initiator Properties.

Open Server Manager on Node1, go to Storage > Disk Management to format and bring the disks online. Just right click on every one of them and choose Online. You don’t need to bring the disks online on the rest of the servers, cluster service will take care of that.

Now right click one of the volumes and choose Initialize Disk. A small window pops-up asking what disk do you want to initialize. Go with the defaults, since the disks we need are already selected in this window. Do not initialize the disks on the other server(s), or your disks will become corrupted.

Next step is to format the volumes and give them a drive letter, so right click on every one of them and choose New Simple Volume. Follow the wizard using the defaults. Do this only on one of the Hyper-V servers, do not go on every one of them and format the volumes, because they are already formated. What you need to do is verify that the drive letter assigned to volume is the same on every server.

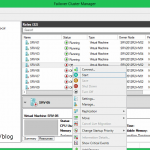
Finally we get to configure the cluster service. Go to Start > Administrative Tools > Failover Cluster Manager.

In the Actions pane click the link Create a Cluster, and the Create Cluster Wizard opens. Skip the Before You Begin screen. Now we need to select the servers that are part of this cluster, so enter node1 and node2. You can go with the Browse button too.

A warning appears because no validation tests are found for the servers we just added to the cluster. It’s OK since node1 and node2 are fresh new servers and never been in a cluster. Click Next to start the wizard for servers validation.

Choose to run all tests and click Next to begin.

At the end you should have only green check marks, but if you don’t, investigate the problem before continuing.


Now give the cluster a name, and provide an IP address. Uncheck the box for the private network, since this is used only for beeping, so the cluster service will know when one of the Hyper-V servers is down.

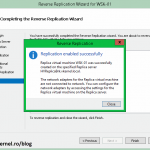
Finish the wizard. The configuration will take just a few seconds.

After is finished you can see your new cluster added to the management console. In part two, I’ll show you how to create a high available virtual machine using the cluster we just created.

Want content like this delivered right to your
email inbox?
More similar articles
 Deploying VDI using Windows Server 2012/R2
- Migrating a Hyper-V Cluster to Windows Server 2012 R2
- Configuring Hyper-V Replica in Windows Server 2012/R2
- Delegate Access Control and Management in Hyper-V
- Manage Hyper-V on Server Core from a remote console
- Create and configure a Hyper-V Failover Cluster – Part2
What if DC or iSCSI server goes down? can’t we bring that system to the cluster?
Hi,
Usually the iSCSI storage has multiple paths, power supplies, and the servers connecting to it have redundant Ethernet adapters. Only if it burns out you will have an outage. With the domain controllers part…Microsoft recommends you have a minimum of two even if is a small network, so think about it…
Wish you well,
Adrian