Configure Windows Deployment Services (WDS) – Part4
OK, we have finally reached the last part of these series. Here I’m going to talk about answer files, how to create them and where to put them for Windows automation. WDS answer files, are xml files that help you automate the deployment of systems, by completing or answering those Windows wizards. To give you an example, on a Windows 7 deployment you have to choose a keyboard language, a time zone, provide a serial number for the product, but now you don’t have to; an answer file ca do it for you. Let’s see how answer files are created.
On the WDS server or a Windows client we need to install a product called Windows AIK, that will help us create answer files. Download the kit from here. Now let’s install Windows AIK.
On the initial screen click Windows AIK Setup to start the installation wizard.

Skip the Welcome screen, read and agree the EULA.

Choose an installation path. I will install Windows AIK on the same partition where WDS Remote Install folder is located. Finish the wizard.

After the installation is done go to Start > All Programs > Microsoft Windows AIK > Windows System Image Manager.

Here we need to select a Windows image or a catalog file. Right click Select a Windows image or catalog file.

Select a catalog or a Windows image (.wim format) from a Windows 7 DVD and click Open. If you don’t have a catalog file you need to select the .wim image and create the catalog.

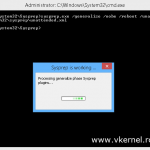
Now an answer file needs to be created, so right click Create or open an answer file. This answer file is for WinPE to format the drive, connect to the WDS Server.

Under the Windows Image pane expand Components > amd64_Microsoft-Windows-Setup_6.1.7600 > Disk Configuration > Disk > Create Partitions, right click Create Partition and choose Add Settings to Pass 1 windowsPE.

Under the Answer File pane configure the Create Partition option like you see in the picture bellow. If nothing is entered on the Size column it will use all the available space and create one big partition.

I’ve attached a picture with an sample answer file from a Windows Vista deployment, for you to get started. When you’re done save the answer file.

A second answer file needs to be created, this is for the OS, so create a new answer file and from the Windows Image pane choose your options. Again I attached a picture for you to get started. When you’re done save the image.

On the WDS server, right click the server an choose Properties. Go to the Client tab and check the box Enable unattended installation. Choose your architecture and select the first xml file created. In this case I will select the x64 architecture, because a Windows 7 x64 will be deployed. Be sure to have both answer files under the RemoteInstall folder created by the WDS Server.

Now go to the Windows 7 image that we captured in the previous guide, right click the image and choose Properties. Check the box Allow image to install in unattended mode, then select the second answer file using the Select File button. Click OK to save the changes.

Before you start deploying the image to all the systems in the network test on single machine to see how it works. Sometimes you get errors or settings in the answer file are not correct.
These concludes the four part series of configuring WDS. Thanks for “walking” with me.
Want content like this delivered right to your
email inbox?
More similar articles
 Customizing the Default Local User Profile before imaging
- Sysprep and Capture a Windows Image with MDT 2012
- Deploying Windows 7 with WDS and MDT 2010 – Part2
- Deploying Windows 7 with WDS and MDT 2010 – Part1
- Configure Windows Deployment Services (WDS) – Part3
- Configure Windows Deployment Services (WDS) – Part2