Configure Windows Deployment Services (WDS) – Part3
In the first two parts of this series I showed you how to install and configure WDS, and how to deploy your first OS. Now that we have an OS installed, we need to install the proper drivers and software, then deploy this OS to the rest of the machines. So go ahead and configure the system the way you want, then come back here and read the rest.
To start we need to create on the WDS Server a so called Capture Image. With this image we are going to capture the OS in wim format to be used on the WDS Server. Open your WDS console and click the Boot Images folder. Here right click the boot image and from the menu choose Create Capture Image.

Give the image a name and description then choose a location to save it.

After the wizard is done with the image creation, check the box Add image to the Windows Deployment Server now, and click Finish. If you clicked by mistake the Finish button before checking the box, you can add the capture image by right clicking the Boot Images folder and choose Add Boot Image.

As you can see the path is already completed for us with the latest image used by the wizard. If the path is not pointing to the right capture image we just created, use the Browse button to select it.

Give your Capture Image a name, and click Next.

On he Summary screen click Next to import the Capture Image.

Now we have to images in the Boot Images folder on the WDS Server. One is for deployment, and the other one is for creating operating systems images.

Before we capture the OS we need to do a sysprep, meaning that all information about the installed hardware, domain details, license key and other stuff will be wiped. This process needs to be done or you won’t be able to capture the system. Do a Run command and in the box type sysprep.

In the window that just opened double click the sysprep executable.

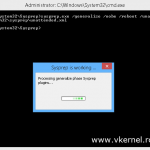
Check the Generalize box and click OK. Now sysprep is doing it’s magic, then is going to restart the machine.

Be careful when it restarts to force the machine to boot form the network. If everything was done right you should have the following screen. Choose Capture Image x64 and press ENTER.

Now the Capture Image is loading in the client memory.

The Capture Image Welcome screen appears. Click Next to skip it.

Click the drop down box and select the volume to be captured. Give the image a name and description, then click Next.

Here click Browse and choose a location for the image to be saved; this can be on the system partition too, if you don’t have any other partitions on the system. The check box Upload image to a Windows Deployment Services is optional, if you want the image to be uploaded to the WDS Server. Type the WDS Server FQDN and click Connect, then provide the domain credentials and click OK. Select an Image Group from the drop down box and click Next.


When you click Next, the capture image process will start. This is going to take some time, so be patient.

At the end just click the Finish button to restart the machine.

You can now see the captured image on your WDS Server. If the image is not there just right click the server name and choose Refresh.

Now you can test this custom image to one of the clients, all you need to do is force the client to boot from the network. When you get to the screen to choose the OS for deployment, choose the one we just captured.

This concludes the third part of this guide. In the fourth part I’ll show you how to automate those Windows wizards using answer files. Until then cheers.
Want content like this delivered right to your
email inbox?
More similar articles
 Customizing the Default Local User Profile before imaging
- Sysprep and Capture a Windows Image with MDT 2012
- Deploying Windows 7 with WDS and MDT 2010 – Part2
- Deploying Windows 7 with WDS and MDT 2010 – Part1
- Configure Windows Deployment Services (WDS) – Part4
- Configure Windows Deployment Services (WDS) – Part2